


Companies frequently use proxies to act as a link between an internal network and the Internet. This is often frustrating for employees, even non-IT ones, when they can’t access a specific site from the company network. For engineers it’s even more obnoxious, since they have to configure all kinds of compute infrastructure to connect to external networks via these proxies.
It’s debatable if this is the best way to harden corporate network security, but it’s still the most widely spread method to restrict outgoing traffic. The intentions behind introducing a proxy are usually good, as the main reason is almost always to prevent data breaches by adding an additional layer of security. Proxies come with other useful features, however. They can audit network traffic, filter undesired content or even act as a cache.
This post will talk about corporate proxies from an infrastructure engineer’s standpoint, when they have to deal with the configuration in an environment including Kubernetes and Istio.
tl;dr: 🔗︎
When utilizing dynamic services that run on Kubernetes and Istio, a proxy requires an increased level of configuration automation for all the components running behind it. We’re going to give a brief overview of how Backyards (now Cisco Service Mesh Manager) helps with the pod-level configuration of these settings in the Kubernetes cluster.
Backyards (now Cisco Service Mesh Manager) is the Banzai Cloud Istio distribution that just works. Backyards (now Cisco Service Mesh Manager) operationalizes the service mesh to bring deep observability, convenient management, and policy-based security to modern container-based applications.
Proxying on Kubernetes 🔗︎
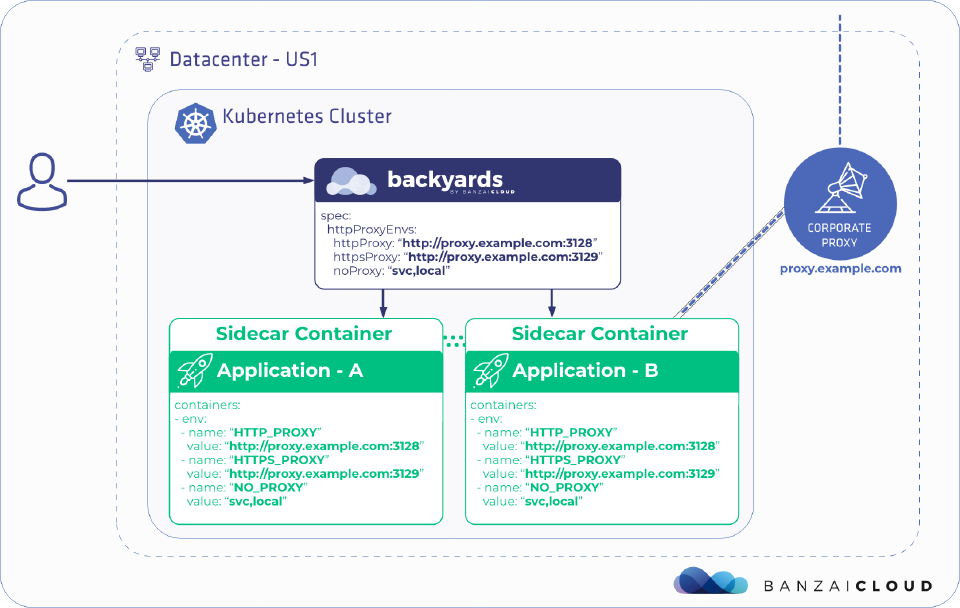
The proxy configuration for client applications usually uses environment variables, such as HTTP_PROXY, HTTPS_PROXY and NO_PROXY.
Let’s assume we have the following proxy addresses:
- http://proxy.example.com:3128/ for HTTP proxy
- http://proxy.example.com:3129/ for HTTPS proxy
If that were the case, the following environment variables would need to be set in the YAML spec of a pod running on the Kubernetes cluster:
containers:
- env:
  - name: "HTTP_PROXY"
    value: "http://proxy.example.com:3128"
  - name: "HTTPS_PROXY"
    value: "http://proxy.example.com:3129"
  - name: "NO_PROXY"
    value: "svc,local"
Manually inserting those variables into each and every pod would be far too tedious and error-prone a process, and would only work in a very small cluster anyway.
Admission webhooks to the rescue 🔗︎
The better option to inject these environment variables to a pod’s containers is to use an admission webhook. Since Backyards (now Cisco Service Mesh Manager) already has a webhook to inject Istio sidecar proxies into pods, we can leverage and extend the existing webhook functionality to support proxy environment variable injection as well.
Backyards (now Cisco Service Mesh Manager) uses the open source Banzai Cloud Istio operator under the hood, which provides support for exactly the kind of feature we were just talking about; we can specify the settings of the external proxy in the Istio custom resource and Backyards (now Cisco Service Mesh Manager) will take care of the rest.
The corresponding Istio custom resource configuration is as follows:
spec:
  httpProxyEnvs:
    httpProxy: "http://proxy.example.com:3128"
    httpsProxy: "http://proxy.example.com:3129"
    noProxy: "svc,local"
Showtime 🔗︎
Setup 🔗︎
-
Create a Kubernetes cluster.
You can create a Kubernetes cluster with the Banzai Cloud Pipeline platform on-prem, or over any one of five different cloud providers.
-
Point
KUBECONFIGto your cluster. -
Install Istio with Backyards (now Cisco Service Mesh Manager):
Note: Backyards (now Cisco Service Mesh Manager) is Banzai Cloud’s Istio service mesh. You can test and evaluate it in non-production environments. Contact us if you’re interested in using Backyards in production.
Register for the free tier version of Cisco Service Mesh Manager (formerly called Banzai Cloud Backyards) and follow the Getting Started Guide for up-to-date instructions on the installation.
This step usually takes a few minutes, and installs Istio and Backyards on your cluster.
Deploy an HTTPS proxy 🔗︎
Let’s deploy a simple proxy inside the cluster to showcase external proxy usage for this example. Also, we’re going to use the pod IP address to make the scenario more realistic. This example uses Tinyproxy, but any proxy that supports HTTP CONNECT will do.
- Create an external namespace
Create a new namespace without the Istio sidecar injection enabled to simulate the proxy being outside of the cluster.
$ kubectl create namespace external
namespace/external created
- Deploy Tinyproxy
$ kubectl apply -f - <<EOF
apiVersion: apps/v1
kind: Deployment
metadata:
  name: tinyproxy
  namespace: external
spec:
  replicas: 1
  selector:
    matchLabels:
      app: tinyproxy
  template:
    metadata:
      labels:
        app: tinyproxy
    spec:
      containers:
      - image: vimagick/tinyproxy
        imagePullPolicy: IfNotPresent
        name: tinyproxy
EOF
- Obtain the IP address of the proxy pod
Store the proxy pod IP in the PROXY_IP environment variable for later use.
$ export PROXY_IP=$(kubectl get pod -n external -l app=tinyproxy -o jsonpath='{@.items..podIP}')
Configure the proxy settings 🔗︎
- Set the proxy settings in the Istio custom resource
The default Tinyproxy container will listen on port 8888, so that’s the port that we’ll use.
$ kubectl -n istio-system patch istio mesh --type=merge --patch "
spec:
  httpProxyEnvs:
    httpProxy: "http://$PROXY_IP:8888"
    httpsProxy: "http://$PROXY_IP:8888"
    noProxy: "svc,local"
Deploy a simple pod to check outgoing connections 🔗︎
- Label the default namespace for automatic sidecar injection
$ backyards sp ai on default
INFO[0002] auto sidecar injection successfully set to namespace default
- Use the following snippet to create a test pod.
$ kubectl create -f - <<EOF
apiVersion: v1
kind: Pod
metadata:
  name: curl-test
spec:
  containers:
  - name: curl
    image: curlimages/curl:7.70.0
    command: [ "/bin/sh", "-c", "--" ]
    args: [ "while true; do sleep 3000; done;" ]
EOF
- Check the environment variables of the created pod to see if the automatic injection worked.
$ kubectl -n default get pods curl-test -o yaml |grep "env:" -A 12|head -13
    env:
    - name: http_proxy
      value: http://10.20.1.127:8888
    - name: HTTP_PROXY
      value: http://10.20.1.127:8888
    - name: https_proxy
      value: http://10.20.1.127:8888
    - name: HTTPS_PROXY
      value: http://10.20.1.127:8888
    - name: no_proxy
      value: svc,local
    - name: NO_PROXY
      value: svc,local
The HTTP(S) proxy environment variables were automatically injected to the pod, and the variables are set in both uppercase and lowercase.
- Send a request from the
curl-testpod in thedefaultnamespace to an external service.
$ kubectl exec -it curl-test -c curl -- sh -c "curl http://httpbin.org/headers"
{
  "headers": {
    "Accept": "*/*",
    "Host": "httpbin.org",
    "User-Agent": "curl/7.70.0-DEV",
    "X-Amzn-Trace-Id": "Root=1-5ef23da7-4c7406e8ef392f32b61d7ddb"
  }
}
- Check the access logs of the proxy for your request
$ kubectl -n external logs -l app=tinyproxy |grep CONNECT
CONNECT   Jun 23 17:36:27 [10]: Established connection to host "httpbin.org" using file descriptor 10.
CONNECT   Jun 23 17:36:38 [6]: Connect (file descriptor 9): ip-10-20-1-173.eu-west-1.compute.internal [10.20.1.173]
CONNECT   Jun 23 17:36:38 [6]: Request (file descriptor 9): GET http://httpbin.org/headers HTTP/1.1
CONNECT   Jun 23 17:36:39 [6]: Established connection to host "httpbin.org" using file descriptor 10.

The future: transparent external proxy with Envoy 🔗︎
An even better solution for the use case we’ve discussed would be to make it so the injected Envoy sidecar transparently supported routing through an external proxy. That way it would be totally unnecessary to configure via environment variables or provide support in the client application.
There is ongoing work to support such a feature in Envoy, and hopefully it will land in the near future. The CONNECT support is already merged, and there is an open issue about CONNECT support for HTTP/1.1 upstreams as well.
Once these features are merged and released upstream, Backyards (now Cisco Service Mesh Manager) will switch to its Envoy-based method of configuring external proxies.
‘Til then, happy proxying.