


The Banzai Cloud Pipeline platform allows enterprises to develop, deploy and scale container-based applications. It leverages best-of-breed cloud components, such as Kubernetes, to create a highly productive, yet flexible environment for developers and operation teams alike.
One of the main features of the Pipeline platform is that it allows enterprises to run workloads cost effectively by mixing spot instances with regular ones, without sacrificing overall reliability. This requires quite a lot of behind the scenes magic to be built on top of core Kubernetes building blocks. A few weeks ago we already discussed Admission webhook basics , today we’d like to give a brief introduction on how they help us achieving higher deployment availability on clusters that have spot instances.
tl;dr 🔗︎
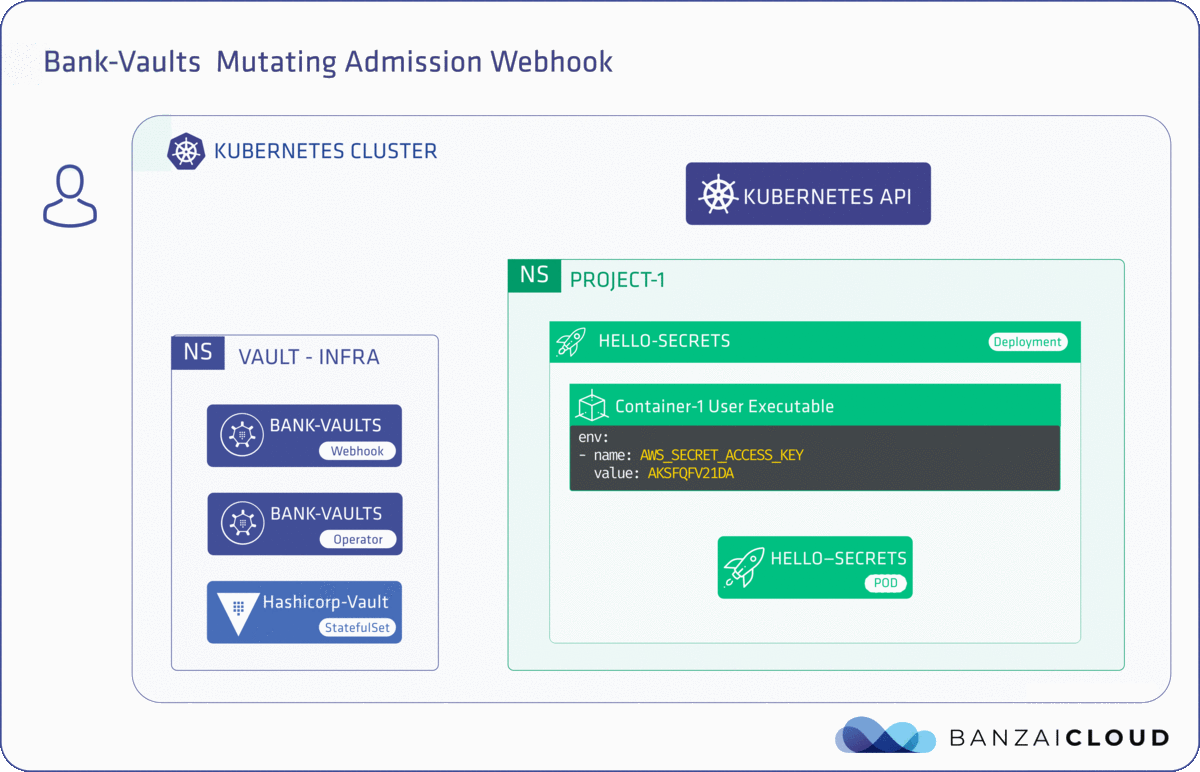
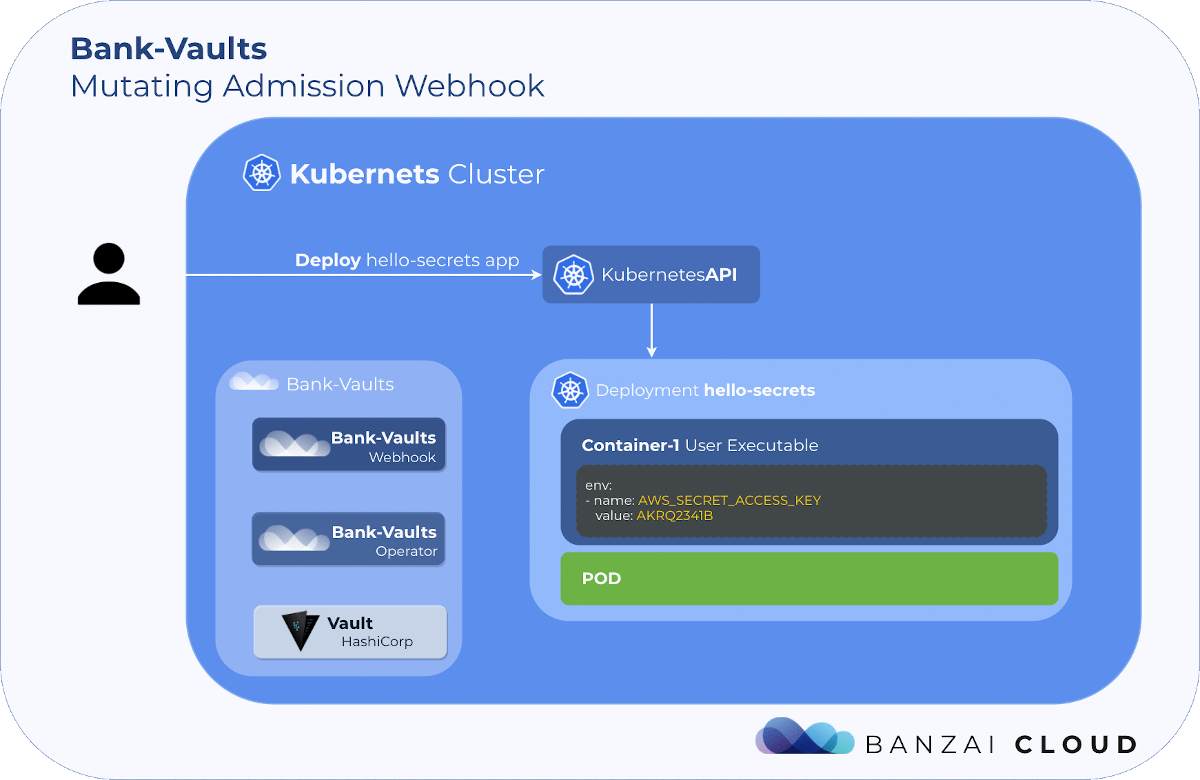
We are using mutating webhooks to set a custom scheduler on deployments when the cluster have spot instances and when Pipeline signals that the deployment should have at least some percent of replicas placed on on-demand instances.
Availability in spot-instance clusters 🔗︎
EKS clusters started with Pipeline can have spot and on-demand instances mixed. Such a cluster can be very volatile, instances - and therefore pods and deployments - can come and go, so it’s usually risky to run workloads or services on these type of clusters. But clusters started with Pipeline have some special watchguards and features that help achieve a higher availability while still benefiting from the lower cost of spot instances.
- Telescopes is used to recommend a diverse set of node pools. It is useful to decrease the chance of interruption of a large chunk of instances at once by mixing the instances in different spot-markets.
- Cloudinfo to supply up to date service and price details.
- Deployments are scheduled in the cluster to have a configurable/fixed percent of replicas always on on-demand instances, so even in the case of a serious spot instance outage, the deployment remains available with a reduced number of replicas. This is achieved through a custom scheduler that takes node labels and specific pod annotations into account when running the predicates against nodes.
- Metrics about spot-related events are collected in Prometheus through Pipeline and different exporters, like termination notices, fulfillment times or current market prices.
- Spot instance terminations are handled properly through Hollowtrees that drains nodes that will be interrupted and replaces them in currently safe spot markets.
We’ve already had some posts about Telescopes, monitoring interruptions, Hollowtrees and how drain works, today we’ll focus on nr. 3 above: availability of deployments in mixed clusters.
Using a custom scheduler 🔗︎
We’ve forked the default Kubernetes scheduler and added a predicate that keeps a set percent of replicas on on-demand instances. Because Pipeline is currently using EKS to deploy clusters on AWS, and the default scheduler is running on the master nodes that Pipeline has no access to, we needed to find a way to run a second scheduler in the cluster. Luckily Kubernetes allows running multiple schedulers, and it’s quite easy. Once you’ve packaged your scheduler, you can run it in a simple Kubernetes deployment.
The interesting part is that when running a pod, the schedulerName must be set on the pod spec, otherwise the default-scheduler will be used:
apiVersion: v1
kind: Pod
metadata:
  name: spot-scheduler-pod
  labels:
    name: spot-scheduler-example
spec:
  schedulerName: spot-scheduler
  containers:
  - name: example-container
    image: k8s.gcr.io/pause:2.0
We don’t want our Pipeline users to be able to understand low-level mechanics like this, and add the scheduler’s name to the spec where needed.
We’d like to present a seamless experience to our users, so the only thing they need to care about is that
“I want to keep at least
N%of my pods safe from spot interruptions”.
We’ve figured out that the easiest way to do it is through mutating webhooks.
Admission webhooks 🔗︎
We have an introduction blog post about admission webhooks, so check it out if you haven’t heard of them yet, or want to have a deeper understanding. Now we’ll only recap the definition quickly. The official Kubernetes documentation is saying the following about admission controllers:
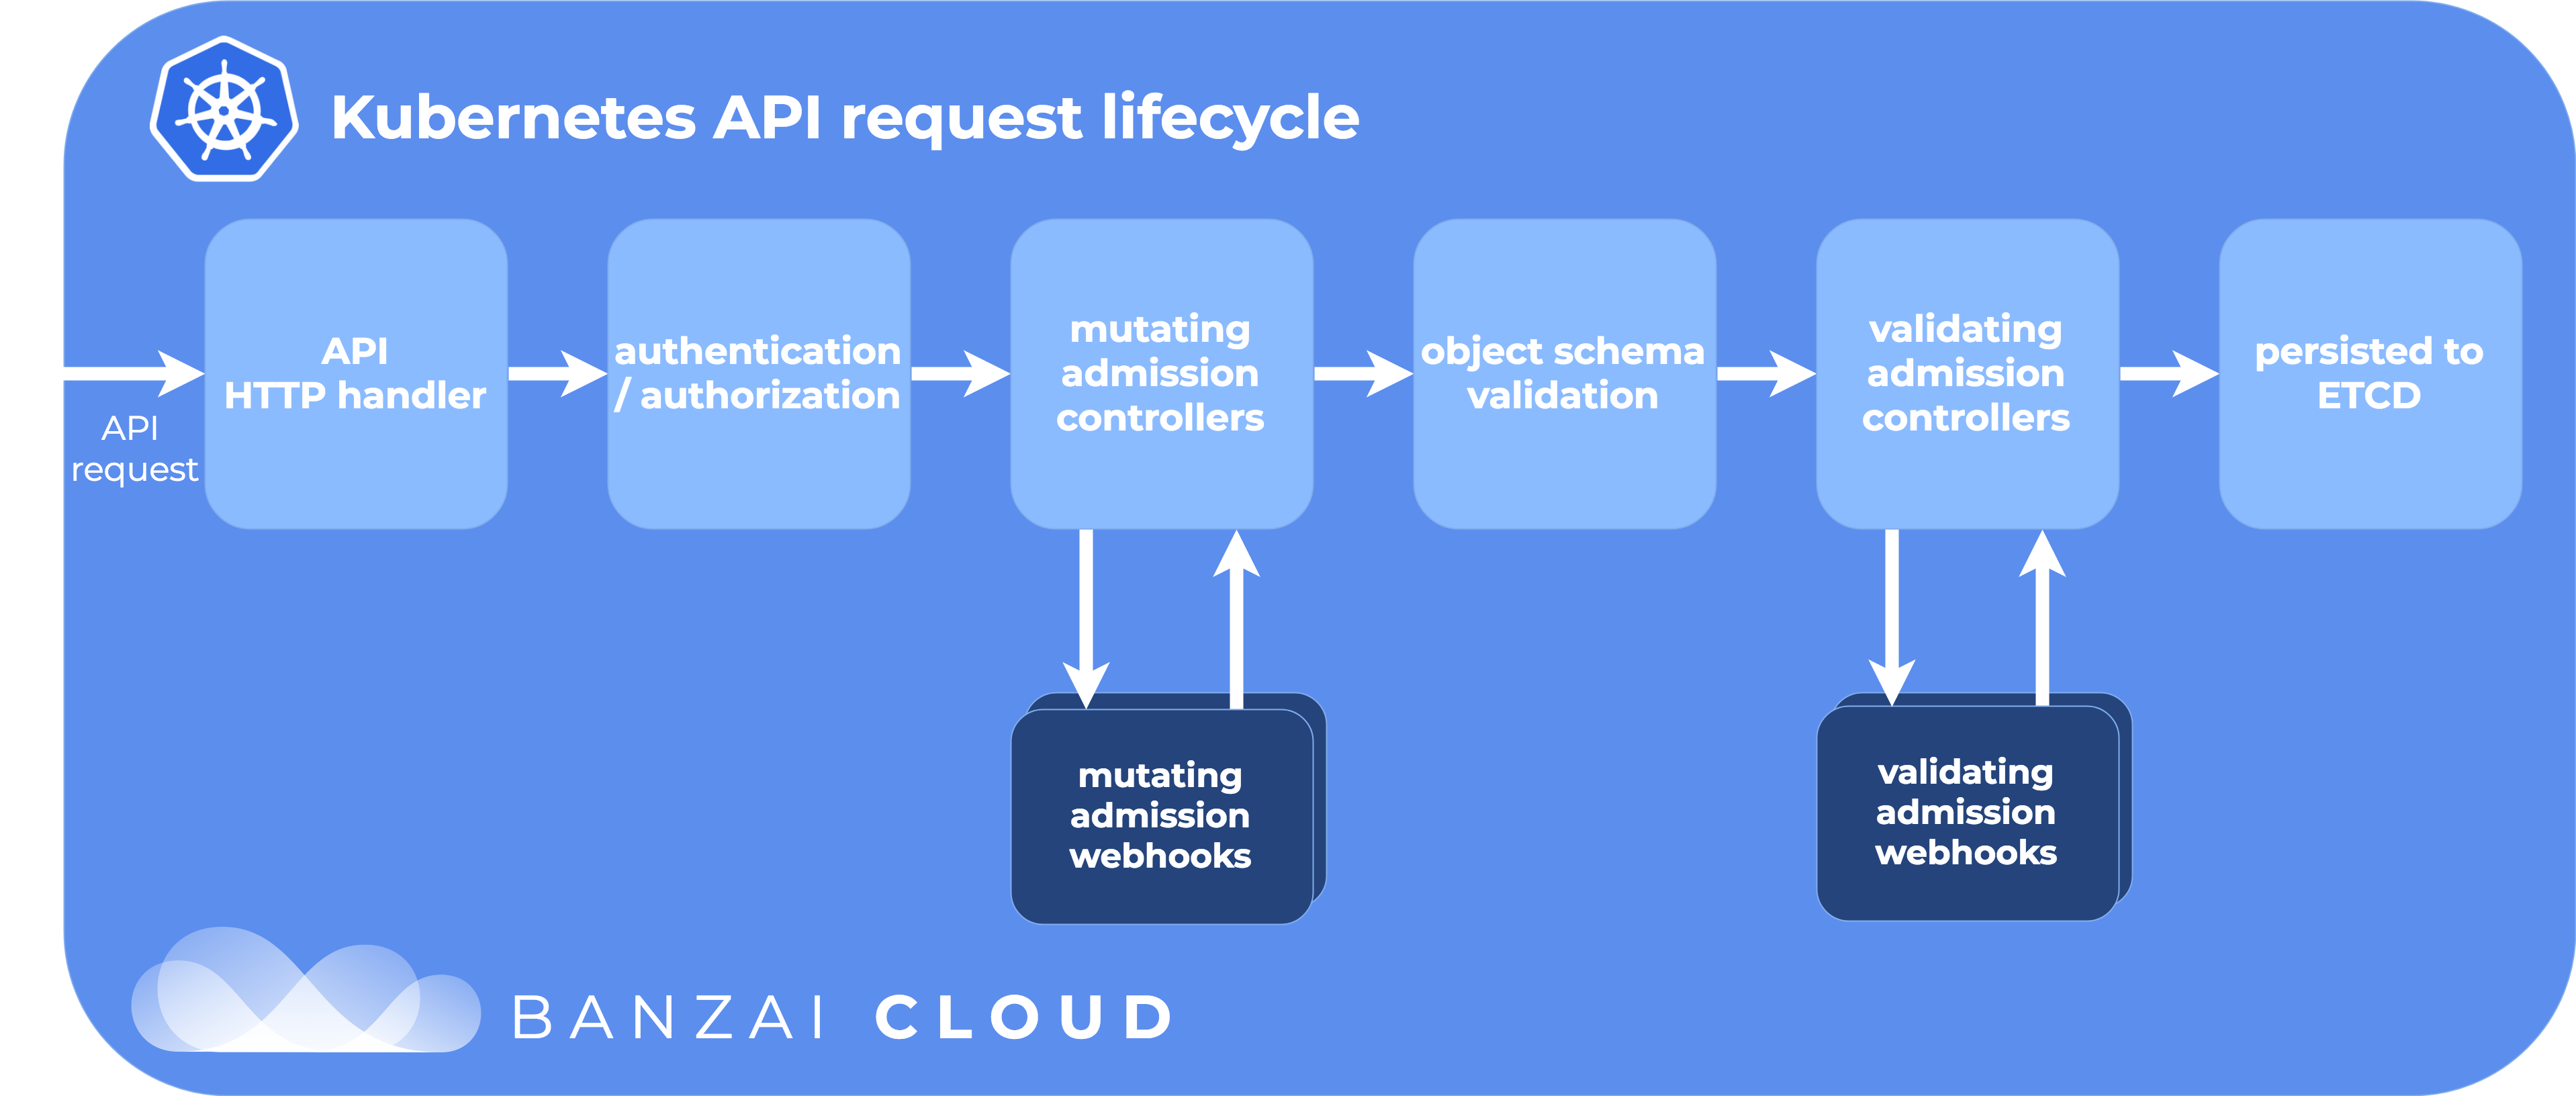
An admission controller is a piece of code that intercepts requests to the Kubernetes API server prior to persistence of the object, but after the request is authenticated and authorized. […] Admission controllers may be “validating”, “mutating”, or both. Mutating controllers may modify the objects they admit; validating controllers may not. […] If any of the controllers in either phase reject the request, the entire request is rejected immediately and an error is returned to the end-user.
A list of built-in admission controllers comes with Kubernetes. These controllers need to be compiled into kube-apiserver, and can only be enabled when the apiserver starts up, so writing a new one with custom behavior would mean recompiling, and reconfiguring the apiserver. But there are two special controllers in this list: MutatingAdmissionWebhook and ValidatingAdmissionWebhook that provide a way to add dynamic behavior when intercepting requests. These special admission controllers send admission requests to external HTTP callbacks and receive admission responses. If these two admission controllers are enabled, a Kubernetes administrator can create and configure an admission webhook in the cluster. The callback that handles admission requests through the webhooks is usually an HTTPS server that’s deployed to the cluster in a pod.
The difference between the two types of admission webhook are pretty self-explanatory: validating webhooks can reject a request, but they cannot modify the object they are receiving in the admission request, while mutating webhooks can modify objects by creating a patch that will be sent back in the admission response.
Mutating webhook to configure the scheduler 🔗︎
Let’s see how the mutating webhook and the corresponding flow works through the Pipeline platform. The flow is shown in the diagram below from the user creating a deployment through Pipeline to the pod being scheduled on a proper node.
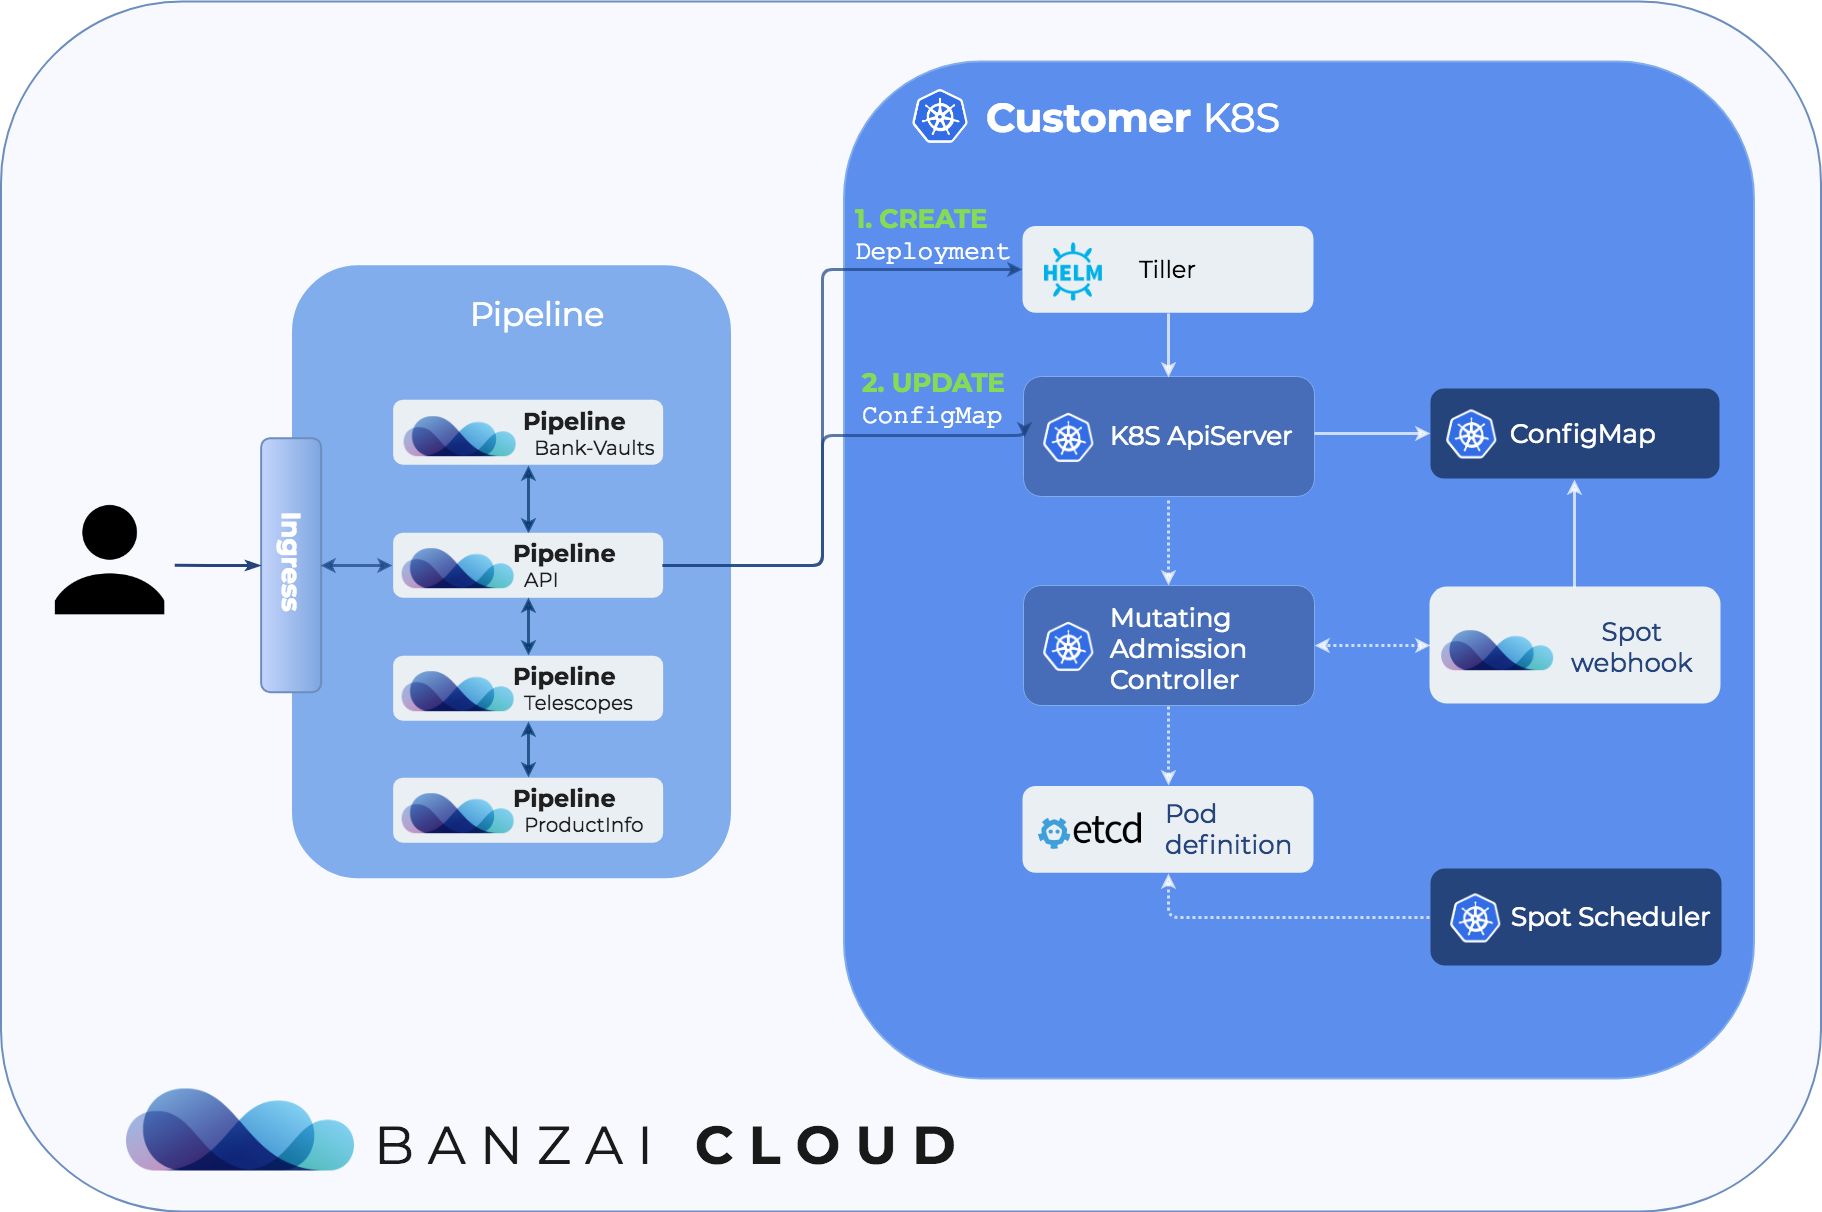
The user has only one task: when creating a deployment through the API or from the UI she must specify how many percentage of her workload must run on safe, on-demand instances. After the API request is sent, Pipeline updates the ConfigMap that stores this information about various deployments and creates the deployment itself through Helm.
When the deployment request is sent to the apiserver, the webhook intercepts the request, and checks if the deployment is present in the ConfigMap. If it’s found, the webhook mutates the request to include a special annotation that can be parsed by the spot-affinity scheduler, and modifies the schedulerName in the pod template spec.
The code for the webhook is pretty easy to understand, we’ll only highlight the most important part: patching the deployment request with our specific annotation, and with the spot-affinity scheduler’s name:
  patch = append(patch, patchOperation{
		Op:   "add",
		Path: "/spec/template/metadata/annotations",
		Value: map[string]string{
			a.spotAnnotationKey: pct,
		},
	})

	patch = append(patch, patchOperation{
		Op:    "add",
		Path:  "/spec/template/spec/schedulerName",
		Value: a.schedulerName,
	})
Finally let’s check out how this admission webhook is built: we’re using the generic-admission-server project to run the admission server. This project is using a Kubernetes ApiService extension and makes it easy to write your own webhook as authentication and authorization is solved through Kubernetes standards, and it’s not needed to implement these things from scratch.
Deploying the webhook to a cluster 🔗︎
The webhook is automatically deployed to any cluster started with Pipeline that has spot instances, but it can be deployed independently using the same Helm chart what Pipeline is using. The chart creates the necessary MutatingWebhookConfiguration as well as the resources - like the TLS certifications - needed by the ApiService extension to run in an RBAC-enabled cluster. The chart is available in the banzaicloud-stable repo:
helm repo add banzaicloud-stable http://kubernetes-charts.banzaicloud.com/branch/master
helm repo update
To install run the following command:
helm install --name <name> banzaicloud-stable/spot-config-webhook