


The API gateway pattern has been used as a part of modern software systems for years. A different concept, service mesh, has also emerged over the last couple of years. They share some similarities in their feature set, and service meshes soon started to introduce their own API gateway implementations.
In this post, we’ll discuss the Istio ingress gateway, from an API gateway perspective. We’ll examine its feature set compared to typical API gateway features. Lastly, we’ll demonstrate some of its features on Google’s microservices demo application using Backyards (now Cisco Service Mesh Manager), which is Banzai Cloud’s production ready Istio distribution.
API Gateway pattern 🔗︎
What is an API Gateway? 🔗︎
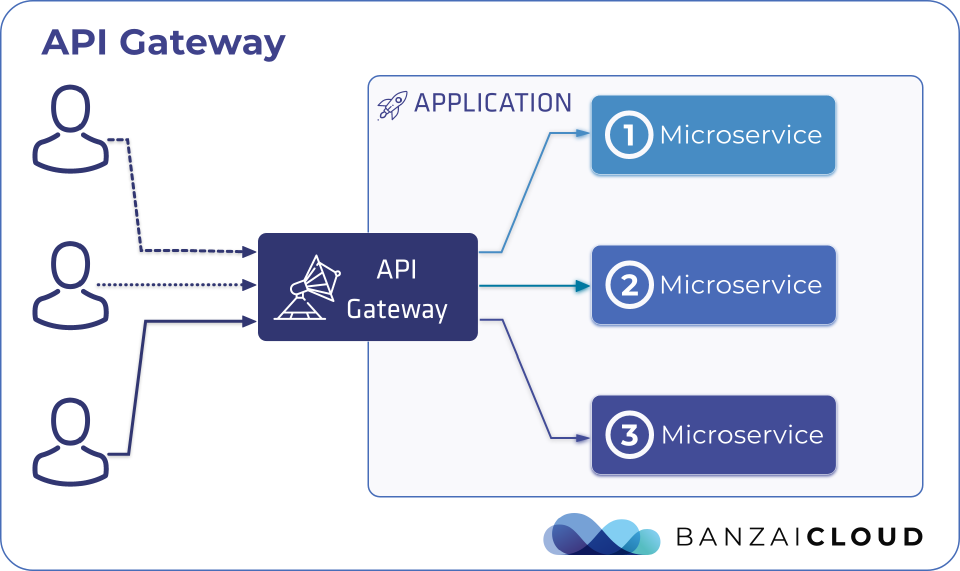
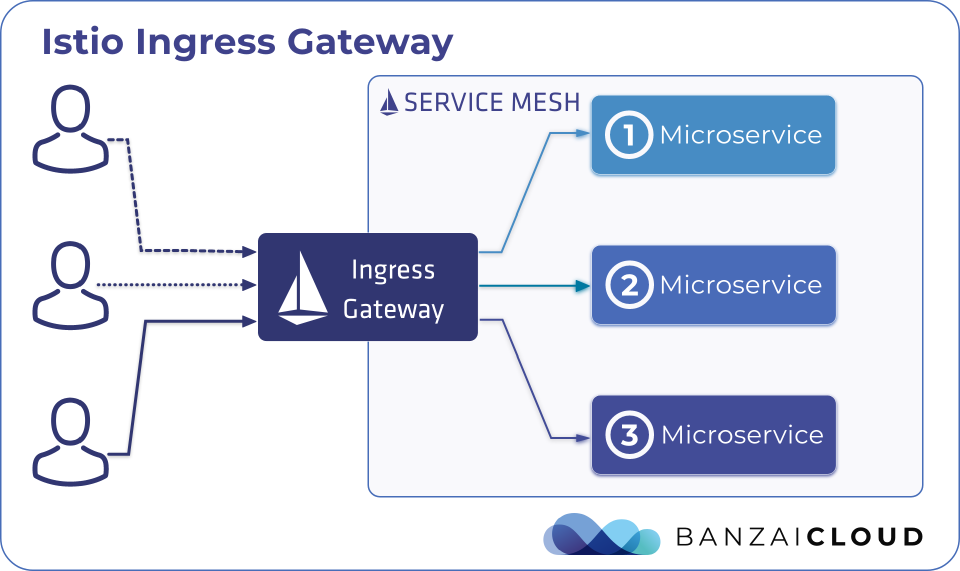
An API gateway is a service that sits between clients and application services. It is the single entry point for all clients when accessing an application. It acts as a reverse proxy for the acceptance of all incoming API calls, routes the requests to the appropriate application services and then returns their results.

What features does it offer? 🔗︎
The API gateway pattern provides the following features:
| Features | API Gateway |
|---|---|
| Custom APIs | check_circle |
| Hide service locations | check_circle |
| Protocol translation | check_circle |
| Request routing | check_circle |
| Traffic routing | check_circle |
| Redirects | check_circle |
| Retries | check_circle |
| Load balancing | check_circle |
| Analytics | check_circle |
| Monitoring | check_circle |
| Authorization | check_circle |
| Authentication | check_circle |
| Security | check_circle |
| IP whitelisting | check_circle |
| API call aggregation | check_circle |
| Rate limiting | check_circle |
| Caching | check_circle |
| Billing | check_circle |
There are different API Gateway implementations available which implement the API gateway pattern. The number and availability of the features listed above depends on which specific implementation is being used. In this post, we’ll concentrate on the Istio ingress gateway API gateway implementation.
Istio’s API Gateway 🔗︎
Service meshes in general and Istio as well were primarily designed to manipulate, observe and secure in-cluster (east-west) traffic flows. On the other hand, API gateways were designed to handle external (north-south) traffic and route them to internal application services. However, there was, from very early, a recognized need for handling external traffic in Istio, and, since those early days, Istio has supported ingress (and egress) gateways. As a result, Istio has a custom ingress controller implementation which realizes API gateway implementation on its own.
To learn more about Kubernetes ingress APIs and controllers, check out this blog post: Kubernetes ingress, deep dive.
If you are interested in Istio’s Ingress implementation in more detail, please refer to this post: An in-depth intro to Istio Ingress.
The Istio ingress is an API gateway implementation which accepts client calls and routes them to the application services inside the mesh.

Let’s see how the features of an Istio ingress gateway can provide compared to a typical API Gateway:
| Features | API Gateway | Istio Ingress |
|---|---|---|
| Custom APIs | check_circle | check_circle |
| Hide service locations | check_circle | check_circle |
| Protocol translation | check_circle | check_circle |
| Request routing | check_circle | check_circle |
| Traffic routing | check_circle | check_circle |
| Redirects | check_circle | check_circle |
| Retries | check_circle | check_circle |
| Load balancing | check_circle | check_circle |
| Analytics | check_circle | check_circle |
| Monitoring | check_circle | check_circle |
| Authorization | check_circle | check_circle |
| Authentication | check_circle | check_circle |
| Security | check_circle | check_circle |
| IP whitelisting | check_circle | check_circle |
| API call aggregation | check_circle | remove_circle |
| Rate limiting | check_circle | remove_circle |
| Caching | check_circle | remove_circle |
| Billing | check_circle | remove_circle |
As you can see, Istio’s ingress implements quite a few of these features. If these features are enough for your use case, then it’s advisable that you use Istio ingress gateway as your API gateway alongside your service mesh. If not, then it’s also possible for you to use a different API gateway implementation alongside Istio to fill the feature gap.
However, it’s important to note that the feature gap is closing over time. In the past, fewer of these features had been made available by Istio ingress and, in the future, a few more will be added (e.g. rate limiting).
Backyards (now Cisco Service Mesh Manager)’ API gateway 🔗︎
Even though Istio’s ingress gateway can provide a lot of API gateway features, it doesn’t mean that it is easy to configure, secure and monitor them by default. To help you with that, in Backyards (now Cisco Service Mesh Manager), we’ve built a lightweight API gateway management tool to complement Istio’s API gateway features by adding a UI for easier configuration of routing, TLS certificate handling and ingress monitoring.
It is important to note here that Backyards’ lightweight API gateway solution is 100% compatible with, and based on, Istio’s ingress gateway. So all the features provided by Istio ingress are available, as should be the case for the future.
The Backyards API gateway dashboard gives you a monitoring and management interface for your Istio gateways with the following features:
- Managing port and host configurations
- Managing TLS certificates
- Managing routing configurations
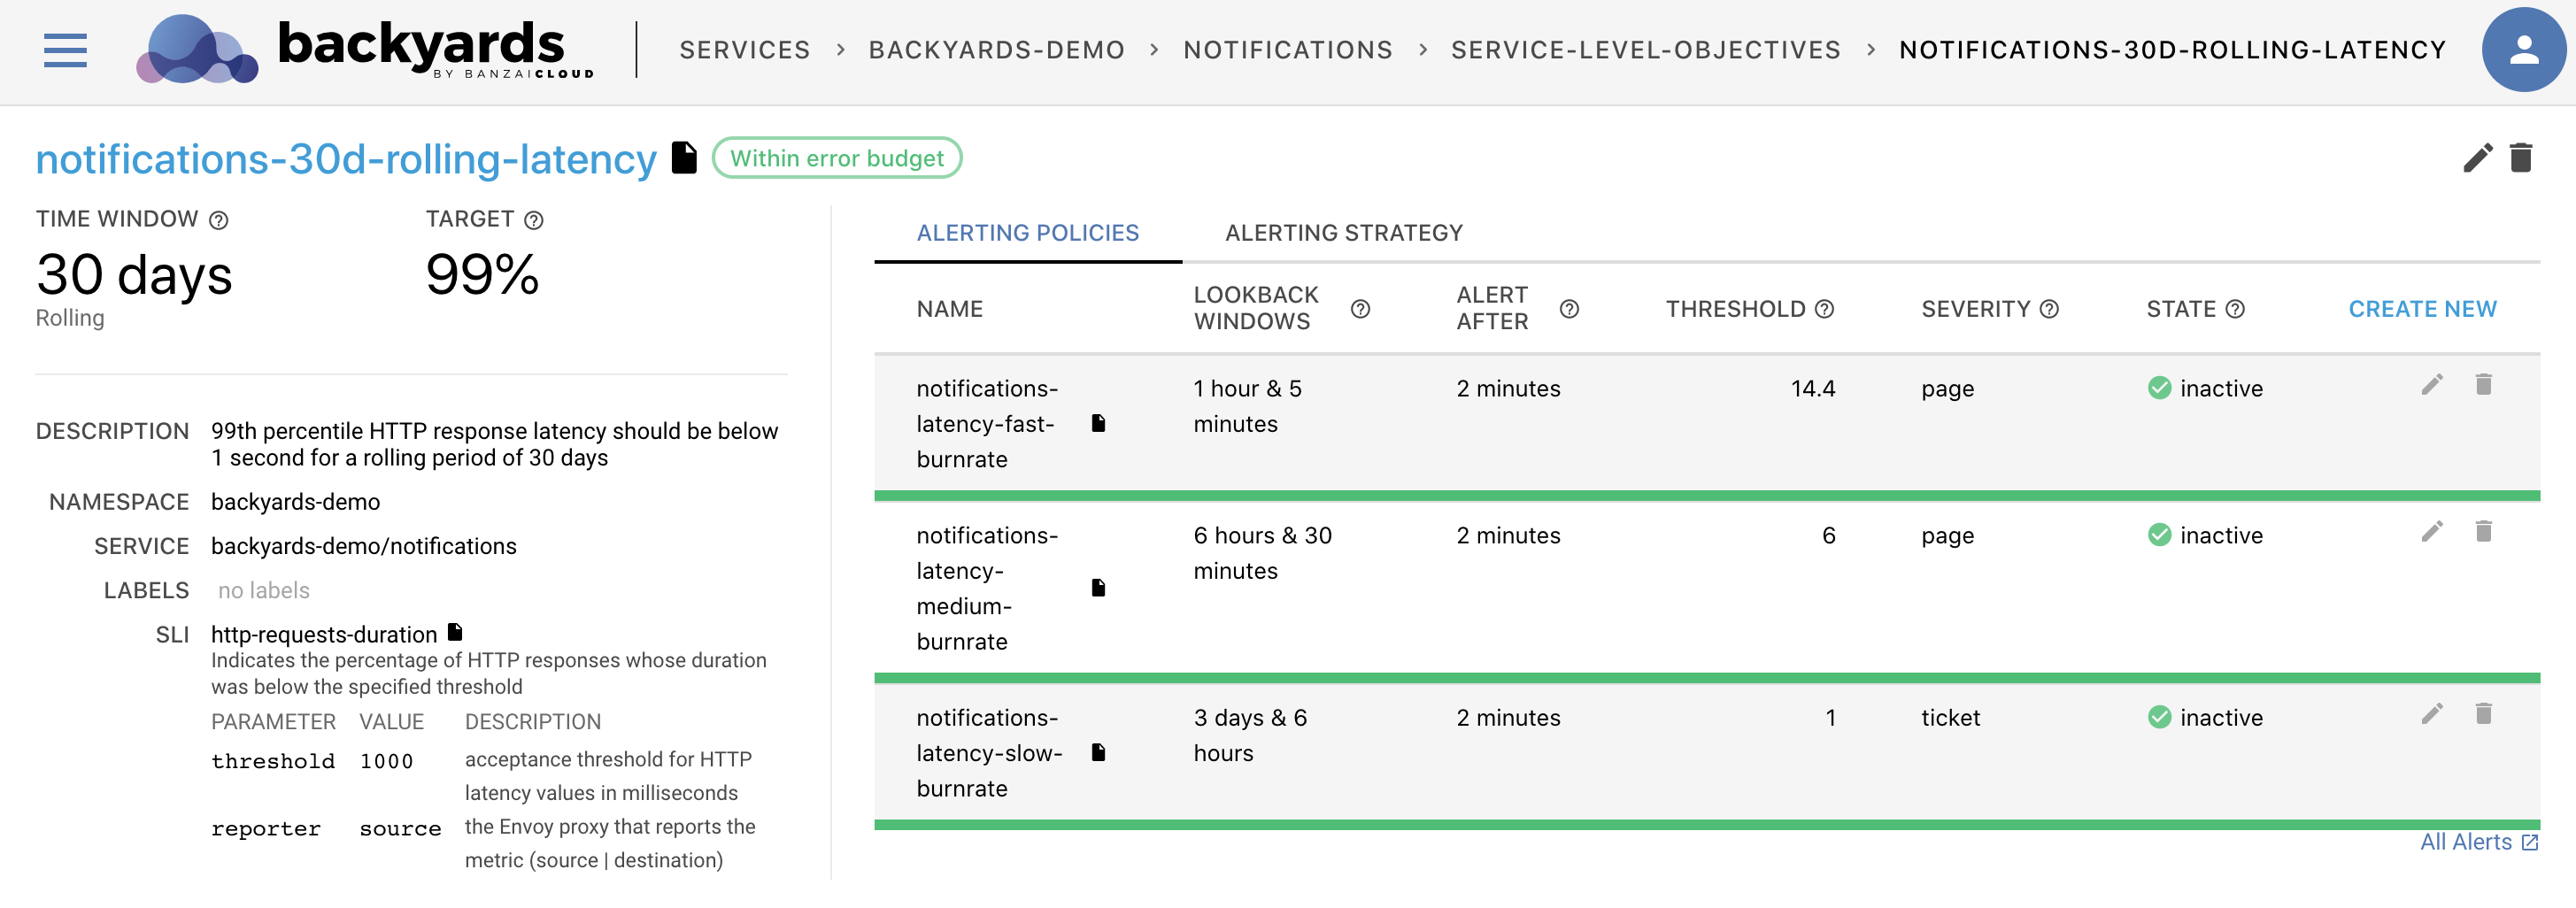
- Monitoring
Try it out! 🔗︎
We’ll deploy Google’s online shop microservices demo application on a Kubernetes cluster, then with Backyards (now Cisco Service Mesh Manager), we’ll setup an Istio ingress gateway for it with monitoring, routing and TLS certificates.
Setup 🔗︎
-
Create a Kubernetes cluster.
If you need a hand with that, you can create a cluster with our free version of Banzai Cloud’s Pipeline platform.
-
Point
KUBECONFIGat your cluster. -
Install Backyards:
Register for the free tier version of Cisco Service Mesh Manager (formerly called Banzai Cloud Backyards) and follow the Getting Started Guide for up-to-date instructions on the installation.
-
Create the
hipstershopnamespace for our example applications:kubectl create ns hipstershop -
Enable sidecar-injection for the
hipstershopnamespace:backyards sidecar-proxy auto-inject on hipstershop -
Make sure that the
hipstershopnamespace has the necessaryistio-injection=enabledlabel. (If it is not there yet, wait a few seconds and check again.)kubectl get ns hipstershop --show-labels -
Install Google’s HipsterShop example application in the
hipstershopnamespace:kubectl -n=hipstershop apply -f https://raw.githubusercontent.com/GoogleCloudPlatform/microservices-demo/master/release/kubernetes-manifests.yaml -
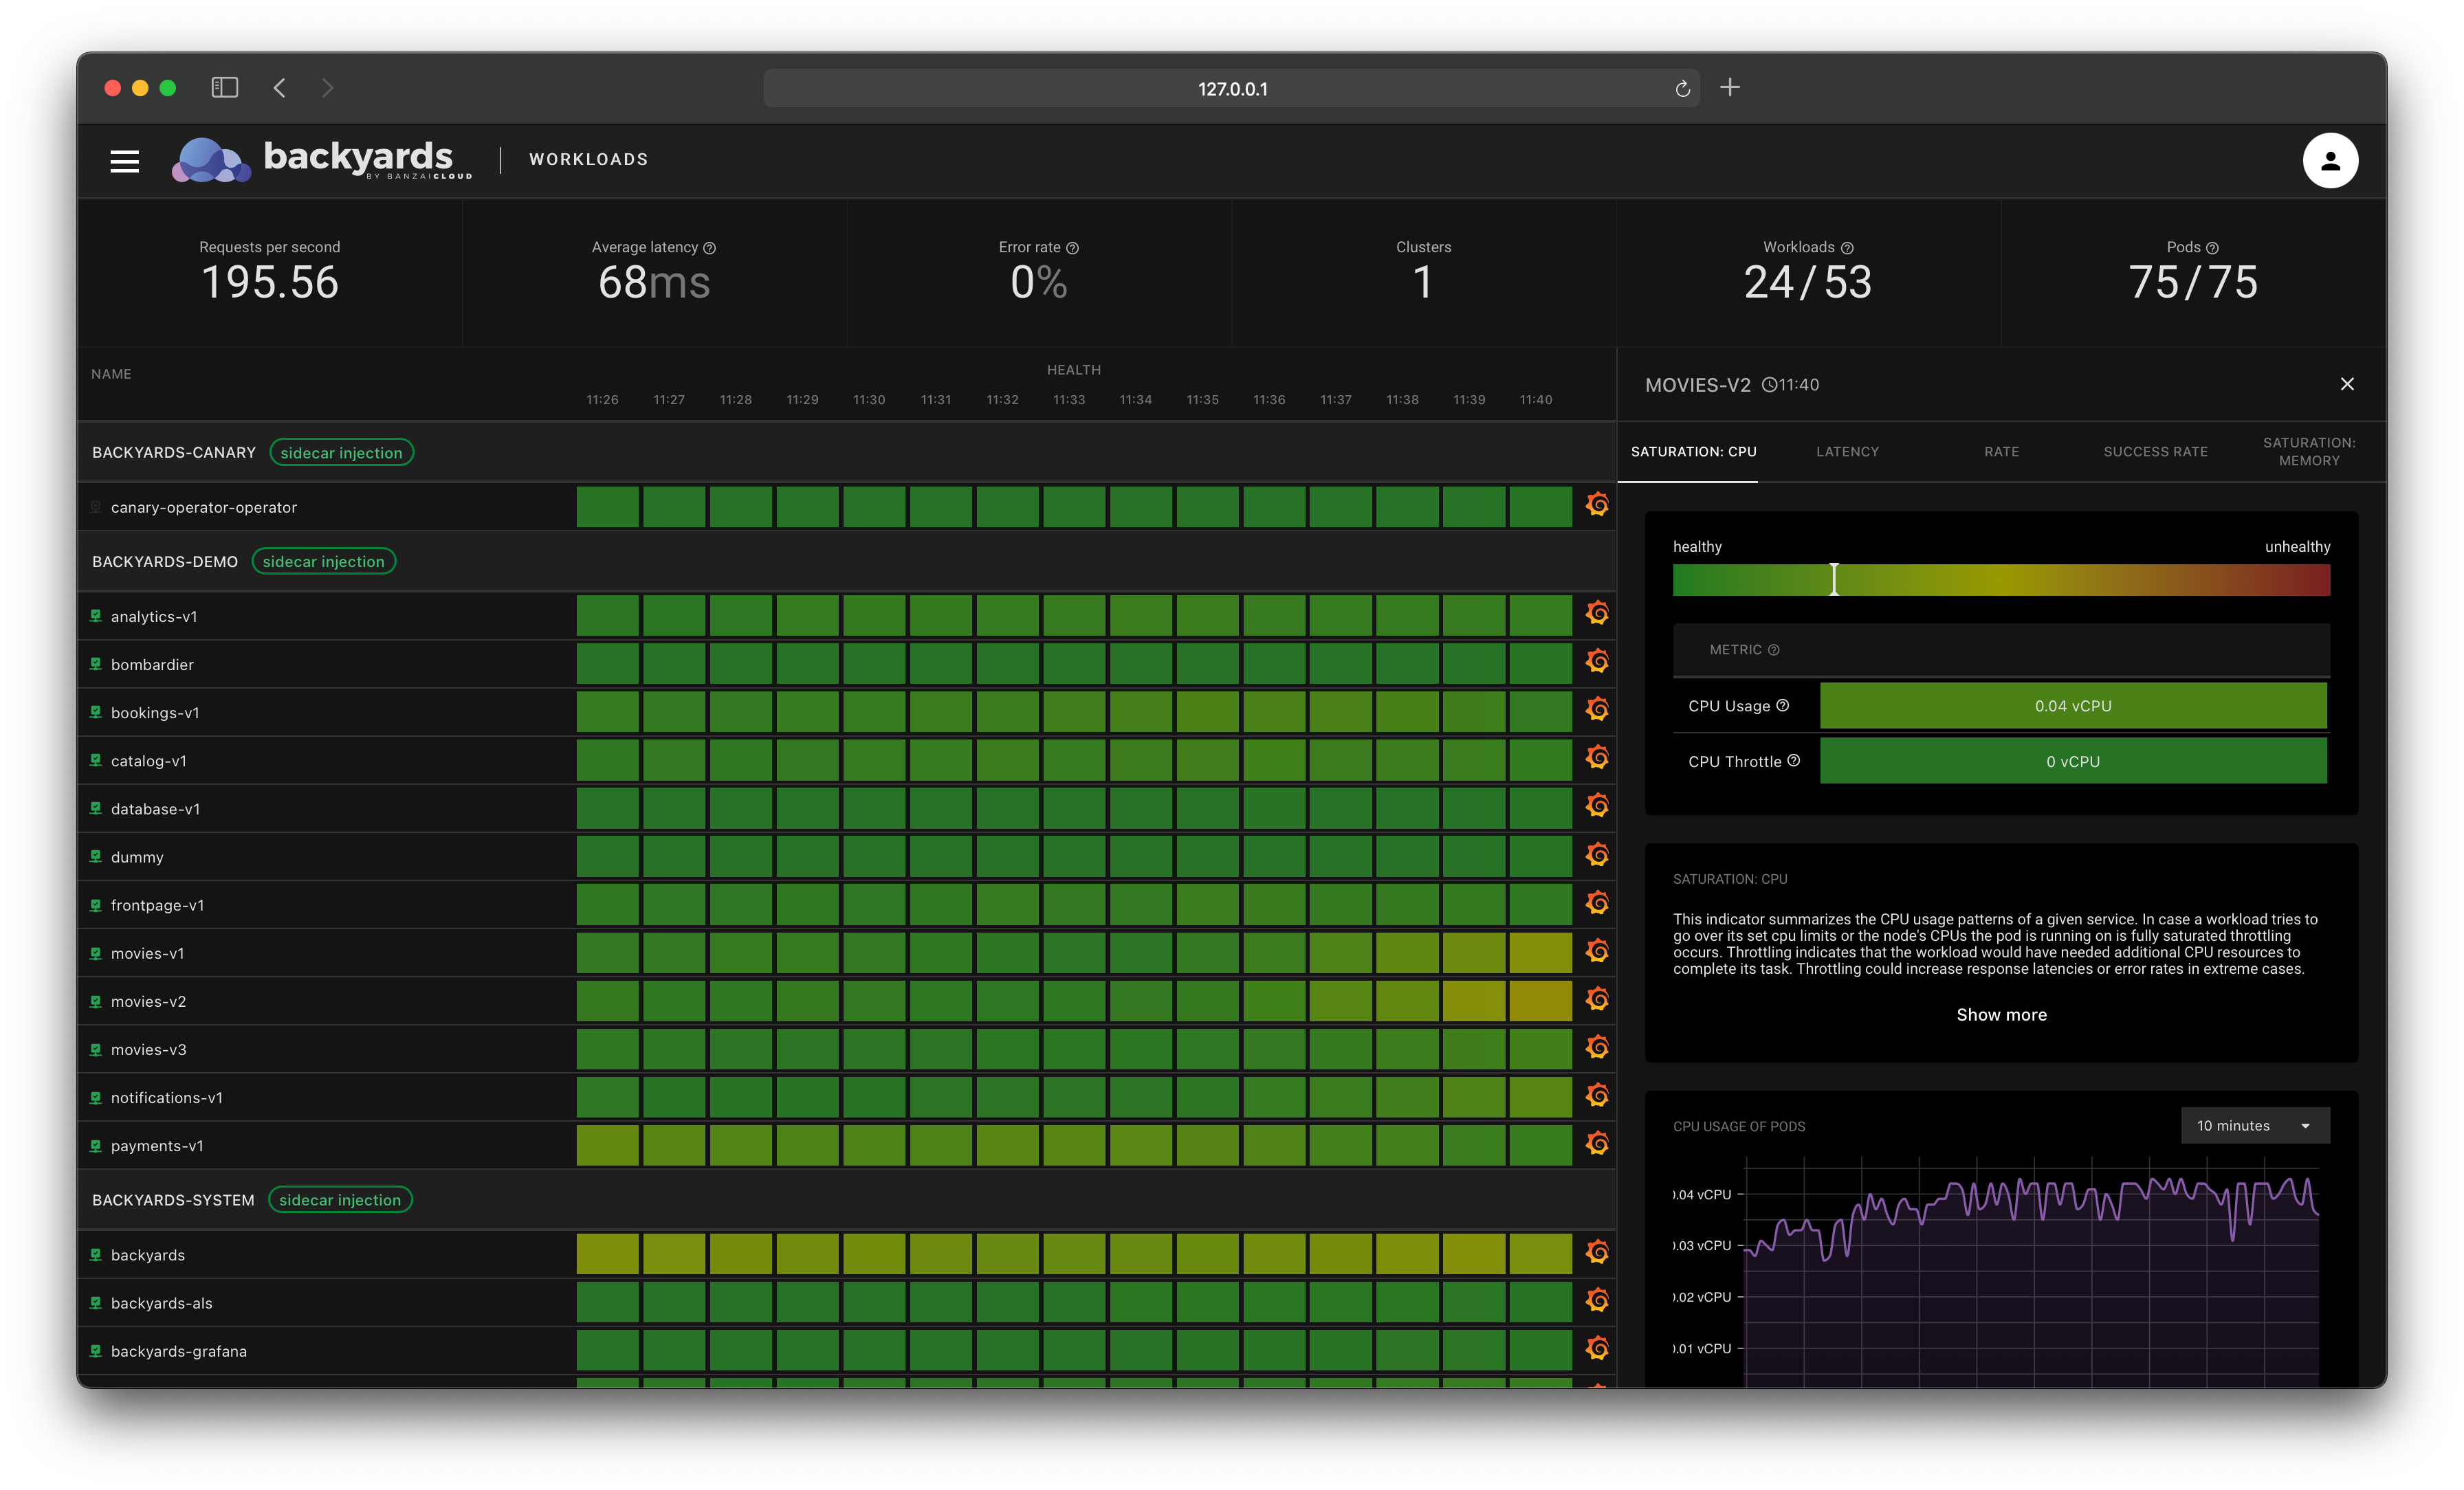
Make sure that the pods are up and running after a minute or so (with 2/2 containers, indicating that Envoy sidecar proxies were successfully injected):
kubectl -n=hipstershop get po NAME READY STATUS RESTARTS AGE adservice-687b58699c-x7l5t 2/2 Running 0 113s cartservice-778cffc8f6-tzmgf 2/2 Running 2 114s checkoutservice-98cf4f4c-477c7 2/2 Running 0 116s currencyservice-c69c86b7c-j5h7c 2/2 Running 0 114s emailservice-5db6c8b59f-qh6dl 2/2 Running 0 117s frontend-8d8958c77-xkkwv 2/2 Running 0 115s loadgenerator-6bf9fd5bc9-xf4cj 2/2 Running 4 114s paymentservice-698f684cf9-dfcv7 2/2 Running 0 115s productcatalogservice-789c77b8dc-vhjzq 2/2 Running 0 115s recommendationservice-75d7cd8d5c-drpn8 2/2 Running 0 116s redis-cart-5f59546cdd-p9pzd 2/2 Running 0 113s shippingservice-7d87945947-45nx5 2/2 Running 0 113s -
Open the Backyards dashboard with:
backyards dashboard -
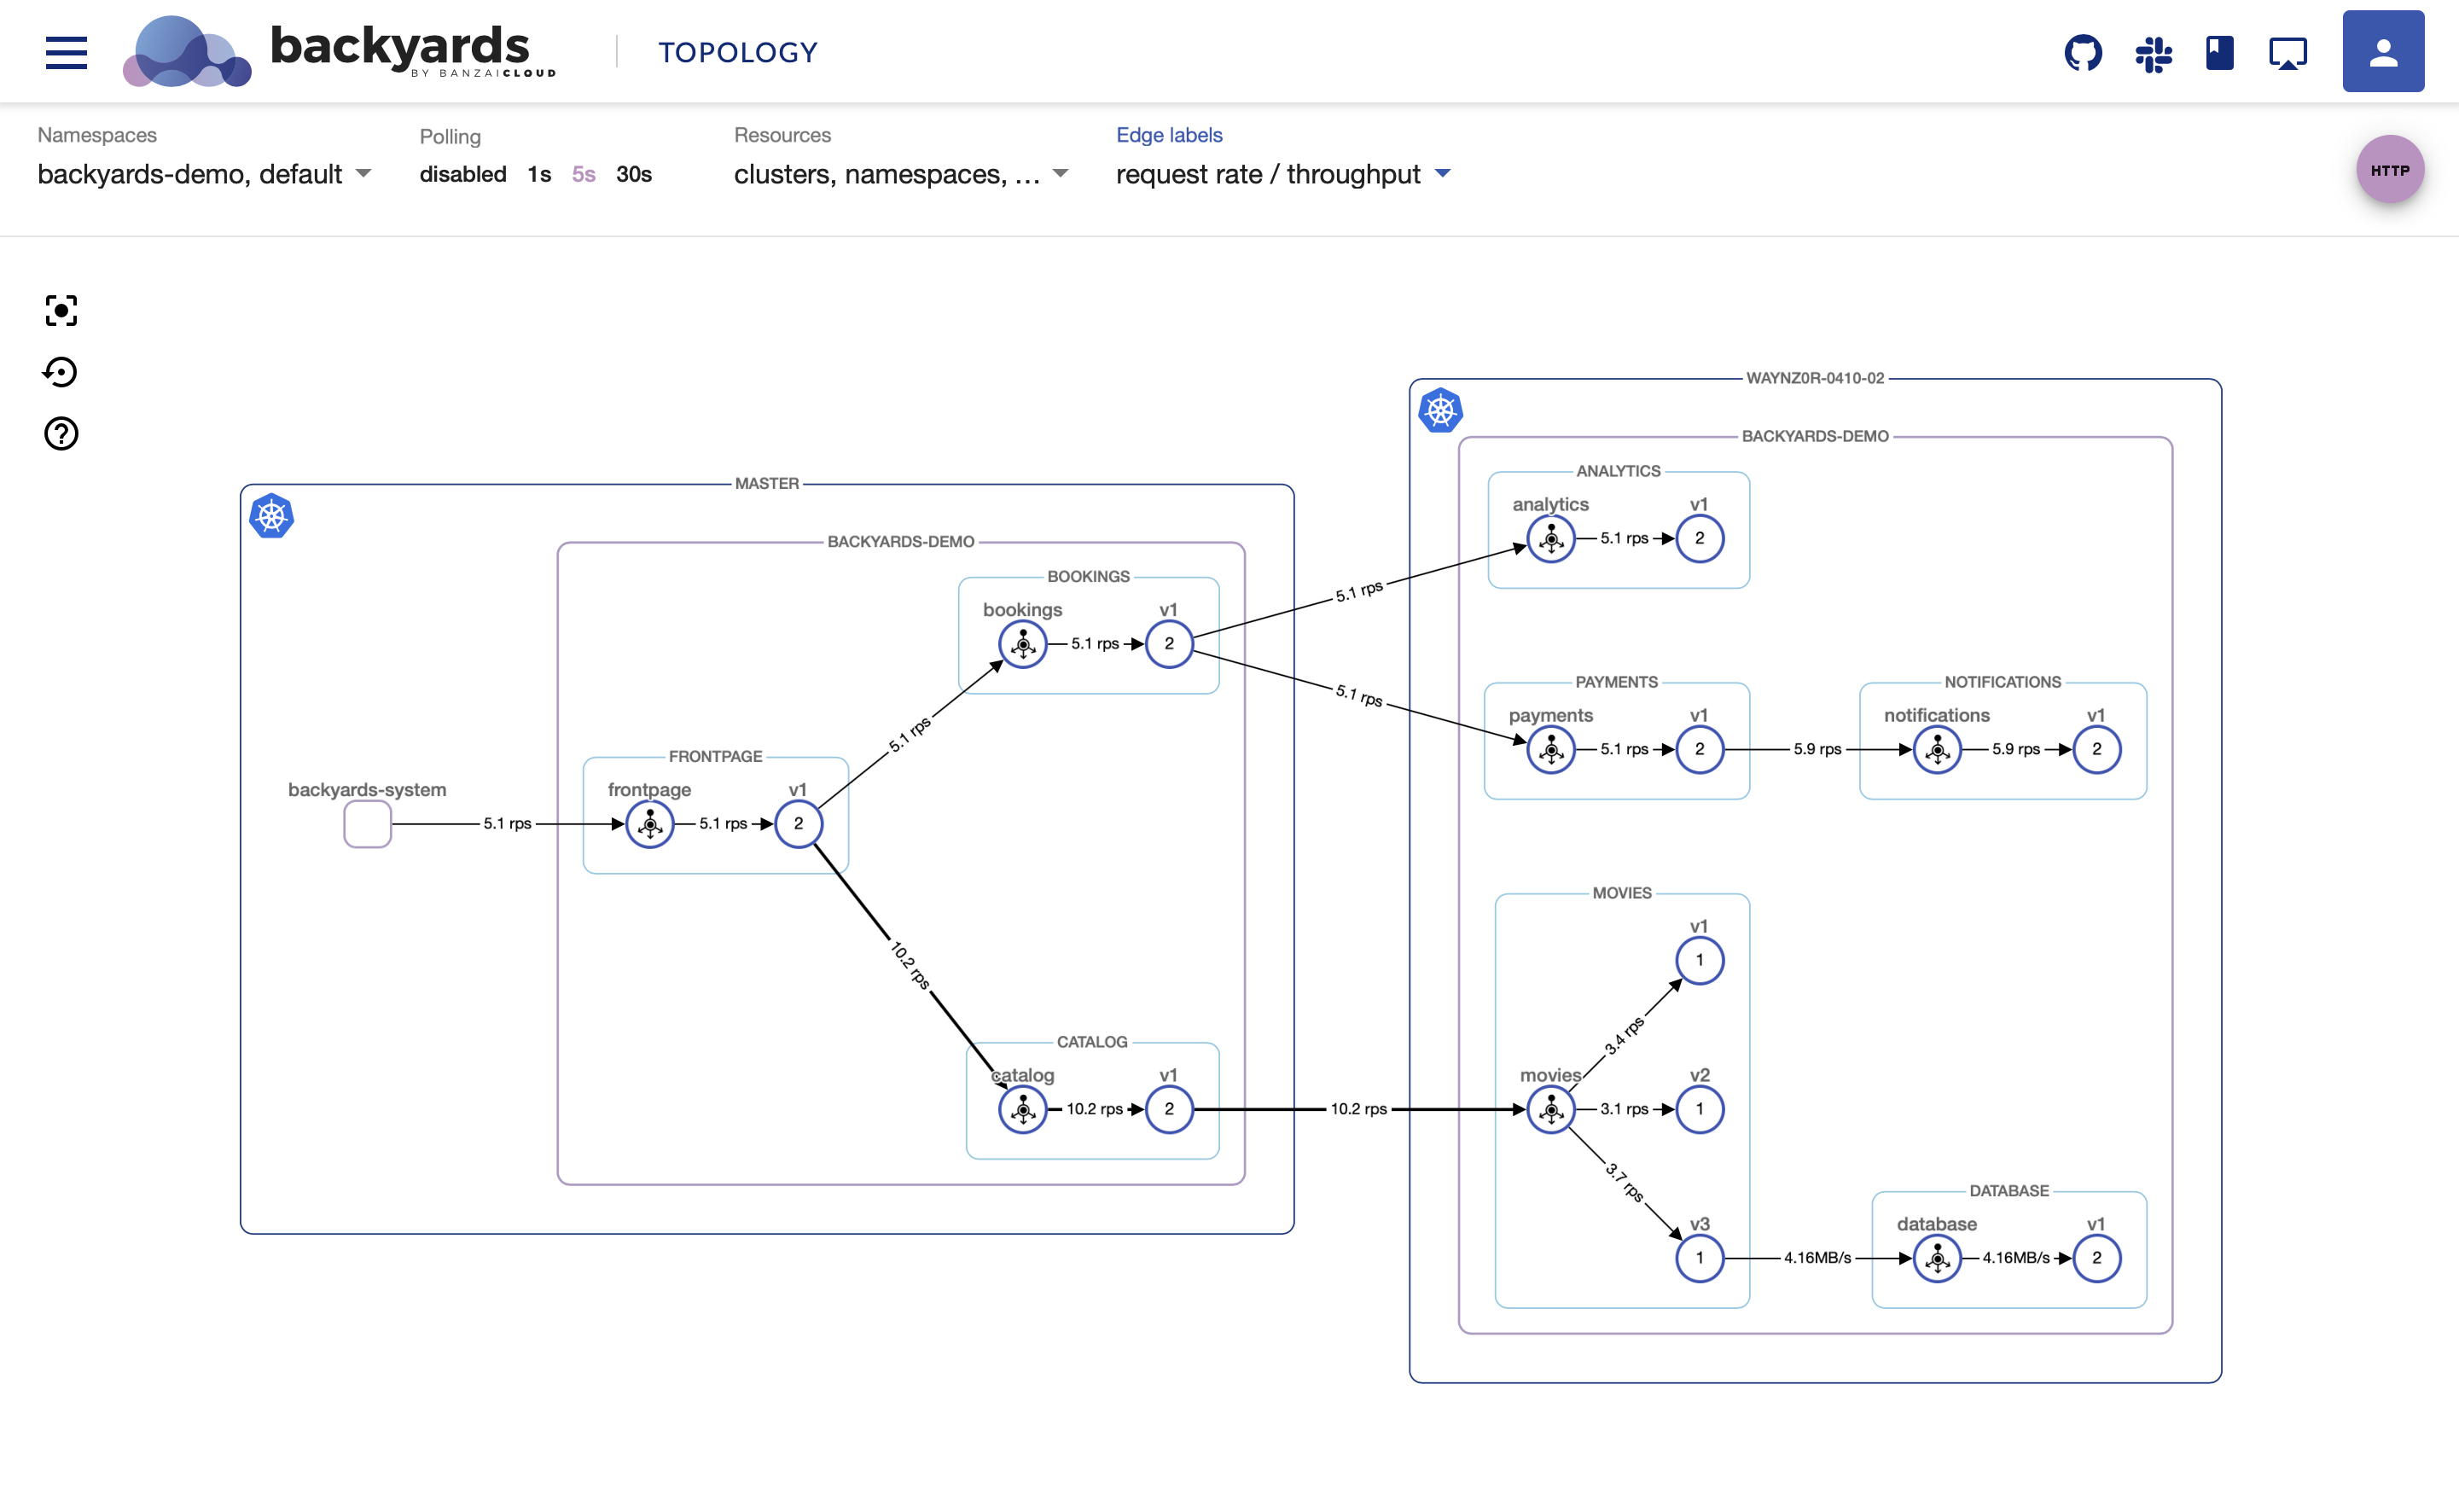
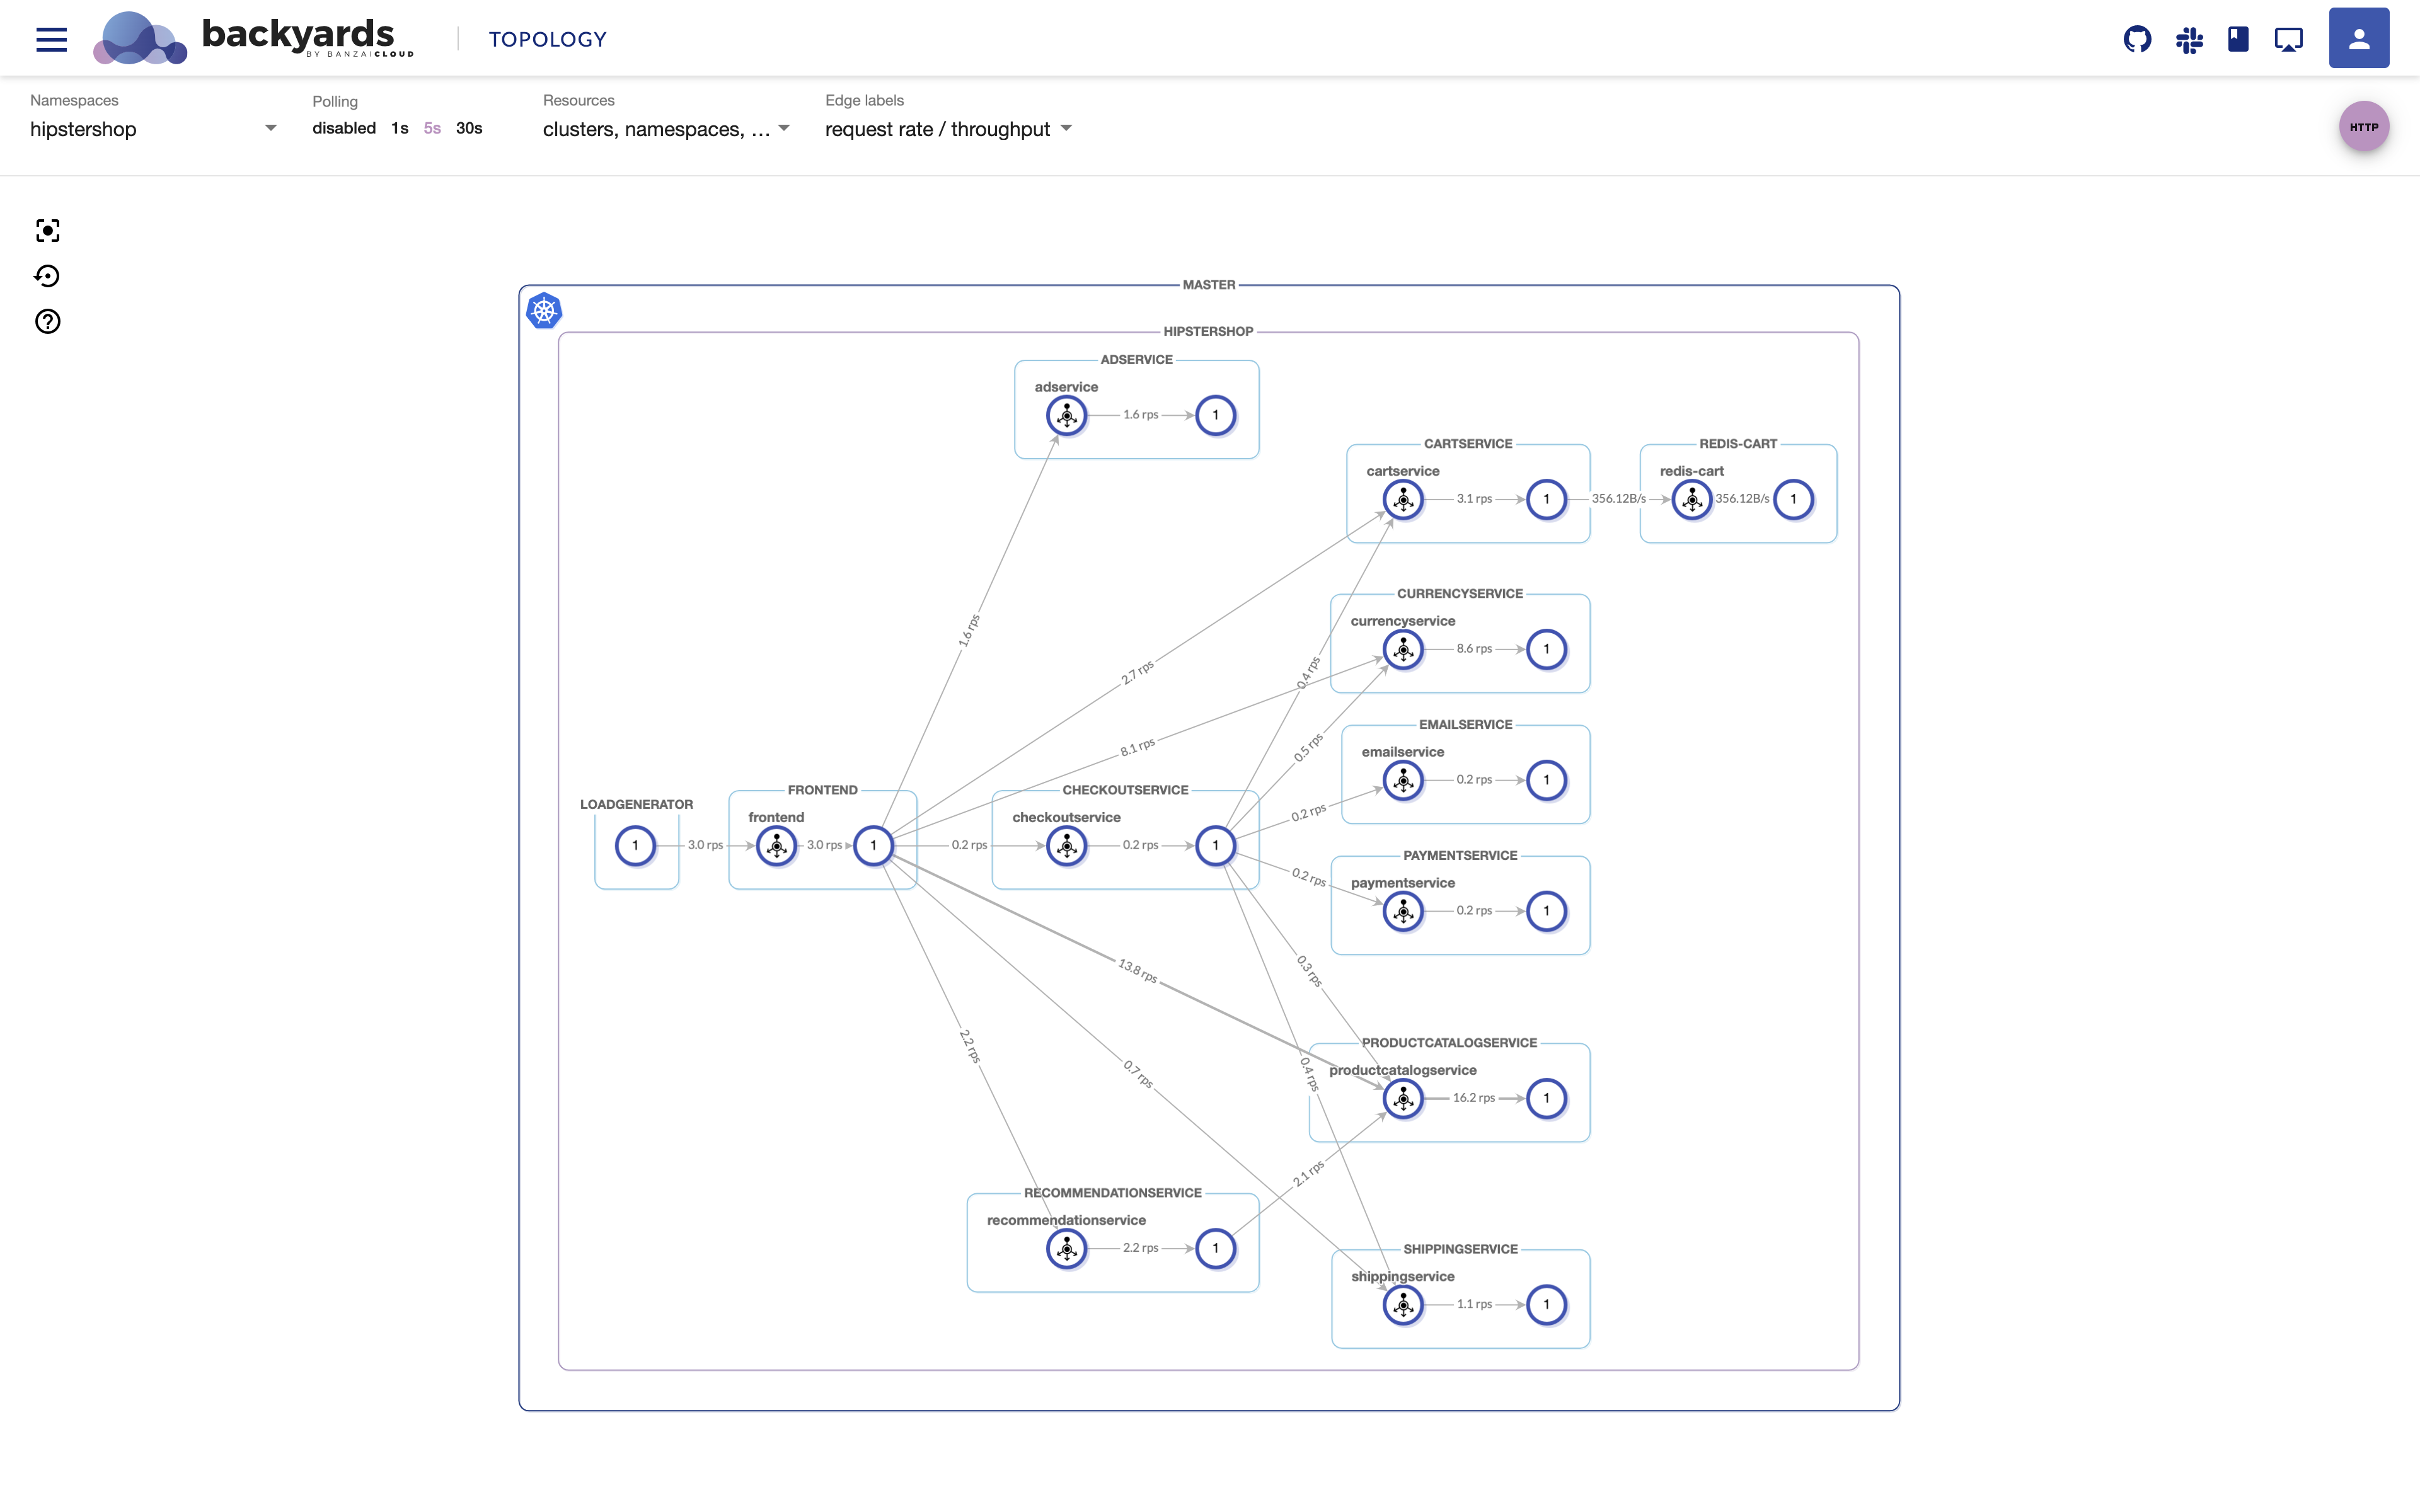
Choose the
hipstershopnamespace in the namespace selector on Backyards’TOPOLOGYview. You should see that the app is up and running already: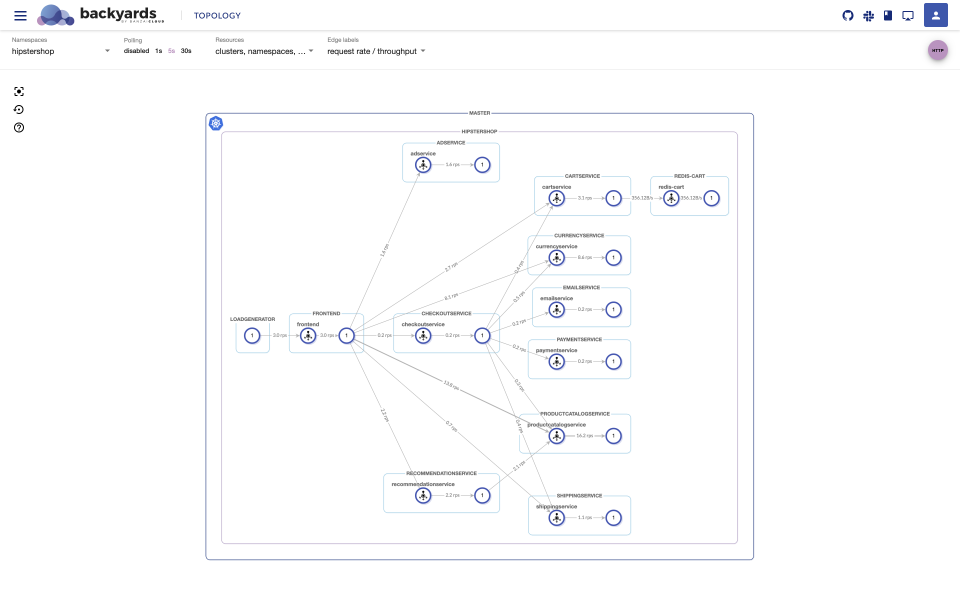
Host, port and TLS configurations 🔗︎
-
Apply the following MeshGateway resource to create a separate Istio ingressgateway for our HipsterShop application (this will be the API gateway we configure for our app).
apiVersion: istio.banzaicloud.io/v1beta1
kind: MeshGateway
metadata:
  name: hipstershop-ingress
  namespace: hipstershop
spec:
  maxReplicas: 1
  minReplicas: 1
  ports:
    - name: http
      port: 80
      protocol: TCP
      targetPort: 8080
    - name: https
      port: 443
      protocol: TCP
      targetPort: 8443
  serviceType: LoadBalancer
  type: ingress
  labels:
    app: hipstershop-ingress
To read more on the MeshGateway resource and on how to setup multiple gateways with Backyards, see the Istio ingress and egress gateways blog post.
-
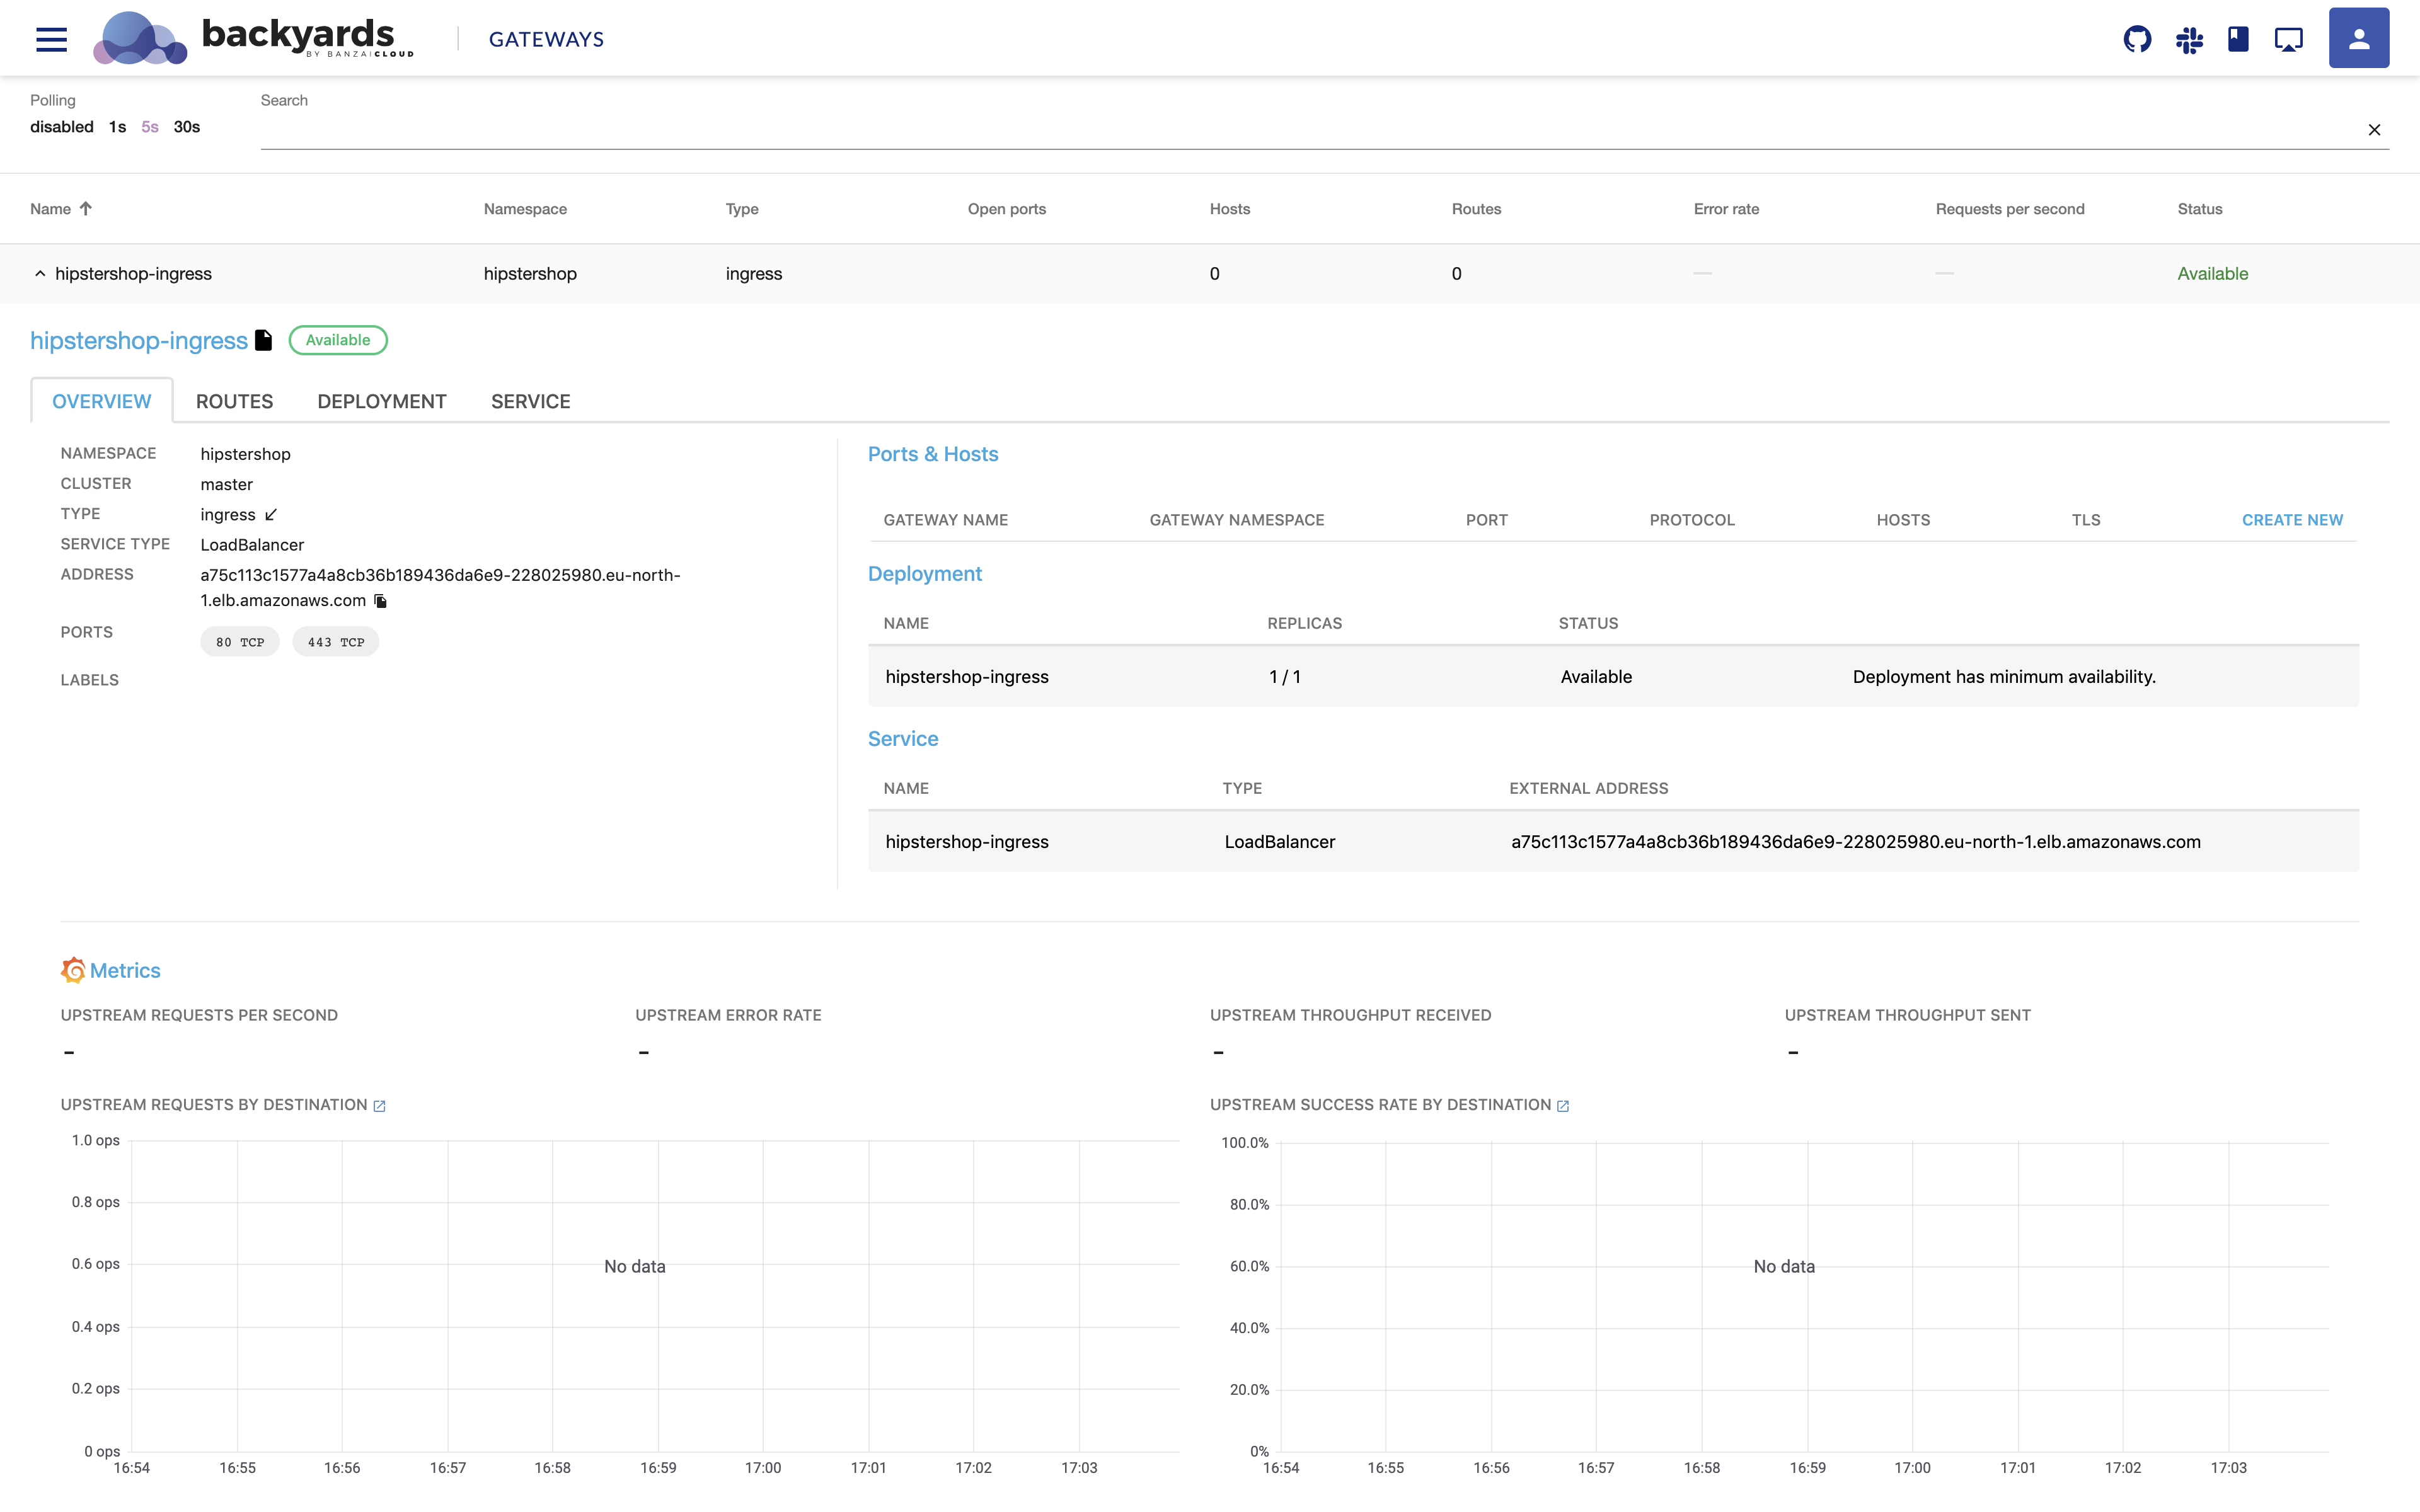
Navigate to the
GATEWAYSpage on the Backyards dashboard where you should see thehipstershop-ingressgateway we’ve just created.
-
Click on
CREATE NEWto create a host and port configuration where you’d like to access the app externally. With Backyards, you can simply generate a subdomain under.banzaicloud.ioand with a single click have a valid Let’s Encrypt certificate generated for it. Finally, click onCREATE: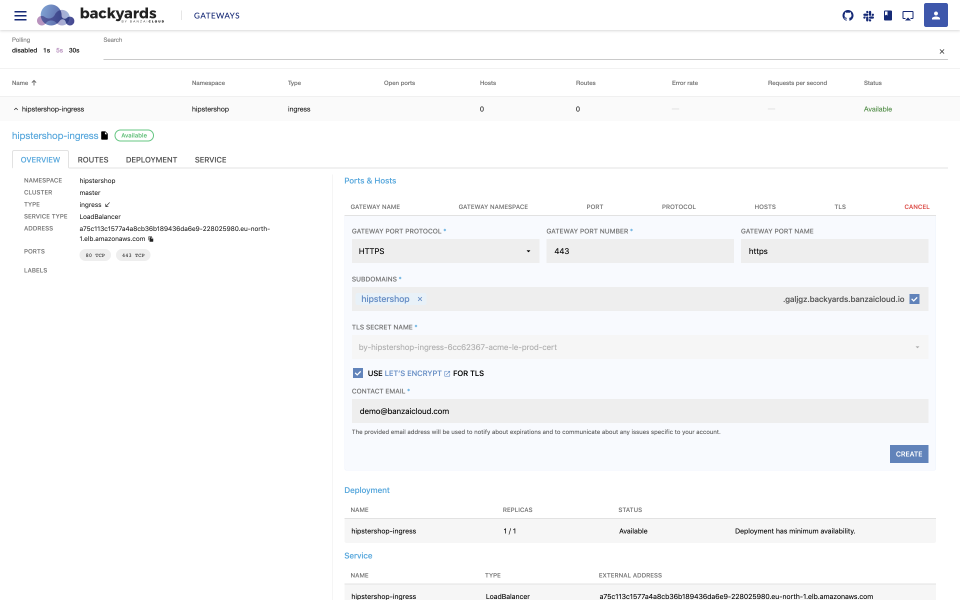

-
After a short while you should see a green checkmark indicating that the certificate has been issued and it is valid.


Routing configurations 🔗︎
-
Click on the
ROUTEStab and onCREATE NEW. Provide the host field you selected earlier and setup a route for thefrontendservice, then clickCREATE: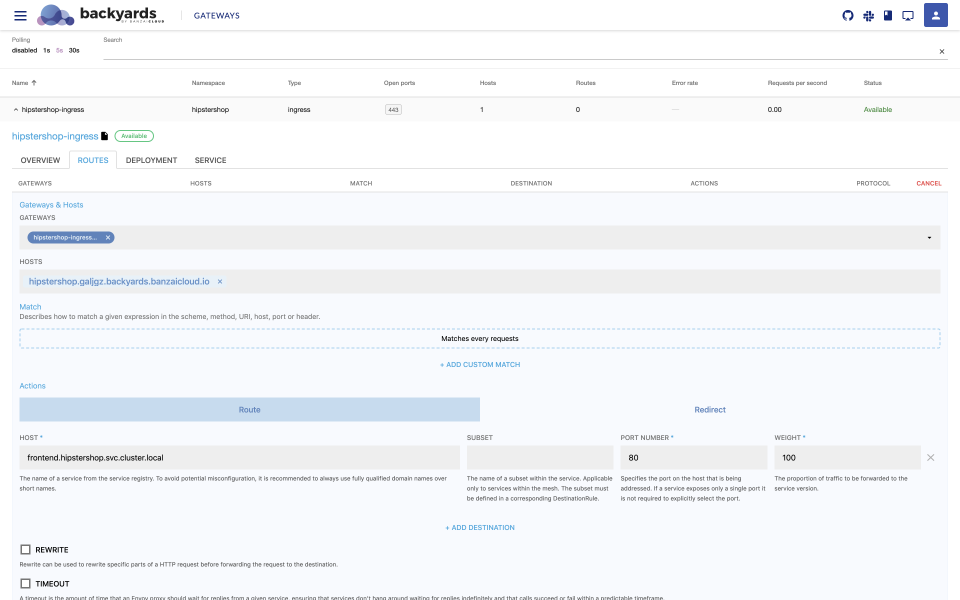
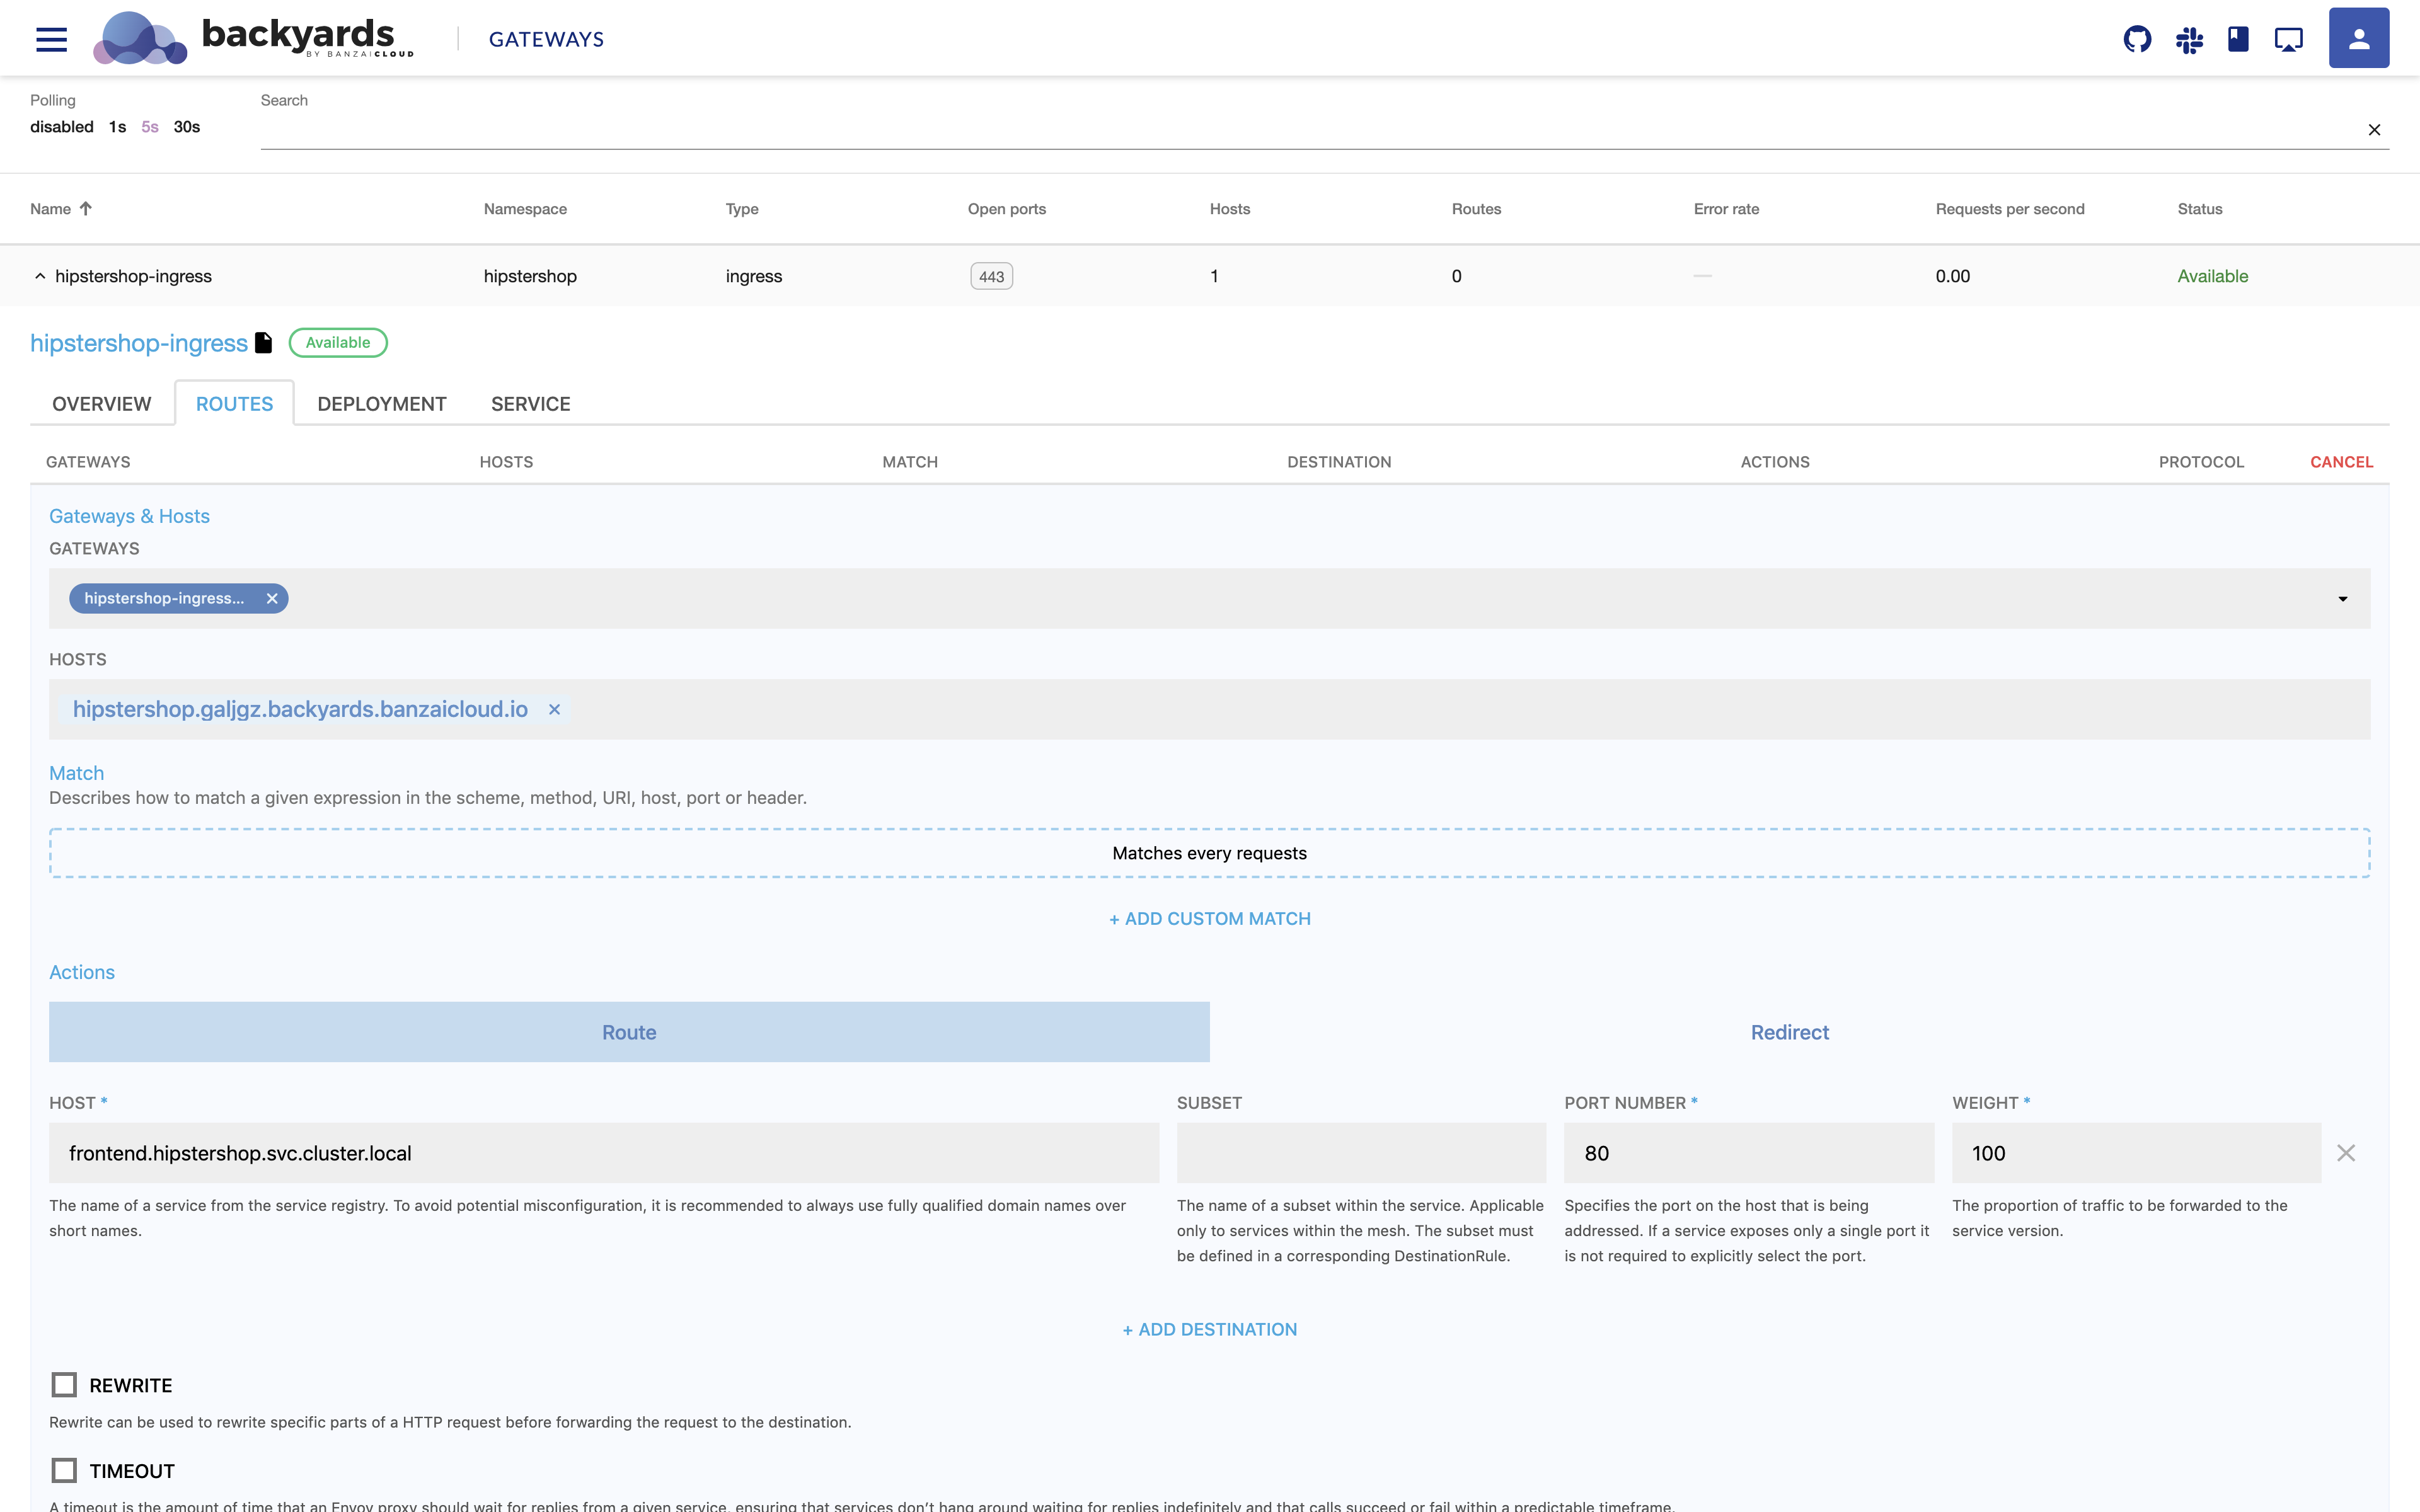
-
The routing rule should route all traffic to the
frontendservice when accessing the specified domain name:

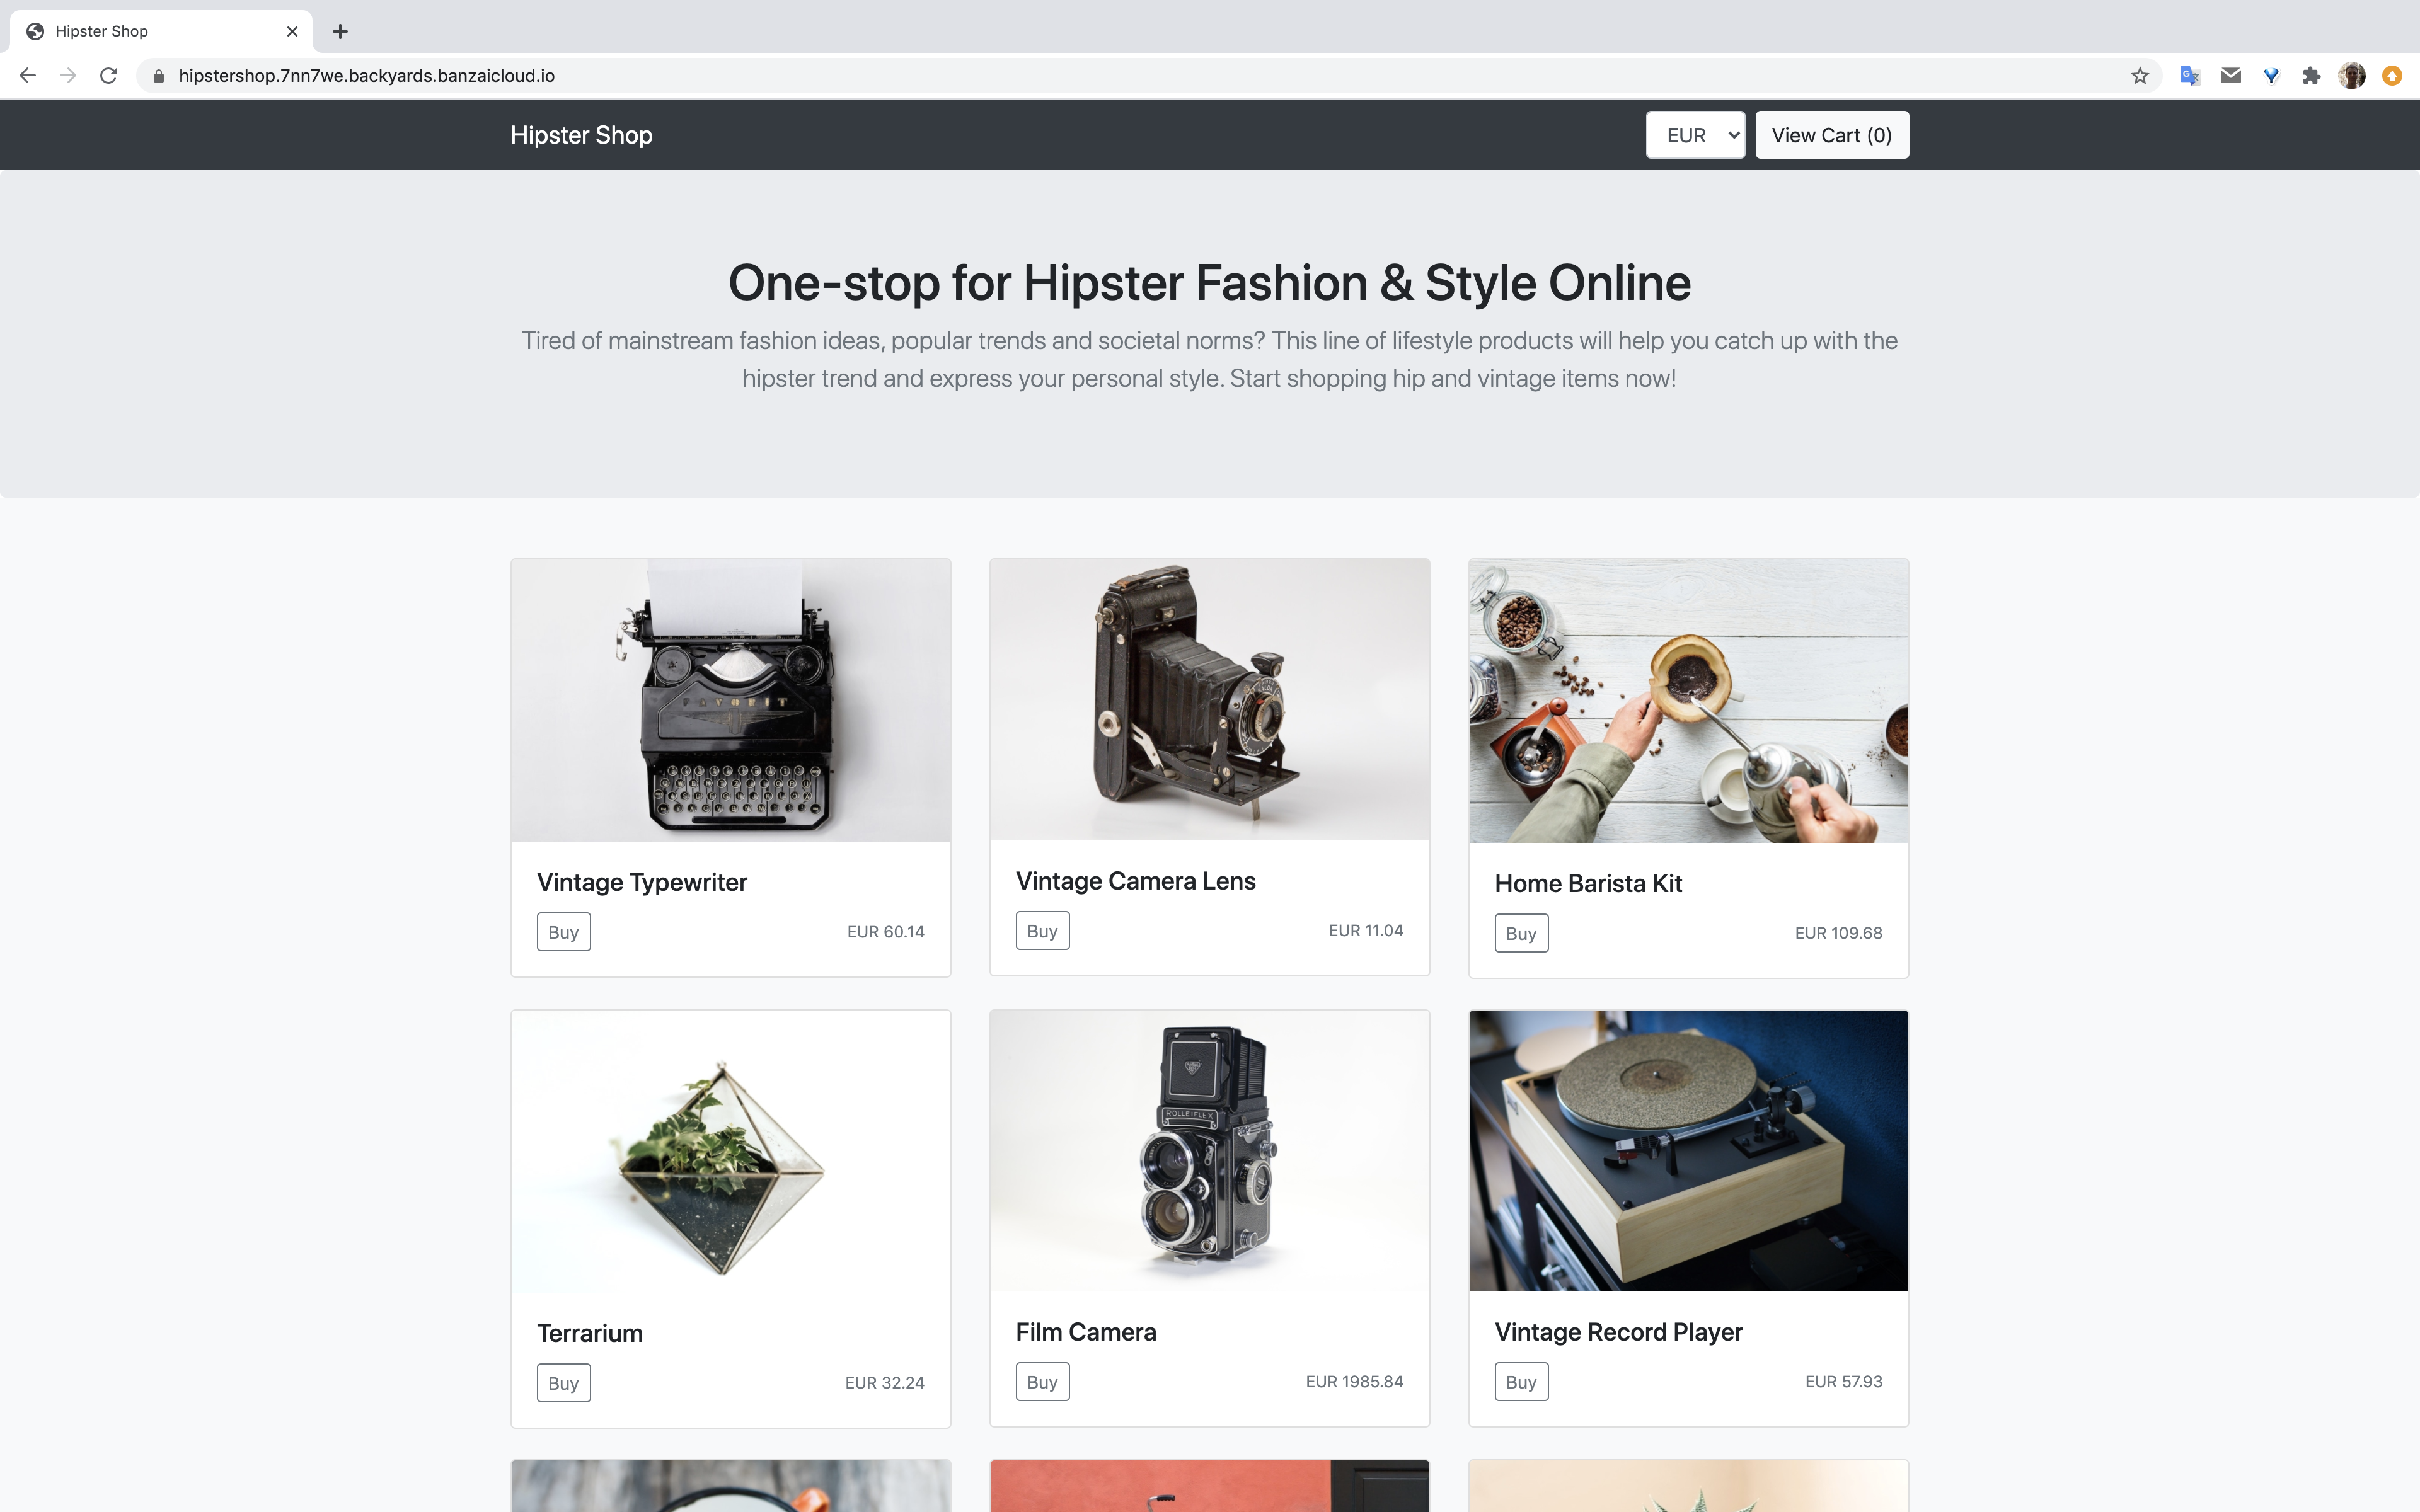
-
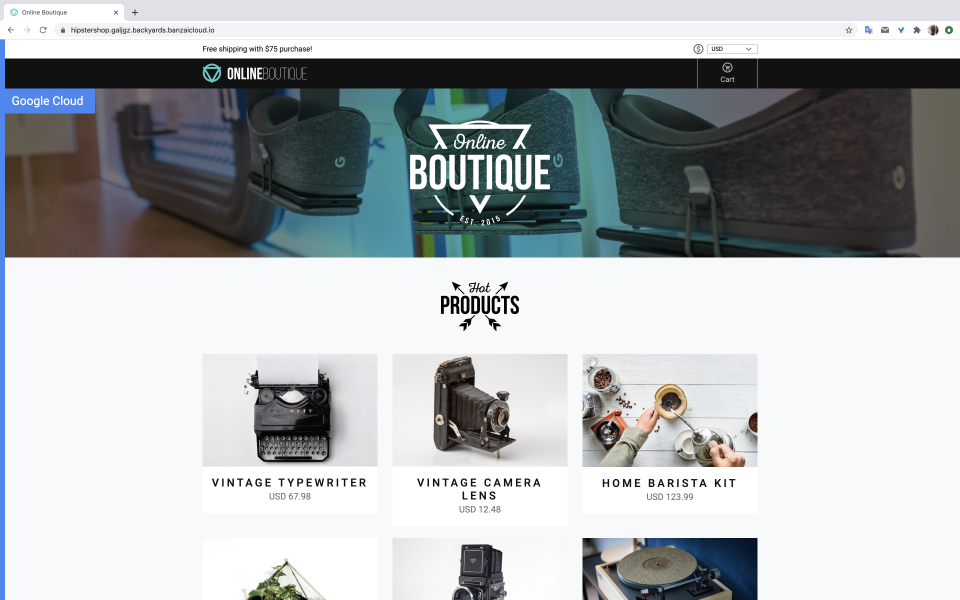
Open the chosen url in a browser with https:// and check to makes sure the online shop app is accessible and a valid certificate has been issued:

-
Deploy a new version of the
frontendservice (frontendv2) so that we can route traffic for that version as well:apiVersion: apps/v1 kind: Deployment metadata: name: frontendv2 spec: selector: matchLabels: app: frontendv2 template: metadata: labels: app: frontendv2 annotations: sidecar.istio.io/rewriteAppHTTPProbers: "true" spec: containers: - name: server image: gcr.io/google-samples/microservices-demo/frontend:v0.1.5 ports: - containerPort: 8080 readinessProbe: initialDelaySeconds: 10 httpGet: path: "/_healthz" port: 8080 httpHeaders: - name: "Cookie" value: "shop_session-id=x-readiness-probe" livenessProbe: initialDelaySeconds: 10 httpGet: path: "/_healthz" port: 8080 httpHeaders: - name: "Cookie" value: "shop_session-id=x-liveness-probe" env: - name: PORT value: "8080" - name: PRODUCT_CATALOG_SERVICE_ADDR value: "productcatalogservice:3550" - name: CURRENCY_SERVICE_ADDR value: "currencyservice:7000" - name: CART_SERVICE_ADDR value: "cartservice:7070" - name: RECOMMENDATION_SERVICE_ADDR value: "recommendationservice:8080" - name: SHIPPING_SERVICE_ADDR value: "shippingservice:50051" - name: CHECKOUT_SERVICE_ADDR value: "checkoutservice:5050" - name: AD_SERVICE_ADDR value: "adservice:9555" - name: ENV_PLATFORM value: "gcp" resources: requests: cpu: 100m memory: 64Mi limits: cpu: 200m memory: 128Mi --- apiVersion: v1 kind: Service metadata: name: frontendv2 spec: type: ClusterIP selector: app: frontendv2 ports: - name: http port: 80 targetPort: 8080 -
Set it so that 50% of the requests go to the original
frontendservice and the other 50% go to thefrontendv2service: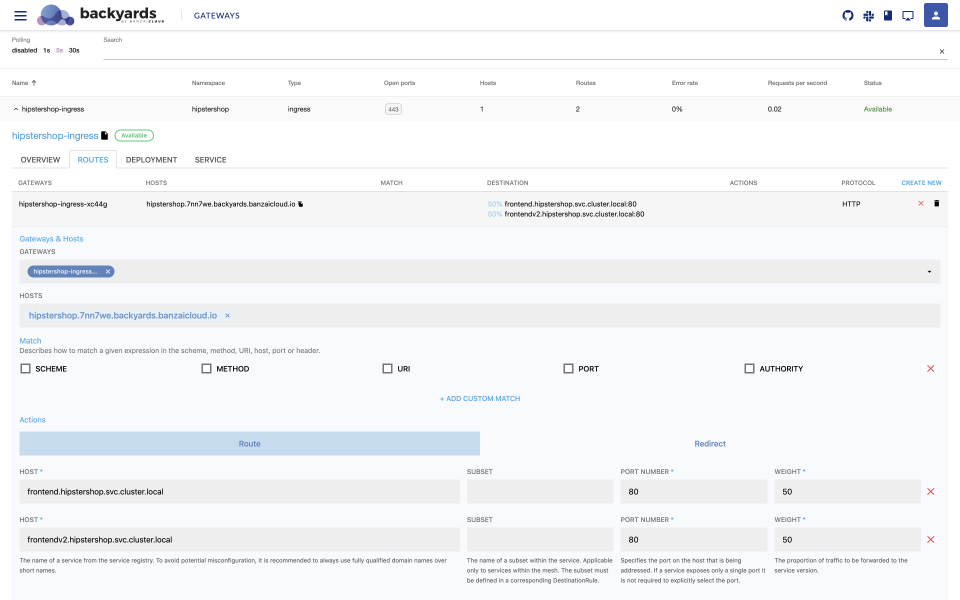

-
Check the browser again and, if you refresh a few times, you’ll see a new front page every second refresh on average:

-
Finally, create a rule where the main page on route “/” is always routed to the new
frontendv2service, but all the other pages use the originalfrontendservice:

Monitoring 🔗︎
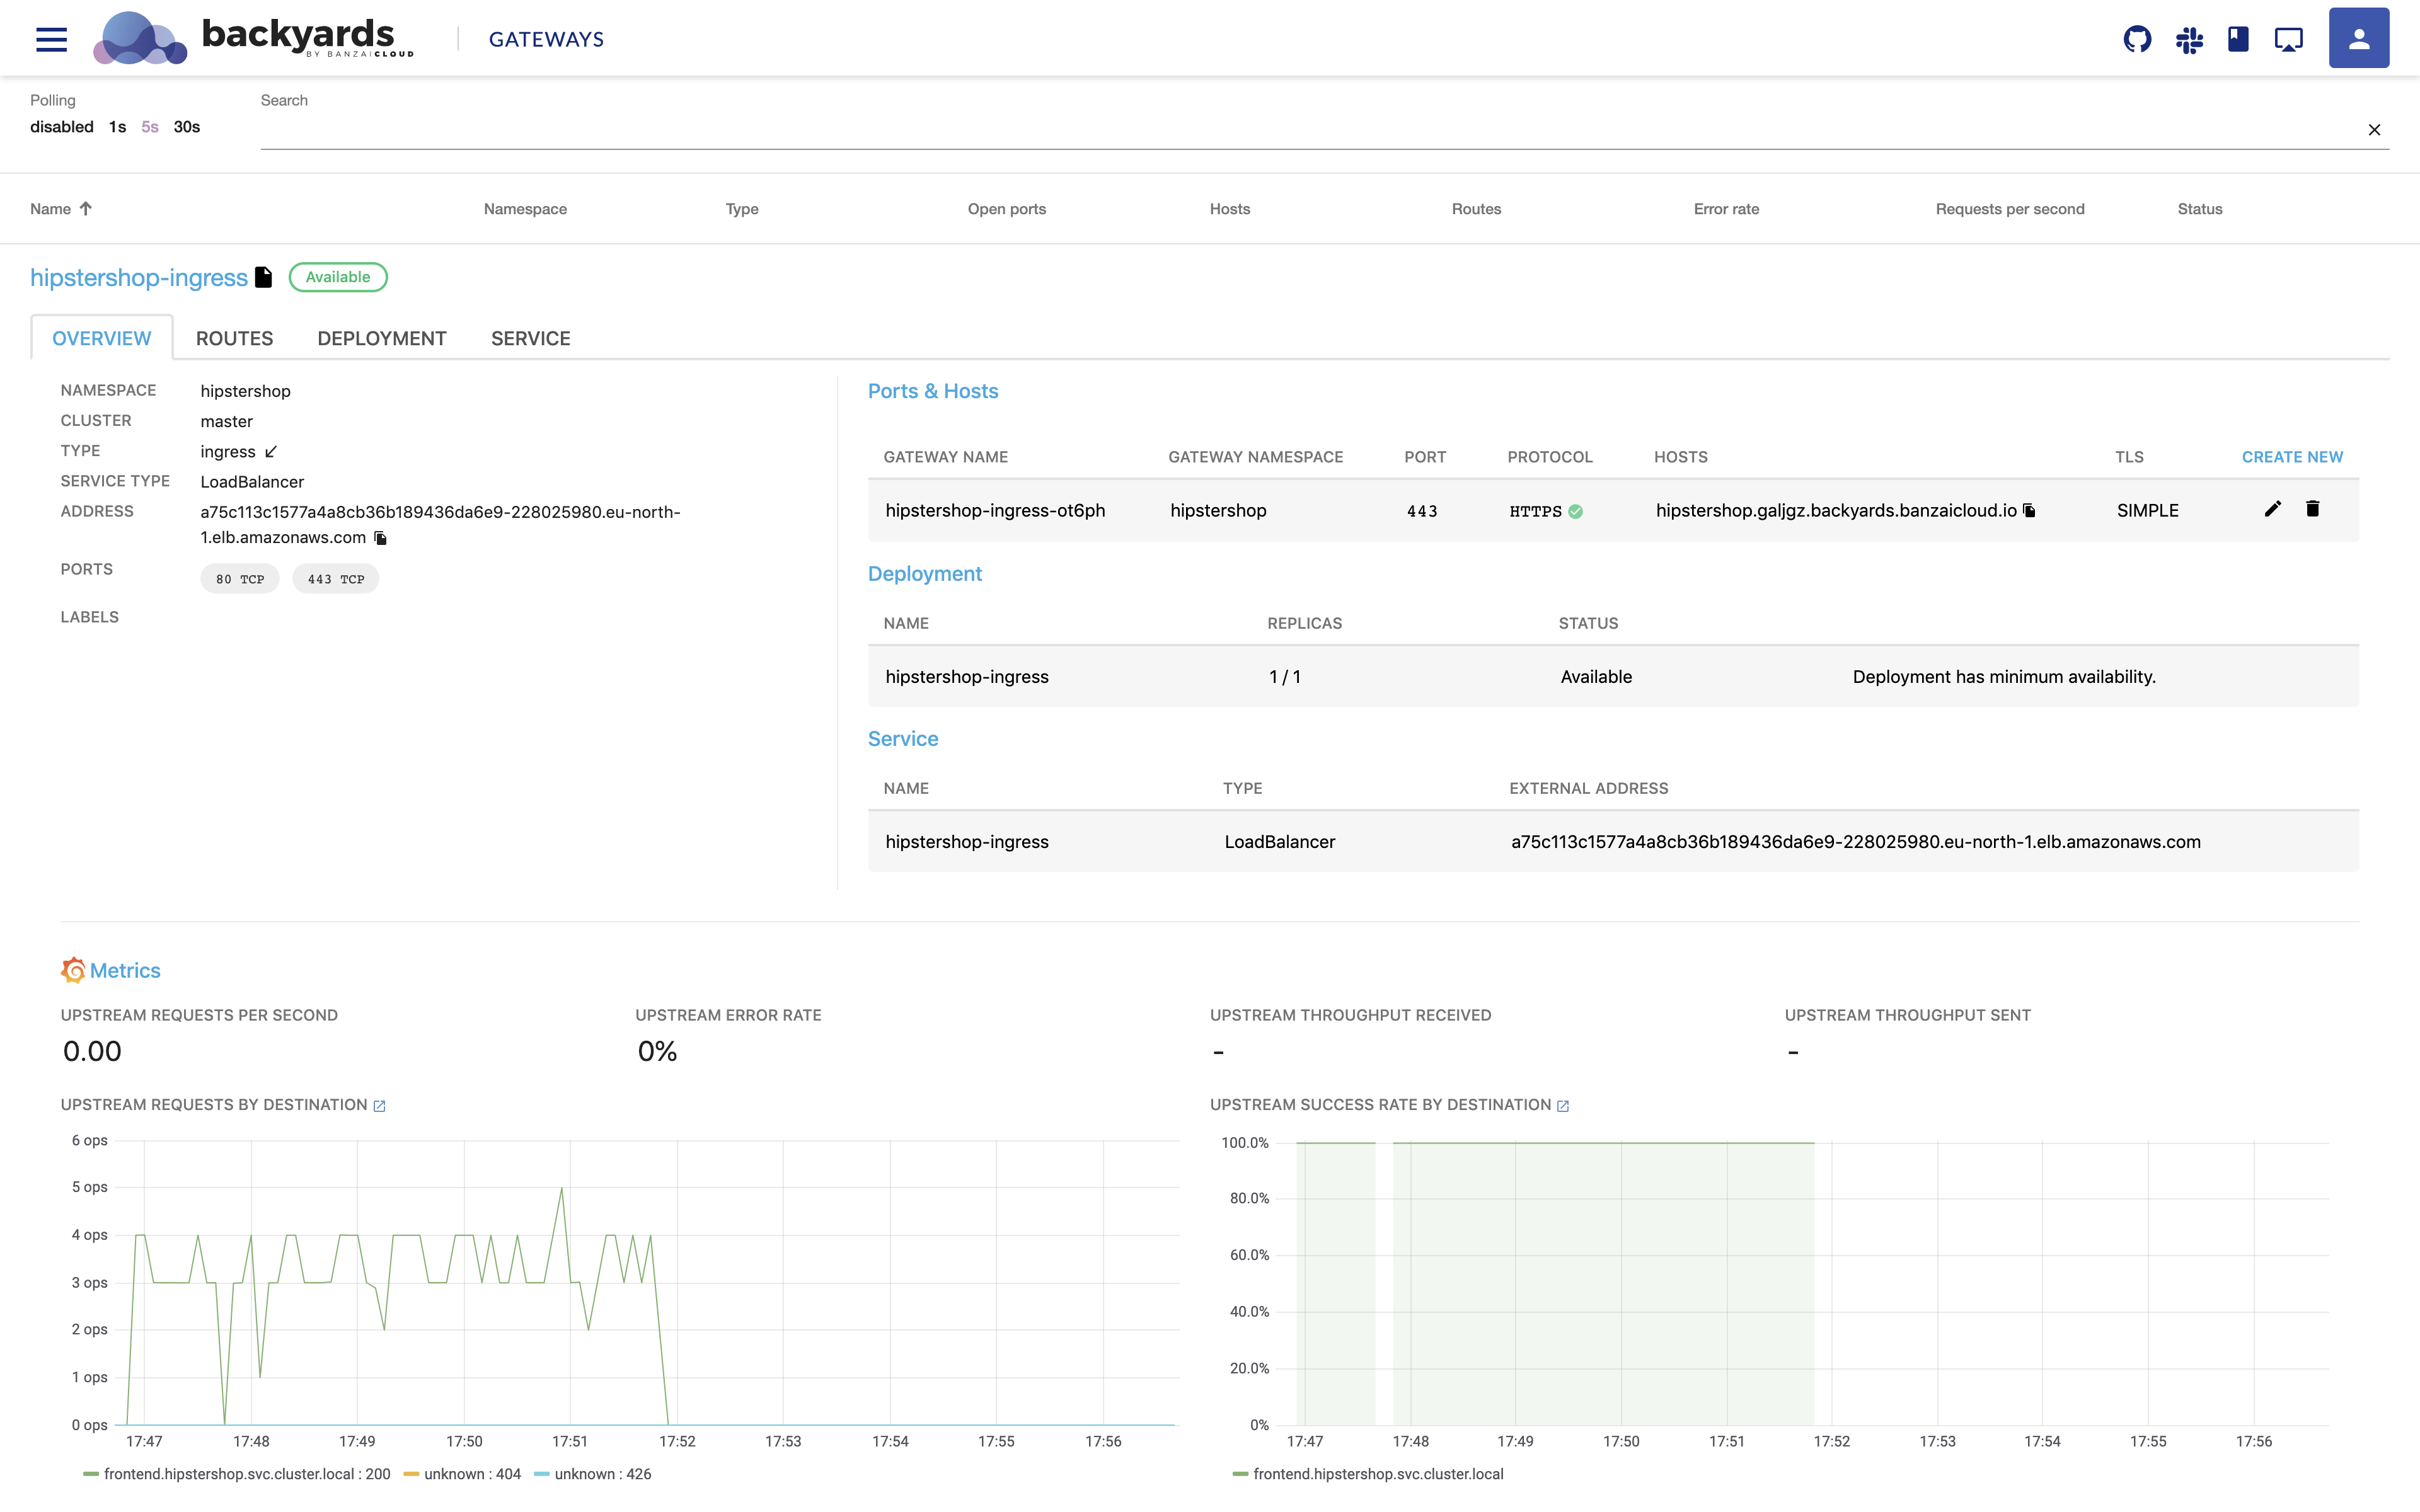
-
With live dashboards you can see where the requests are routed and how they respond based on your gateway configurations, in the Backyards UI:

Cleanup 🔗︎
To remove the demo application and Backyards from your cluster, run the following command, which removes all of these components:
kubectl delete ns hipstershop
backyards uninstall -a
Takeaway 🔗︎
Istio’s ingress gateway is a perfectly reasonable API gateway implementation to use based on feature set, but its configuration and maintenance are complex, which may not suit the needs of many users. Backyards (now Cisco Service Mesh Manager) increases productivity when working with Istio gateways by combining Istio’s strong feature set with an API Gateway’s user experience.
Check out Backyards in action on your own clusters!
Want to know more? Get in touch with us, or delve into the details of the latest release.
Or just take a look at some of the Istio features that Backyards automates and simplifies for you, and which we’ve already blogged about.