


One of the challenges we repeatedly faced when using microservices-based solutions was how best to properly secure communication between participating services. One option was to manage security at the application layer, which meant implementing specific authentication mechanisms in the application code itself. This approach, however, would quickly become burdensome, eating up time for developers, who should be concentrating on implementing actual business logic.
Wouldn’t it be awesome, we thought, if developers never had to worry about implementing authentication mechanisms in their application code, and, instead, there was a magical solution that would provide secure communication between their services?
This is where service meshes, and where Istio specifically, come into the picture. Istio has been rightfully praised for ushering in secure service to service communication without the need for any application code change.
In this post, you’ll learn how Istio uses mutual Transport Layer Security (TLS) to secure communication between services, how you can fine-tune these configurations for more advanced use-cases, and how Backyards (now Cisco Service Mesh Manager) can ease this process.
Mutual TLS in Istio 🔗︎
Istio offers mutual TLS as a solution for service-to-service authentication.
Istio uses the sidecar pattern, meaning that each application container has a sidecar Envoy proxy container running beside it in the same pod.
- When a service receives or sends network traffic, the traffic always goes through the Envoy proxies first.
- When mTLS is enabled between two services, the client side and server side Envoy proxies verify each other’s identities before sending requests.
- If the verification is successful, then the client-side proxy encrypts the traffic, and sends it to the server-side proxy.
- The server-side proxy decrypts the traffic and forwards it locally to the actual destination service.

Now, how is it that we can verify that the traffic sent between services is actually encrypted?
- One way is to check the
Connection Security Policymetric label. Istio sets this label tomutual_tlsif the request has actually been encrypted. - If you are using Backyards (now Cisco Service Mesh Manager), it’s even easier than that. Keep reading to find out why.
Managing mTLS with Istio 🔗︎
Mutual TLS settings in Istio can be configured using Authentication Policies, which apply to requests that a service receives.
If it weren’t for the auto mTLS feature, we would have to define Destination Rules for the target services, but in this guide we’ll be relying on the auto mTLS feature and introducing the necessary configurations whenever it’s turned on.
Scopes 🔗︎
In Istio, there are three levels of granularity through which we can define our mTLS settings. For each service, Istio applies the narrowest matching policy. The order is: service-specific, namespace-wide, mesh-wide.
Mesh-wide 🔗︎
The mesh-wide setting affects all services in the mesh. The following MeshPolicy sets the mTLS mode of all services to PERMISSIVE.
apiVersion: authentication.istio.io/v1alpha1
kind: MeshPolicy
metadata:
  name: default
spec:
  peers:
  - mtls:
      mode: PERMISSIVE
Note: There can only be one, mesh-wide
MeshPolicydefined in a cluster, and it must be nameddefault.
Namespace-wide 🔗︎
The namespace-wide policy applies to all the services in a given namespace. The following Policy sets the mTLS mode of services in the backyards-demo namespace to STRICT.
apiVersion: "authentication.istio.io/v1alpha1"
kind: Policy
metadata:
  name: default
  namespace: backyards-demo
spec:
  peers:
  - mtls:
      mode: STRICT
The namespace-wide policy has higher precedence than the mesh-wide policy, so it overrides any previously defined MeshPolicy for the backyards-demo namespace.
Note: There can only be one namespace-wide
Policydefined in each namespace, and it must be nameddefault.
Service-specific 🔗︎
The service-specific policy applies to a given service, or to a specific port of a service. The following Policy sets the mTLS mode of the bookings service in the backyards-demo namespace to PERMISSIVE.
apiVersion: "authentication.istio.io/v1alpha1"
kind: Policy
metadata:
  name: bookings
  namespace: backyards-demo
spec:
  targets:
  - name: bookings
  peers:
  - mtls:
      mode: PERMISSIVE
The service-specific policy has higher precedence than the mesh-wide and namespace-wide policies, so it overrides the previously defined mTLS settings for the bookings service.
Note: Do not define multiple service-specific
Policiesfor the same service. That will result in inconsistent behavior in Istio.
mTLS Modes in Istio 🔗︎
There are three mTLS modes you can use: STRICT, PERMISSIVE and DISABLED.
STRICT mode 🔗︎
In this mode, the service can only accept encrypted traffic. You can enforce this setting by the following forms in the Policy yaml:
  - mtls:
      mode: STRICT
or
- mtls: {}
The empty brackets also mean STRICT mode, because that is the default mTLS setting in Istio.
PERMISSIVE mode 🔗︎
In this mode, the service can accept both encrypted and plain-text traffic. You can set mTLS to PERMISSIVE via the form below inside the Policy yaml:
  - mtls:
      mode: PERMISSIVE
The PERMISSIVE mode is particularly useful when migrating to Istio, when there are still services that are not in the mesh and therefore do not have an Envoy sidecar. With the PERMISSIVE setting, these out-of-mesh services can also communicate with the services that are already in the mesh, aiding the Istio migration process.
DISABLED mode 🔗︎
There is less documentation on the DISABLED mode; it explicitly disallows encrypted traffic, and allows only plain-text traffic to a service.
Enabling this mode in Istio is not a straightforward process, as there is no DISABLED keyword that can be set. But you can enable this mode by omitting the peers section from the manifest:
apiVersion: authentication.istio.io/v1alpha1
kind: Policy
metadata:
  name: bookings
  namespace: backyards-demo
spec:
  targets:
  - name: bookings
You may want to set mTLS to this mode when using a custom TLS authentication mechanism that is implemented in the application layer.
If there is no Policy defined for a service, then Istio applies the namespace-wide or the mesh-wide policy to the service; not defining a service-specific Policy is not always the same as explicitly setting a service-specific Policy to
DISABLED!
mTLS modes in practice 🔗︎
At this point, you can set any service to any mTLS mode in Istio. But let’s take a look at what happens in each mode, when a service is called from in mesh or out of mesh?
In mesh means that a sidecar proxy is running next to the application container. Out of mesh means that there is no sidecar container.
Let’s sum this up in a handy table:
| from in mesh | from out of mesh | |
|---|---|---|
| PERMISSIVE | lock | lock_open |
| STRICT | lock | clear |
| DISABLED | lock_open | lock_open |
PERMISSIVEmTLS policy: uses mTLS within the mesh, and plain-text connections outside the meshSTRICTmTLS policy: uses mTLS within the mesh, but refuses connections from outside the meshDISABLEDmTLS policy: uses plain-text connections both in and out of the mesh
For a more in-depth explanation, read our Automatic mutual TLS in Istio blog post.
Difficulties with mTLS 🔗︎
Securing communication between services with mutual TLS is one of the most advertised and widely used features of Istio, as it claims to work out-of-the-box, without any code changes. However, a very common criticism lobbed against Istio, in general, is that the complexity and domain knowledge required to operate a mesh is too high.
This might also be a valid point about working with mTLS. When you have a simple application like the BookInfo app and you turn on the default mesh-wide mTLS policy, it works like a charm out-of-the-box. However, if your application is a bit more complex, or your architecture needs more fine-grained control of mTLS, then mTLS’ settings become very prone to error. In such cases, it is easy to misconfigure the mesh when lacking the necessary domain knowledge.
Without going into any details here, let me just list a few cases wherein mTLS misconfigurations can easily occur with Istio:
- statefulsets, headless services
- using non-HTTP protocols, for example, simple database TCP connections
- multi-cluster scenarios
- services with their own authentication mechanisms
- and so on
If you’ve worked with Istio and had a misconfiguration, you have probably already seen the following error: upstream connect error or disconnect/reset before headers 503 error.
This is where the debug sessions start (and lasts for who knows how long).
In a future post, we might write about some of our exotic mTLS-related war stories we’ve run into when working with our customers.
Returning to the subject at hand, over successive Istio releases the mTLS feature has become increasingly stable, and in version 1.4 the auto mTLS feature brought some much needed convenience to users.
What Istio users really want - reliable mTLS management 🔗︎
For us at Banzai Cloud, security comes first. It always has been, and always will be, our top priority. We supported setting the mesh-wide mTLS policy in our open-source Istio operator from day 0. And we pay special attention to security in Backyards (now Cisco Service Mesh Manager), our service-mesh product based on Istio.
Backyards (now Cisco Service Mesh Manager) has already helped our customers to successfully manage production-ready Istio meshes without having acquired expert-level Istio knowledge. We have found that our customers want to:
- Understand, supervise, and control the mTLS settings between their services,
- and to do this in a way that is more seamless than the one Istio currently provides.
- Properly handle edge cases, without facing Istio’s complexity, or having to pick up the domain knowledge necessary to do so. And more importantly, they want to
- avoid the error-prone manual YAML editing process.
So starting with Backyards 1.1, you can conveniently view and control the mTLS settings of your services, mesh-wide, namespace-wide, and on the service-specific level.
Mutual TLS in Backyards (now Cisco Service Mesh Manager) 🔗︎
In Backyards (now Cisco Service Mesh Manager), you can view and edit all service policies by using an intuitive UI, without the need of modifying any YAML files by hand. (Alternatively, you can also use a CLI tool.)
Because of the precedence order of policies, knowing which Policy applies to a given service is not always straightforward. You often need to search through multiple YAML files to find the actual mTLS setting of a given service. This is no longer the case with Backyards, as it returns the mTLS policies of services in its UI or CLI.
Backyards enables the auto mTLS feature by default, thus avoids a lot of potential misconfigurations that may arise from Destination Rules.
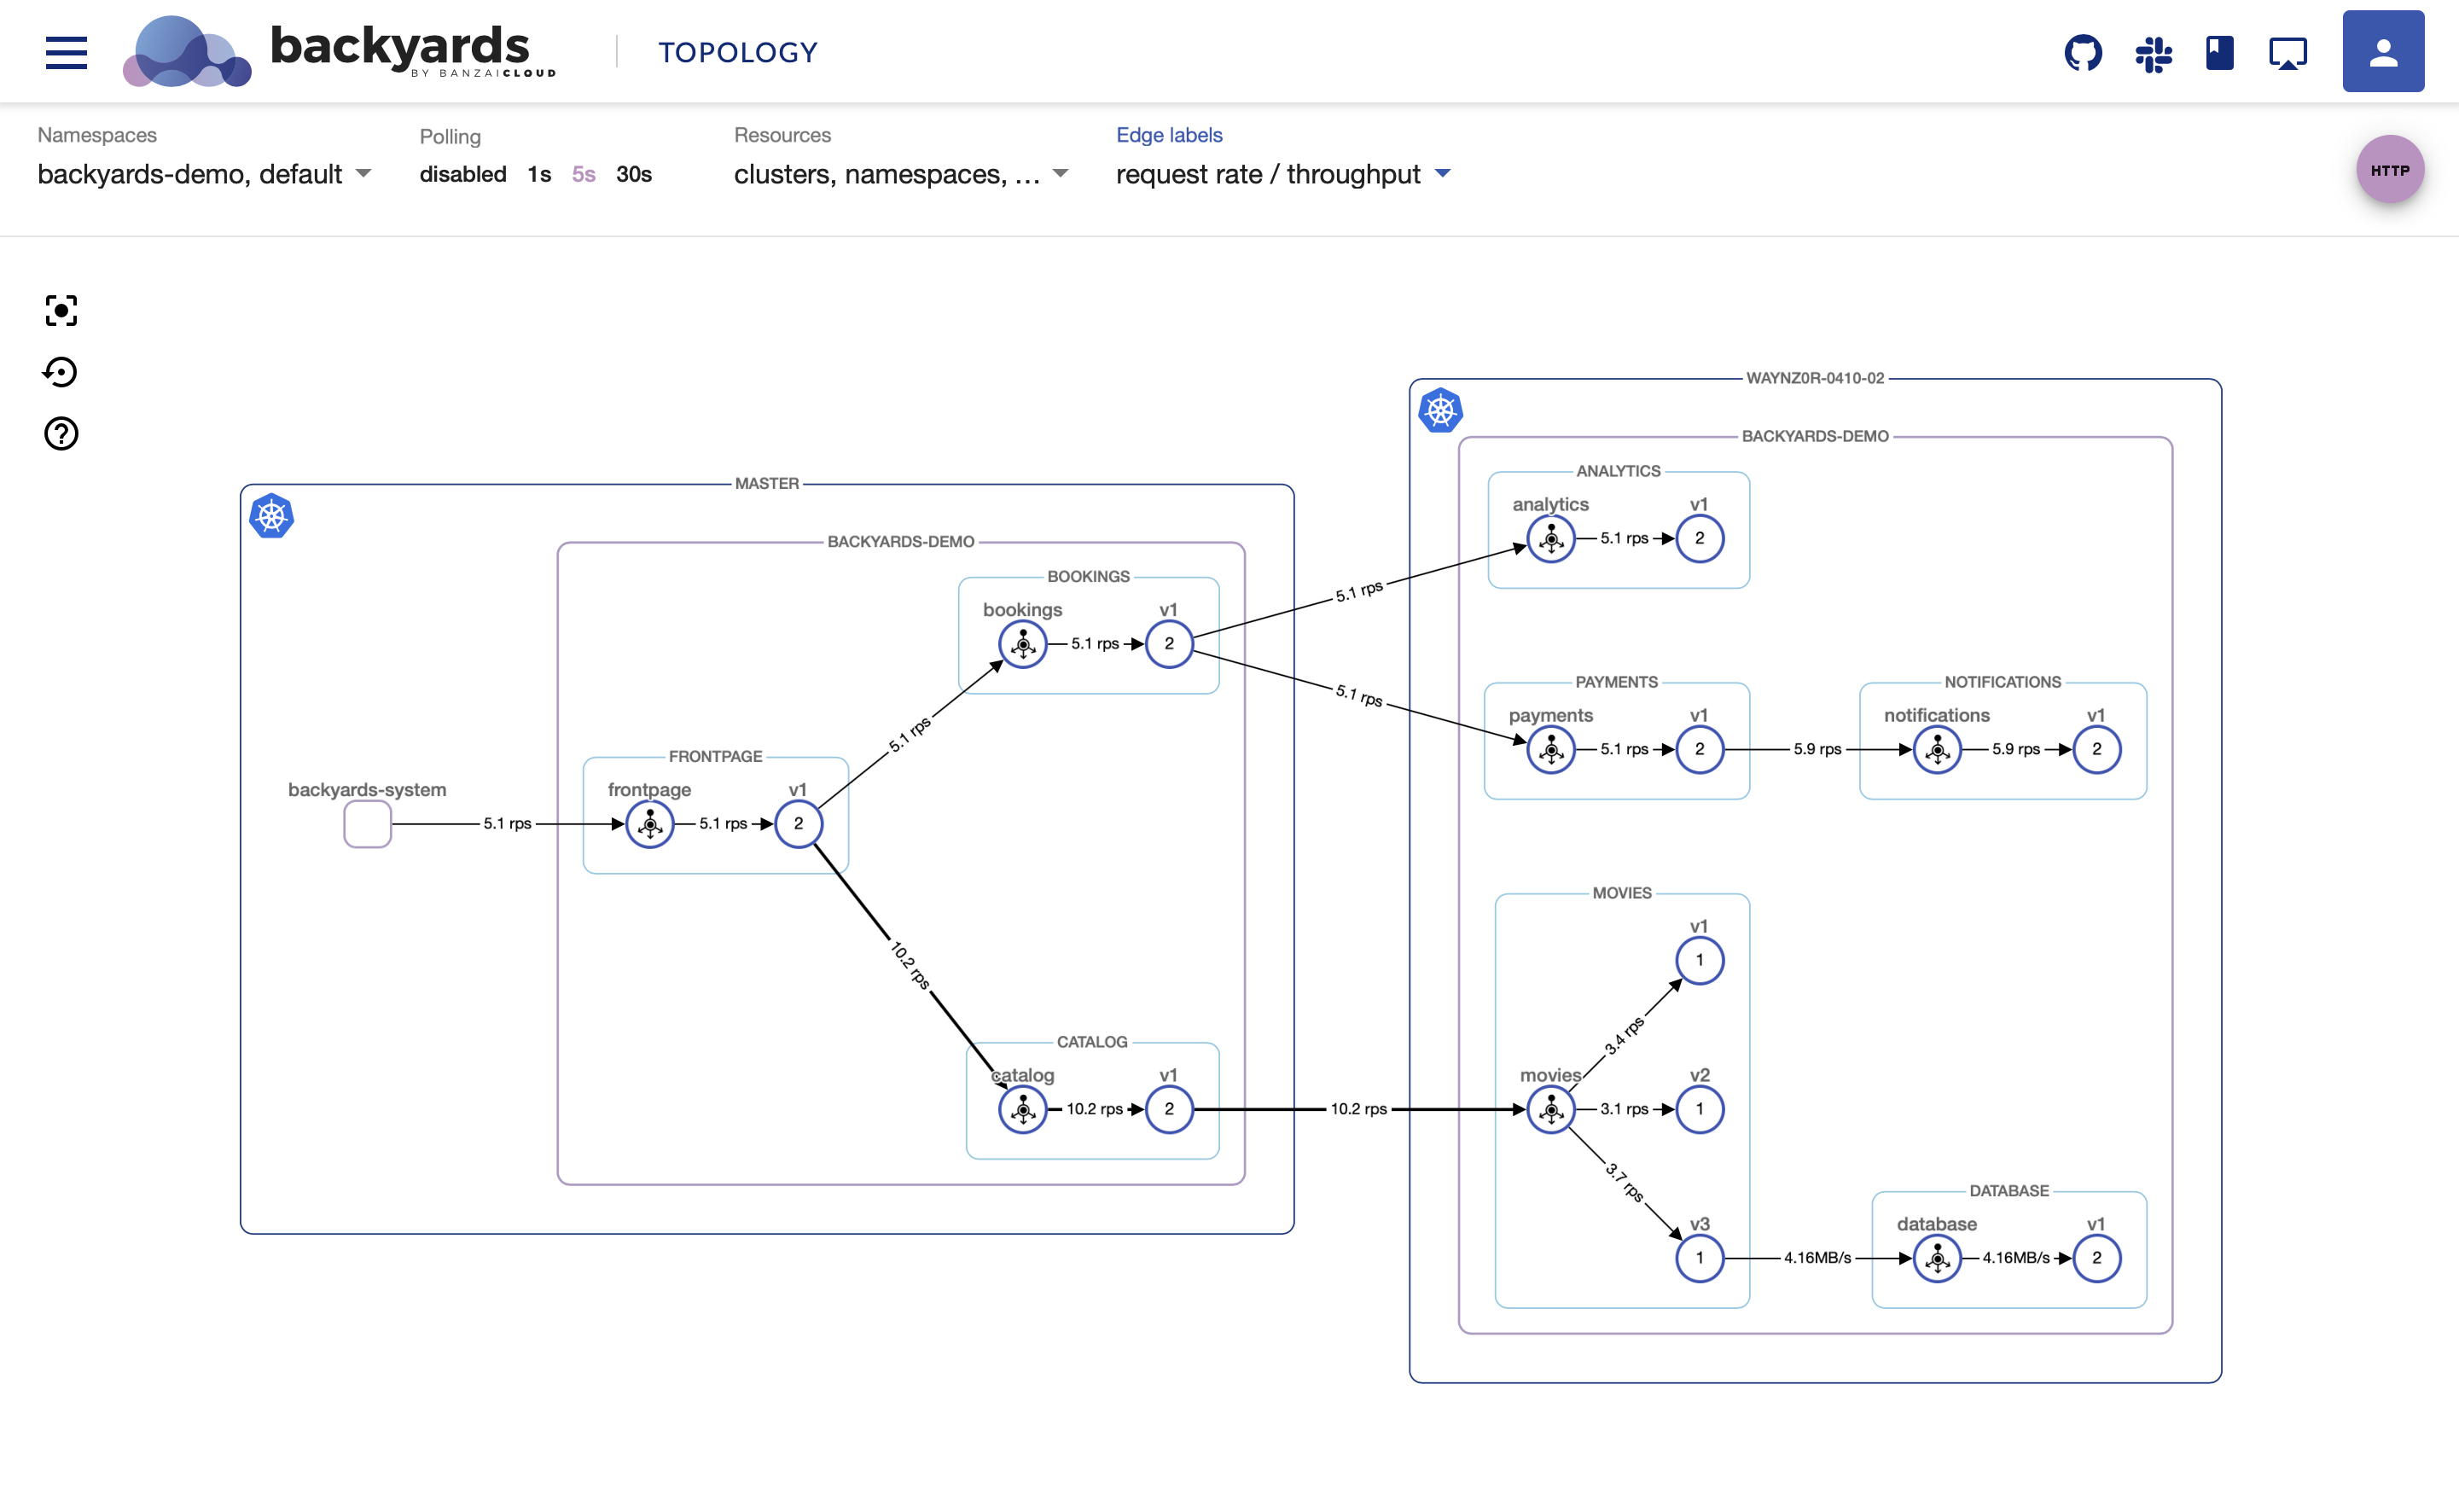
On the UI, you can easily verify whether the traffic between your services is actually encrypted or not by glancing at the security edge labels.
Behind the scenes, Backyards checks the
Connection Security Policymetric label to show users this information.
Try it out! 🔗︎
The following procedure walks you through the process of:
- creating a cluster,
- installing Backyards (now Cisco Service Mesh Manager),
- creating a service mesh for the cluster, and
- testing all the different mTLS settings on the service mesh (using the Backyards UI or the command line).
You can test all this for yourself in less than 15 minutes, which includes the time it takes to install Istio.
Create a cluster 🔗︎
To test Backyards, you’ll need a Kubernetes cluster.
I created a Kubernetes cluster on AWS, using Banzai Cloud’s lightweight, CNCF-certified Kubernetes distribution, PKE via the Banzai Cloud Pipeline platform. If you’d like to do likewise, create your clusters on any of the several cloud providers we support, or on-premises using the free version of Banzai Cloud’s Pipeline platform.
Install Backyards 🔗︎
The easiest way to install Istio and a demo application on a new cluster is to install Backyards (now Cisco Service Mesh Manager) by using the Backyards CLI.
-
Make sure that
KUBECONFIGis set for the cluster where you want to test Istio. -
Register for the free version and run the following command to install the CLI tool, then watch as Backyards starts a brand new production-ready Istio cluster in just a few minutes!
This command first installs Istio with the open-source Banzai Cloud Istio operator, then installs Backyards (now Cisco Service Mesh Manager) itself as well as a demo application. After the installation of each component has finished, the Backyards UI will automatically open and send some traffic to the demo application.
Changing Istio mTLS settings using the Backyards UI 🔗︎
You can change the mTLS settings of your Istio service mesh using the Backyard UI.
-
You can change the mesh-wide mTLS settings on the
Overviewpage: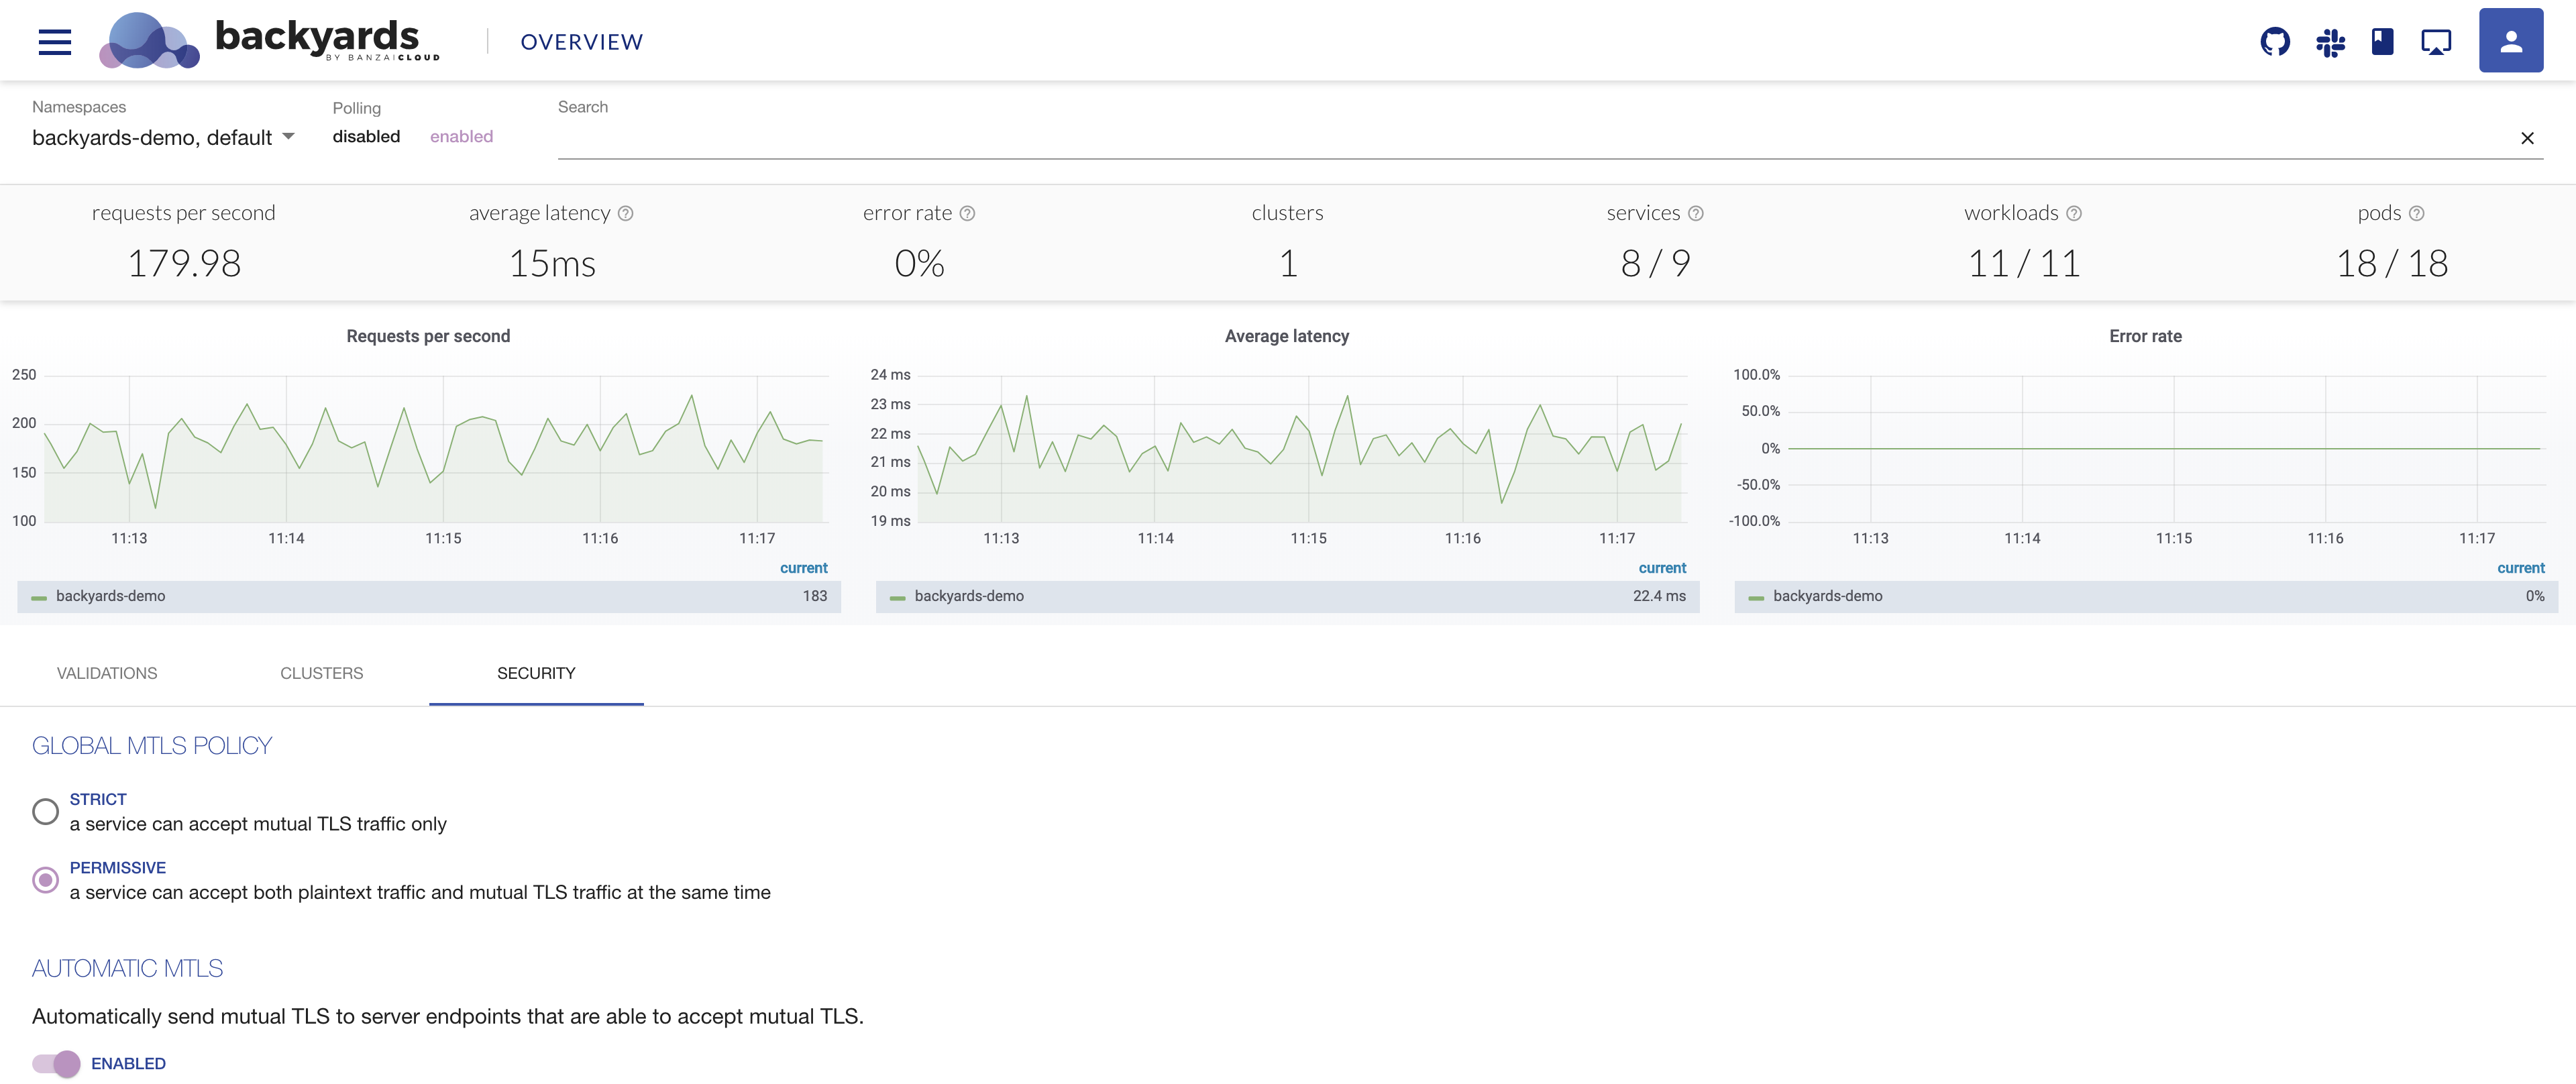
-
To create, edit, view, or remove namespace-wide and service-specific mTLS settings, open the
Detailspanel of the namespace or service, then click on theSecuritytab.
By default, there is no service-specific or namespace-wide Policy defined in Backyards, hence the mesh-wide
PERMISSIVEMeshPolicy will apply to thebookingsservice. -
Let’s set the
bookingsservice’s mTLS toDISABLED: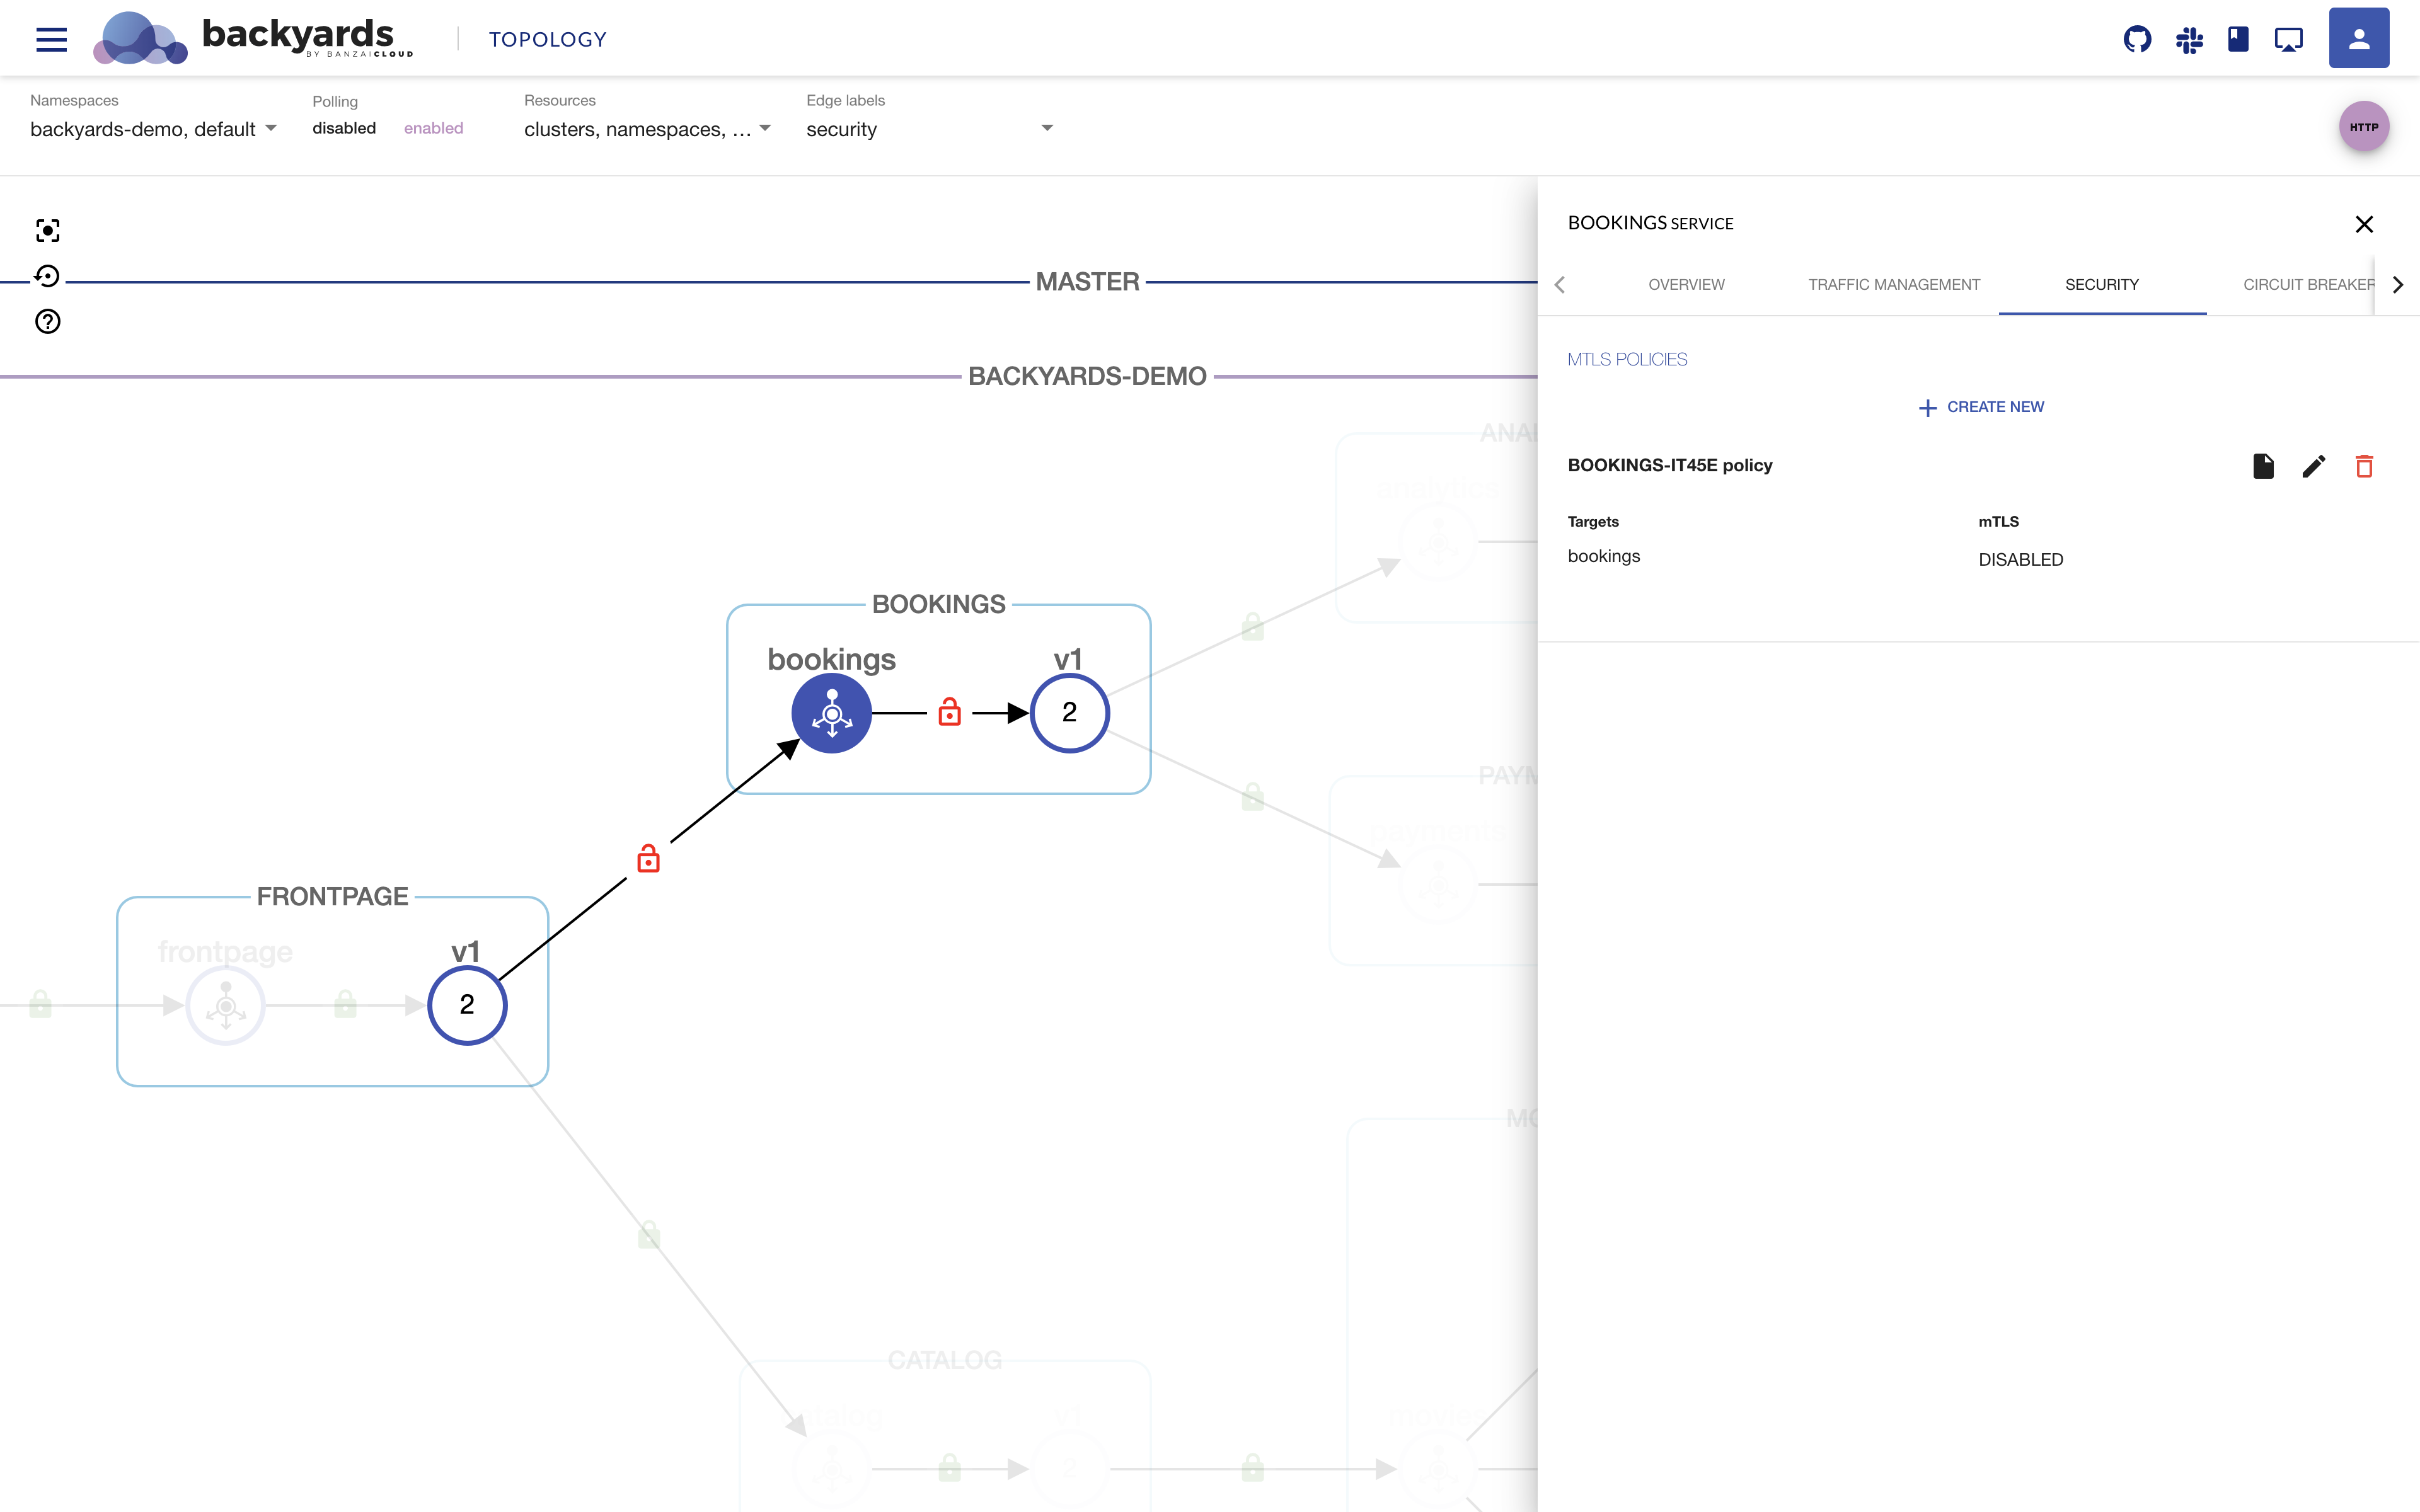
Now, when a load is sent to the demo application, red open locks (as opposed to green closed ones) will appear around the
bookingsservice in the UI, indicating that non-encrypted, plain-text data has been sent to it, as expected inDISABLEDmode. -
You can also display the YAML representation of the Policy in the UI:
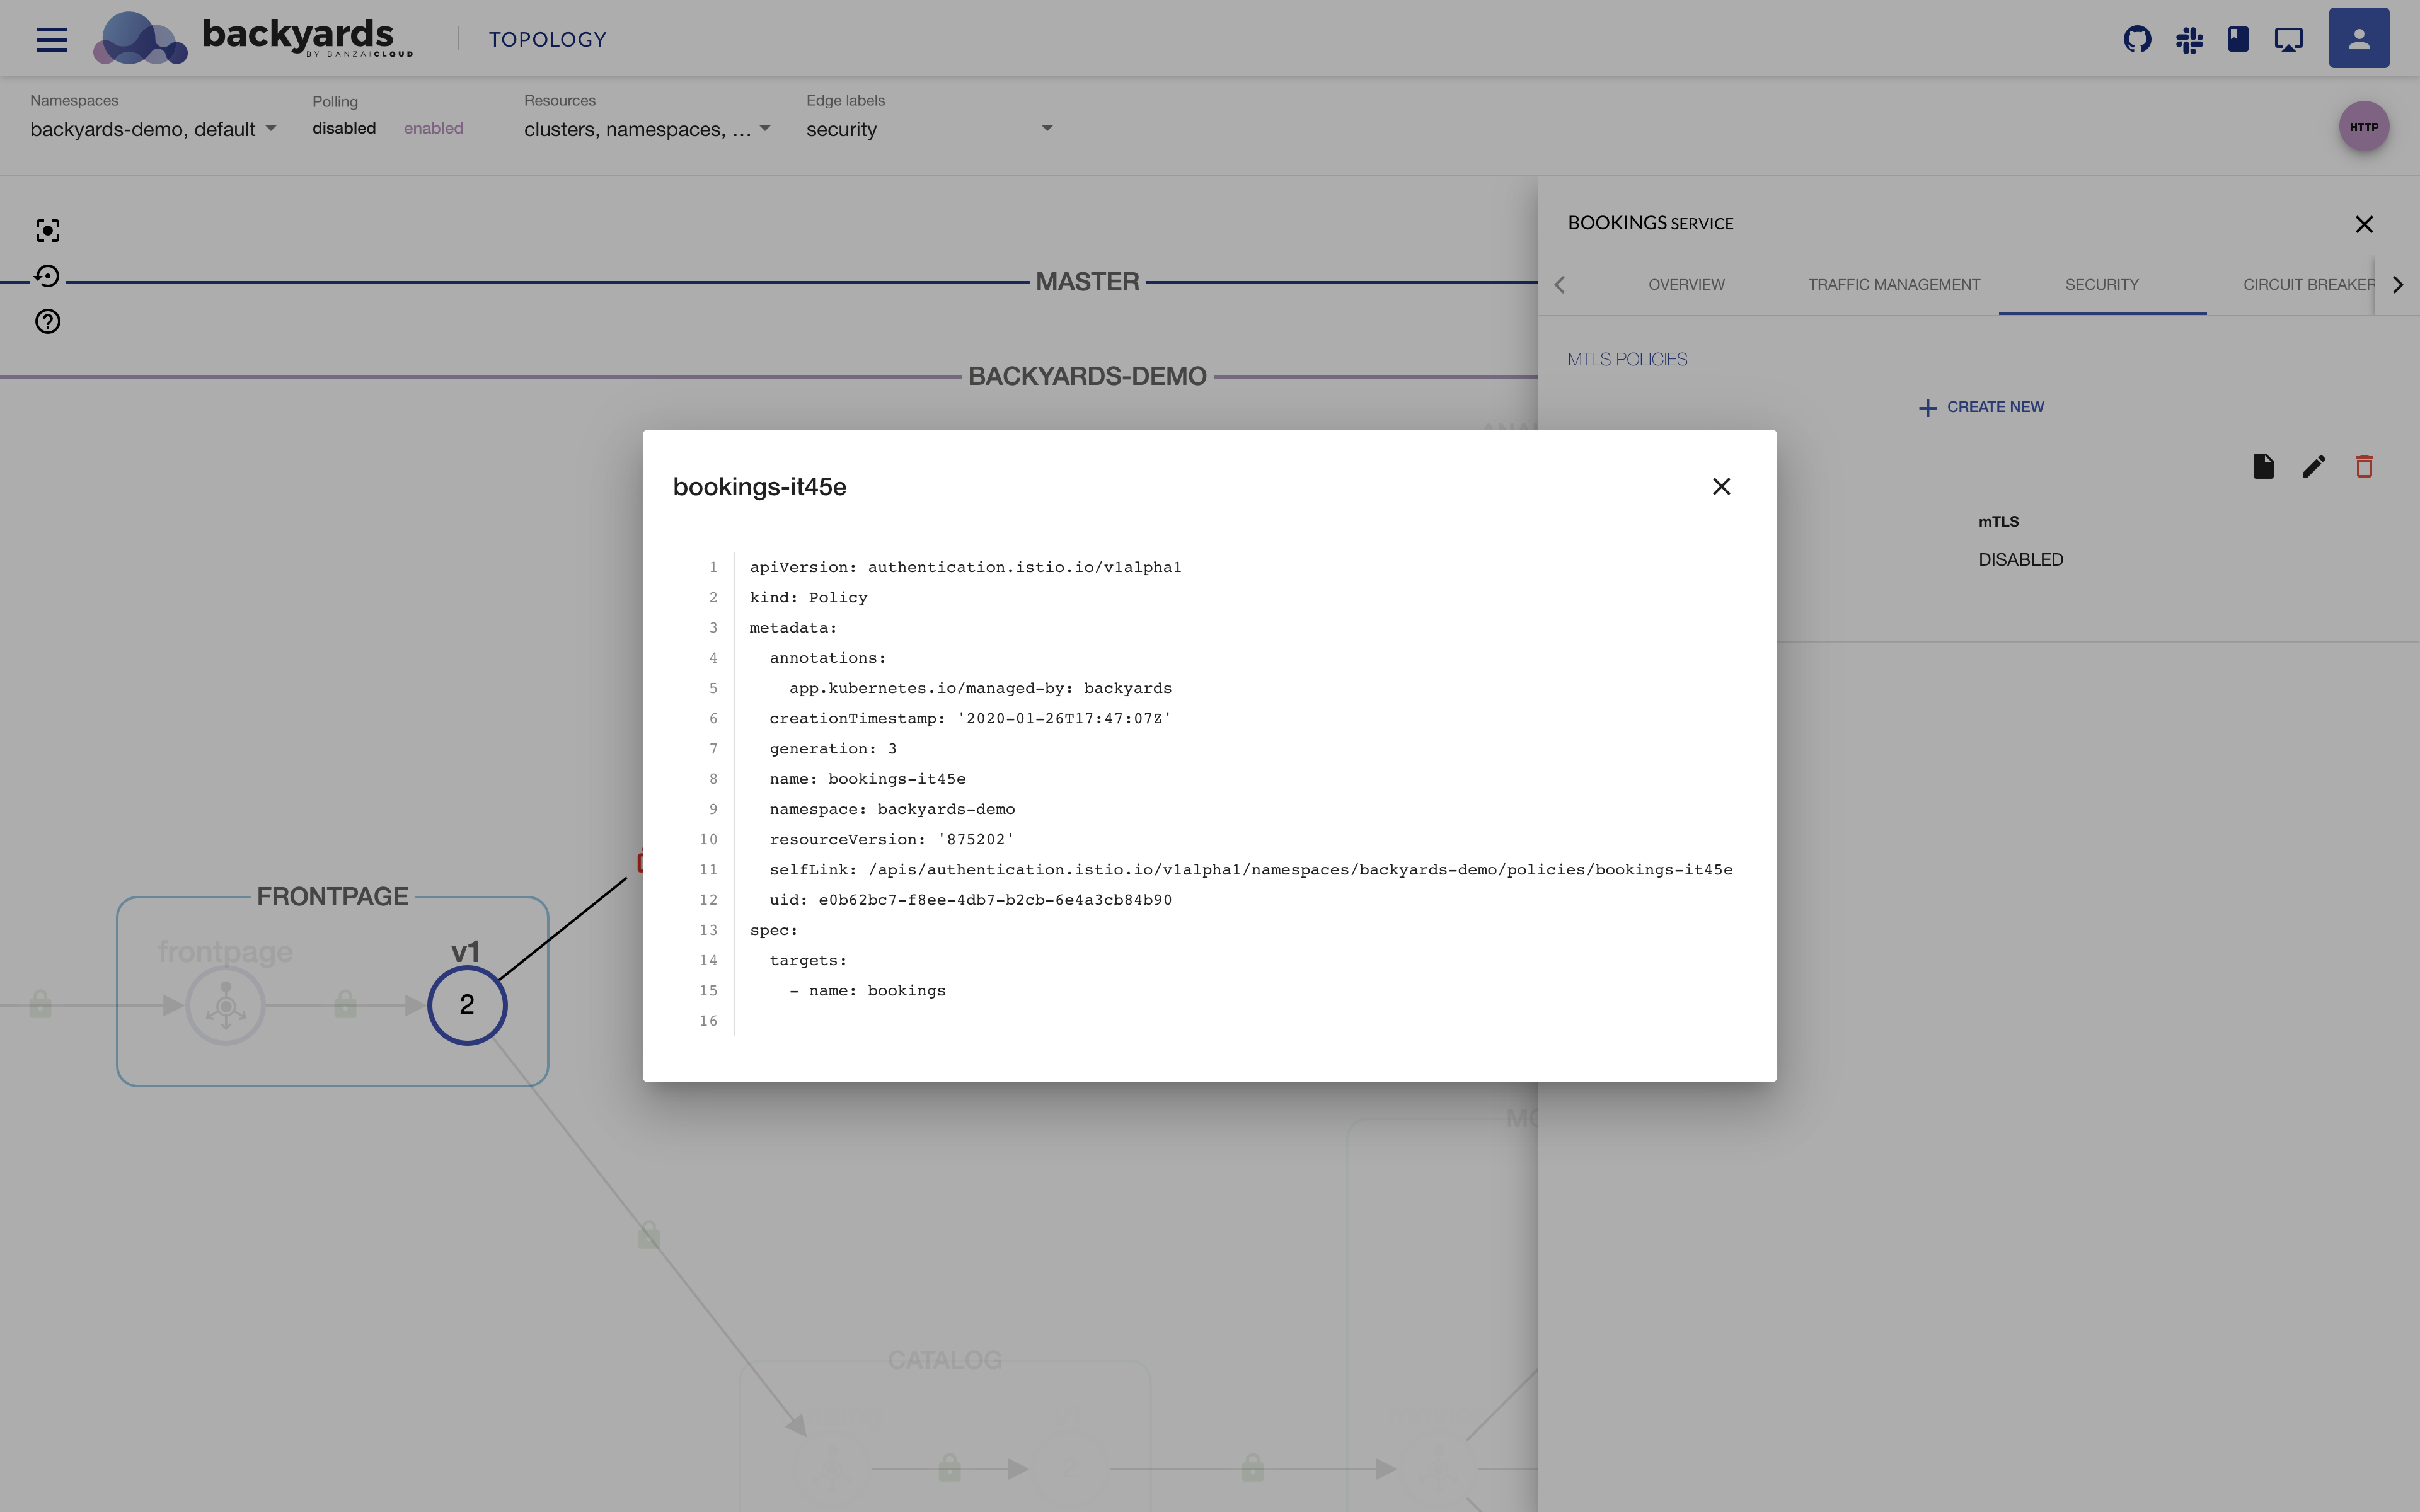
You can then further edit or remove the mTLS settings of the bookings service.
Changing Istio mTLS settings using the Backyards CLI 🔗︎
Mesh-wide mTLS settings 🔗︎
Complete the following steps to test the mesh-wide mTLS settings from the command line.
-
Change the mesh-wide setting to
PERMISSIVEwith the following command:$ backyards mtls allow mesh INFO[0001] switched global mTLS to PERMISSIVE successfully -
Then, verify that the setting is present:
$ backyards mtls get mesh
mTLS rule for /mesh

Policy    Targets  MtlsMode
/default  []       PERMISSIVE
Namespace-wide and service-specific mTLS settings 🔗︎
Complete the following steps to change the mTLS settings of a namespace and a specific service from the command line.
-
Create a
STRICTPolicy for thebackyards-demonamespace.Note that after the command has been run successfully, the output returns the Policy which applies to the namespace.
$ backyards mtls require backyards-demo INFO[0001] policy peers for backyards-demo/ set successfully mTLS rule for backyards-demo/ Policy Targets MtlsMode backyards-demo/default [] STRICT -
Create a
PERMISSIVEPolicy for the 8080 port of thebookingsservice in thebackyards-demonamespace:$ backyards mtls allow backyards-demo/bookings:8080 INFO[0001] policy peers for backyards-demo/bookings set successfully mTLS rule for backyards-demo/bookings Policy Targets MtlsMode backyards-demo/bookings-r2xux [bookings(8080)] PERMISSIVE -
Remove the Policy you’ve just set with the following command:
$ backyards mtls unset backyards-demo/bookings:8080
INFO[0001] policy peers for backyards-demo/bookings unset successfully

mTLS rule for backyards-demo/bookings

Policy                  Targets  MtlsMode
backyards-demo/default  []       STRICT
Note that when the service-specific Policy is removed for the
bookingsservice, the namespace-wide Policy will be applied to the service. -
Remove the Policy from the
backyards-demonamespace as well:$ backyards mtls unset backyards-demo INFO[0001] policy peers for backyards-demo/ unset successfully mTLS rule for backyards-demo/ Policy Targets MtlsMode /default [] PERMISSIVENote that when the namespace-wide Policy is removed from the
backyards-demonamespace, the mesh-wide MeshPolicy will be applied to the namespace.
Cleanup 🔗︎
To remove the demo application, Backyards, and Istio from your cluster, run the following command, which removes all of these components in the correct order:
$ backyards uninstall -a
Takeaway 🔗︎
Configuring fine-grained mutual TLS settings in Istio and in a production environment is not a straightforward process; it presents specific challenges. Backyards (now Cisco Service Mesh Manager), our service-mesh product based on Istio, meets these challenges by managing mTLS settings between services, and does so much more reliably and conveniently through its UI or CLI.
Contact us if you’d like to use Backyards in production.
Be secure, and until next time!
About Backyards 🔗︎
Banzai Cloud’s Backyards (now Cisco Service Mesh Manager) is a multi and hybrid-cloud enabled service mesh platform for constructing modern applications. Built on Kubernetes, our Istio operator and the Banzai Cloud Pipeline platform gives you flexibility, portability, and consistency across on-premise datacenters and on five cloud environments. Use our simple, yet extremely powerful UI and CLI, and experience automated canary releases, traffic shifting, routing, secure service communication, in-depth observability and more, for yourself.