Check out Backyards in action on your own clusters!
Want to know more? Get in touch with us, or delve into the details of the latest release.
Or just take a look at some of the Istio features that Backyards automates and simplifies for you, and which we’ve already blogged about.
Service mesh probably needs no introduction. But, just to recap, let’s define it as a highly configurable, dedicated and low‑latency infrastructure layer designed to handle and provide reliable service-to-service communication, implemented as lightweight network proxies deployed alongside application code. Typical examples of mesh services are service discovery, load balancing, encryption, observability (metrics and traces) and security (authn and authz). Circuit breakers, service versioning, and canary releases are frequent use cases, all of which are part of any modern cloud-native microservice architecture.
One of the most mature and popular service meshes is Istio. Developers use it to combine individual microservices into single controllable composite applications. At Banzai Cloud we’ve been using Istio, and have opensourced an Istio operator to automate the features we’ve just discussed by using the Pipeline platform, while simultaneously putting a lot of effort into managing them across multi and hybrid cloud environments.
Typically, an Istio service mesh takes one of three different forms:
- Single cluster - single mesh
- Multi cluster - single mesh
- Multi cluster - multi mesh
On the Pipeline platform, we’ve previously supported the first two examples (powered by the Istio operator), but recently some of our advanced customers have been asking for multi cluster - multi mesh support. In a single cluster scenario, Pipeline users are able to spin up Istio service meshes on five different cloud providers or on-prem, but in multi-cluster environments these meshes typically span accross multiple providers or hybrid environments, for reasons typically stemming from a large number of microservices, regulation, redundancy, and isolation.
This post will take a deep dive into the third form: multi cluster - multi mesh, a feature new to the Istio operator.
Multi cluster scenarios 🔗︎
As briefly discussed, Istio supports the following multi-cluster patterns:
- single mesh – which combines multiple clusters into one unit managed by one Istio control plane
- multi mesh – in which they act as individual management domains and the service exposure between those domains is handled separately, controlled by one Istio control plane for each domain
Single mesh multi-cluster 🔗︎
The single mesh scenario is most suited to those use cases wherein clusters are configured together, sharing resources and typically treated as a single infrastructural component within an organization. A single mesh multi-cluster is formed by enabling any number of Kubernetes control planes running a remote Istio configuration to connect to a single Istio control plane. Once one or more Kubernetes clusters are connected to the Istio control plane in that way, Envoy communicates with the Istio control plane in order to form a mesh network across those clusters.
A multi cluster - single mesh setup has the advantage of all its services looking the same to clients, regardless of where the workloads are actually running; a service named foo in namespace baz of cluster1 is the same service as the foo in baz of cluster2. It’s transparent to the application whether it’s been deployed in a single or multi-cluster mesh.
Single mesh multi-cluster with flat network or VPN 🔗︎
The Istio operator has supported setting up single mesh, multi-cluster meshes from its first release. This setup has a few network constraints, since all pod CIDRs, as well as API server communications, need to be unique and routable to each other in every cluster. You can read more about this scenario in one of our previous blog posts, istio-multicluster-federation-1.
It’s fairly straightforward to set up such an environment on-premise or Google Cloud (which allows the creation of flat networks)
Single mesh multi-cluster without flat network or VPN 🔗︎
The Istio operator supports such a setup as well, using some of the features originally introduced in Istio v1.1: Split Horizon EDS and SNI-based routing. By using these features, the network constraints for this setup are not untenably steep, since communication passes through the clusters’ ingress gateways.
We explored this scenario thoroughly in one of our previous blog posts, istio-multicluster-federation-2.
Multi mesh multi-cluster 🔗︎
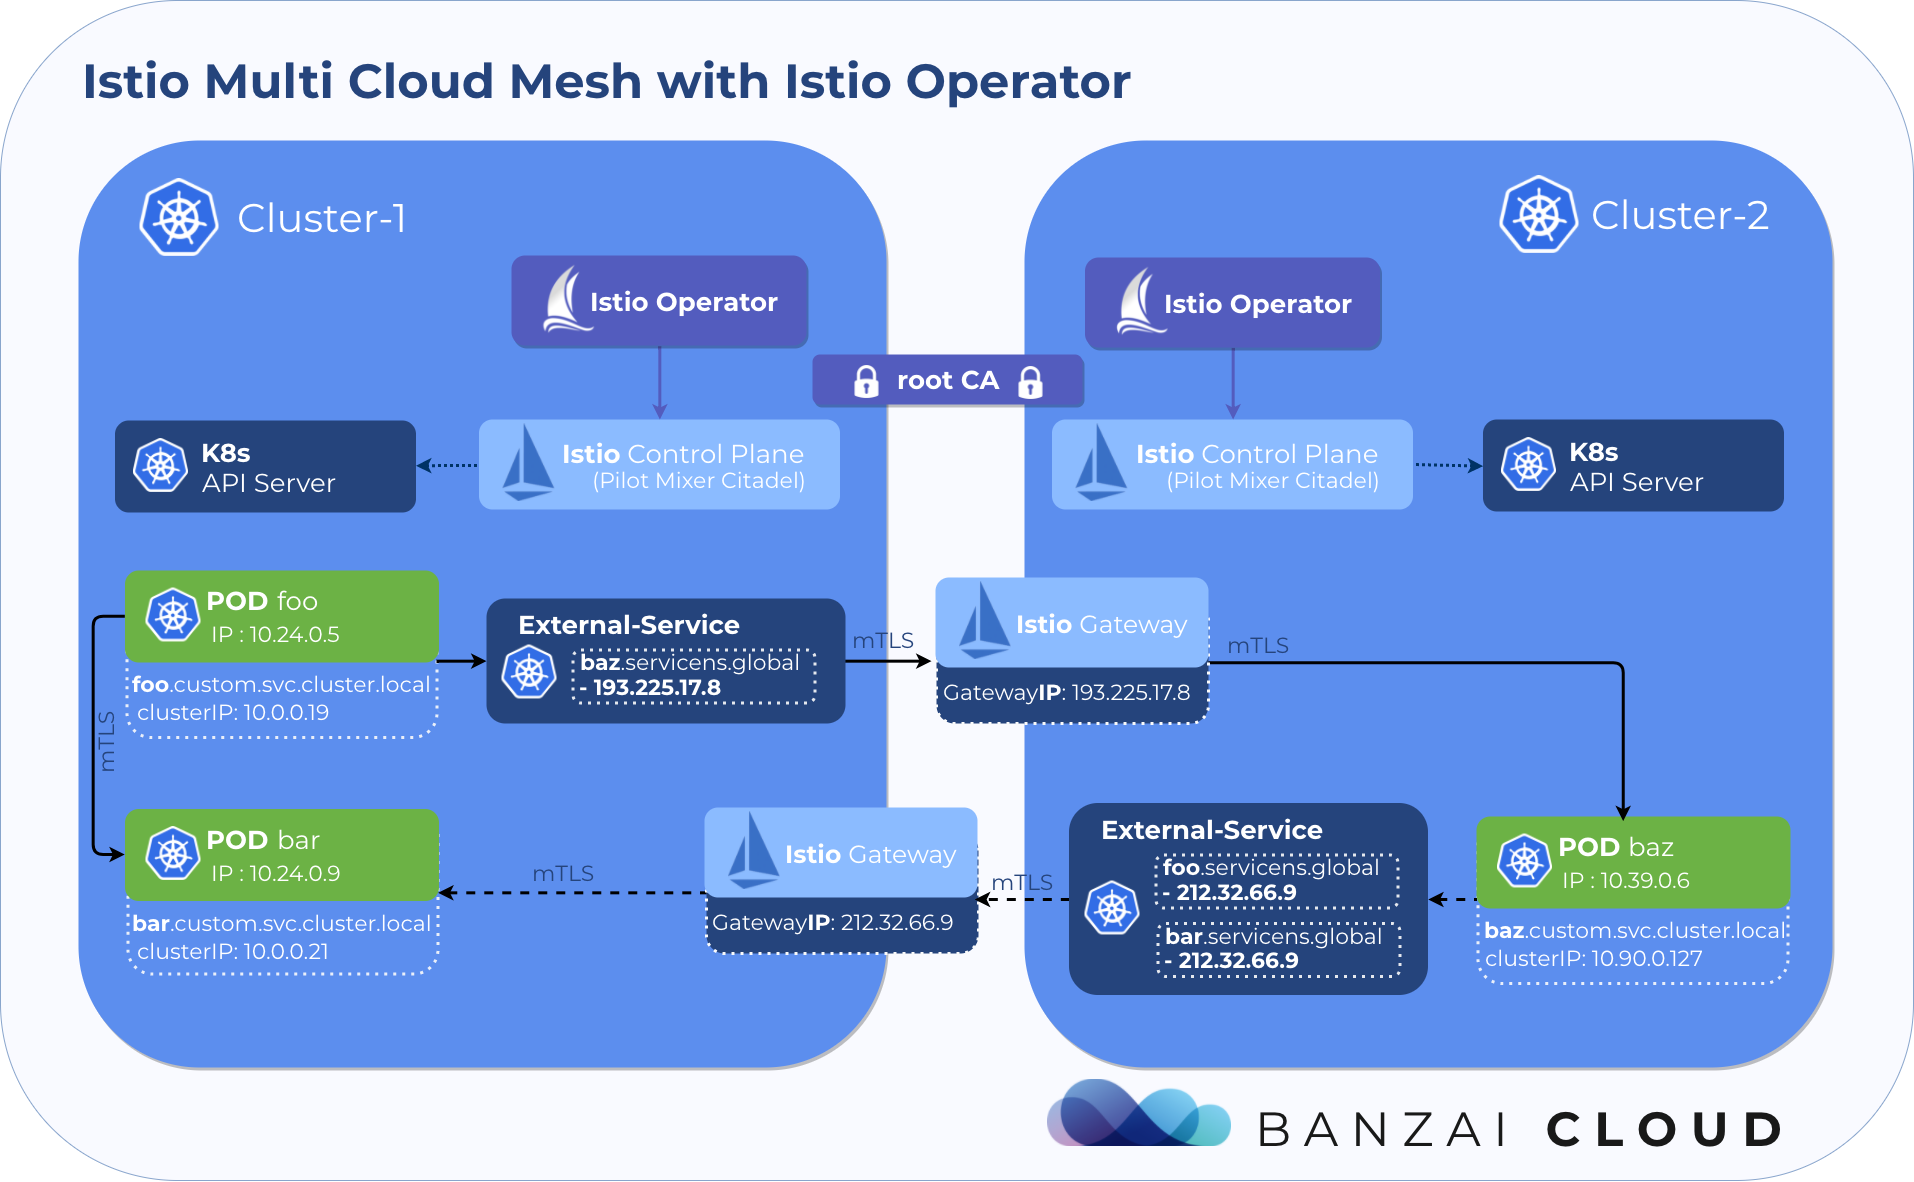
We’ve finally reached the crux of this post. In a multi-mesh multi-cluster multiple service meshes are treated as independent fault domains, but with inter-mesh communication.
In multi-mesh environments, meshes that would be otherwise independent are loosely coupled together using ServiceEntries for configuration and a common root CA as a base for secure communication through Istio ingress gateways using mTLS. From a networking standpoint, this setup’s only requirement is that its ingress gateways be reachable from one another.
Workloads in each cluster can access existing local services via their Kubernetes DNS suffix, e.g., <name>.<namespace>.svc.cluster.local, as per usual. To reach services in remote meshes, Istio includes a CoreDNS server that can be configured to handle service names in the form of <name>.<namespace>.global, thus calls from any cluster to foo.foons.global will resolve to the foo service in namespace foons on the mesh on which it’s running.
Every service in a given mesh that needs to be accessed from a different mesh requires a ServiceEntry configuration in a remote mesh. The host used in the service entry should take the form <name>.<namespace>.global, where name and namespace correspond to the service’s name and namespace respectively.
Multi mesh multi-cluster with the Banzai Cloud’s Istio operator 🔗︎

The latest version of the Istio operator could do all the necessary deployments and configuration to inter-connect two or more meshes easily, only the common root CA certs must be provided manually beforehand.
Try it out 🔗︎
For demonstrative purposes, let’s create 2 clusters, a 2 node Banzai Cloud PKE cluster on EC2 (our own CNCF certified Kubernetes distribution) and a GKE cluster with 2 nodes as well. This setup shows that the solutions works not just in a multi-cluster, but also in a multi-cloud environment (same for a hybrid cloud environment, where PKE is running within your own private cloud/datacenter).
Get the latest version of the Istio operator 🔗︎
❯ git clone https://github.com/banzaicloud/istio-operator.git
❯ cd istio-operator
❯ git checkout release-1.1
Create the clusters using the Banzai Cloud Pipeline platform 🔗︎
The Pipeline platform is the easiest way to setup the demo environment. We could use the UI, RESTful API or one of the langauge bindings, but let’s use the CLI tool, which is simply called banzai.
AWS_SECRET_ID="[[secretID from Pipeline]]"
GKE_SECRET_ID="[[secretID from Pipeline]]"
GKE_PROJECT_ID="<GKE project ID>"

❯ cat docs/federation/multimesh/istio-pke-cluster.json | sed "s/{{secretID}}/${AWS_SECRET_ID}/" | banzai cluster create
INFO[0004] cluster is being created
INFO[0004] you can check its status with the command `banzai cluster get "istio-multimesh-pke"`
Id   Name
741  istio-multimesh-pke

❯ cat docs/federation/multimesh/istio-gke-cluster.json | sed -e "s/{{secretID}}/${GKE_SECRET_ID}/" -e "s/{{projectID}}/${GKE_PROJECT_ID}/" | banzai cluster create
INFO[0005] cluster is being created
INFO[0005] you can check its status with the command `banzai cluster get "istio-gke"`
Id   Name
742  istio-gke
Wait for the clusters to be up and running 🔗︎
❯ banzai cluster list
Id   Name                Distribution  Status   CreatorName    CreatedAt
742  istio-multimesh-gke   gke           RUNNING  waynz0r        2019-05-28T12:44:38Z
741  istio-multimesh-pke   pke           RUNNING  waynz0r        2019-05-28T12:38:45Z
Download the kubeconfigs from the Pipeline UI and set them as k8s contexts.
❯ export KUBECONFIG=~/Downloads/istio-multimesh-pke.yaml:~/Downloads/istio-multimesh-gke.yaml

❯ kubectl config get-contexts -o name
istio-multimesh-gke
kubernetes-admin@istio-pke

❯ export CTX_GKE=istio-multimesh-gke
❯ export CTX_PKE=kubernetes-admin@istio-multimesh-pke
Setup the PKE cluster 🔗︎
Install the operator into the PKE cluster 🔗︎
The following commands will deploy the operator to the istio-system namespace.
❯ kubectl config use-context ${CTX_PKE}
❯ make deploy
Setup root CA and deploy Istio control plane on the PKE cluster 🔗︎
Cross mesh communication requires mutual TLS connection between services. To enable mutual TLS communication across meshes, each mesh Citadel must be configured with intermediate CA credentials generated by a shared root CA. For demo purposes a sample root CA certificate is used.
The following commands will add the sample root CA certs as a secret. It also creates a custom resource definition in the cluster, following a pattern typical of operators, this will allow you to specify your Istio configurations to a Kubernetes custom resource. Once you apply that to your cluster, the operator will start reconciling the Istio components.
❯ kubectl create secret generic cacerts -n istio-system \
    --from-file=docs/federation/multimesh/certs/ca-cert.pem \
    --from-file=docs/federation/multimesh/certs/ca-key.pem \
    --from-file=docs/federation/multimesh/certs/root-cert.pem \
    --from-file=docs/federation/multimesh/certs/cert-chain.pem
❯ kubectl --context=${CTX_PKE} -n istio-system create -f docs/federation/multimesh/istio-multimesh-cr.yaml
Wait for the multimesh Istio resource status to become Available and for the pods in the istio-system to become ready.
❯ kubectl --context=${CTX_PKE} -n istio-system get istios
NAME        STATUS      ERROR   GATEWAYS           AGE
multimesh   Available           [35.180.106.193]   4m15s

❯ kubectl --context=${CTX_PKE} -n istio-system get pods
NAME                                      READY   STATUS    RESTARTS   AGE
istio-citadel-58c77cc58b-mj7tg            1/1     Running   0          4m12s
istio-egressgateway-6958db94bc-78dl7      1/1     Running   0          4m10s
istio-galley-5dd459c899-llt2k             1/1     Running   0          4m11s
istio-ingressgateway-7ddbbddc9f-dj9ls     1/1     Running   0          4m10s
istio-pilot-6b97586d79-lr9sz              2/2     Running   0          4m11s
istio-policy-8b7bd457-j5n59               2/2     Running   2          4m9s
istio-sidecar-injector-54d7d74bdb-mw4kn   1/1     Running   0          3m58s
istio-telemetry-86f6459cd5-mgvtv          2/2     Running   2          4m9s
istiocoredns-74dd777b79-z7nbp             2/2     Running   0          3m58s
Setup the GKE cluster 🔗︎
It takes exactly the same steps to setup the GKE cluster as well.
Install the operator into the GKE cluster 🔗︎
❯ kubectl config use-context ${CTX_GKE}
❯ make deploy
Setup root CA and deploy Istio control plane on the GKE cluster 🔗︎
❯ kubectl create secret generic cacerts -n istio-system \
    --from-file=docs/federation/multimesh/certs/ca-cert.pem \
    --from-file=docs/federation/multimesh/certs/ca-key.pem \
    --from-file=docs/federation/multimesh/certs/root-cert.pem \
    --from-file=docs/federation/multimesh/certs/cert-chain.pem
❯ kubectl --context=${CTX_GKE} -n istio-system create -f docs/federation/multimesh/istio-multimesh-cr.yaml
Wait for the multimesh Istio resource status to become Available and for the pods in the istio-system to become ready.
❯ kubectl --context=${CTX_GKE} -n istio-system get istios
NAME        STATUS      ERROR   GATEWAYS           AGE
multimesh   Available           [35.180.106.193]   4m15s

❯ kubectl --context=${CTX_GKE} -n istio-system get pods
NAME                                      READY   STATUS    RESTARTS   AGE
istio-citadel-58c77cc58b-mj7tg            1/1     Running   0          4m12s
istio-egressgateway-6958db94bc-78dl7      1/1     Running   0          4m10s
istio-galley-5dd459c899-llt2k             1/1     Running   0          4m11s
istio-ingressgateway-7ddbbddc9f-dj9ls     1/1     Running   0          4m10s
istio-pilot-6b97586d79-lr9sz              2/2     Running   0          4m11s
istio-policy-8b7bd457-j5n59               2/2     Running   2          4m9s
istio-sidecar-injector-54d7d74bdb-mw4kn   1/1     Running   0          3m58s
istio-telemetry-86f6459cd5-mgvtv          2/2     Running   2          4m9s
istiocoredns-74dd777b79-z7nbp             2/2     Running   0          3m58s
Testing, testing 🔗︎
Create a simple echo service on both clusters for testing purposes.
Create
GatewayandVirtualServiceresources as well to be able to reach the service through the ingress gateway.
❯ kubectl --context ${CTX_PKE} -n default apply -f docs/federation/multimesh/echo-service.yaml
❯ kubectl --context ${CTX_PKE} -n default apply -f docs/federation/multimesh/echo-gw.yaml
❯ kubectl --context ${CTX_PKE} -n default apply -f docs/federation/multimesh/echo-vs.yaml

❯ kubectl --context ${CTX_PKE} -n default get pods
NAME                    READY   STATUS    RESTARTS   AGE
echo-5c7dd5494d-k8nn9   2/2     Running   0          1m

❯ kubectl --context ${CTX_GKE} -n default apply -f docs/federation/multimesh/echo-service.yaml
❯ kubectl --context ${CTX_GKE} -n default apply -f docs/federation/multimesh/echo-gw.yaml
❯ kubectl --context ${CTX_GKE} -n default apply -f docs/federation/multimesh/echo-vs.yaml

❯ kubectl --context ${CTX_GKE} -n default get pods
NAME                    READY   STATUS    RESTARTS   AGE
echo-595496dfcc-6tpk5   2/2     Running   0          1m
Hit the PKE cluster’s ingress with some traffic to see how the echo service responds:
❯ export PKE_INGRESS=$(kubectl --context=${CTX_PKE} -n istio-system get svc/istio-ingressgateway -o jsonpath='{.status.loadBalancer.ingress[0].hostname}')

❯ for i in `seq 1 100`; do curl -s "http://${PKE_INGRESS}/" |grep "Hostname"; done | sort | uniq -c
 100 Hostname: echo-5c7dd5494d-k8nn9
So far so good, the only running pod in the echo service answered to every requests.
Create a service entry in the PKE cluster for the echo service running on the GKE cluster 🔗︎
As it was mentioned in the eariler part of this post, in order to allow access to echo running on the GKE cluster, we need to create a service entry for it in the PKE cluster. The host name of the service entry should be of the form <name>.<namespace>.global where name and namespace correspond to the remote service’s name and namespace respectively.
For DNS resolution for services under the *.global domain, you need to assign these services an IP address. In this example we’ll use IPs in 127.255.0.0/16. Application traffic for these IPs will be captured by the sidecar and routed to the appropriate remote service.
Each service (in the .global DNS domain) must have a unique IP within the cluster, but they are not need to be routable.
❯ kubectl apply --context=$CTX_PKE -n default -f - <<EOF
apiVersion: networking.istio.io/v1alpha3
kind: ServiceEntry
metadata:
  name: echo-svc
spec:
  hosts:
  # must be of form name.namespace.global
  - echo.default.global
  location: MESH_INTERNAL
  ports:
  - name: http1
    number: 80
    protocol: http
  resolution: DNS
  addresses:
  - 127.255.0.1
  endpoints:
  - address: $(kubectl --context ${CTX_GKE} -n istio-system get svc/istio-ingressgateway -o jsonpath='{@.status.loadBalancer.ingress[0].ip}')
    ports:
      http1: 15443 # Do not change this port value
EOF
The configurations above will result that all traffic from the PKE cluster for echo.default.global to be routed to the endpoint IPofGKEIngressGateway:15443 over a mutual TLS connection. The port 15443 for the ingress gateway is configured in a special SNI-aware Gateway resource that the operator installed as part of the reconciliation logic.
Apply a revised VirtualService resource 🔗︎
The revised VirtualService is configured so that the traffic for echo service will be split 50/50 between endpoints in the two clusters.
❯ kubectl apply --context=$CTX_PKE -n default -f - <<EOF
apiVersion: networking.istio.io/v1alpha3
kind: VirtualService
metadata:
  name: echo
  namespace: default
spec:
  hosts:
  - "*"
  gateways:
  - echo-gateway.default.svc.cluster.local
  http:
  - route:
    - destination:
        host: echo.default.svc.cluster.local
        port:
          number: 80
      weight: 50
    - destination:
        host: echo.default.global
        port:
          number: 80
      weight: 50
EOF
Hit the PKE cluster’s ingress again with some traffic:
❯ for i in `seq 1 100`; do curl -s "http://${PKE_INGRESS}/" |grep "Hostname"; done | sort | uniq -c
  45 Hostname: echo-595496dfcc-6tpk5
  55 Hostname: echo-5c7dd5494d-k8nn9
It’s clear from the results that although we hit the PKE cluster’s ingress gateway only, pods on the two clusters responded evenly.
Cleanup 🔗︎
Execute the following commands to clean up the clusters:
❯ kubectl --context=${CTX_PKE} -n istio-system delete istios multimesh
❯ kubectl --context=${CTX_PKE} delete namespace istio-system

❯ kubectl --context=${CTX_GKE} -n istio-system delete istios multimesh
❯ kubectl --context=${CTX_GKE} delete namespace istio-system

❯ banzai cluster delete istio-multimesh-pke --no-interactive
❯ banzai cluster delete istio-multimesh-gke --no-interactive
Takeaway 🔗︎
The Istio operator now supports the multi cluster - multi mesh setup as well. With this new feature, all possible multicluster Istio topologies are covered and supported by the Istio operator.
About Banzai Cloud Pipeline 🔗︎
Banzai Cloud’s Pipeline provides a platform for enterprises to develop, deploy, and scale container-based applications. It leverages best-of-breed cloud components, such as Kubernetes, to create a highly productive, yet flexible environment for developers and operations teams alike. Strong security measures — multiple authentication backends, fine-grained authorization, dynamic secret management, automated secure communications between components using TLS, vulnerability scans, static code analysis, CI/CD, and so on — are default features of the Pipeline platform.


