Check out Backyards in action on your own clusters!
Want to know more? Get in touch with us, or delve into the details of the latest release.
Or just take a look at some of the Istio features that Backyards automates and simplifies for you, and which we’ve already blogged about.
Istio has been rightfully praised for ushering in free observability and secure service to service communication. Other, more significant features, however, are what truly make Istio the Swiss army knife of service mesh operators; when it comes to meeting SLOs like uptime, latency and error rates, the ability to manage traffic between services is absolutely critical.
When we released the Istio operator earlier this year, our goal (besides managing Istio installation and upgrades) was to provide support for these excellent traffic routing features, while making everything more usable and UX friendly. We ended up creating a simple and automated service mesh, Backyards (now Cisco Service Mesh Manager), which features a management UI, CLI and GraphQL API on top of our Istio operator. Backyards (now Cisco Service Mesh Manager) is integrated into Banzai Cloud’s container management platform, Pipeline, however, it also works, and is available, as a standalone product. Naturally, using Backyards with Pipeline provides users with a variety of specific benefits (like managing applications in a multi-cloud and hybrid cloud world) but Backyards works on any Kubernetes installation.
Some of the related Backyards features we have already blogged about:
- Traffic shifting
- Circuit breaking
- Fault injection
- Distributed tracing
- Automatic canary deployments with Backyards
Traffic routing 🔗︎
Istio’s three main group of features are seamless observability, seamless security and easy traffic management without changing application code. Traffic management covers a lot of different things, like circuit breaking, A/B or canary rollouts or even fault injection, but the core of it is traffic routing.
Per the most generic definition, traffic routing rules determine where do network packets get forwarded after leaving a node. Routing is a very broad term in networking, it can happen on multiple layers of the network stack, and can get quite complicated. But this post is not a computer networking deep dive, so let’s just stick to L7, because we’re discussing Istio. Application layer routing lets you configure sophisticated rules based on URIs, ports or headers.
Istio’s traffic routing functionalities are based on the Envoy sidecar proxies that build up the data plane of the service mesh. The configuration of these proxies determine the route of a packet. The idea that all traffic flow through the Envoys enables direct control of routing without changing any application code.
Traffic routing serves as the core building block when speaking about service mesh features like traffic shifting, or canary releases. So let’s take a look at how routing works in Istio and how can you set up basic routing rules through custom resources, and how Backyards (now Cisco Service Mesh Manager) can simplify this process.
Traffic routing with custom resources 🔗︎
In Istio, routing is mostly described in Kubernetes custom resources: Virtual Services and Destination Rules.
These declarative representations are saved into etcd by the Kubernetes API server, and picked up by an Istio component called Pilot.
Pilot translates these CRs to Envoy configuration, and dynamically sends it to the data plane through a protocol called xDS.
The Istio documentation says the following about virtual services:
A virtual service lets you configure how requests are routed to a service within an Istio service mesh, building on the basic connectivity and discovery provided by Istio and your platform. Each virtual service consists of a set of routing rules that are evaluated in order, letting Istio match each given request to the virtual service to a specific real destination within the mesh.
And this about destination rules:
You can think of virtual services as how you route your traffic to a given destination, and then you use destination rules to configure what happens to traffic for that destination. Destination rules are applied after virtual service routing rules are evaluated, so they apply to the traffic’s “real” destination.
If you can’t tell the difference after the first reading of the above two definitions, you’re probably not alone. It starts to make sense after some time, but it can be pretty confusing when starting with Istio.
Instead of definitions, let’s take a look at some examples to clear things up.
Virtual Service 🔗︎
apiVersion: networking.istio.io/v1alpha3
kind: VirtualService
metadata:
  name: bookings-backyards-demo-ye8lv
  namespace: backyards-demo
spec:
  hosts:
  - bookings.backyards-demo.svc.cluster.local
  http:
  - match:
    - uri:
        prefix: /api/v1
    - uri:
        exact: /v1/version
      method:
        exact: GET
    route:
    - destination:
        host: bookings
        port:
          number: 8080
        subset: v1
      weight: 100
    retries:
      attempts: 3
      perTryTimeout: 1s
    rewrite:
      uri: /example
    timeout: 5s
A VirtualService is basically a collection of rules that will be applied to network requests when sent to specific hosts through specific gateways.
The hosts field describes the destination hosts to which traffic is being sent.
In our example hosts is set to bookings.backyards-demo.svc.cluster.local, so the VirtualService will only be valid for requests where the destination host is this value.
If for example there is a workload called frontpage in the mesh that calls the bookings service, then every HTTP request through these services will be matched against the rules described in the http section.
In our example, there is no gateways field.
This is a special case, and it means that these rules should be applied if the source of traffic is not an Istio gateway, or in other words it’s coming from inside the mesh.
That’s why an empty gateway array is the same as: gateways: ["mesh"].
When the gateways array is set to one or more specific gateways, it means that these rules will only be applied when the traffic is coming from those Istio gateways.
When you want to apply the same rules inside the mesh, and to external traffic coming from a gateway, you should specify mesh and the gateway name in the list.
These fields can be complicated by specifying multiple hosts, multiple gateways, or adding a * wildcard, but detailing everything would result in a marathon blog post, so if you want to read more, head to the Istio reference.
The traffic rules are added in the tcp, tls and http fields, but let’s just stick to http for now.
It is an ordered list of route rules for HTTP traffic. The first rule matching an incoming request is used.
An HTTPRoute has a match field that defines the requests where the route is applied.
This is an array with an OR relation between the elements, and the elements themselves can hold multiple fields like uri, method or headers with AND relations between them.
If match is not set, it means any requests are matched.
The rest of the fields other than match add up the routing rules.
Every HTTP route must have a target: a route, or a redirect.
A route is a forwarding target, and it can point to one of several versions of a service described in DestinationRules.
Weights associated with the service version determine the proportion of traffic it receives.
Weights must always add up to 100 percent.
The redirect primitive can be used to send a HTTP 301 redirect to a different URI or Authority.
For a redirect, not all of the rules can be defined, for example a rewrite is not applicable in this case.
Destination Rule 🔗︎
apiVersion: networking.istio.io/v1alpha3
kind: DestinationRule
metadata:
  name: bookings-o8nie
  namespace: backyards-demo
spec:
  host: bookings
  subsets:
  - labels:
      version: v1
    name: v1
  trafficPolicy:
    tls:
      mode: ISTIO_MUTUAL
DestinationRule defines policies that apply to traffic intended for a service after routing has occurred.
A DestinationRule is a bit simpler than a VirtualService, but can still be tricky.
The host is the name of a service from the service registry. Service names are looked up from Kubernetes services and from the hosts declared by Service Entries. Rules defined for services that do not exist in the service registry will be ignored.
A subset holds a label selector that represents an individual version of a service.
For example workloads behind the bookings service with the version: v1 label is considered the v1 subset.
The third main element of a DestinationRule is trafficPolicy.
It contains information about load balancing policies, connection pool sizes, outlier detection and TLS settings.
You can learn more about these in our circuit breaking and auto mTLS posts, or from the Istio reference.
This post is very far from being a complete guide to VirtualServices and DestinationRules, but it shows how complex these custom resources are.
And we weren’t even talking about advanced concepts, like merging multiple VirtualServices for specific hosts, or the visibility of these resources through exportTo fields.
Backyards was designed to be able to help understand these concepts. It provides a CLI and a UI dashboard that drives you through setting up these rules, and a great validation feature that finds issues in your mesh setup.
Traffic routing with Backyards (now Cisco Service Mesh Manager) 🔗︎
Backyards makes it a lot easier to handle routing rules in Istio. You don’t have to write error prone YAML configs, rather you can use the dashboard or the CLI to easily create routing rules. But it doesn’t mean that Backyards has it’s own representations and abstraction layer of these configs.
When you set a rule through Backyards, it gets translated to Istio YAML config. It works in the opposite direction as well: if you decide to write Istio YAML, Backyards is capable of parsing and displaying it. There are no restrictions like, “if you’ve added a rule, you cannot add another or cannot touch the YAML”.
Let’s take a look at how it works!
Prerequisites 🔗︎
The only prerequisite is to have a Kubernetes cluster.
You can create a Kubernetes cluster on five different cloud providers, or on-premise via the free developer version of the Pipeline platform. But you can also bring your own.
Install Backyards 🔗︎
The easiest way by far of installing Istio, Backyards, and a demo application on a brand new cluster is to use the Backyards CLI.
You just need to issue one command (KUBECONFIG must be set for your cluster):
> backyards install -a --run-demo
This command installs Istio with our open-source Istio operator, then installs Backyards itself, as well as a demo application for demonstration purposes. After the installation of each component has finished, the Backyards UI will automatically open and send some traffic to the demo application. By issuing this one simple command you can watch Backyards start a new Istio mesh in just a few minutes!
You can do all these steps in sequential order as well. Backyards requires an Istio cluster - if you don’t have one, you can install Istio with
$ backyards istio install. Once you have Istio installed, you can install Backyards with$ backyards install. Finally, you can deploy the demo application withbackyards demoapp install.
Traffic routing using the backyards-cli 🔗︎
These examples work out of the box with the demo application packaged with Backyards. Change the service name and namespace to match your service.
To see the current routing rules for a particular service, use the route get command:
> backyards routing route get backyards-demo/movies

Settings for backyards-demo/movies

Matches             Routes                 Redirect  Timeout  Retry        Rewrite  Mirror To
any                 33% movies:8080 (v1)   -         -        -            -        -
                    33% movies:8080 (v2)
                    34% movies:8080 (v3)
To create, or edit an existing routing rule, use route set.
Let’s start with a simple example, that forwards all traffic going to the payments host to the payments Kubernetes service.
Backyards automatically creates the corresponding Istio VirtualService and DestinationRule.
The any keyword after the match switch means matching all requests.
It cannot be omitted, because unlike Istio, we wanted to make it explicit.
> backyards routing route set backyards-demo/payments -m any -d payments -w 100

INFO[0002] routing for backyards-demo/payments set successfully

Settings for backyards-demo/payments

Matches  Routes         Redirect  Timeout  Retry  Rewrite  Mirror To
any      100% payments  -         -        -      -        -
Now let’s add a few other actions to the same rule.
Note that you don’t have to specify the destination or the weight again. The CLI merges the rules for a specific match:
> backyards routing route set backyards-demo/payments -m any --timeout 4s --retry-attempts 2 --retry-per-try-timeout 2s

INFO[0002] routing for backyards-demo/payments set successfully

Settings for backyards-demo/payments

Matches  Routes         Redirect  Timeout  Retry        Rewrite  Mirror To
any      100% payments  -         4s       2x (2s ptt)  -        -
Finally, try a routing rule with an advanced matching configuration, and set a different timeout and retry policy.
When you specify multiple --match arguments, there will be OR relations between them.
The rule will match requests that match the first, or the second rule.
Inside a match, you can specify multiple rules that have an AND relation.
This is how you can match requests against a specific URL and an HTTP method for example.
> backyards routing route set backyards-demo/payments --match "uri=/version"  --match "uri=/api/v1,method=GET" -d payments -w 100 --timeout 3s --retry-attempts 3 --retry-per-try-timeout 2s

INFO[0001] routing for backyards-demo/payments set successfully

Settings for backyards-demo/payments

Matches                                         Routes         Redirect  Timeout  Retry        Rewrite  Mirror To
(uri=/version) OR (uri=/api/v1 AND method=GET)  100% payments  -         3s       3x (2s ptt)  -        -
Let’s see how our matching rules look like now.
Rules are evaluated in top-down order.
Note how the any rule is always the last one to help avoiding rule shadowing.
For other matching rules, it is the user’s responsibility to handle the order of rules.
Ordering is not yet supported in Backyards.
> backyards routing route get backyards-demo/payments

Settings for backyards-demo/payments

Matches                                         Routes         Redirect  Timeout  Retry        Rewrite  Mirror To
(uri=/version) OR (uri=/api/v1 AND method=GET)  100% payments  -         3s       3x (2s ptt)  -        -
any                                             100% payments  -         4s       2x (2s ptt)  -        -
To delete the rules, use these commands:
> backyards routing route delete backyards-demo/payments --match "uri=/version"  --match uri=/api/v1,method=GET  --non-interactive

> backyards routing route delete backyards-demo/payments --match any --non-interactive
Tip 1: all CLI commands and switches have short names, check the [CLI docs]((https://smm-docs.eticloud.io/docs/reference/cli/) to get to know them.
Tip 2: the CLI has an interactive mode: try the above commands with
--match anyas the only argument
Traffic routing using the Backyards UI 🔗︎
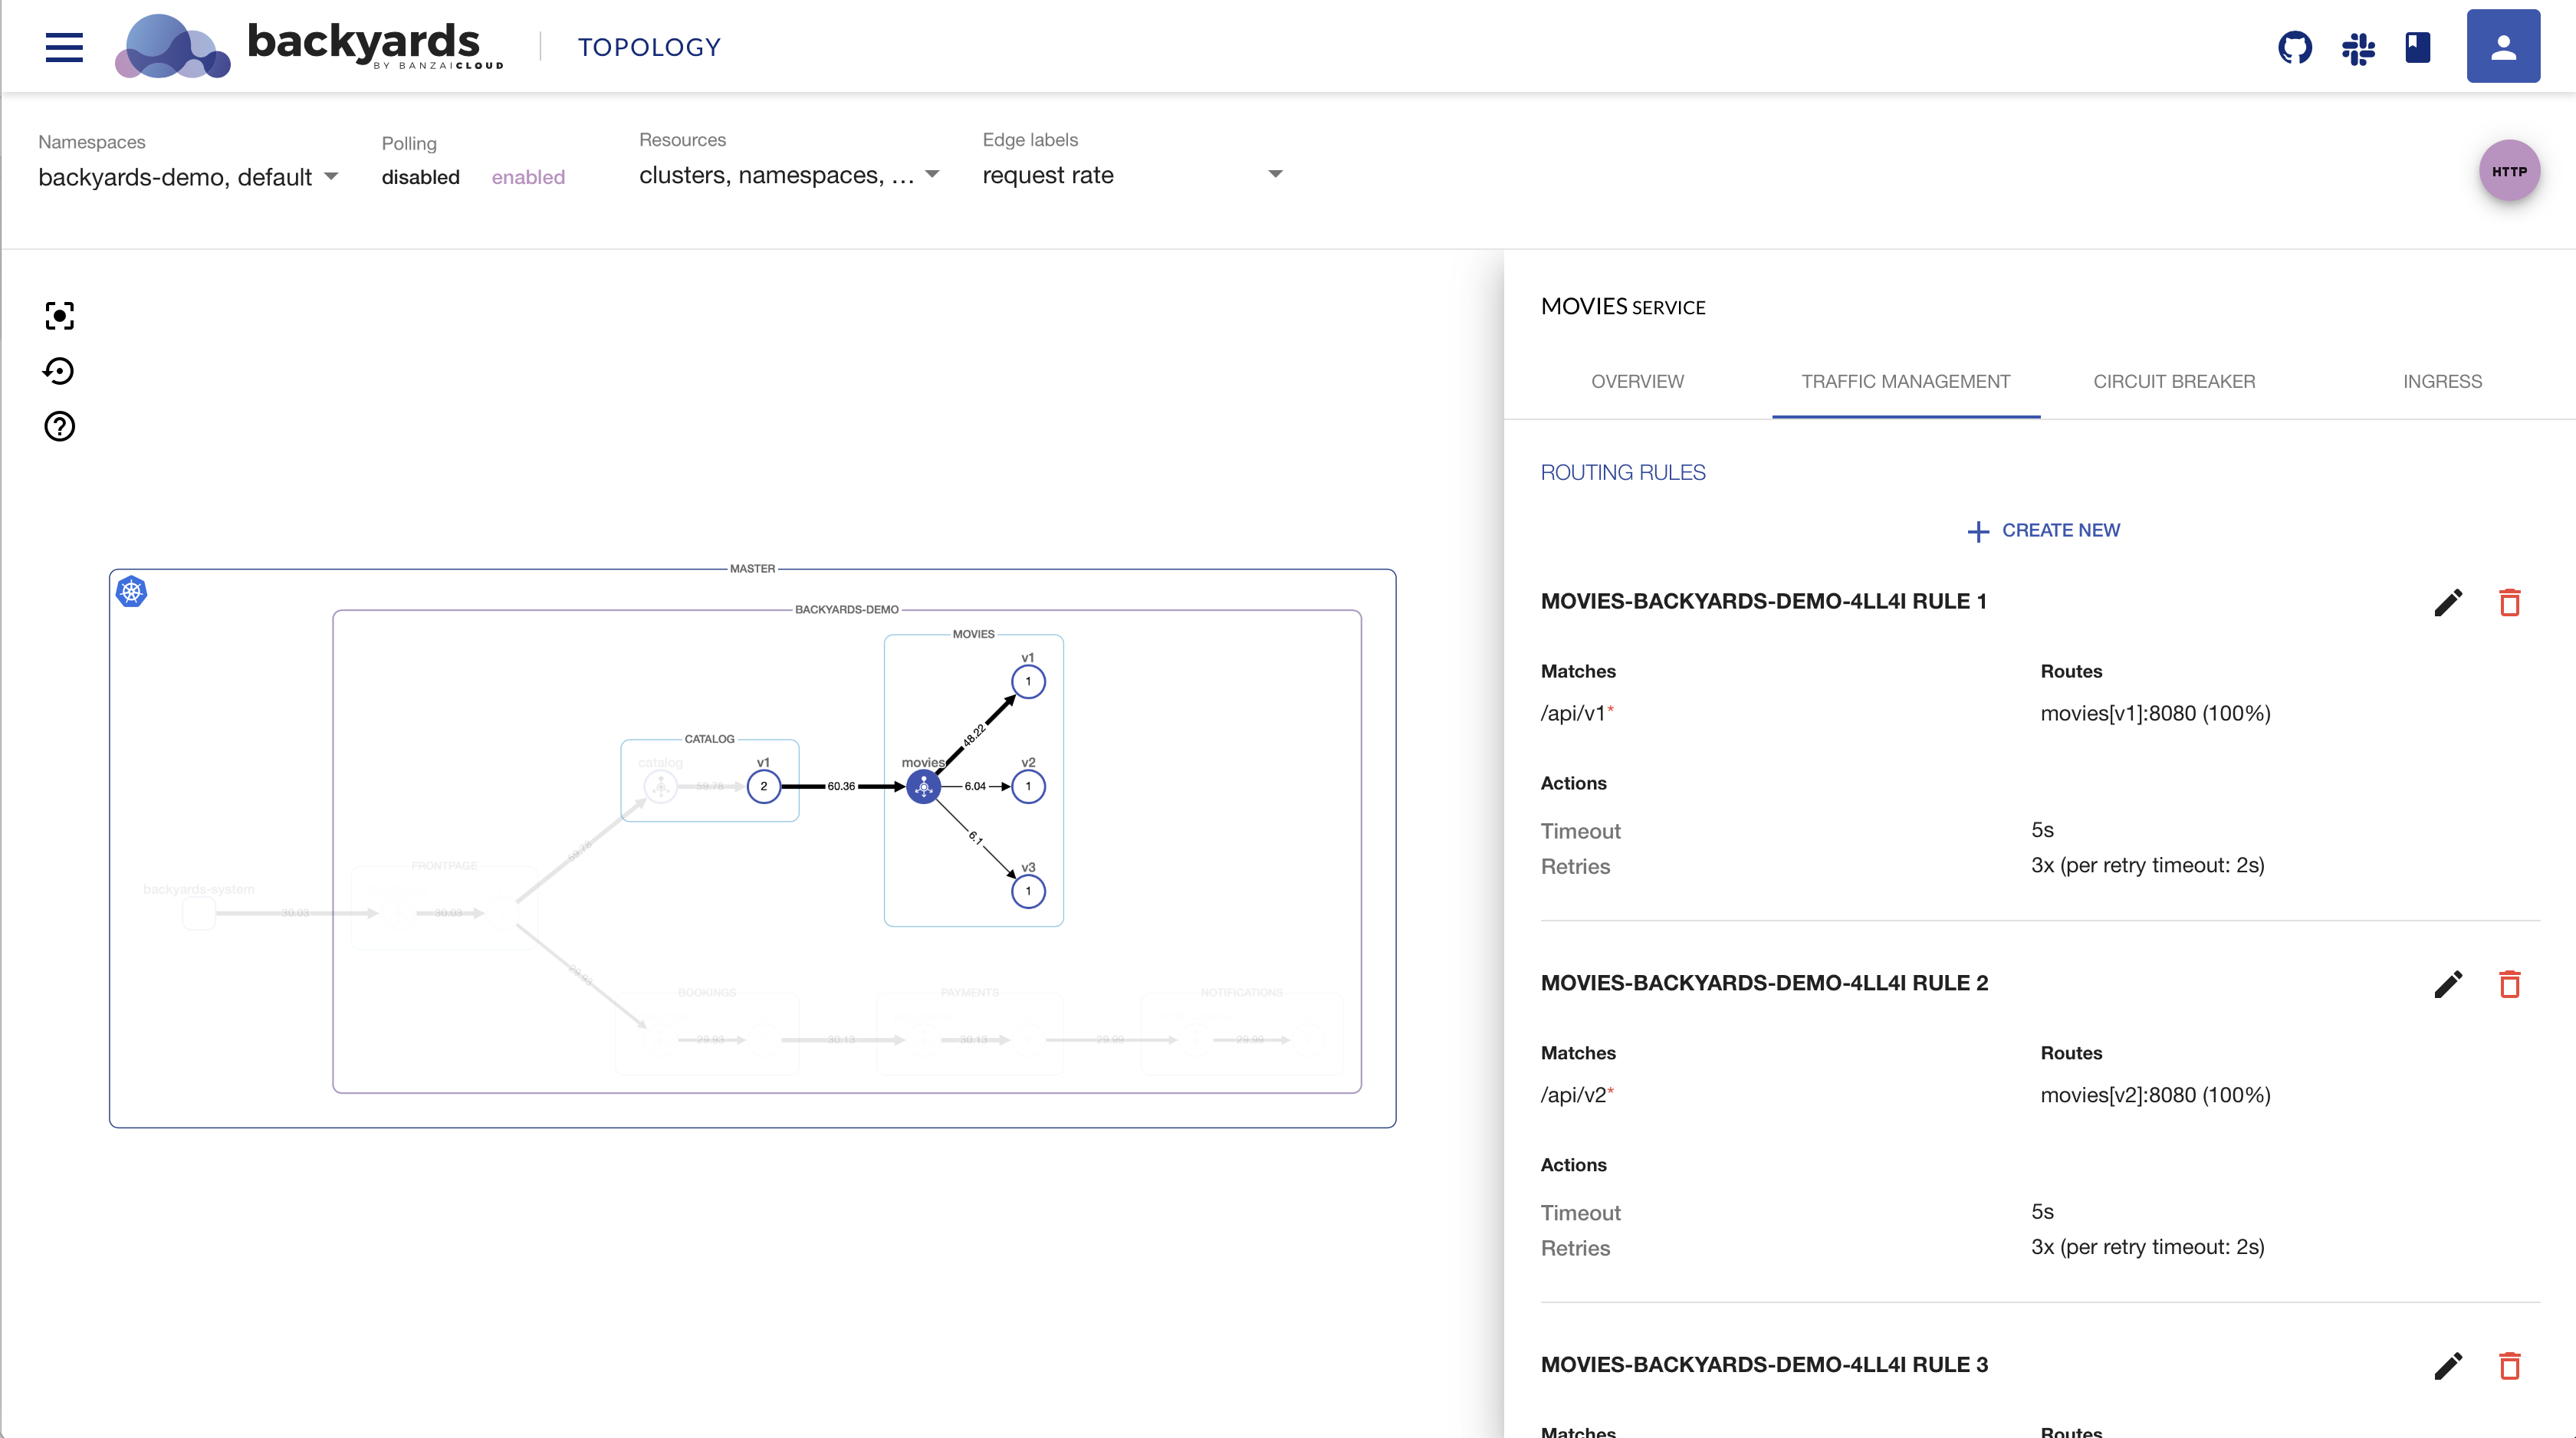
Routing can also be configured from the Backyards dashboard.
To open the Backyards dashboard, set your KUBECONFIG and run backyards dashboard from the CLI.
The routing form can help you easily set up complex routing rules, that otherwise would be pretty hard to figure out.
Select the service on the Services or the Topology view, and create a new rule on the traffic management tab.
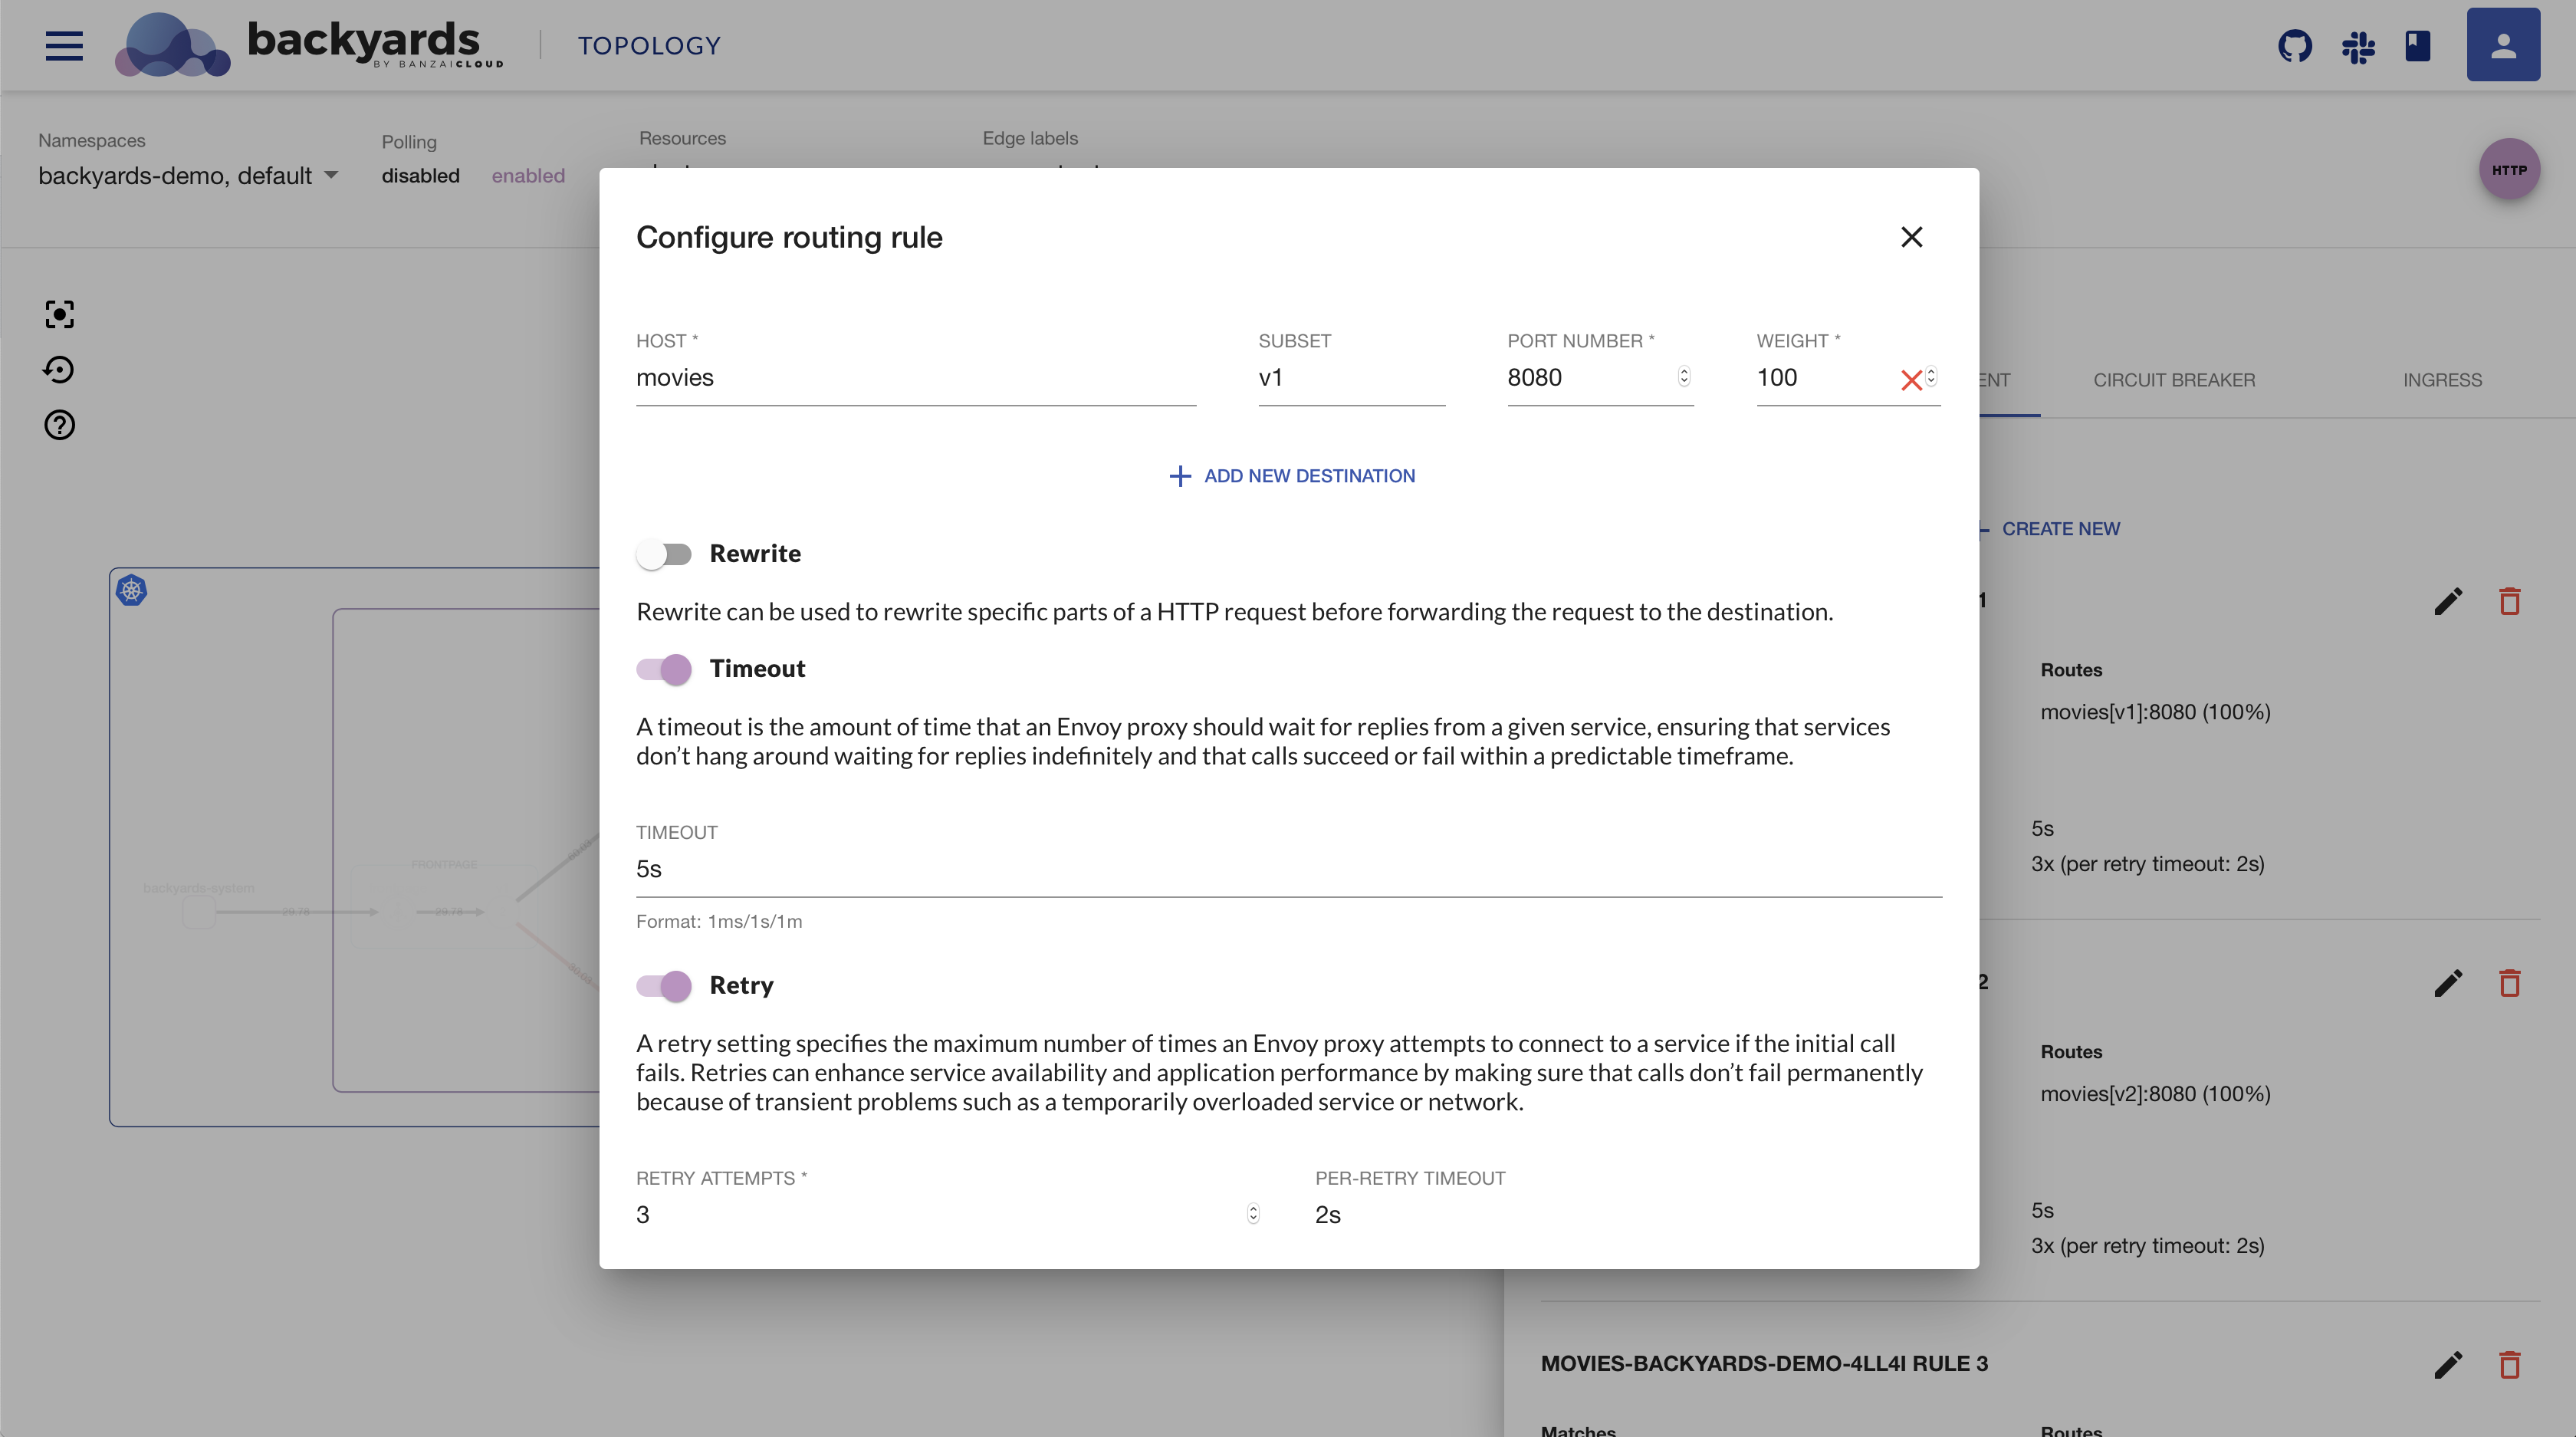
You can also edit or delete rules, and you can also view the full YAML description of the virtual service.
Cleanup 🔗︎
To remove the demo application, Backyards, and Istio from your cluster, you need only to apply one command, which takes care of removing these components in the correct order:
$ backyards uninstall -a
About Backyards 🔗︎
Banzai Cloud’s Backyards (now Cisco Service Mesh Manager) is a multi and hybrid-cloud enabled service mesh platform for constructing modern applications. Built on Kubernetes, our Istio operator and the Banzai Cloud Pipeline platform gives you flexibility, portability, and consistency across on-premise datacenters and on five cloud environments. Use our simple, yet extremely powerful UI and CLI, and experience automated canary releases, traffic shifting, routing, secure service communication, in-depth observability and more, for yourself.
About Banzai Cloud 🔗︎
Banzai Cloud is changing how private clouds are built: simplifying the development, deployment, and scaling of complex applications, and putting the power of Kubernetes and Cloud Native technologies in the hands of developers and enterprises, everywhere.
#multicloud #hybridcloud #BanzaiCloud


