


The Kubernetes scheduler can be constrained to place a pod on particular nodes using a few different options. One of these options is node and pod affinities. In a smaller homogeneous cluster they probably don’t make too much sense, because the scheduler is doing a good job spreading pods on different nodes, - well, that’s its job - but when you have a larger cluster with different types of nodes, maybe even spreading across availability zones, or multiple racks, then affinities may come in handy.
We already wrote a blog post about taints, tolerations and affinities a few weeks ago, and deep dive into how the Pipeline platform using these - today we’ll add to it by looking at the different types of affinities through some examples.
Setting the baseline 🔗︎
Before jumping into node selectors - our first example - let’s set the baseline by creating a very simple deployment on a Kubernetes cluster. This deployment will contain a simple front-end application that will be serving some static content through an Nginx web server.
But to be able to create the deployment, we’ll need a Kubernetes cluster first. I’ve created my cluster through Pipeline, but to follow the examples you can just use GKE or a custom Kubernetes cluster as well. The only special thing in this cluster is that out of the 4 nodes, 2 are preemptible. Preemptible VMs are Google Compute Engine VM instances that last a maximum of 24 hours and provide no availability guarantees, but are priced lower than standard instances. These nodes are marked with a special label that we’ll use later in our examples.
kubectl get nodes --show-labels
NAME                                               STATUS    ROLES     AGE       VERSION         LABELS
gke-gkecluster-marton-75-special-dc46c951-d3df    Ready     <none>    2m        v1.10.9-gke.5    [...] node.banzaicloud.io/ondemand=false
gke-gkecluster-marton-75-special-dc46c951-hmv5    Ready     <none>    2m        v1.10.9-gke.5    [...] node.banzaicloud.io/ondemand=false
gke-gkecluster-marton-75-standard-4155ef06-1pqg   Ready     <none>    2m        v1.10.9-gke.5    [...] node.banzaicloud.io/ondemand=true
gke-gkecluster-marton-75-standard-4155ef06-tblq   Ready     <none>    2m        v1.10.9-gke.5    [...] node.banzaicloud.io/ondemand=true
The example yamls are available here, I’ll refer to them based on the names in the repo.
To run our application, we’ll need to create a configmap first that will hold our Nginx configuration and the static html file.
cd very-important-frontend
kubectl create configmap nginx-config --from-file=conf.d
If the configmap is ready, we can create our first deployment and a corresponding service that’s creating a LoadBalancer in front of the deployment replicas.
kubectl apply -f 1-very-important-deployment-basic.yaml
kubectl expose deployment very-important-app --port=80 --type=LoadBalancer
Before continuing, check if your pods are running properly and if your service has an external IP. It may take quite a few seconds.
kubectl get pods -o wide
NAME                                  READY     STATUS    RESTARTS   AGE       IP           NODE
very-important-app-58f5bcdf4b-24d7q   1/1       Running   0          0s        10.12.0.11   gke-gkecluster-marton-75-special-dc46c951-d3df
very-important-app-58f5bcdf4b-bkpfp   1/1       Running   0          0s        10.12.1.11   gke-gkecluster-marton-75-special-dc46c951-hmv5
very-important-app-58f5bcdf4b-dbbvl   1/1       Running   0          0s        10.12.2.6    gke-gkecluster-marton-75-standard-4155ef06-1pqg
very-important-app-58f5bcdf4b-qr5qg   1/1       Running   0          0s        10.12.3.6    gke-gkecluster-marton-75-standard-4155ef06-tblq
very-important-app-58f5bcdf4b-zlh7x   1/1       Running   0          0s        10.12.1.12   gke-gkecluster-marton-75-special-dc46c951-hmv5

kubectl get services --watch
kubernetes           ClusterIP      10.15.240.1     <none>           443/TCP        4m
very-important-app   LoadBalancer   10.15.252.110   35.224.144.123   80:30789/TCP   24s
The --wide switch shows the names of the nodes where each pod was placed by the scheduler.
It’s not easy to track this info from the command line and have a good understanding of the placement of the pods, so we’ve decided to create a visualizer that can help understand the scheduler and the constraints.
Actually, we stole the idea from Brendan Burns’ Github, forked his repo that can be used to display pods and their respective controllers connected, and changed it to display which pod is placed on which node.
The code of this visualizer is available here, we’ll use it to follow where pods will land after setting constrains on them.
To use it, you’ll only need 2 commands.
git clone https://github.com/martonsereg/gcp-live-k8s-visualizer.git
kubectl proxy --www=path/to/gcp-live-k8s-visualizer --www-prefix=/visualizer/
The kubectl proxy command has a --www switch that can serve some static files from a directory under a particular prefix, so it’s really easy to write some JS code that’s using the Kubernetes API to collect resources and to display them.
If you’re kubectl proxy is running, open your browser at http://127.0.0.1:8001/visualizer/, and check if your nodes and pods are visible. The pods must have a name label in order for the visualization to work.
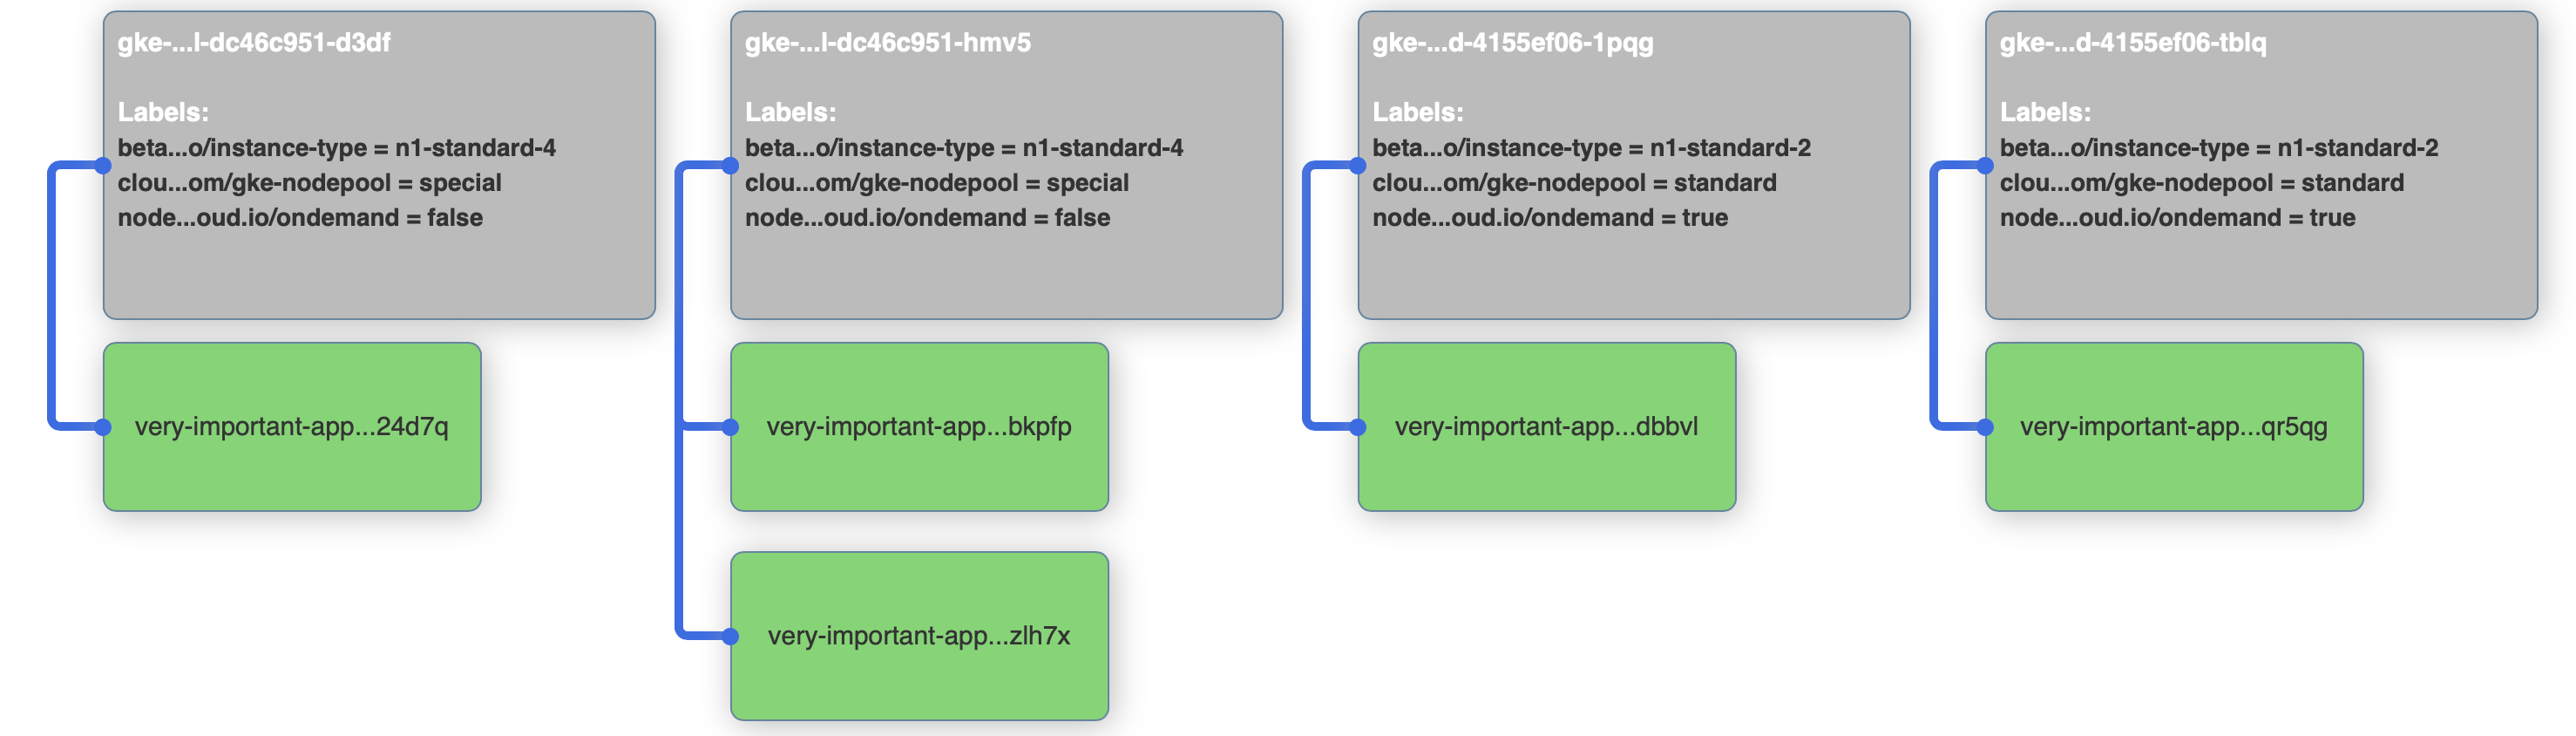
So, the application is running, it can be reached from the browser through the load-balanced service and we can see the pods placed on the nodes though our visualizer. Let’s delete our deployment and move on to nodeSelectors
kubectl delete deploy very-important-appUsing a node selector 🔗︎
Let’s say that our application is so important that we don’t want any replica pods to run on preemptible nodes, because we don’t want them interrupted.
Node selectors to the rescue! We can add a nodeSelector that’s telling the scheduler to put replicas only on nodes that have a label saying it’s ondemand and not preemptible. The diff from the base example is only 2 lines:
$ diff 1-very-important-deployment-basic.yaml 2-very-important-deployment-ns.yaml

>       nodeSelector:
>         node.banzaicloud.io/ondemand: "true"
After applying the new deployment, check out the visualizer. It should show that all pods are running on nodes that have the label set.
kubectl apply -f 2-very-important-deployment-ns.yaml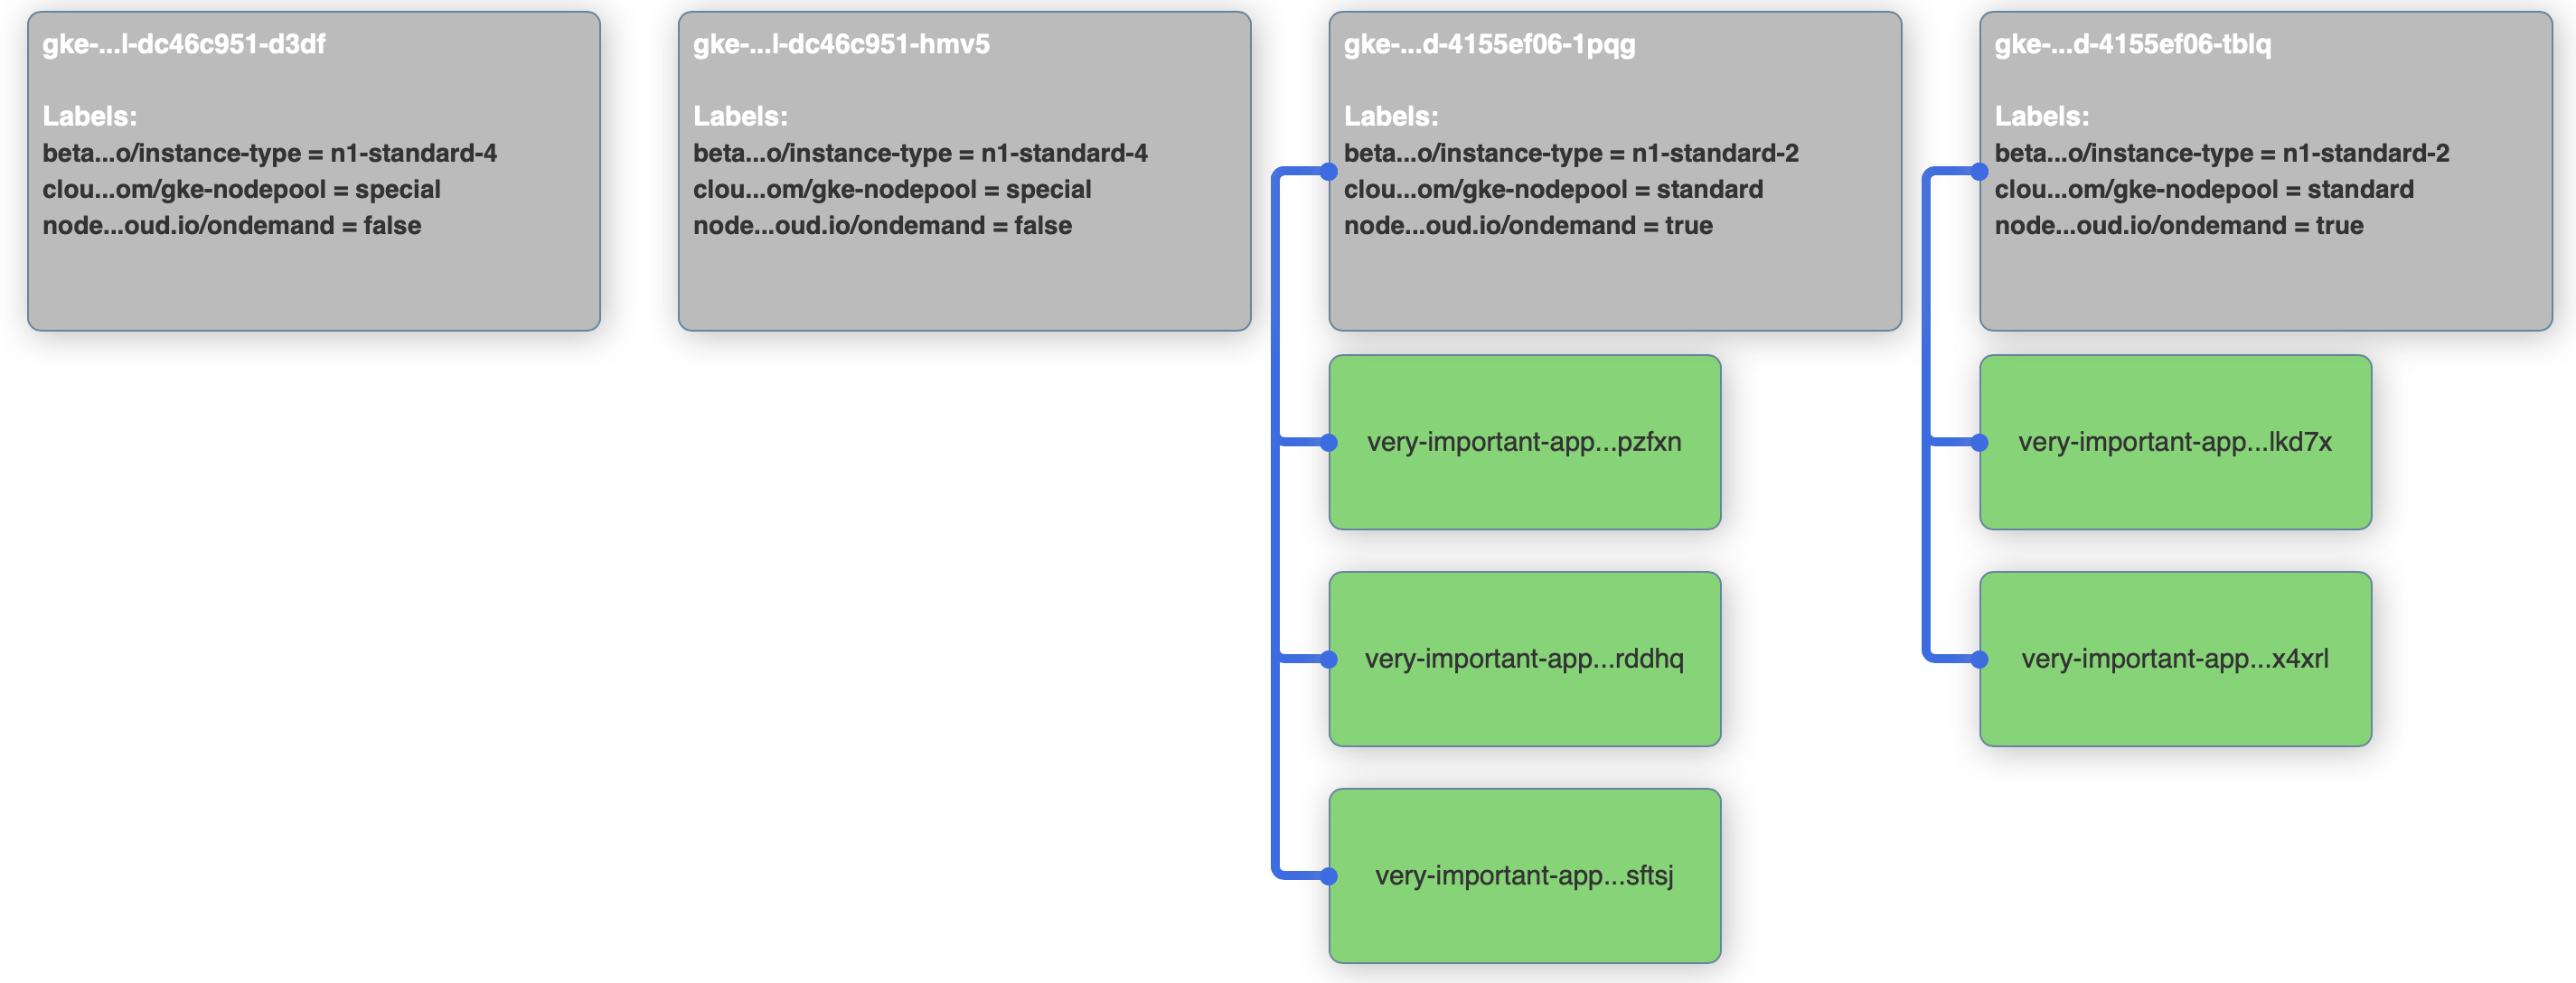
Before moving on, delete the deployment again.
kubectl delete deploy very-important-appUsing node affinites 🔗︎
Node selectors are deprecated in Kubernetes because affinities can do everything what nodeSelectors are capable of and even more.
So let’s try to rewrite our example to use node affinities, but before that, check out the list of additional features:
- you can indicate that the rule is “soft”/“preference” rather than a hard requirement, so if the scheduler can’t satisfy it, the pod will still be scheduled
- the language is more expressive (not just “AND of exact match”)
- you can constrain against labels on other pods running on the node (or other topological domain), rather than against labels on the node itself, which allows rules about which pods can and cannot be co-located
The difference from the previous example is quite large. With affinities, it takes 9 lines of yaml to describe the same constraint, but it’s our new shiny toy so let’s just get used to it. Instead of a simple key-value pair, we now have matchExpressions to describe the same thing, and we have something called requiredDuringSchedulingIgnoredDuringExecution that we’ll discuss in the next example.
diff 2-very-important-deployment-ns.yaml 3-very-important-deployment-na.yaml

<       nodeSelector:
<         node.banzaicloud.io/ondemand: "true"
---
>       affinity:
>         nodeAffinity:
>           requiredDuringSchedulingIgnoredDuringExecution:
>             nodeSelectorTerms:
>             - matchExpressions:
>               - key: node.banzaicloud.io/ondemand
>                 operator: In
>                 values:
>                 - "true"
To see this affinity in action, run the apply command again, check out the visualizer (it should show something very similar as in the previous example) and delete the application again before moving on.
kubectl apply -f 3-very-important-deployment-na.yaml
kubectl delete deploy very-important-app
Required during scheduling 🔗︎
In the last yaml we’ve already seen requiredDuringSchedulingIgnoredDuringExecution. What else could we write there? Well, only one other keyword for now, that has an easy to remember name: preferredDuringSchedulingIgnoredDuringExecution.
You can think of them as “hard” and “soft” respectively, in the sense that the former specifies rules that must be met for a pod to be scheduled onto a node (just like nodeSelector but using a more expressive syntax), while the latter specifies preferences that the scheduler will try to enforce but will not guarantee.
The second part of the keyword, IgnoredDuringExecution indicates that the node affinity only applies during pod scheduling, it doesn’t apply to already running pods. In the future there will be something like RequiredDuringExecution that will deschedule pods if the environment changes and the originally applied constraints are no longer standing.
Next, we’ll try to emulate an environment that runs out of resources on on-demand nodes, and see if the scheduler really fails to place additional pods with a “hard” rule. My cluster has n1-standard-2 type of nodes as on-demand ones, they have 2 CPUs. I’ve added a resource request of 450 millicores to our containers, so about 3 of these pods can fit on a node. But I’ve also increased the replicas to 8, let’s see what happens.
$ diff 3-very-important-deployment-na.yaml 4-very-important-deployment-na-resources.yaml

<   replicas: 5
---
>   replicas: 8

>         resources:
>           requests:
>             cpu: "450m"
After applying the new configuration, we can check the resource usage on the nodes. I’ll be using the kubeutil command for that that’s aliased to:
alias kubeutil='kubectl get nodes --no-headers | awk '\''{print $1}'\'' | xargs -I {} sh -c '\''echo {} ; kubectl describe node {} | grep Allocated -A 5 | grep -ve Event -ve Allocated -ve percent -ve -- ; echo '\'''kubeutil should show that CPU resource requests are around 80-90 percent on the on-demand nodes, while close to 15-20% on preemptible ones.
kubectl apply -f 4-very-important-deployment-na-resources.yaml
kubeutil

gke-gkecluster-marton-75-special-dc46c951-d3df
  CPU Requests  CPU Limits  Memory Requests  Memory Limits
  880m (22%)    400m (10%)  814Mi (6%)       948Mi (7%)

gke-gkecluster-marton-75-special-dc46c951-hmv5
  CPU Requests  CPU Limits  Memory Requests  Memory Limits
  600m (15%)    0 (0%)      576Mi (4%)       470Mi (3%)

gke-gkecluster-marton-75-standard-4155ef06-1pqg
  CPU Requests  CPU Limits  Memory Requests  Memory Limits
  1741m (90%)   286m (14%)  664552Ki (11%)   1022952Ki (17%)

gke-gkecluster-marton-75-standard-4155ef06-tblq
  CPU Requests  CPU Limits  Memory Requests  Memory Limits
  1550m (80%)   0 (0%)      200Mi (3%)       300Mi (5%)
Also, kubectl get pods should show that there are some pending pods that cannot be scheduled, because the scheduler couldn’t find any nodes for them. Running kubectl describe pod on one of the pending pods will also show the reason:
kubectl get pods
NAME                                  READY     STATUS    RESTARTS   AGE
very-important-app-574996d8b6-29lnp   1/1       Running   0          6s
very-important-app-574996d8b6-gs6rj   1/1       Running   0          6s
very-important-app-574996d8b6-pfhmb   1/1       Running   0          6s
very-important-app-574996d8b6-s87vm   0/1       Pending   0          6s
very-important-app-574996d8b6-sqd5r   1/1       Running   0          6s
very-important-app-574996d8b6-tdc8h   1/1       Running   0          6s
very-important-app-574996d8b6-x25gz   0/1       Pending   0          6s
very-important-app-574996d8b6-xwgns   1/1       Running   0          6s

kubectl describe pod very-important-app-574996d8b6-x25gz
[...]
Events:
  Type     Reason            Age                From               Message
  ----     ------            ----               ----               -------
  Warning  FailedScheduling  11s (x7 over 42s)  default-scheduler  0/4 nodes are available: 2 Insufficient cpu, 2 node(s) didn't match node selector.
Before moving on, delete the deployment as usual.
kubectl delete deploy very-important-appPreferred during scheduling 🔗︎
Let’s see what happens when we change our deployment to use preferredDuringSchedulingIgnoredDuringExecution.
Note that it’s not enough to change the keyword, the yaml structure changes a bit as well.
There are no nodeSelectorTerms but preference instead, and there is a new field called weight:
diff 4-very-important-deployment-na-resources.yaml 5-very-important-deployment-na-preferred.yaml

<           requiredDuringSchedulingIgnoredDuringExecution:
<             nodeSelectorTerms:
<             - matchExpressions:
---
>           preferredDuringSchedulingIgnoredDuringExecution:
>           - weight: 1
>             preference:
>               matchExpressions:
We would expect that it will work like this: the scheduler will put pods on on-demand nodes until it can, then after the resource constraints no longer allow that, it will place the remaining pods on preemptible nodes. Good thought, but not completely true. Apply the new configuration, and see what happens:
kubectl apply -f 5-very-important-deployment-na-preferred.yaml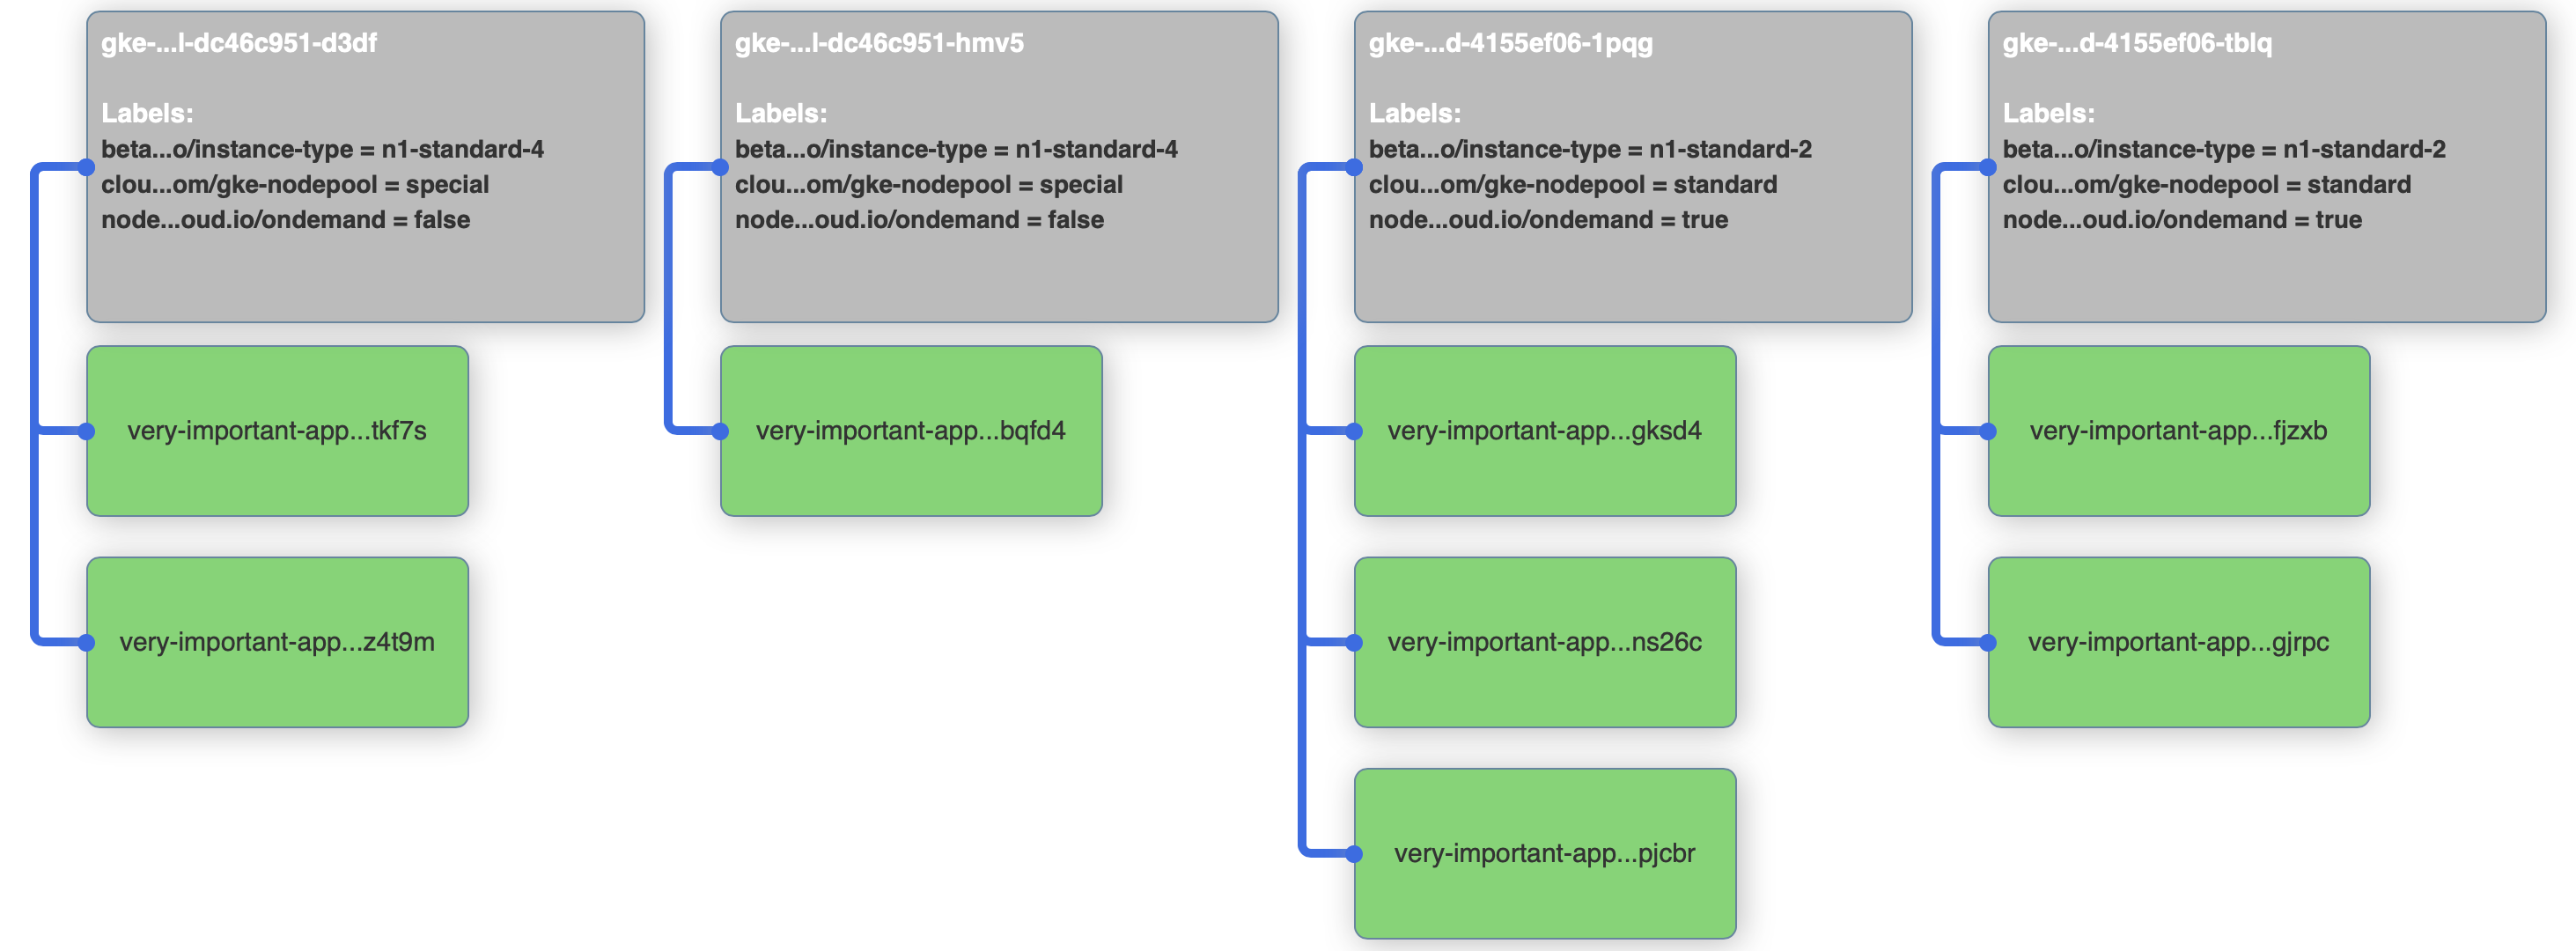
There are no pending pods anymore, but our on-demand nodes are not fully utilized. So how does this really work? To be able to understand it, we should peak into the internal operation of the scheduler, especially priorities.
After the scheduler filters nodes that do not meet certain requirements, it calculates a priority score for every remaining node to find the “best one”.
This score is added up from multiple built-in priority functions, like LeastRequestedPriority, BalancedResourceAllocation or SelectorSpreadPriority.
NodeAffinityPriority is also one of these functions, so when a pod comes into the scheduler with preferredDuringSchedulingIgnoredDuringExecution set to on-demand nodes, it will calculate a priority score for every node in the cluster, and will add the value of the weight field to this score only for nodes where the matchExpression is true. So those nodes will have a higher priority score for NodeAffinityPriority, but it can happen that other priority functions on other nodes balance this higher priority. So even if there’s still free capacity on nodes where the matchExpression is true, the pod can be placed elsewhere.
In our example the other nodes are under-utilized, replicas are not spread well on 2 nodes, so the preference can be shadowed by other priority functions, that will take these into account.
Read more about priorities and the internals of the scheduler here
So what’s a good advice for setting weight in the range 1-100? It’s simple: you won’t be able to calculate the priority score in advance for each of the nodes, so as a rule of thumb, the more you want your preference to be fulfilled, the higher weight you’ll need to set.
Don’t forget to delete the deployment again:
kubectl delete deploy very-important-appNode anti-affinity 🔗︎
Node anti-affinity is not a different keyword, it’s still a node affinity, but with different operators in the matchExpression.
You can use several different operators in matchExpressions, like In, NotIn, Exists, DoesNotExist, Gt, and Lt. You can use NotIn and DoesNotExist to achieve node anti-affinity behavior, or use node taints to repel pods from specific nodes.
We can change our example to say: “don’t schedule pods on nodes that are not on-demand instances”. It’s a node anti-affinity but the effect should be the same as before.
diff 3-very-important-deployment-na.yaml 6-very-important-deployment-naa.yaml

<                 operator: In
---
>                 operator: NotIn

<                 - "true"
---
>                 - "false"
Apply the config, check the visualizer and delete the deployment once you’re ready.
kubectl apply -f 6-very-important-deployment-naa.yaml
kubectl delete deploy very-important-app
Pod anti-affinity 🔗︎
Inter-pod affinity and anti-affinity allow you to constrain which nodes your pod is eligible to be scheduled based on labels on pods that are already running on the node rather than based on labels on nodes. From the Kubernetes docs: The rules are of the form “this pod should (or, in the case of anti-affinity, should not) run in an X if that X is already running one or more pods that meet rule Y”. X means a topology - in its simplest form a node, but it can be a rack, an availability zone or something else that’s marked by a label on each node. Y means a label selector just like with node affinities.
The definition can sound quite intimidating, so jump in to an example again. Let’s say that our front-end application needs a redis in-memory cache.
We’d like to deploy 3 replicas to our cluster and we want to make sure that these are spread across nodes, in other words a node can only run one redis replica. We can achieve it with a node anti-affinity.
If we substitute X with node, and rule Y with name=redis-cache, we get: this pod should not run on a node if that node is already running one or more pods with the name redis-cache. That’s how it looks like in yaml:
affinity:
  podAntiAffinity:
    requiredDuringSchedulingIgnoredDuringExecution:
    - labelSelector:
        matchExpressions:
        - key: name
          operator: In
          values:
          - redis-cache
      topologyKey: "kubernetes.io/hostname"
Note that podAntiAffinity is not like nodeAntiAffinity, as it’s a separate keyword, not only a different the operator.
This is because using a NotIn operator with podAffinity would mean a different thing, something like: this pod should run in an X if that X is already running one or more pods that doesn’t meet rule Y.
Apply the redis configuration on your cluster, and check if the pods are running successfully:
kubectl apply -f 7-redis-deployment.yamlPod affinity 🔗︎
Our last example is about pod affinity. Let’s say that our front-end application from before is using redis and we want to make sure that - for performance reasons - our front-end pods are scheduled to nodes where a redis pod is already running. We won’t use the node affinities for now, so that’s how we can do it with pod affinities:
diff 1-very-important-deployment-basic.yaml 8-very-important-deployment-pa.yaml

>       affinity:
>         podAffinity:
>           requiredDuringSchedulingIgnoredDuringExecution:
>           - labelSelector:
>               matchExpressions:
>               - key: name
>                 operator: In
>                 values:
>                 - redis-cache
>             topologyKey: "kubernetes.io/hostname"
If we apply our last deployment on the cluster, we’ll see that front-end pods are only deployed alongside redis pods.
kubectl apply -f 8-very-important-deployment-pa.yaml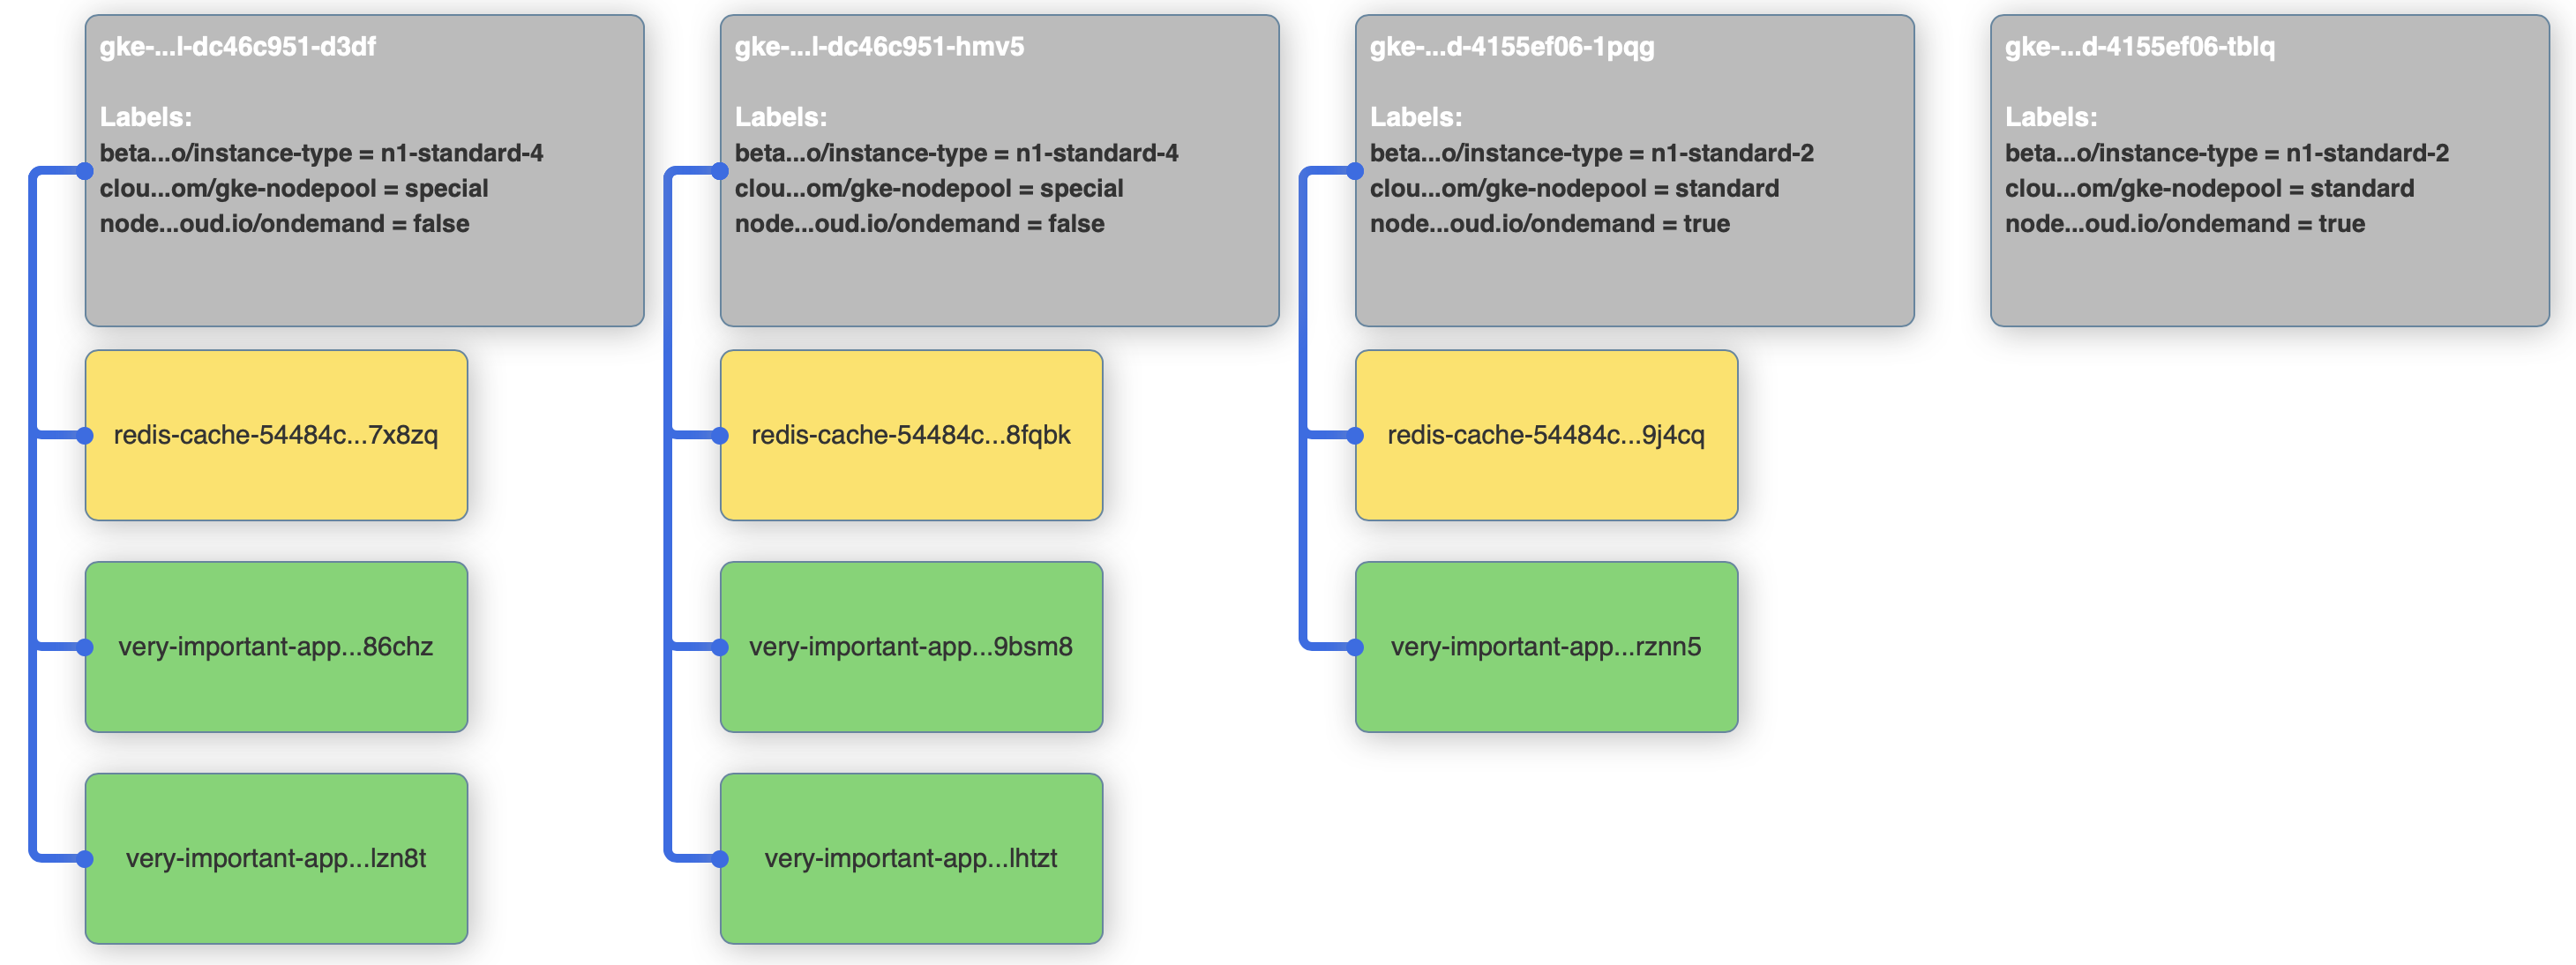
Cleanup 🔗︎
To clean things up:
kubectl delete deploy very-important-app
kubectl delete deploy redis-cache
kubectl delete configmap nginx-config
kubectl delete service very-important-app
About Banzai Cloud Pipeline 🔗︎
Banzai Cloud’s Pipeline provides a platform for enterprises to develop, deploy, and scale container-based applications. It leverages best-of-breed cloud components, such as Kubernetes, to create a highly productive, yet flexible environment for developers and operations teams alike. Strong security measures — multiple authentication backends, fine-grained authorization, dynamic secret management, automated secure communications between components using TLS, vulnerability scans, static code analysis, CI/CD, and so on — are default features of the Pipeline platform.


