


This post highlights how the Pipeline Platform enables Managed Service Identity (MSI) and assigns the Storage Account Contributor role to AKS cluster Virtual Machines.
But wait, why? 🔗︎
At Banzai Cloud we have a PVC Operator, which makes using Kubernetes Persistent Volumes easier on cloud providers by dynamically creating the required accounts and storage classes. That operator allows us to use the same Helm chart on all supported providers, thus there is no need to create cloud specific Helm charts.
We are launching Kubernetes clusters with Pipeline on all major providers, supporting various use cases with multiple storage requirements. One requirement was the use of AzureFile, which requires the creation of a Storage Account. The PVC Operator handles Storage Account creation automatically but the following permissions need to be set:
- MSI has to be enabled
- Grant Access to your VMs to create a Storage Account; instead of adding a Read role, use the Storage Account Owner role.
If you are interested in AKS related posts, you may be interested in the following: AKS posts
What is Managed Service Identity (MSI)? 🔗︎
A common challenge when building cloud applications is how to manage the credentials in your code for authentication to cloud services. Keeping these credentials secure is an important task. Ideally, they never appear on developer workstations or get checked into source control. Azure Key Vault provides a method of securely storing credentials and other keys and secrets, but your code needs to be authenticated to Key Vault in order to retrieve them. MSI simplifies this problem by giving Azure services an automatically managed identity in Azure Active Directory (Azure AD). You can use this identity to authenticate to any service that supports Azure AD authentication, including Key Vault, without having any credentials in your code.
MSI is gratis with Azure Active Directory - there is no additional cost for Managed Service Identity.
Types of Managed Service Identities 🔗︎
There are two types of Managed Service Identities: System Assigned and User Assigned.
- A System Assigned Identity is enabled directly on Azure service instances. When enabled, Azure creates an identity for the service instance in the Azure AD tenant that is trusted by the subscription. Once the identity is created, its credentials are provisioned onto the service instance. The life cycle of a system assigned identity is tied to the Azure service instance it’s enabled on; if the service instance is deleted, Azure automatically scrubs the credentials and the identity in Azure AD.
- A User Assigned Identity is created as a standalone Azure resource. Through a create process, Azure generates an identity in the Azure AD tenant that is trusted by the subscription. After the identity is generated, it can be assigned to one or more Azure service instances. The life cycle of a user assigned identity is managed separately from the life cycle of the Azure service instances it is assigned to.
Supported services with MSI 🔗︎
- Azure Virtual Machines
- Azure App Service
- Azure Functions
- Azure Data Factory V2
Assign Storage Account Contributor role to VMs with Azure CLI and console 🔗︎
Azure subscription with AKS service enabled necessary for the operations.
If Azure CLI tool is not installed, please run the following commands:
$ curl -L https://aka.ms/InstallAzureCli | bash
$ exec -l $SHELL
$ az login
Create a resource group with the following command:
An Azure resource group is a logical group in which Azure resources are deployed and managed.
$ az group create --name blogRG --location eastusCreate an AKS cluster:
The following example creates a cluster named blogCluster with two nodes. This may take awhile.
$ az aks create --resource-group blogRG --name blogCluster --node-count 2 --generate-ssh-keysAfter the cluster has been created successfully you can see on the console that that cluster has two Virtual Machines:
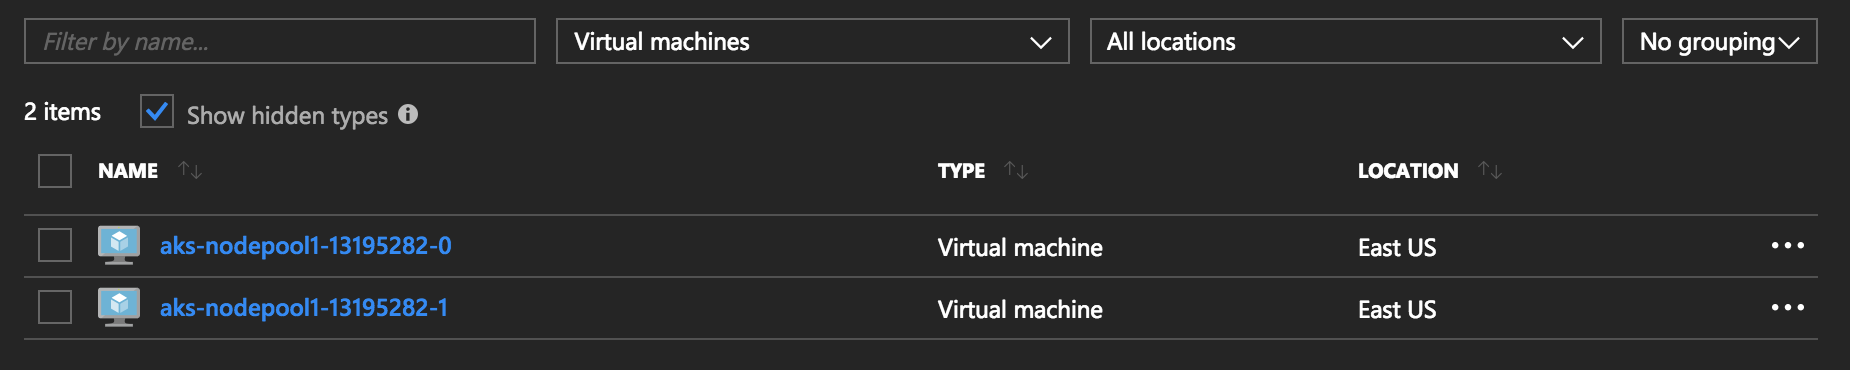
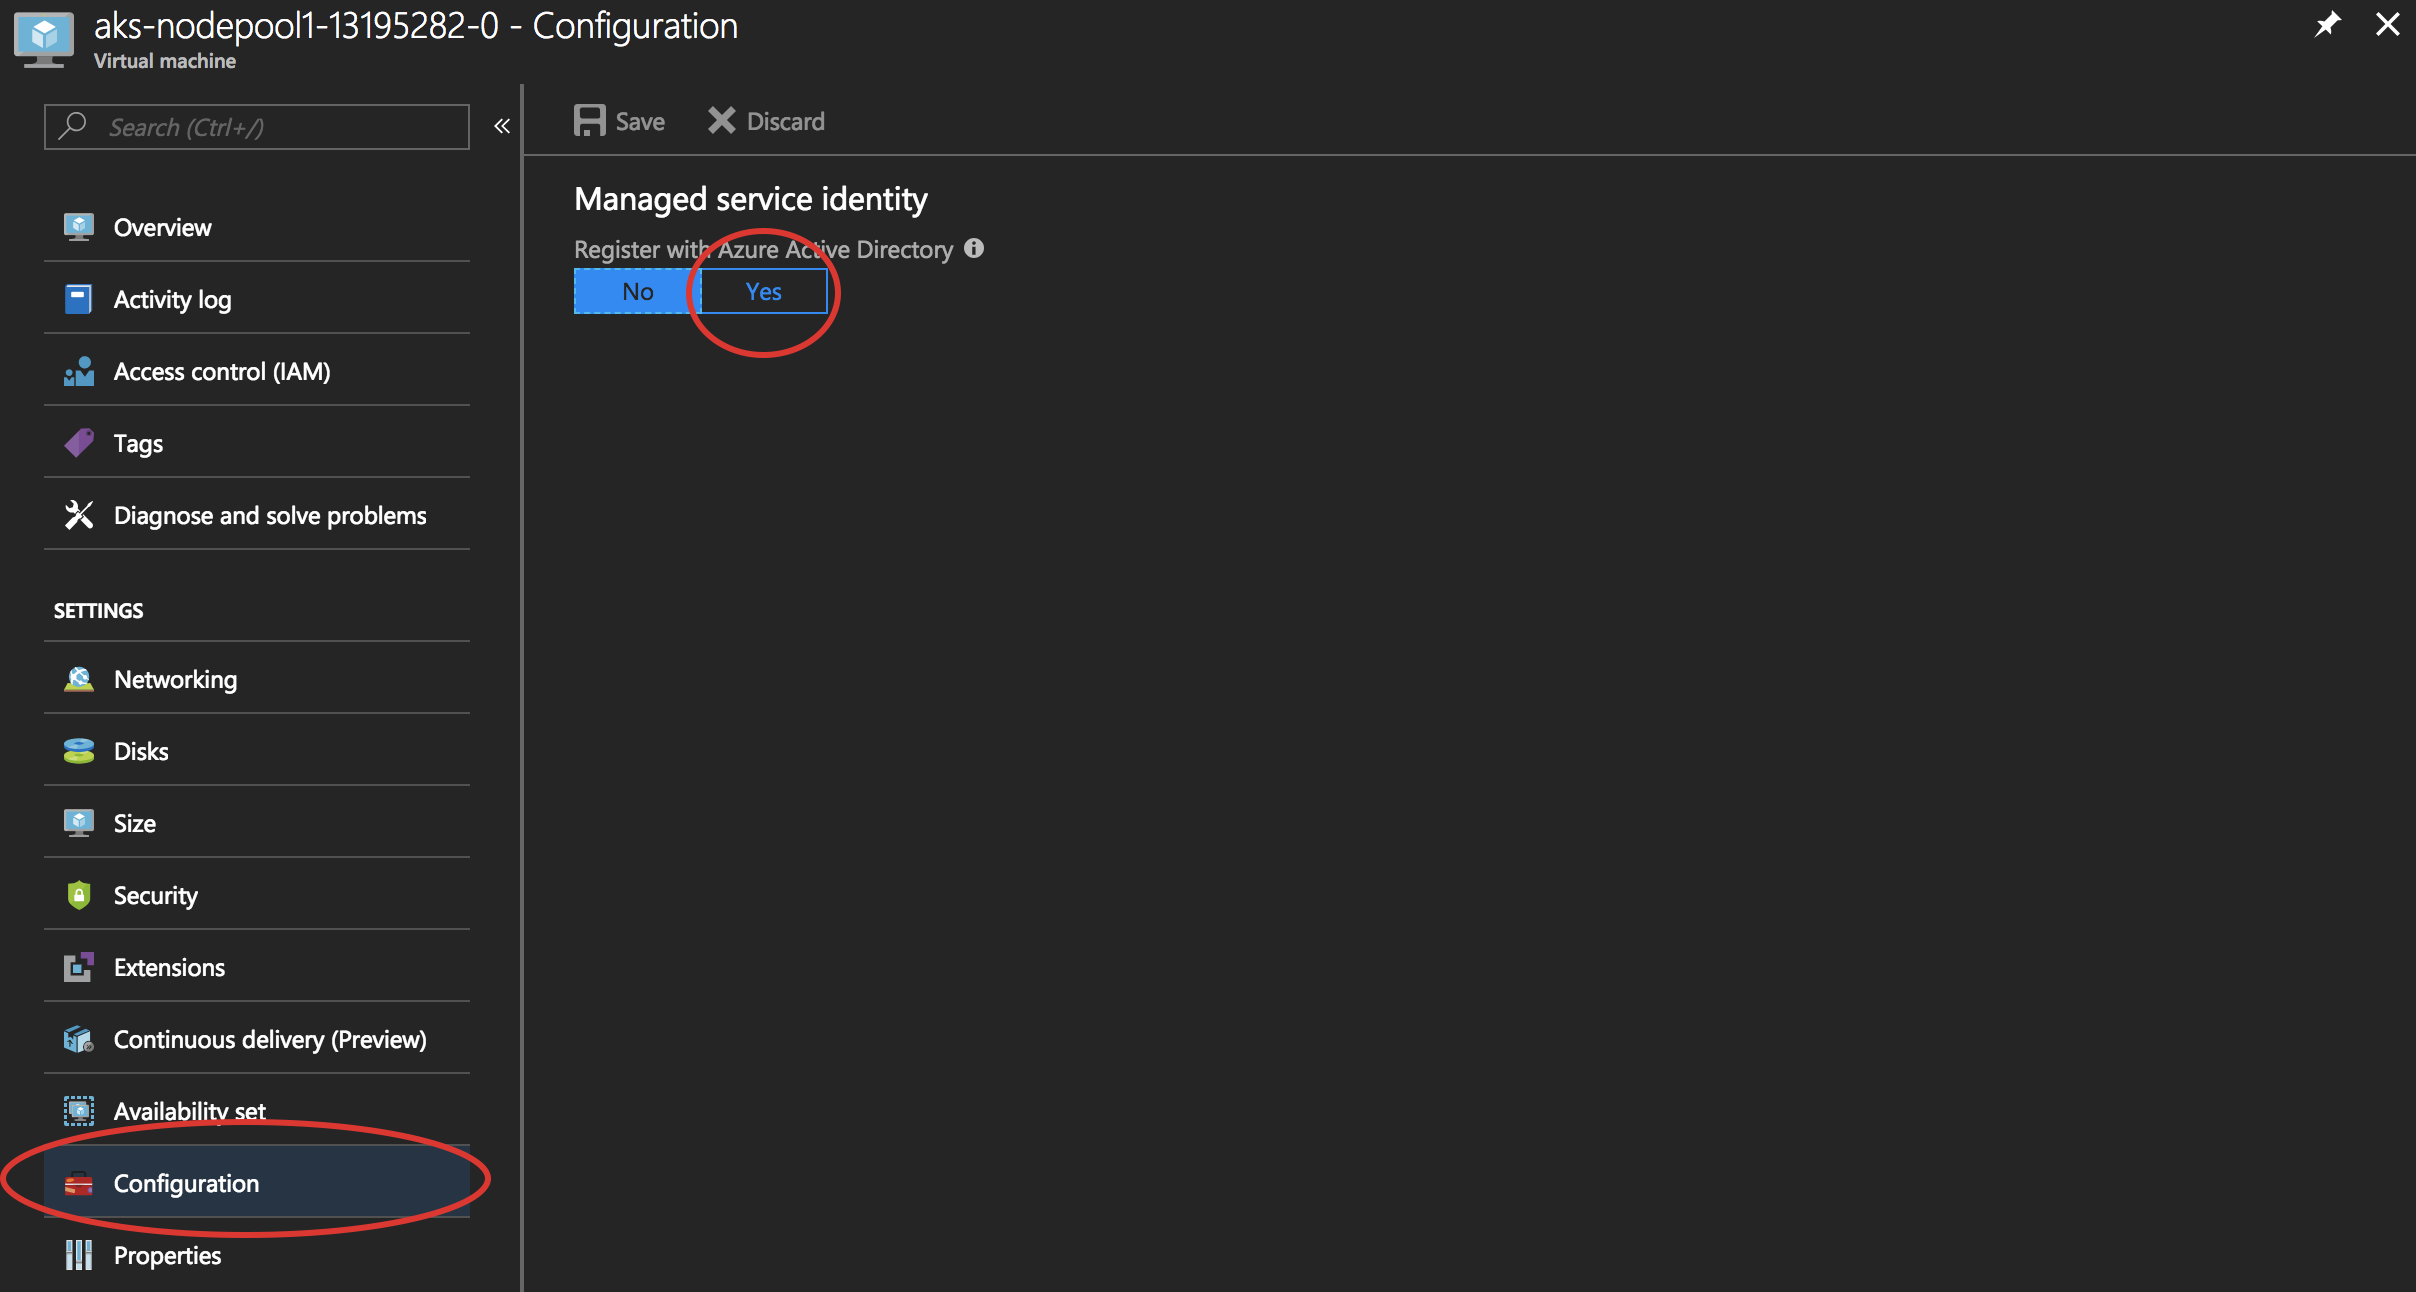
Enable MSI 🔗︎
Now you can enable MSI on each Virtual Machine. Begin by selecting the Virtual Machine that you want to enable MSI on. Then, on the left navigator bar, choose Configuration. Locate Managed Service Identity. To register and enable the MSI, select Yes, if you wish to disable it, choose No. Don’t forget to save this configuration.
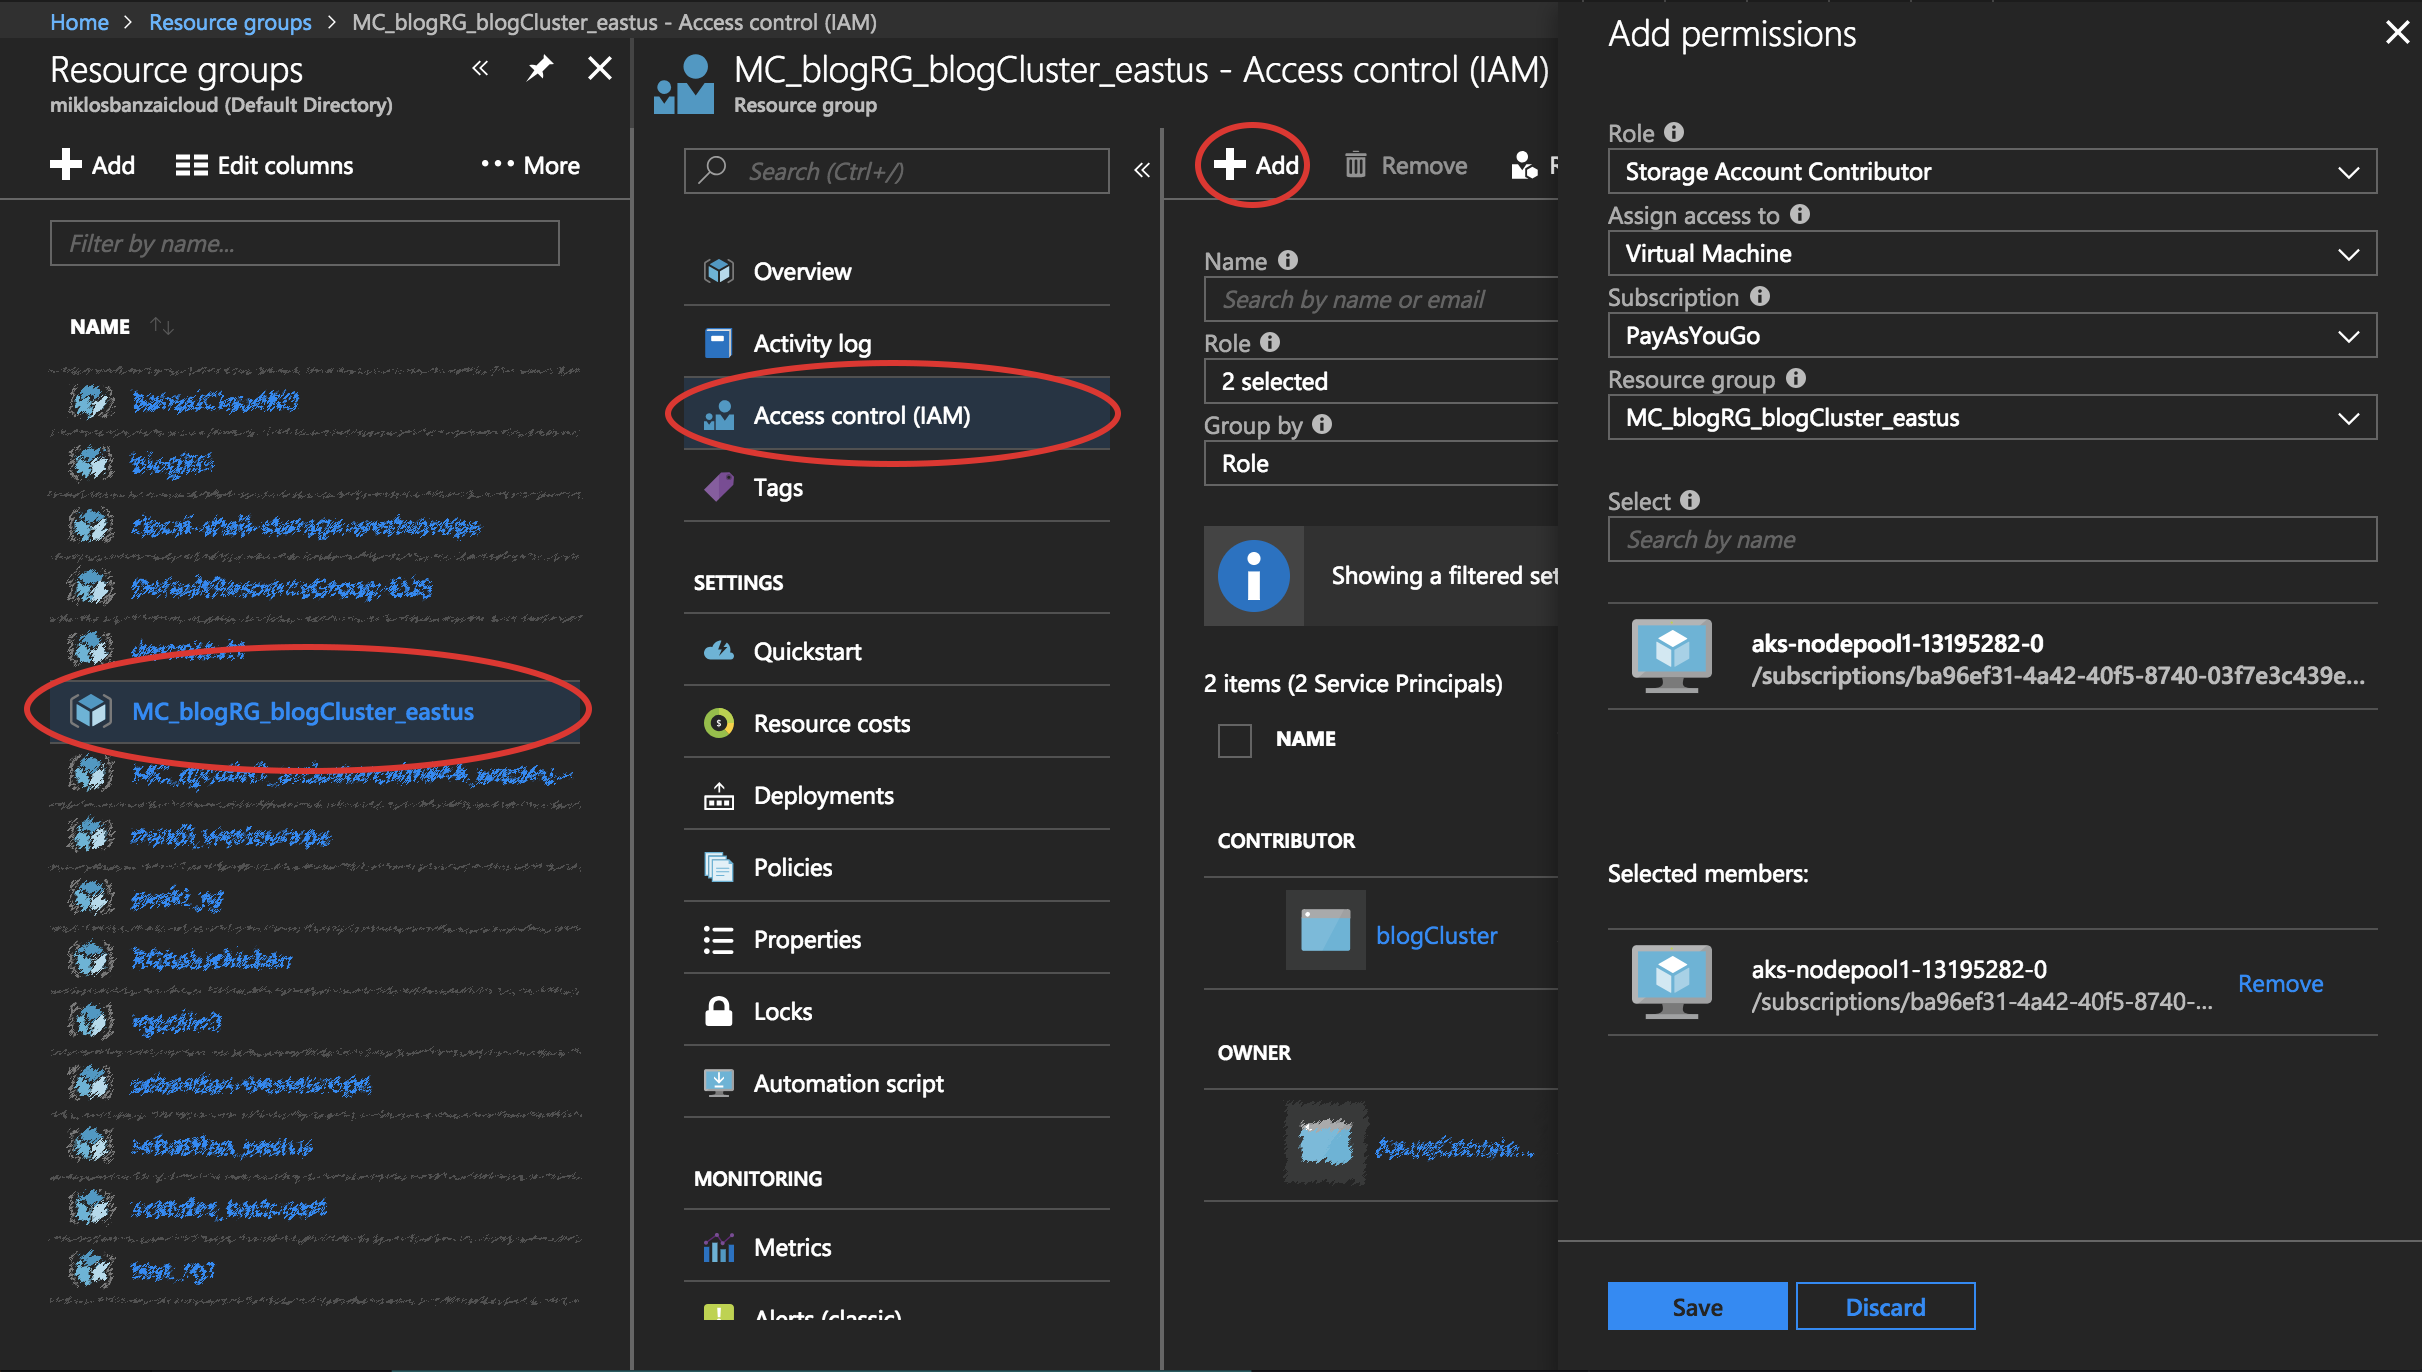
Grant your VM access 🔗︎
Through MSI, your code can get access tokens to authenticate to resources that support Azure AD authentication. The Azure Resource Manager API supports Azure AD authentication. First, you need to grant this VM’s identity access to a resource group in Azure Resource Manager, in this case the Resource Group in which the VM is contained.
- Navigate to the tab for Resource Groups.
- Select the specific Resource Group you created earlier.
- Go to Access control(IAM) in the left panel.
- Click to Add a new role assignment for your VM. Type Storage Account Contributor into the Role field.
- In the next dropdown, Assign access to the resource Virtual Machine.
- Next, ensure the proper subscription is listed in the Subscription dropdown. And for Resource Group, select your cluster’s infrastructure resource group.
- Finally, in Select choose your VM in the dropdown and click Save.
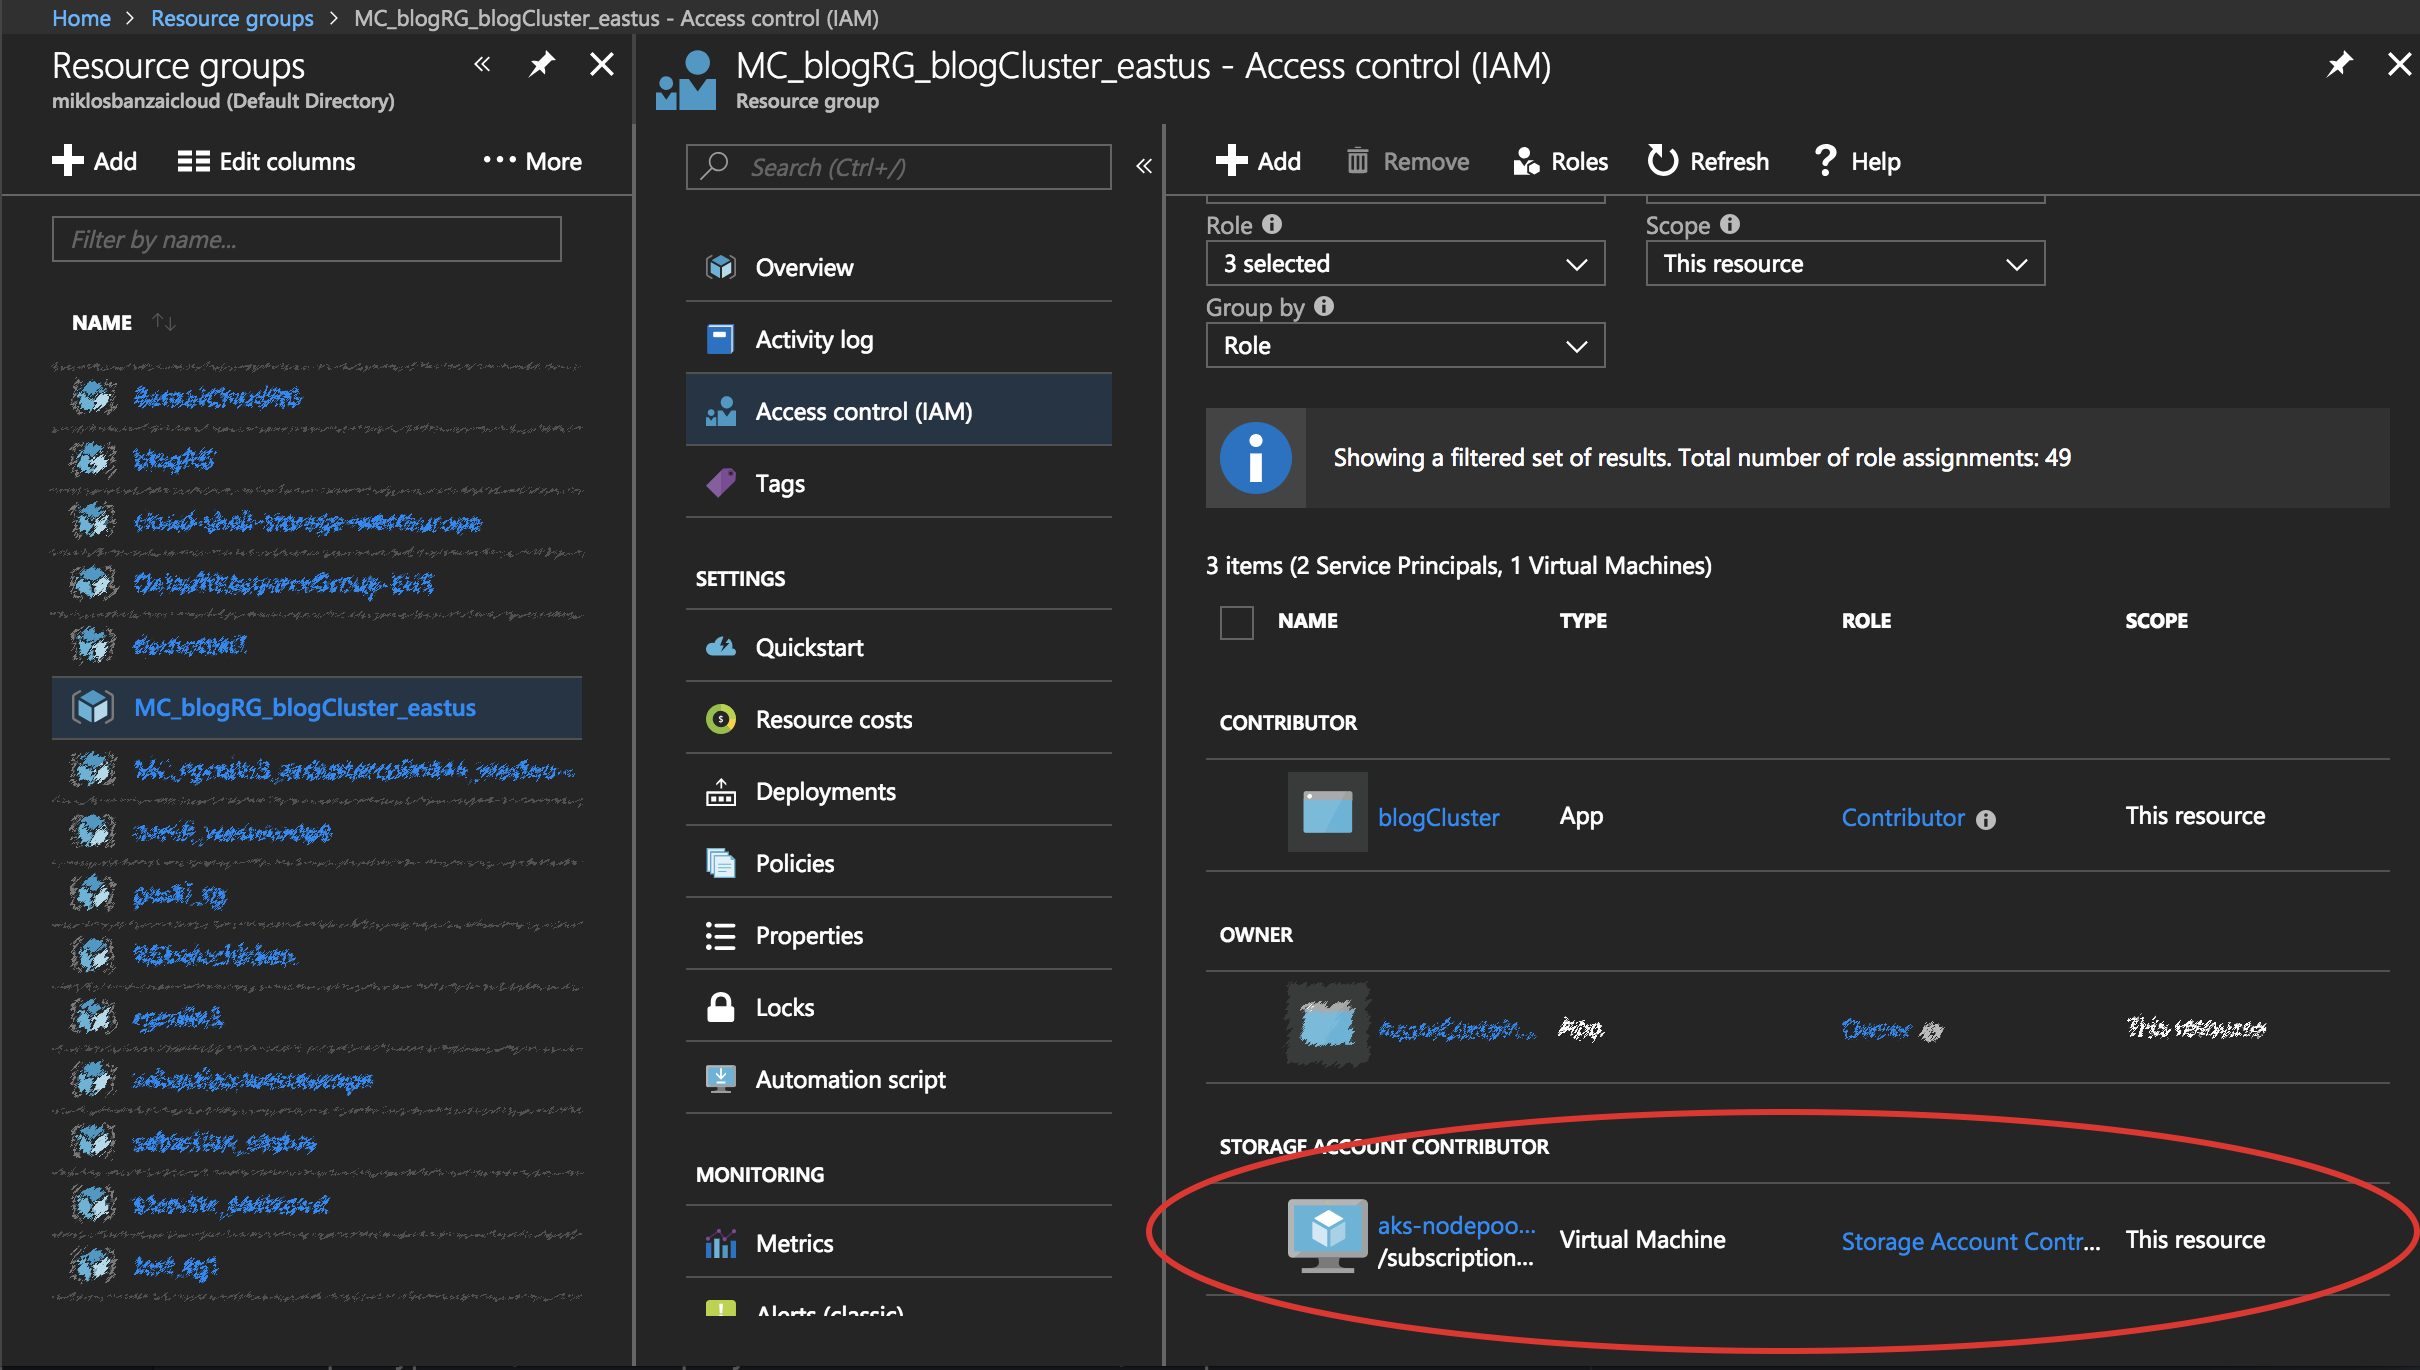
If everything is running smoothly, you should see a new Storage Account Contributor in the Access Control panel:
It’s been a long and ardous road, but we’ve achieved what we set out to. Nevertheless, we don’t want to go through all these steps again, which is where the Pipeline API comes in.
Use Pipeline to create an AKS cluster with role assigned VMs 🔗︎
Prerequisites 🔗︎
Pipeline Control Plane 🔗︎
To start with, you’ll need a running Pipeline Control Plane for launching the components/services that compose the Pipeline platform. We practice what we preach here at Banzai, so our platform is a Kubernetes deployment as well. You can spin up a control plane on any of the cloud providers (we have automated the setup for Amazon, Azure and Google), an existing Kubernetes cluster, or, for development purposes, even Minikube.
Provider credentials 🔗︎
You will need provider specific credentials for creating secrets in Pipeline.
It is also necessary that you have an Azure subscription with AKS service enabled.
If Azure CLI tool is not installed please run the following commands:
$ curl -L https://aka.ms/InstallAzureCli | bash
$ exec -l $SHELL
$ az login
Create a Service Principal for the Azure Active Directory using the following command:
$ az ad sp create-for-rbac --role 'owner'The role parameter with the value owner is important for assigning role(s) to, for example, Virtual Machines. The default role is Contributor.
You should get something like:
{

  "appId": "1234567-1234-1234-1234-1234567890ab",
  "displayName": "azure-cli-2017-08-18-19-25-59",
  "name": "http://azure-cli-2017-08-18-19-25-59",
  "password": "1234567-1234-1234-be18-1234567890ab",
  "tenant": "1234567-1234-1234-be18-1234567890ab"
}
Run the following command to get your Azure subscription ID:
$ az account show --query id
"1234567-1234-1234-1234567890ab"
AKS requires a few services to be pre-registered for the subscription. You can add these through the portal, or by using the CLI. The requisite pre-registered service providers are:
Microsoft.Compute
Microsoft.Storage
Microsoft.Network
Microsoft.ContainerService
You can check the registered providers with:
az provider list --query "[].{Provider:namespace, Status:registrationState}" --out table.
If the above are not registered, you can add them:
az provider register --namespace Microsoft.ContainerService
az provider register --namespace Microsoft.Compute
az provider register --namespace Microsoft.Storage
az provider register --namespace Microsoft.Network
While registration proceeds through zones and datacenters, we reccommend you sit back and enjoy a damn fine cup of coffee. You can check its status by hitting az provider show -n Microsoft.ContainerService for each individual service.
Create Azure secrets 🔗︎
The prerequisites for creating clusters and for adding provider specific secrets are a GitHub account and an OAuth App that has been setup upfront, since OAuth is being used for authentication.
Before you start you will need to create secrets via Pipeline. Note that we place high emphasis on security and we store all credentials or sensitive information in Vault using Bank-Vaults. These secrets are never available as environment variables, placed in files, etc. They are securely stored and retrieved from Vault using plugins and interchanged between applications or APIs behind the scenes. All heavy lifting pertaining to Vault is performed by our open source project, Bank-Vaults.
Pipeline stores these secrets in Vault using Bank-Vaults, which can be used by referring to them as secret_id.
The relationship between the credential variables and secret keys:
Credential variable name Secret variable appId AZURE_CLIENT_ID password AZURE_CLIENT_SECRET tenant AZURE_TENANT_ID az account show --query idoutputAZURE_SUBSCRIPTION_ID
curl -g --request POST \
  --url 'http://{{url}}/api/v1/orgs/{{orgId}}/secrets' \
  --header 'Authorization: Bearer {{token}}' \
  --header 'Content-Type: application/json' \
  -d '{
	"name": "My azure secret",
	"type": "azure",
	"values": {
		"AZURE_CLIENT_ID": "{{AZURE_CLIENT_ID}}",
		"AZURE_CLIENT_SECRET": "{{AZURE_CLIENT_SECRET}}",
		"AZURE_TENANT_ID": "{{AZURE_TENANT_ID}}",
		"AZURE_SUBSCRIPTION_ID": "{{AZURE_SUBSCRIPTION_ID}}"
	}
}'
Create an Azure AKS cluster 🔗︎
Sample cURL request to create an Azure cluster with 2 nodepool:
curl -g --request POST \
--url 'http://{{url}}/api/v1/orgs/{{orgId}}/clusters' \
--header 'Authorization: Bearer {{token}}' \
--header 'Content-Type: application/json' \
-d '{
"name":"azcluster{{username}}{{$randomInt}}",
"location": "westeurope",
"cloud": "azure",
"secret_id": "{{secret_id}}",
"nodeInstanceType": "Standard_B2ms",
"properties": {
"azure": {
"resourceGroup": "{{az-resource-group}}",
"kubernetesVersion": "1.9.2",
"nodePools": {
"pool1": {
"count": 1,
"nodeInstanceType": "Standard_B2ms"
},
"pool2": {
"count": 1,
"nodeInstanceType": "Standard_B2ms"
}
}
}
}
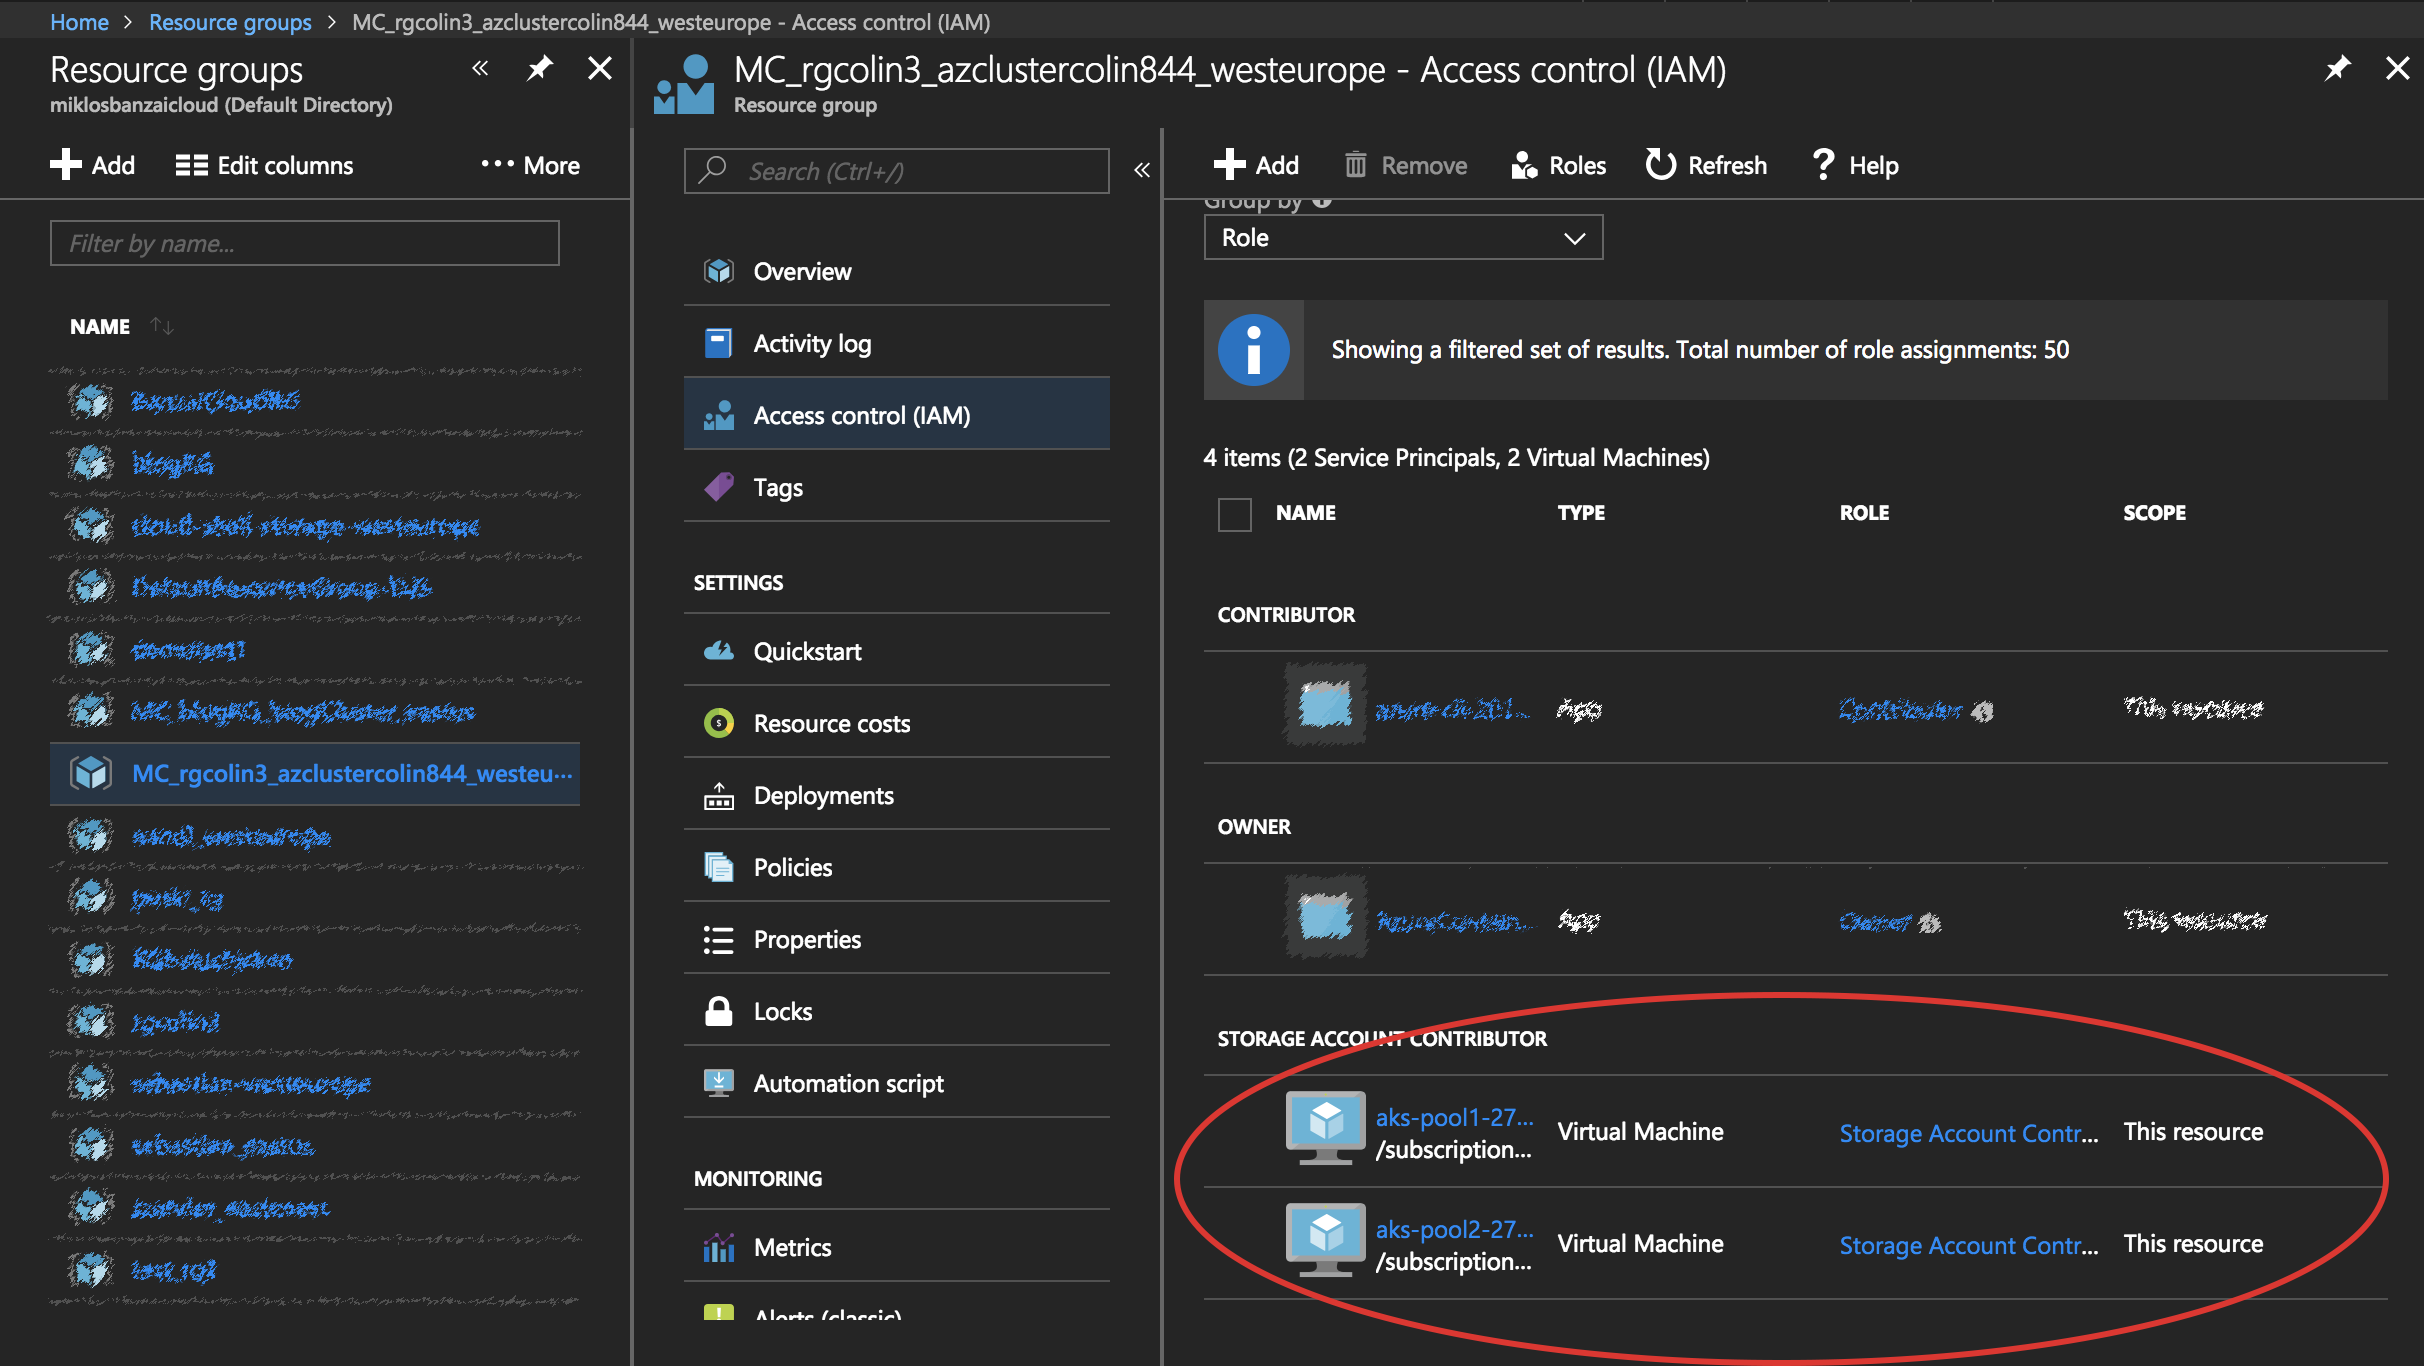
}'After a cluster is created successfully it has two Virtual Machines:

Without taking any action, the Storage Account Contributor role is assigned to all Virtual Machines.
Behind the scenes 🔗︎
The Azure client, which is responsible for all Azure interactions in Pipeline, performs each of the above steps.
Enable MSI 🔗︎
Parameter description:
existsVMis a Virtual Machine on which you may enable MSI
rgis the cluster’s resource group
locationis the cluster’s location
isMSIEnabledis true if MSI is enabled
func (vmc *VirtualMachinesClient) updateMSI(existsVM *compute.VirtualMachine, rg, location string, isMSIEnabled bool) (*compute.VirtualMachine, error) {

	var identityType compute.ResourceIdentityType
	if isMSIEnabled {
		identityType = compute.ResourceIdentityTypeSystemAssigned
	} else {
		identityType = compute.ResourceIdentityTypeNone
	}

	existsVM.Resources = nil
	existsVM.Identity = &compute.VirtualMachineIdentity{
		Type: identityType,
	}

	return vmc.CreateOrUpdateVirtualMachine(rg, *existsVM.Name, *existsVM)
}
Role assign 🔗︎
Parameter description:
scopeis the resource group scope
roleDefinitionIDis the ID of the Storage Account Contributor role
principalIDis the ID of the selected Virtual Machine
func (r *RoleAssignmentsClient) CreateRoleAssignment(scope, roleDefinitionID, principalID string) (authorization.RoleAssignment, error) {

	roleAssignmentName := uuid.NewV1().String()
	return r.client.Create(context.Background(), scope, roleAssignmentName, authorization.RoleAssignmentCreateParameters{
		Properties: &authorization.RoleAssignmentProperties{
			RoleDefinitionID: to.StringPtr(roleDefinitionID),
			PrincipalID:      to.StringPtr(principalID),
		},
	})

}
We hope this will help with Azure Managed Service Identity and assigning role(s) to Virtual Machine(s) quickly and efficiently. We’ll stop here, as this has been a long post already, however, if you are interested in all the features we provide with the Pipeline platform, make sure you read our previous posts or explore our GitHub repositories.
If you’d like to learn more about Banzai Cloud check out our other posts in the blog, the Pipeline, Hollowtrees and Bank-Vaults projects.


