


Here at Banzai Cloud, we provision and manage Kubernetes clusters on multiple cloud providers (Amazon, Azure, and Google) and on-premise (bare metal or vmWare) with our container management platform, Pipeline. We support both cloud provider-managed K8s distributions (ACK, EKS, GKE) and our own lightweight, CNCF certified Kubernetes distribution, PKE.
Both these approaches have their pros and cons, though that’s not what we’ll be talking about today (we’ve blogged about this several times already, see Deploying Pipeline Kubernetes Engine (PKE) on Azure). But whichever way you slice it, etcd (managed/hidden or implicit) is a key component of any Kubernetes cluster.
With Pipeline, our users have a couple methods for creating and managing etcd clusters:
- one etcd cluster per Kubernetes cluster (HA or not HA)
- a shared etcd cluster across several Kubernetes clusters
Both options - like PKE, Pipeline and our other components - are available as a subscription or as managed services.
In this post, we’d like to talk about how we create, manage, backup and operate these etcd clusters, and also share how we’ve retooled them (the command line we built works with any etcd cluster, and is not tied to the PKE Kubernetes distribution).
Motivation 🔗︎
Multi-tenant deployments for etcd are not common practice. Enterprise users, however, face challenges specific to operating multiple large Kubernetes clusters, each of which require standalone etcd instances, and are often deployed and managed by separate teams. Let’s see what it takes to make a multi-tenant etcd cluster easy to manage, secure and also highly available.
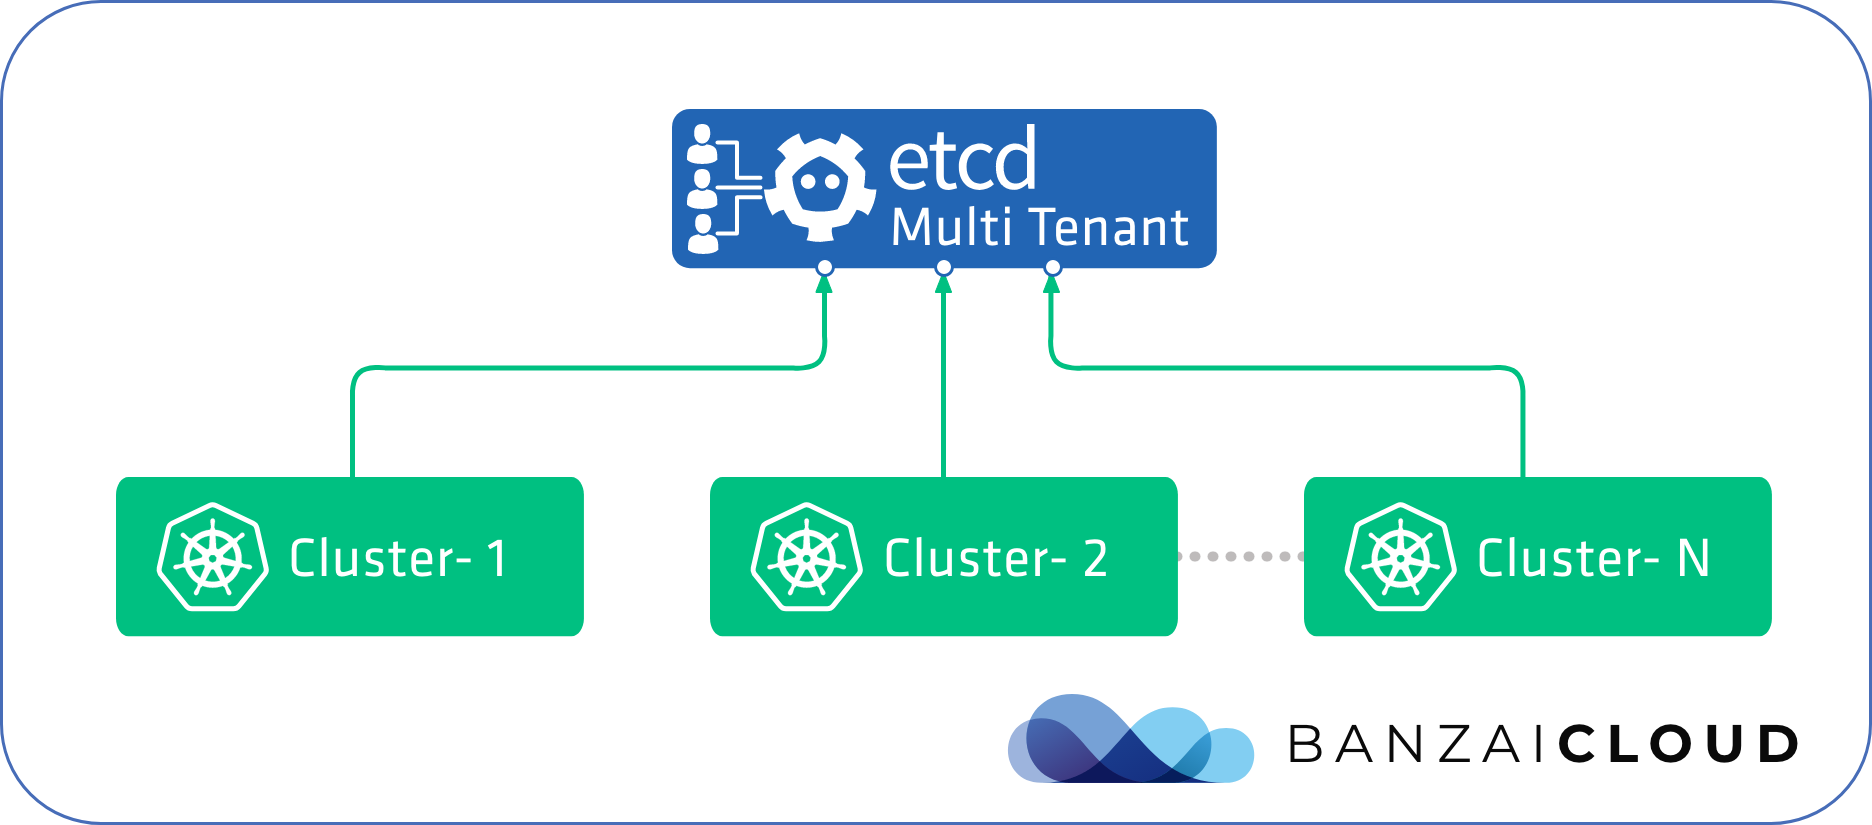
We’ll use our own pke-etcd command line tool, which automates many of the manual tasks involved in this process, and combines a variety of useful features from previously existing tools.
Here’s some of those features and tasks:
- setting up certificates for secure communication
- bootstrapping
- backup and restoration
- authentication for multi-tenancy
Download and configure the tool 🔗︎
pke-etcd is available for Linux and currently supports CentOS and RHEL (for other distros please get in touch).
Download the binary and make it available to the root user.
It must be run as root, since it will install etcd and create and manage the file permissions it needs.
mkdir /banzaicloud
curl -Lo /banzaicloud/pke-etcd https://banzaicloud.com/downloads/pke-etcd/pke-etcd-v0.1.0
chmod +x /banzaicloud/pke-etcd
export PATH=$PATH:/banzaicloud
There are some repetitive flags that can be omitted from the commands here with a configuration file. Place this file in the current working directory to save you some time and give you a consistent set of flags for certificate management
cat <<EOT > pke-etcd.yaml
cacertpath: /etc/etcd/pki
certpath: /etc/etcd/pki
cacert: /etc/etcd/pki/ca.crt
cert: /etc/etcd/pki/root.crt
key: /etc/etcd/pki/root.key
EOT
Set up certificates 🔗︎
Our goal is to enable the authentication required to support multi-tenancy. Etcd supports authentication based on X509 client certificates, wherein a certificate provides credentials for a user specified in the Common Name field.
The overall process is similar to what we would normally do when setting up a single-tenant cluster, although with some caveats.
Let’s look at the different options we have for setting up for the PKI, in general.
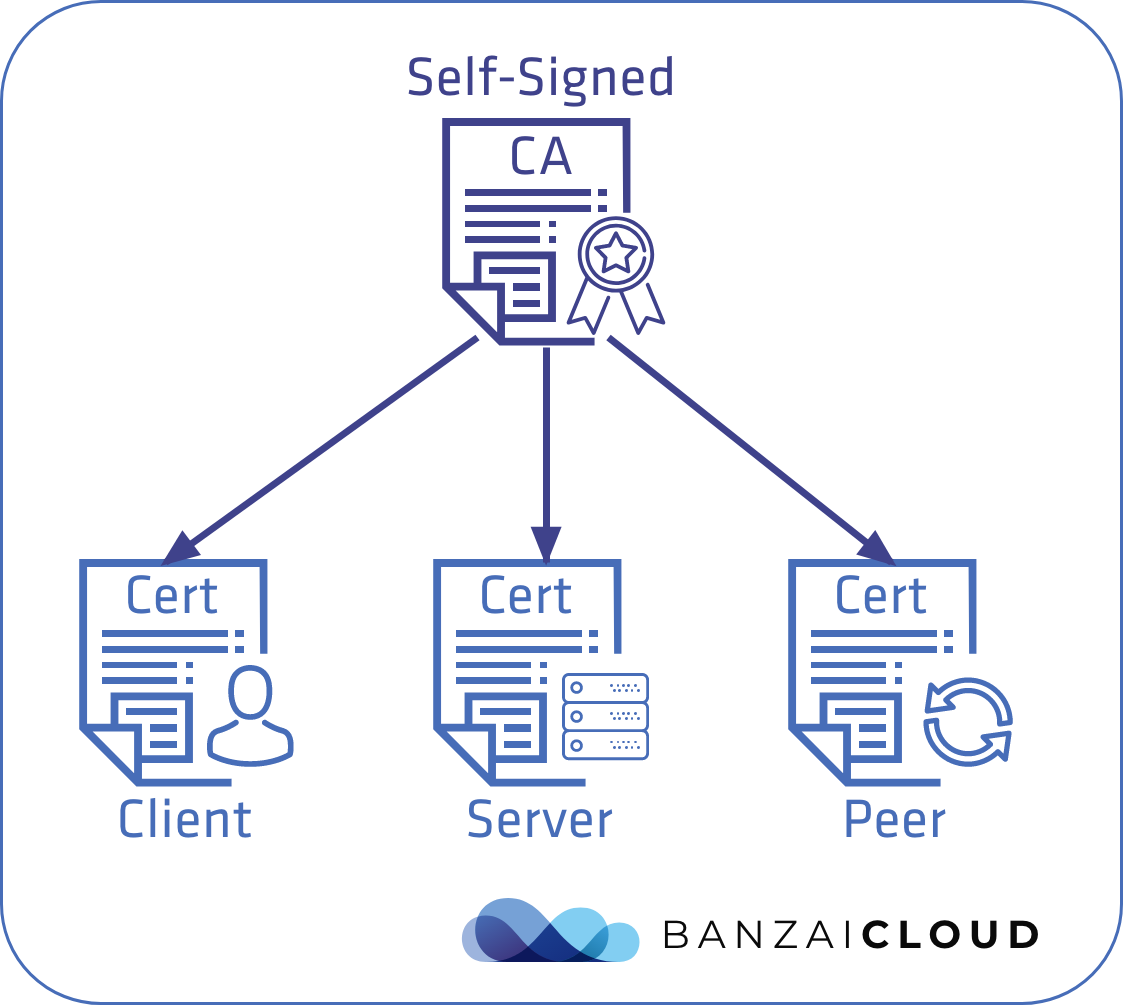
Self-signed CA 🔗︎
First, we generate the CA certificate and private key we need, on our own. Server and client certificates are then taken directly from the CA. Adding a new etcd node will require copying the CA and reusing it to generate new certificates.
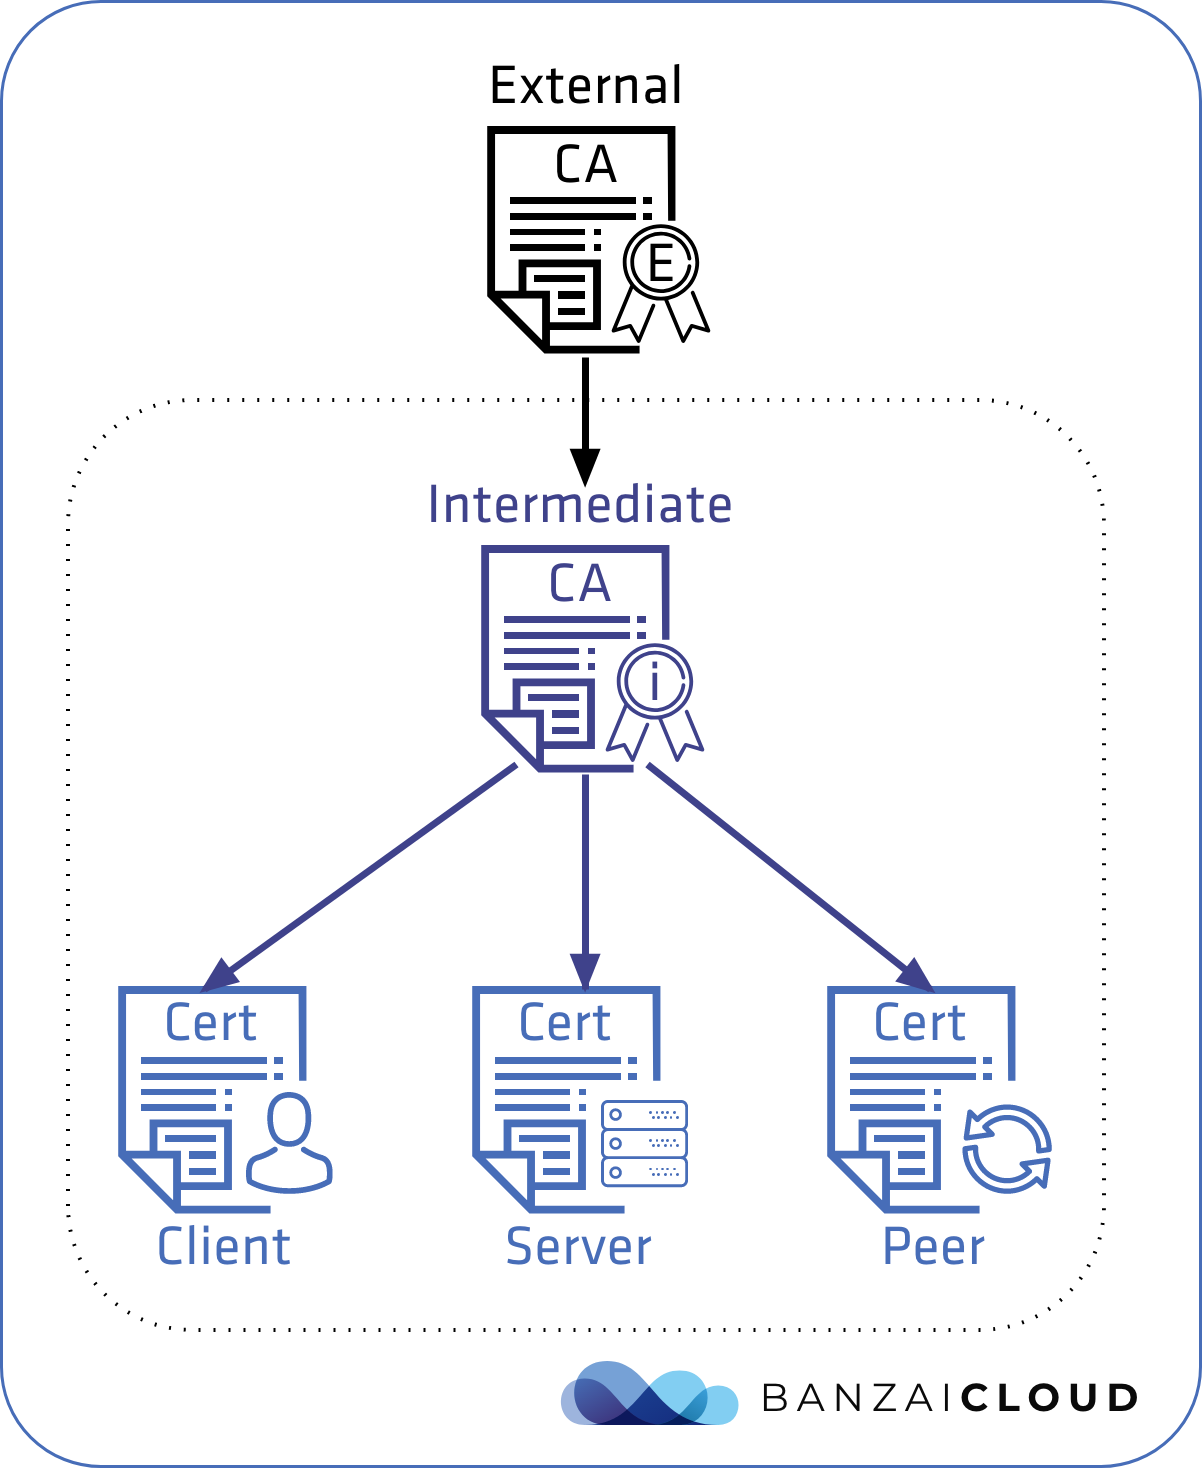
Provided CA 🔗︎
This process is very nearly the same as above, except that we don’t generate the CA for ourselves but request an intermediate from an external source. We can then use this intermediate CA the same way we would a self-signed CA.
Request certificates (CSR) 🔗︎
The most advanced method is to obtain certificates by creating Certificate Signing Requests (CSR), on demand. However, for this to work we would need a third party like Vault’s PKI API.
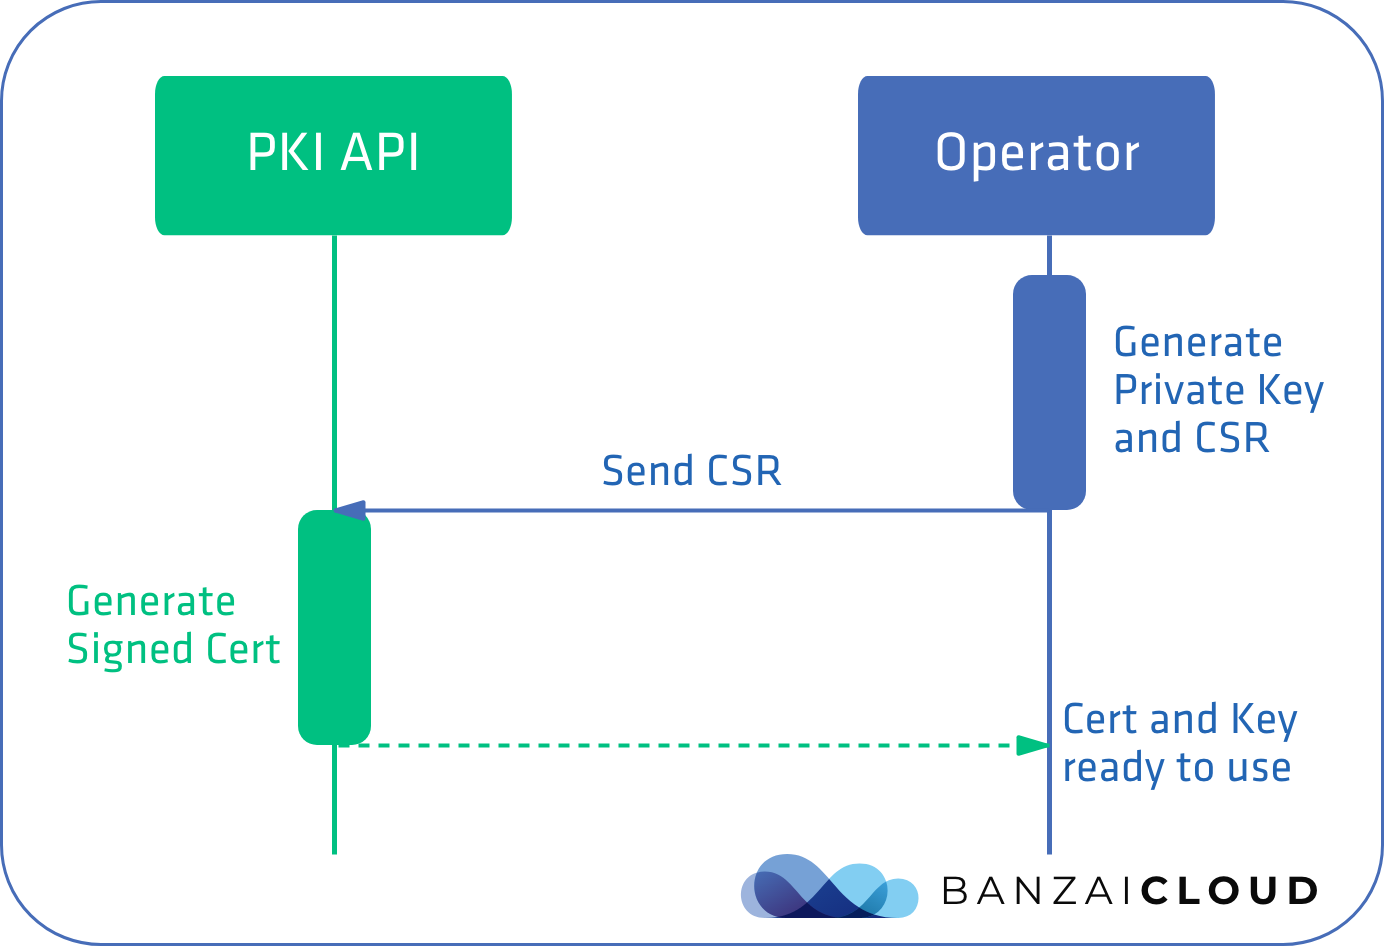
Ultimately, we want to apply the most advanced solution, but the self-signed CA is the easiest to implement and to automate without having to depend on a third party.
What we end up with is the following set of certificates and keys.
CA certificate 🔗︎
We need one CA for the etcd cluster, which will be shared among the different Kubernetes tenants. The pke-etcd install command can generate one for itself or use a pre-existing one already available on the specified path.
Also, we can explicitly generate a self-signed CA certificate with the following command
pke-etcd cert ca
This means that ca.crt and ca.key files will become available in the directory we specified at the beginning of this post, in pke-etcd.yaml. All our other certificates will show up there, as well.
ls -l /etc/etcd/pki
total 32
-rw-r--r--. 1 etcd ssh_keys 1017 Aug 12 15:23 ca.crt
-rw-------. 1 etcd ssh_keys 1679 Aug 12 15:23 ca.key
This step can be omitted and the self-signed CA can be replaced with an externally provided one. Subsequent commands will simply check for the existence of the above files and use them for cert generation.
Once generated, copy the CA cert and key to all the etcd and Kubernetes nodes.
Server certificates 🔗︎
The pke-etcd install command will take care of the server certificate, or we can generate them manually:
export ETCD_IP=...
pke-etcd cert server --name "$(hostname)" --ipaltnames "${ETCD_IP}"
Additional flags --dnsaltnames and --ipaltnames should be used to add SAN records to those certificates with possible hostnames and/or the IP addresses that the etcd nodes will be available on.
Client (root user) 🔗︎
We will need the root user to manage authentication and authorization and to issue other administrative commands when adding/removing etcd nodes.
Again, pke-etcd install will generate these certificates for us automatically, or we can create them manually:
pke-etcd cert client --clientname root --basename root
Client (for each Kubernetes tenant) 🔗︎
We will need client certificates for our Kubernetes tenants. We’ll go into this in more detail later, once we have our cluster up and running.
Bootstrapping methods 🔗︎
Once we have certificates we can move on to starting the nodes. There are several ways to bootstrap an etcd cluster:
- static
- discovery
- runtime configuration
Static 🔗︎
This is the simplest method. However, you have to know the IP addresses of the initial etcd nodes, which is not always feasible.
Discovery (etcd or DNS) 🔗︎
This method uses a third party service (etcd or DNS) to discover cluster members, so you don’t have to know your nodes in advance. Naturally, this method is more complex and harder to set up.
The sequence of the etcd discovery process is illustrated below
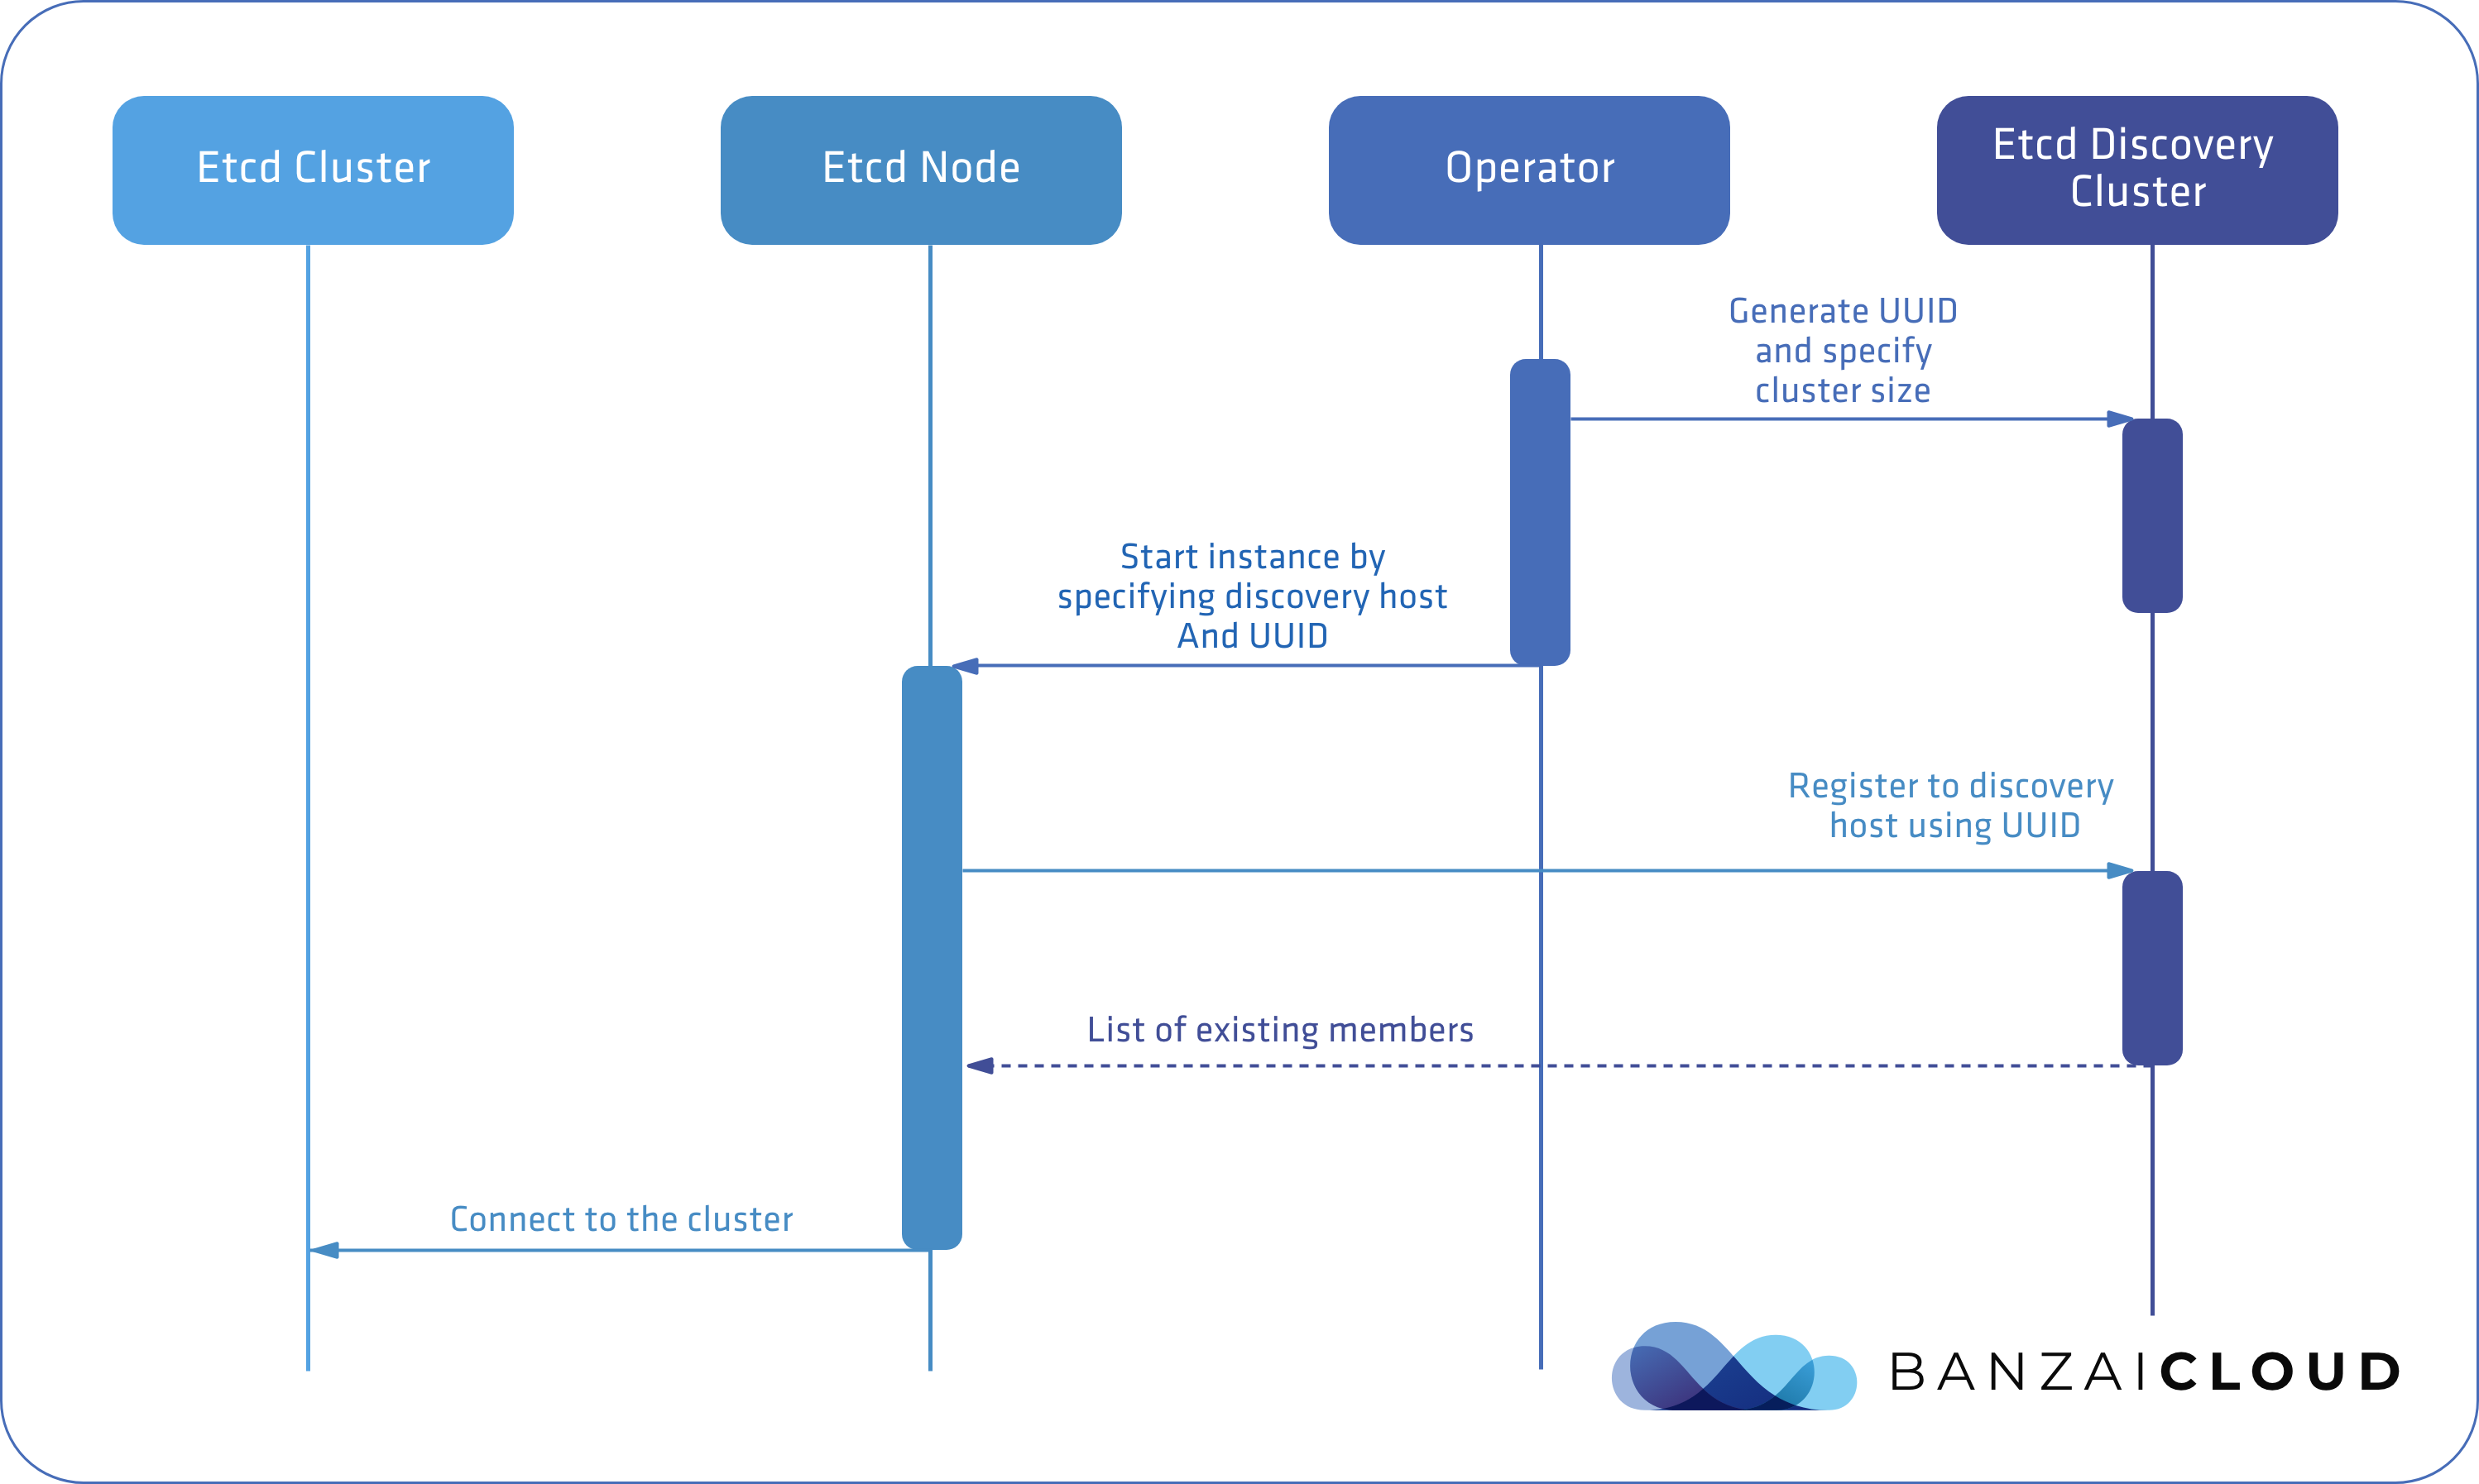
DNS discovery works differently, but the core concept is similar; the operator sets up a DNS server which can bootstrap a fixed number of nodes. For our purposes, we’ll need something more dynamic.
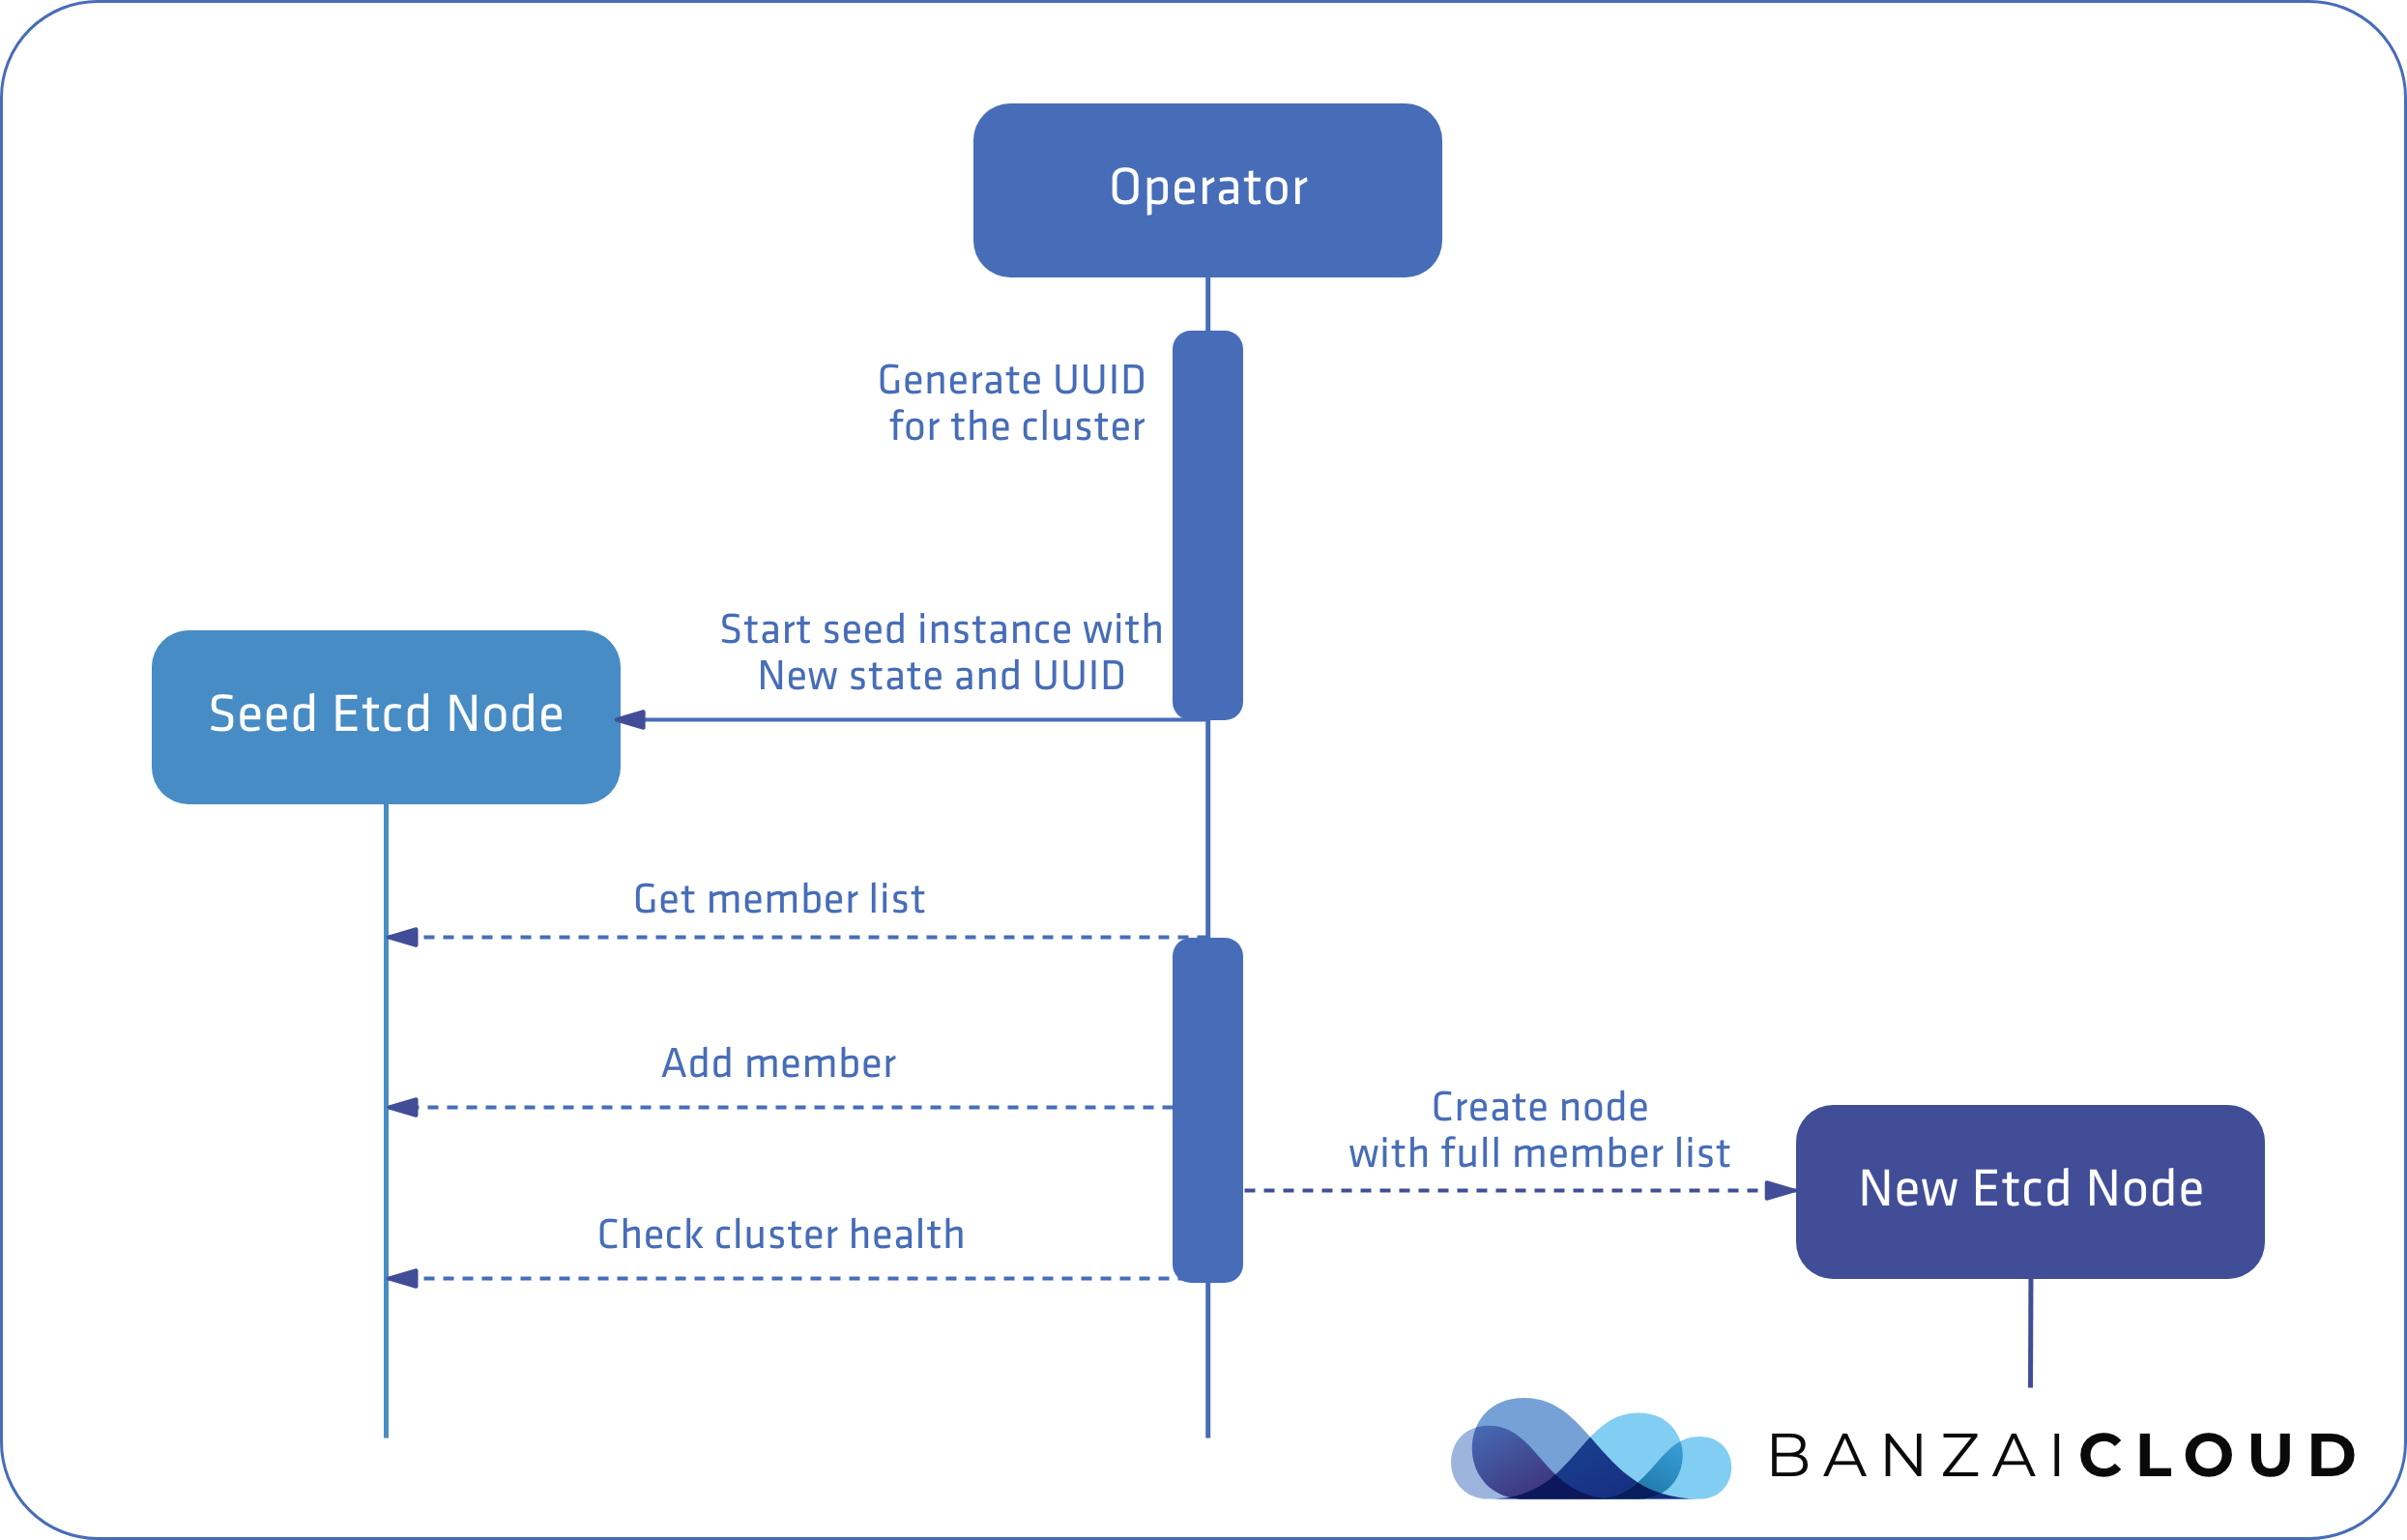
Runtime configuration 🔗︎
This doesn’t appear in any offical documentation as a bootstrapping method, but is widely used during open source projects like the etcd-operator and etcdadm. We can start by deploying a single node and then adding as many nodes as is required, using etcd’s runtime configuration feature, wherein nodes may be added or removed at runtime.
This is more convenient as we don’t have to automate different ways of bootstrapping, growing, upgrading or replacing failed nodes in the cluster, on demand. One important thing to keep in mind is that the process of adding or removing nodes should be sequential to avoid serious cluster degradation issues like the loss of a quorum.
This involves a process very similar to that of etcd discovery protocol. In this case, however, the duties of the discovery service can be implemented in the operator. The operator does not necessarily have to be a Kubernetes Operator, and can be a CLI tool designed to make life easier, like ours.
Two things to keep in mind:
- Before adding a new member node, try to make sure the requisite etcd binaries have been downloaded and are ready to use, as this process may time out in the background, leaving the cluster in an unhealthy state. If that happens, remove the newly added node through the API and start the process again.
- Avoid adding nodes concurrently. Make sure the process progresses only when the node is reported healthy by the cluster.
Let’s see how that might work in practice.
Bootstrapping in practice 🔗︎
The first node must be initialized using the pke-etcd install seed command.
We’ll assume the instances can communicate with each other using their IP addresses, set by the ETCD_IP environment variable, and that they are also reachable on these IPs from the Kubernetes nodes.
Install seed node 🔗︎
Let’s install the seed etcd node, first. ETCD_IP should be an IP that etcd can bind to and is reachable by other nodes.
If it is necessary that the bind IPs be different from what etcd would advertise to clients and peers (in EC2, for example), then --listen-client-urls and --listen-peer-urls must also be set.
export ETCD_IP=...

pke-etcd install seed \
  --name "$(hostname)" \
  --client-url "https://${ETCD_IP}:2379" \
  --peer-url "https://${ETCD_IP}:2380"
This command will do the following:
- Generate CA certs, server certs and the root user’s client certificate, unless those already exist at the given path.
- Set up the etcd configuration at
/etc/etcd/etcd.confto listen for client and peer connections on the IP given byETCD_IP. - Install etcd as an OS package with the latest version (version can be explicitly selected with the
--etcd-versionflag), and start it as a systemd service.
Install member nodes 🔗︎
First, download pke-etcd and create the pke-etcd.yaml config file, just as before.
Then, copy the CA cert and key from the seed to the new node, and move that to the /etc/etcd/pki directory.
Next, install the member node and automatically join it to the cluster.
We will need the client url of the seed node to complete this task, which is provided by the --join flag.
export SEED_NODE_IP=...
export ETCD_IP=...

pke-etcd install member \
  --name "$(hostname)" \
  --client-url "https://${ETCD_IP}:2379" \
  --peer-url "https://${ETCD_IP}:2380" \
  --join "https://${SEED_NODE_IP}:2379"
We can check the members of the cluster with the following command:
pke-etcd member list
Backup and restore 🔗︎
Now that we’re starting our nodes, it’s time to think about disaster recovery.
Start from snapshot 🔗︎
The most important part of a backup plan is how to restore from it.
This is a frequently overlooked aspect of backup plans, so let’s make this a number one priority from the start, and design the bootstrap process so that it’s as simple as adding a --snapshot-path flag to our install command, which will allow bootstrapping from an existing backup automatically.
Then we’ll go even further and allow bootstrapping from snapshots at remote locations, such as S3.
Backup 🔗︎
There are several tools that allow the snapshotting of etcd, etcdctl being the simplest.
We want to:
- Create snapshots from all the nodes for redundancy
- Move snapshots to a secure remote location, also for redundancy
- Perform automated periodic snapshots
Let’s see how pke-etcd helps us to achieve these, in practice.
Create and restore a local snapshot 🔗︎
pke-etcd snapshot save /tmp/etcd-snapshot
This is easy and not much harder with etcdctl.
Things get more complicated as we try to restore the snapshot, because there are a lot of non-trivial configuration options that we have to provide in order to properly bootstrap a new cluster from an existing state.
pke-etcd helps us do this by starting a new cluster directly from the snapshot, using one, simple flag.
By providing --snapshot-path to the install seed command, we can bootstrap the cluster from an existing state the same way we would normally.
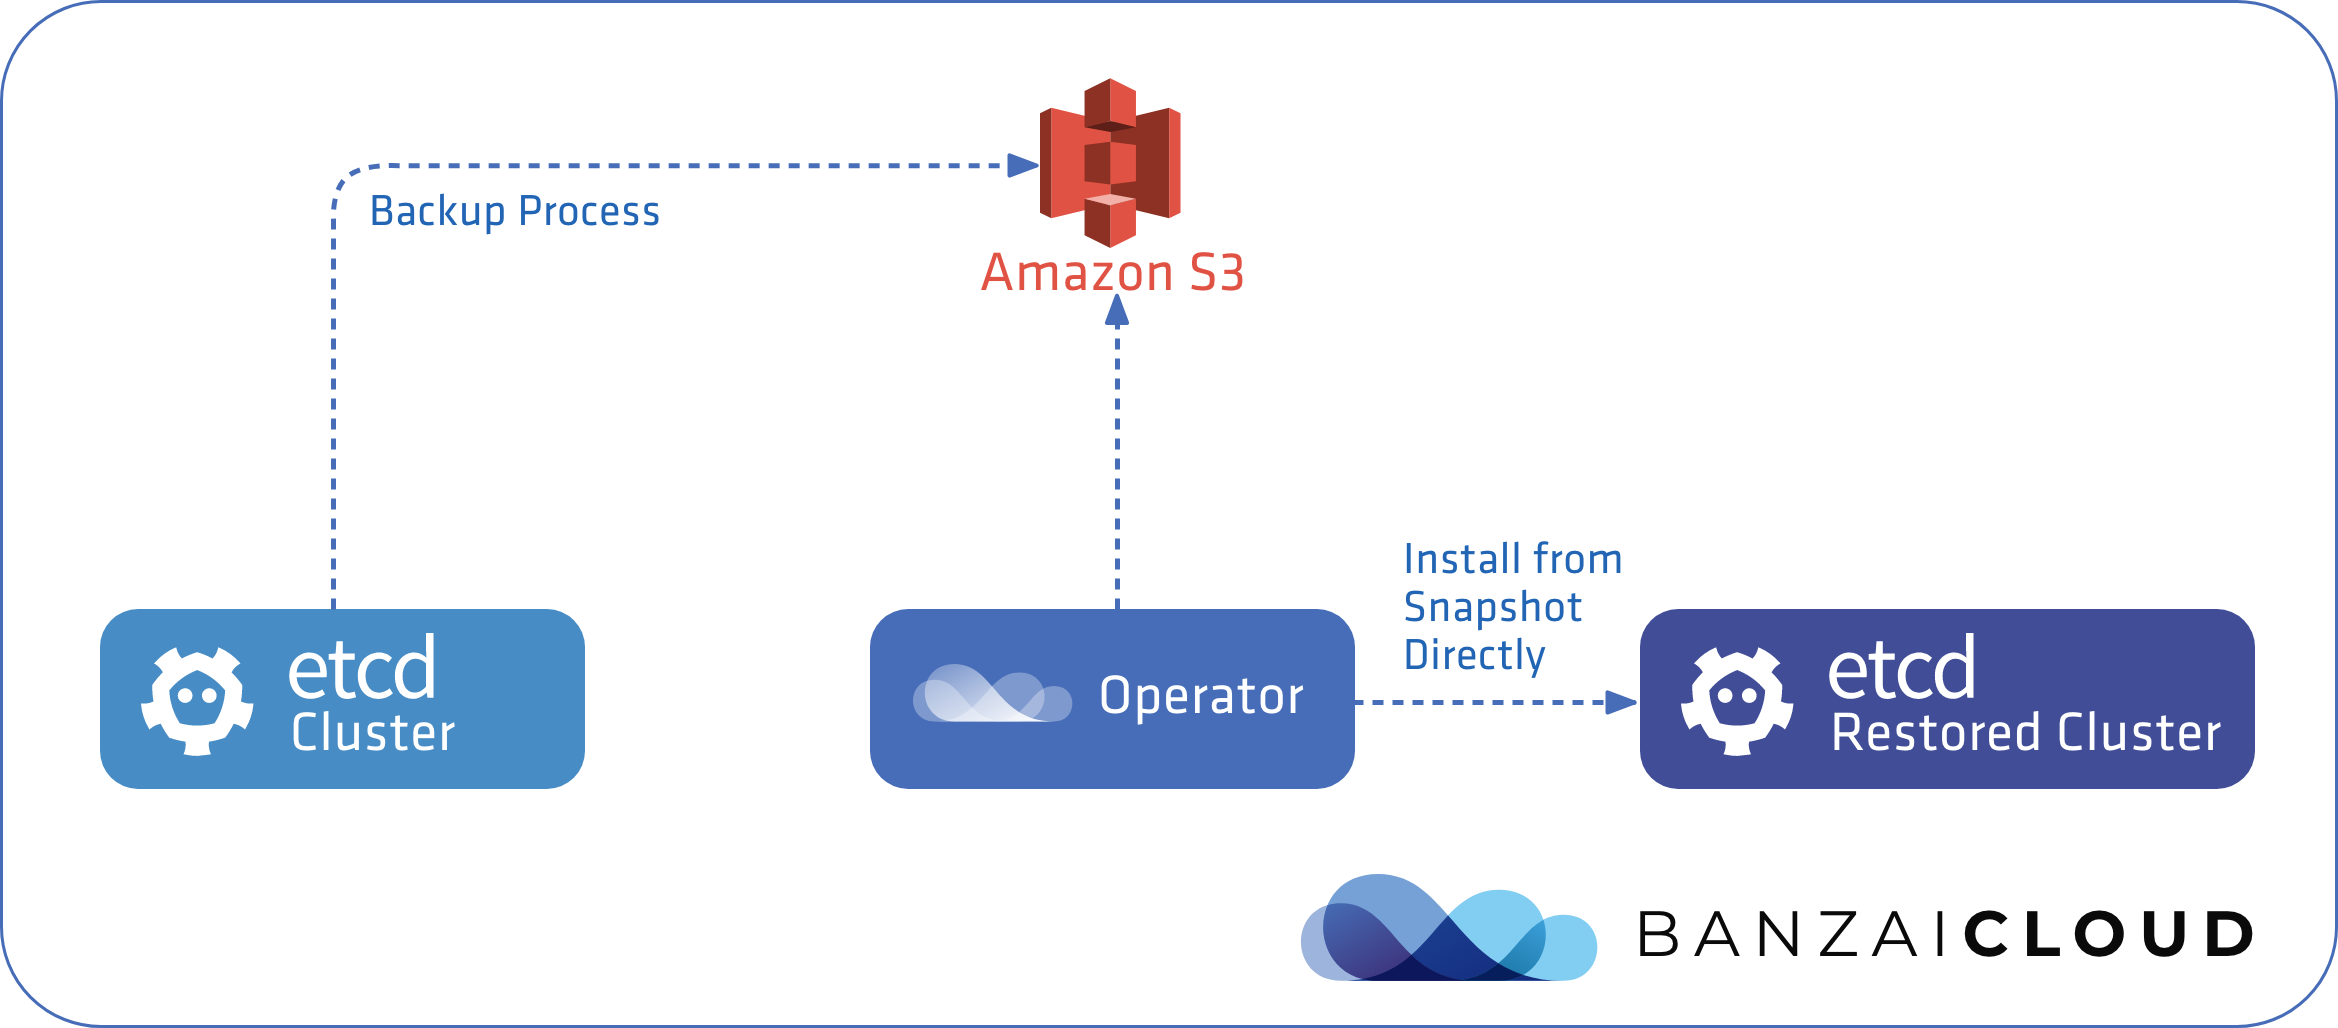
Create an S3 snapshot 🔗︎
Creating local snapshots is easy but not very safe. What if we lose our nodes completely? Even if we use persistent volumes, whole regions may go down. To make sure business continues uninterrupted under any circumstances, we should upload backups to remote storage.
To do this, we can create a snapshot to an S3 bucket. The command required is slightly different, since we have to define the AWS region, the S3 bucket and, of course, the necessary credentials:
export AWS_ACCESS_KEY_ID=...
export AWS_SECRET_ACCESS_KEY=...
export S3_REGION=...
export S3_BUCKET=...

pke-etcd snapshot save-s3 --region "${S3_REGION}" --bucket "${S3_BUCKET}"
Scheduling an S3 snapshot 🔗︎
To avoid having to set up a cron job manually, pke-etcd can help us by using the command given above, with the addition of the --install-scheduled flag.
The default schedule is to create a snapshot every 10 minutes, but it can be overriden using the --schedule flag.
The first snapshot will be created to verify the configuration options and a cron job will be installed once it finishes successfully.
To remove the cron job run the following command:
pke-etcd snapshot save-s3 --delete-scheduled
Restore from an S3 snapshot 🔗︎
This method is almost identical to restoring from a local snapshot, but here we have to specify the S3 file location:
export ETCD_IP=...
export AWS_ACCESS_KEY_ID=...
export AWS_SECRET_ACCESS_KEY=...
export S3_REGION=...
export S3_BUCKET=...
export S3_PATH=...

pke-etcd install seed \
  --name "$(hostname)" --client-url "https://${ETCD_IP}:2379" --peer-url "https://${ETCD_IP}:2380" \
  --snapshot-s3-region "${S3_REGION}" --snapshot-s3-bucket "${S3_BUCKET}" --snapshot-s3-path "${S3_PATH}"
Authentication and RBAC 🔗︎
It’s time to think about how we isolate tenants. Etcd has a nice API for creating users and setting up role-based access control (RBAC) to define which users have access to what prefixes.
The required steps:
- create users for the different Kubernetes clusters’ API Servers (e.g.
tenant1,tenant2, …) - create roles and grant read/write permissions to access a single key prefix (e.g.
/tenant1,/tenant2, …) - grant the respective cluster users the corresponding roles
- create a root user (no need to set permissions, since the root user automatically has access to everything)
- enable authentication
- generate certs for the users
In order for TLS Client Certs and Authentication to play nicely, we need to set an important flag on our etcd nodes:
--client-cert-auth=true. This flag tells etcd to look up a user from the Common Name of the Client Certificate, so that no passwords are required.pke-etcdtakes care of this automatically.
Create users with RBAC 🔗︎
The following command can be used to create a user with the roles required to access a single prefix (the --non-interactive flag uses automatically generated passwords which we don’t need, since we’ll be using client certificates for authentication)
pke-etcd auth useradd "tenant1" "/tenant1" --non-interactive
Enable auth 🔗︎
We can now enable auth and create the root user with a single command
pke-etcd auth enable --non-interactive
And, just like that, we’re ready to create our Kubernetes tenants.
Setting up Kubernetes tenants 🔗︎
To install a Kubernetes cluster that uses a multi-tenant etcd, you need the following things from the API server configuration:
- The etcd CA certificate
- The client certificate and key that identifies the specific tenant
- The list of etcd client urls
- The path prefix for the cluster (
/tenant1,/tenant2, …) with permissions granted to our cluster user (see above) - Optionally, and for greater security, configure Data at Rest encryption
This is all configurable through PKE, our Kubernetes distribution and installer.
Generate client certificates 🔗︎
Since we are using an external etcd, we have to individually generate client certificates on each Kubernetes master node.
We need the CA cert and key to be present on these nodes, as well as for them to have the proper permissions:
$ ls -alh /etc/etcd/pki/ca*
-rw-r--r--. 1 root root 1017 Aug 15 09:51 /etc/etcd/pki/ca.crt
-rw-------. 1 root root 1.7K Aug 15 09:51 /etc/etcd/pki/ca.key
Install pke-etcd just like we did on the etcd nodes:
mkdir /banzaicloud
curl -Lo /banzaicloud/pke-etcd https://banzaicloud.com/downloads/pke-etcd/pke-etcd-v0.1.0
chmod +x /banzaicloud/pke-etcd
export PATH=$PATH:/banzaicloud

cat <<EOT > pke-etcd.yaml
cacertpath: /etc/etcd/pki
certpath: /etc/etcd/pki
cacert: /etc/etcd/pki/ca.crt
cert: /etc/etcd/pki/root.crt
key: /etc/etcd/pki/root.key
EOT
Then create the certificate with the following command:
pke-etcd cert client --clientname tenant1 --basename apiserver-etcd-client
Install Kubernetes master nodes with PKE 🔗︎
We recommend using PKE together with pke-etcd, although they don’t explicitly depend on each other.
Get the latest PKE release from https://github.com/banzaicloud/pke/releases/latest (at time of writing, 0.4.12)
curl -Lo /banzaicloud/pke https://github.com/banzaicloud/pke/releases/download/0.4.12/pke-0.4.12
chmod +x /banzaicloud/pke
Let’s install a single master Kubernetes cluster for the purposes of demonstration.
We can configure the Kubernetes API Server to use the external etcd using the --etcd-* flags.
With PKE, Data at Rest encryption is automatically configured for Kubernetes secrets.
export APISERVER_IP=...
export ETCD_ENDPOINTS=https://<ETCD_IP>:2379,...
export TENANT=tenant1

pke install single \
  --kubernetes-advertise-address="${APISERVER_IP}" \
  --kubernetes-api-server="${APISERVER_IP}:6443" \
  --etcd-ca-file /etc/etcd/pki/ca.crt \
  --etcd-cert-file /etc/etcd/pki/apiserver-etcd-client.crt \
  --etcd-key-file /etc/etcd/pki/apiserver-etcd-client.key \
  --etcd-prefix "/${TENANT}" \
  --etcd-endpoints "${ETCD_ENDPOINTS}"
Once that command is successful, we can check if the node is up and running, using kubectl:
KUBECONFIG=/etc/kubernetes/admin.conf kubectl get node
I recommend reviewing this blog post, if you want to learn how to create a multi-master Kubernetes cluster using PKE.
Wrapping up 🔗︎
We’ve showed you how to use pke-etcd together with PKE to create a multi-tenant etcd cluster capable of serving multiple Kubernetes tenants. Some of the above steps may still seem a bit labor-intensive, but we’re still a ways out from our ultimate goal. We’re already finishing the work necessary to integrate pke-etcd into Pipeline, which will fully automate these operations.
About PKE 🔗︎
PKE is a simple, lightweight Kubernetes installer and distribution. Designed to work anywhere, it’s the preferred means of managing Banzai Cloud’s cloud native application and devops platform, Pipeline. Banzai Cloud Pipeline supercharges the development, deployment and scaling of container-based applications, and includes native support for multi-, hybrid, and edge cloud environments.
About Banzai Cloud Pipeline 🔗︎
Banzai Cloud’s Pipeline provides a platform for enterprises to develop, deploy, and scale container-based applications. It leverages best-of-breed cloud components, such as Kubernetes, to create a highly productive, yet flexible environment for developers and operations teams alike. Strong security measures — multiple authentication backends, fine-grained authorization, dynamic secret management, automated secure communications between components using TLS, vulnerability scans, static code analysis, CI/CD, and so on — are default features of the Pipeline platform.


