


At Banzai Cloud we blog mostly about our container management platform, Pipeline. We frequently gloss over the workhorse underneath Pipeline, our CNCF certified Kubernetes distribution, PKE. That’s because our customers usually install and manage PKE with Pipeline, and thus benefit from all the enterprise-grade features we’ve already made available on that platform. However, PKE is also available on its own, and is one of the simplest ways to kickstart a Kubernetes cluster across multiple supported environments.
Just like with Pipeline, we battle tested PKE against the CIS Kubernetes benchmark. PKE is designed to work on any cloud, VM or even on bare metal nodes, and is often our customers’ preferred Kubernetes distribution, even when cloud providers offer alternative management solutions. There are several reasons for this, but, if we’re limiting ourselves to the realm of security, customers prefer PKE because it employs strong defaults for its pod security and network policies.
PKE is available in single node, multi node and single/multi master versions. However, in this post we’ll be focusing on its multi-master version and its version upgrade capabilities.
Note that while there will be lots of CLI commands in the upcoming sections. The CLI machinery behind the scenes - whether it pertains to multi-master installations or to seamless upgrades - is entirely automated with Pipeline. The overall goal of this post is to highlight how you can still accomplish these tasks even without the Pipeline platform.
Just what are we doing here, exactly? 🔗︎
We’ll be installing a multi-master PKE cluster and upgrading it, on the fly, using virtual machines. Since (at time of writing) the two Kubernetes versions we support are v1.15 and v1.14, we’ll be starting with the latter, and upgrading to the former. Note that Banzai Cloud-managed Kubernetes clusters are constantly being upgraded, patched and tested, so that our customers can focus exclusively on the application side of their containerized experience, and leave the heavy lifting to us.
This post serves as a guide through the step-by-step installation of PKE using either a local machine (Vagrant) or AWS EC2. The differences will be noted within each step. (local machine, AWS EC2 or common commands respectively).
We’ll be doing the following:
- Launching four machines (three master nodes + one worker node)
- Installing PKE Kubernetes 1.14
- Upgrading PKE Kubernetes to 1.15
Local machine 🔗︎
A four node cluster of virtual machines will be launched on our host machine. The first three of these nodes will serve as master nodes, and the final node will be our worker (we could, of course, add as many workers nodes as we need).
Please be prepared for your virtual machines to consume eight CPU cores and eight GiB of memory. If your machine is low on resources, you may need to edit
Vagrantfile; master Kubernetes nodes usually require at least two CPU cores.
What are we not doing? 🔗︎
This post will not cover how to add a load-balancer in front of our master nodes. Stay tuned, though, as that topic will be the subject of an upcoming blog post. Also we will not be covering how we to seamlessly upgrade, snapshot (and recover) etcd; for the purposes of this post, it’s enough to bear in mind that these features are covered and automated by the Pipeline platform, and that PKE clusters install or can connect to existing single/multi node etcd clusters.
Note that this is not meant to be a production ready setup, it just serves as a demonstration: additional security, storage, cluster backups, automated security scans, and lots lots more are required for a production ready Kubernetes cluster (again, all these come out-of-the-box with Kubernetes clusters launched on Pipeline.
Prerequisites 🔗︎
Local machine 🔗︎
Here, we’ll cover the installation of Vagrant on a macOS machine. For different OSes, please take a look at the official instructions.
Install VirtualBox, VirtualBox Extension Pack and Vagrant.
brew cask install virtualbox
brew cask install vagrant
vagrant plugin install vagrant-vbguest
Check out the PKE source code.
git clone git@github.com:banzaicloud/pke.git
cd pke
You can download the latest PKE build or you can build it yourself.
curl -Lv https://banzaicloud.com/downloads/pke/pke-latest -o build/pke
chmod +x build/pke
Alternative manual build process.
make pke-linuxbuilds the project andcp build/pke-linux build/pkeputs it in place so the rest of the commands apply.
Once PKE is in place we can proceed to cluster installation.
AWS EC2 🔗︎
We’ll assume that the AWS CLI is already installed and configured. If you don’t have the AWS CLI installed, please follow these instructions.
OK, now that we’ve finished with the prerequisites, let’s move on to creating our Kubernetes cluster.
PKE cluster installation 🔗︎
Local machine 🔗︎
First, we need to fire up four virtual machines.
vagrant up
This will take a few minutes depending on your internet connection, so grab a coffee and take a short break. Once all the machines are up and running, we can start to bring up our PKE cluster. Let’s proceed to the installation of our first master node.
AWS EC2 🔗︎
I will not go into detail about each and every command, but feel free to check them out in the corresponding PKE documentation.
First, you need to create AWS instance profiles and roles.
export CLUSTER_NAME="banzaicloud-pke"
export AWS_SSH_KEY_PAIR_NAME="pke-ssh-key"
export AWS_DEFAULT_REGION="eu-central-1"
export IMAGE_ID="ami-0dc9154691d8a1757" # for other regions check: https://github.com/banzaicloud/pipeline/blob/0.25.1/internal/providers/pke/pkeworkflow/create_cluster.go#L87

aws cloudformation create-stack \
--stack-name pke-global \
--capabilities CAPABILITY_IAM CAPABILITY_NAMED_IAM \
--template-body https://raw.githubusercontent.com/banzaicloud/pipeline/master/templates/pke/global.cf.yaml
Wait for the stack to finish being created; run the following command until you see the status, CREATE_COMPLETE. This may take a few minutes.
$ aws cloudformation describe-stacks --stack-name pke-global --query "Stacks[*].StackStatus"
[
    "CREATE_COMPLETE"
]
Set up the security group.
aws ec2 create-security-group --group-name pke-cluster --description "PKE security group"
aws ec2 authorize-security-group-ingress --group-name pke-cluster --protocol tcp --port 22 --cidr 0.0.0.0/0
PKE_CLUSTER_SEC_GROUP_ID=$(aws ec2 describe-security-groups --group-name pke-cluster --region $AWS_DEFAULT_REGION --query "SecurityGroups[*].GroupId" --output=text)
aws ec2 authorize-security-group-ingress --group-name pke-cluster --source-group $PKE_CLUSTER_SEC_GROUP_ID --protocol -1

aws ec2 create-security-group --group-name pke-master --description "PKE master security group"
aws ec2 authorize-security-group-ingress --group-name pke-master --protocol tcp --port 6443 --cidr 0.0.0.0/0
Import your SSH key and start the machines.
aws ec2 import-key-pair --key-name $AWS_SSH_KEY_PAIR_NAME --public-key-material file://~/.ssh/id_rsa.pub

aws ec2 run-instances --image-id $IMAGE_ID \
--count 3 \
--instance-type c5.large \
--key-name $AWS_SSH_KEY_PAIR_NAME \
--tag-specifications "ResourceType=instance,Tags=[{Key=kubernetes.io/cluster/$CLUSTER_NAME,Value=owned},{Key=Name,Value=pke-master}]" \
--security-groups pke-cluster pke-master \
--iam-instance-profile Name=pke-global-master-profile

aws ec2 run-instances --image-id $IMAGE_ID \
--count 1 \
--instance-type c5.large \
--key-name $AWS_SSH_KEY_PAIR_NAME \
--tag-specifications "ResourceType=instance,Tags=[{Key=kubernetes.io/cluster/$CLUSTER_NAME,Value=owned},{Key=Name,Value=pke-worker}]" \
--security-groups pke-cluster \
--iam-instance-profile Name=pke-global-worker-profile
Using SSH, connect to each initiated EC2 instance and run the following commands as root:
Query master instances:
$ aws ec2 describe-instances --filter="Name=tag:Name,Values=pke-master" --query="Reservations[*].Instances[*].{ID:InstanceId,PublicIP:PublicIpAddress,PrivateIP:PrivateIpAddress,State:State.Name}" --output=table
----------------------------------------------------------------------
|                          DescribeInstances                         |
+----------------------+---------------+------------------+----------+
|          ID          |   PrivateIP   |    PublicIP      |  State   |
+----------------------+---------------+------------------+----------+
|  i-03e71469d404b05bf |  172.31.1.152 |  18.184.255.3    |  running |
|  i-0fec42374d451be3b |  172.31.7.121 |  3.123.3.106     |  running |
|  i-04260e07984eaa756 |  172.31.3.129 |  18.184.137.210  |  running |
+----------------------+---------------+------------------+----------+
SSH using PublicIP and gain root access.
ssh centos@18.184.255.3
sudo -s # root access
mkdir -p /banzaicloud
curl -vL https://banzaicloud.com/downloads/pke/pke-latest -o /banzaicloud/pke
chmod +x /banzaicloud/pke

export CLUSTER_NAME="banzaicloud-pke"
export EXTERNAL_IP=$(curl http://169.254.169.254/latest/meta-data/public-ipv4)
export INTERNAL_IP=$(curl http://169.254.169.254/latest/meta-data/local-ipv4)

export MAC=$(curl -s http://169.254.169.254/latest/meta-data/network/interfaces/macs/)
export VPC_CIDR=$(curl -s http://169.254.169.254/latest/meta-data/network/interfaces/macs/$MAC/vpc-ipv4-cidr-block/)
First master node installation 🔗︎
Local Machine 🔗︎
Log into the first node.
vagrant ssh node1 -c 'sudo -s'
Now run the PKE installer:
/banzaicloud/pke install master \
--kubernetes-master-mode=ha \
--kubernetes-advertise-address=192.168.64.11:6443 \
--kubernetes-api-server=192.168.64.11:6443 \
--kubernetes-version=1.14.3
AWS EC2 🔗︎
Log into the first master node.
/banzaicloud/pke install master \
--kubernetes-master-mode=ha \
--kubernetes-advertise-address=${INTERNAL_IP} \
--kubernetes-api-server=${EXTERNAL_IP}:6443 \
--kubernetes-cloud-provider=aws \
--kubernetes-cluster-name=${CLUSTER_NAME} \
--kubernetes-infrastructure-cidr=${VPC_CIDR} \
--kubernetes-version=1.14.3
Get the internal ip of the first master node. We’ll use this later for APISERVER_IP.
echo $INTERNAL_IP
172.31.1.152
Common commands for both local setup, and AWS EC2 🔗︎
Let’s makes ure the first installed master node is up and running.
export KUBECONFIG=/etc/kubernetes/admin.conf
kubectl get node -o wide
NAME    STATUS   ROLES    AGE     VERSION   INTERNAL-IP     EXTERNAL-IP   OS-IMAGE                KERNEL-VERSION              CONTAINER-RUNTIME
node1   Ready    master   55s   v1.14.3   192.168.64.11   <none>        CentOS Linux 7 (Core)   3.10.0-957.5.1.el7.x86_64   containerd://1.2.5
Once PKE is successfully installed, we need to distribute the generated certificates. Please note, /banzaicloud/ is a folder that’s shared between virtual machines. We use this fortuitous circumstance within Vagrant to distribute any necessary certificates. For AWS you have to manually scp certs.tgz to each of the other tow machines. In a production environment, you have to find your own way of doing this, e.g. using scp to copy certificates between machines. If you are using Pipeline to set up a multi-master PKE cluster, we do it for you. Also, note that we use Vault and our Bank-Vault project, behind the scenes.
# pack certificates
tar -cvzf /banzaicloud/certs.tgz \
  /etc/kubernetes/pki/*ca.* \
  /etc/kubernetes/pki/ca.* \
  /etc/kubernetes/pki/etcd/*ca.* \
  /etc/kubernetes/pki/*sa* \
  /etc/kubernetes/admission-control/encryption-provider-config.yaml
To join other nodes to the cluster, we need a token and a certificate hash so as to be able to verify their authenticity. Luckily, the installation has already created one for us, we just need to query it.
/banzaicloud/pke token list
This command will output a token and a certificate hash. We’ll save these for later use on additional nodes.
Second and third master node installation 🔗︎
Log into the second and third node.
Extract the shared certificates we got from the first node, and use the token and the certificate hash we just mentioned.
# extract certificates
tar -xvzf /banzaicloud/certs.tgz -C /
# copy token here from first master
export TOKEN="0qztey.dv0o99zdcljb5une"
# copy certificate hash here from first master
export CERTHASH="sha256:24034ed4322ee85c3ef1aa7b380d64d7931b994b7836bad2980110dc43a20db1"
Local machine 🔗︎
/banzaicloud/pke install master \
--kubernetes-master-mode=ha \
--kubernetes-version=1.14.3 \
--kubernetes-join-control-plane \
--kubernetes-node-token=$TOKEN \
--kubernetes-api-server-ca-cert-hash=$CERTHASH \
--kubernetes-api-server=192.168.64.11
AWS EC2 🔗︎
# replace IP with the value of the first master node's private IP address, as mentioned above
export APISERVER_IP="172.31.1.152"
/banzaicloud/pke install master \
--kubernetes-master-mode=ha \
--kubernetes-version=1.14.3 \
--kubernetes-join-control-plane \
--kubernetes-node-token=$TOKEN \
--kubernetes-api-server-ca-cert-hash=$CERTHASH \
--kubernetes-api-server=${APISERVER_IP} \
--kubernetes-advertise-address=${INTERNAL_IP} \
--kubernetes-cloud-provider=aws \
--kubernetes-cluster-name=${CLUSTER_NAME} \
--kubernetes-infrastructure-cidr=${VPC_CIDR}
Worker node installation 🔗︎
At this point, all our master nodes should be up and running. Now we’re ready to add a worker node to the cluster.
Log into the fourth node, which we’ll use as our worker.
Run PKE installer:
# copy token here from first master
export TOKEN="0qztey.dv0o99zdcljb5une"
# copy certificate hash here from first master
export CERTHASH="sha256:24034ed4322ee85c3ef1aa7b380d64d7931b994b7836bad2980110dc43a20db1"
/banzaicloud/pke install worker \
--kubernetes-version=1.14.3 \
--kubernetes-node-token=$TOKEN \
--kubernetes-api-server-ca-cert-hash=$CERTHASH \
--kubernetes-api-server=192.168.64.11
AWS EC2 🔗︎
To get the PublicIP of the worker, run:
aws ec2 describe-instances --filter="Name=tag:Name,Values=pke-worker" --query="Reservations[*].Instances[*].{ID:InstanceId,PublicIP:PublicIpAddress,PrivateIP:PrivateIpAddress,State:State.Name}" --output=table
export APISERVER_IP="172.31.1.152"
/banzaicloud/pke install worker \
--kubernetes-version=1.14.3 \
--kubernetes-node-token=$TOKEN \
--kubernetes-api-server-ca-cert-hash=$CERTHASH \
--kubernetes-api-server=${APISERVER_IP} \
--kubernetes-cloud-provider=aws
Verifying the running cluster 🔗︎
We can check if all the nodes are joined to our Kubernetes cluster from our first node.
[root@node1 vagrant]$ kubectl get node -o wide
NAME    STATUS   ROLES    AGE     VERSION   INTERNAL-IP     EXTERNAL-IP   OS-IMAGE                KERNEL-VERSION              CONTAINER-RUNTIME
node1   Ready    master   54m     v1.14.3   192.168.64.11   <none>        CentOS Linux 7 (Core)   3.10.0-957.5.1.el7.x86_64   containerd://1.2.5
node2   Ready    master   13m     v1.14.3   192.168.64.12   <none>        CentOS Linux 7 (Core)   3.10.0-957.5.1.el7.x86_64   containerd://1.2.5
node3   Ready    master   8m25s   v1.14.3   192.168.64.13   <none>        CentOS Linux 7 (Core)   3.10.0-957.5.1.el7.x86_64   containerd://1.2.5
node4   Ready    <none>   114s    v1.14.3   192.168.64.14   <none>        CentOS Linux 7 (Core)   3.10.0-957.5.1.el7.x86_64   containerd://1.2.5
Kubernetes version upgrade; PKE cluster upgrade! 🔗︎
Since we now have a cluster running on K8s 1.14.3, we can start to upgrade it to the latest version. At time of writing, only 1.15.0 is available.
The upgrade flow for a patch version upgrade is exactly the same. In the future, you need only to specify --kubernetes-version=1.15.1 after it has been made generally available.
First master node upgrade 🔗︎
/banzaicloud/pke upgrade master --kubernetes-version=1.15.0
Second and third master node upgrade 🔗︎
/banzaicloud/pke upgrade master --kubernetes-version=1.15.0 --kubernetes-additional-control-plane
Upgrading worker node 🔗︎
/banzaicloud/pke upgrade worker --kubernetes-version=1.15.0
Verifying running cluster 🔗︎
We can check if all the nodes are joined to our Kubernetes cluster from our first node.
[root@node1 vagrant]$ kubectl get node -o wide
NAME    STATUS   ROLES    AGE     VERSION   INTERNAL-IP     EXTERNAL-IP   OS-IMAGE                KERNEL-VERSION              CONTAINER-RUNTIME
node1   Ready    master   14m     v1.15.0   192.168.64.11   <none>        CentOS Linux 7 (Core)   3.10.0-957.5.1.el7.x86_64   containerd://1.2.5
node2   Ready    master   10m     v1.15.0   192.168.64.12   <none>        CentOS Linux 7 (Core)   3.10.0-957.5.1.el7.x86_64   containerd://1.2.5
node3   Ready    master   8m7s    v1.15.0   192.168.64.13   <none>        CentOS Linux 7 (Core)   3.10.0-957.5.1.el7.x86_64   containerd://1.2.5
node4   Ready    <none>   4m26s   v1.15.0   192.168.64.14   <none>        CentOS Linux 7 (Core)   3.10.0-957.5.1.el7.x86_64   containerd://1.2.5
Conclusion 🔗︎
As you can see, upgrading an existing PKE Kubernetes cluster is as easy as issuing a single command on every node. You don’t need to mess with Kubernetes upgrades, because the hard work is done by PKE. Again, when using this in combination with the Pipeline platform even less work is required, since Banzai Cloud Pipeline already supports multi-master installations. If you are interested in trying this out for yourself, we’re running a free developer version of the platform, available at: /products/pipeline/

Resources - simplifying things even more 🔗︎
All the above examples can be run on your local machine with scripts that are included in the source repository.
For a single node installation:
./centos-single.sh v1.14.3
./centos-single-upgrade.sh v1.15.0
For multi-master setup as described in this blogpost:
./centos-multi.sh v1.14.3
./centos-multi-upgrade.sh v1.15.0
About PKE 🔗︎
PKE is a simple, lightweight Kubernetes installer and distribution. Designed to work anywhere, it’s the preferred means of managing Banzai Cloud’s cloud native application and devops platform, Pipeline. Banzai Cloud Pipeline supercharges the development, deployment and scaling of container-based applications, and includes native support for multi-, hybrid, and edge cloud environments.
About Banzai Cloud Pipeline 🔗︎
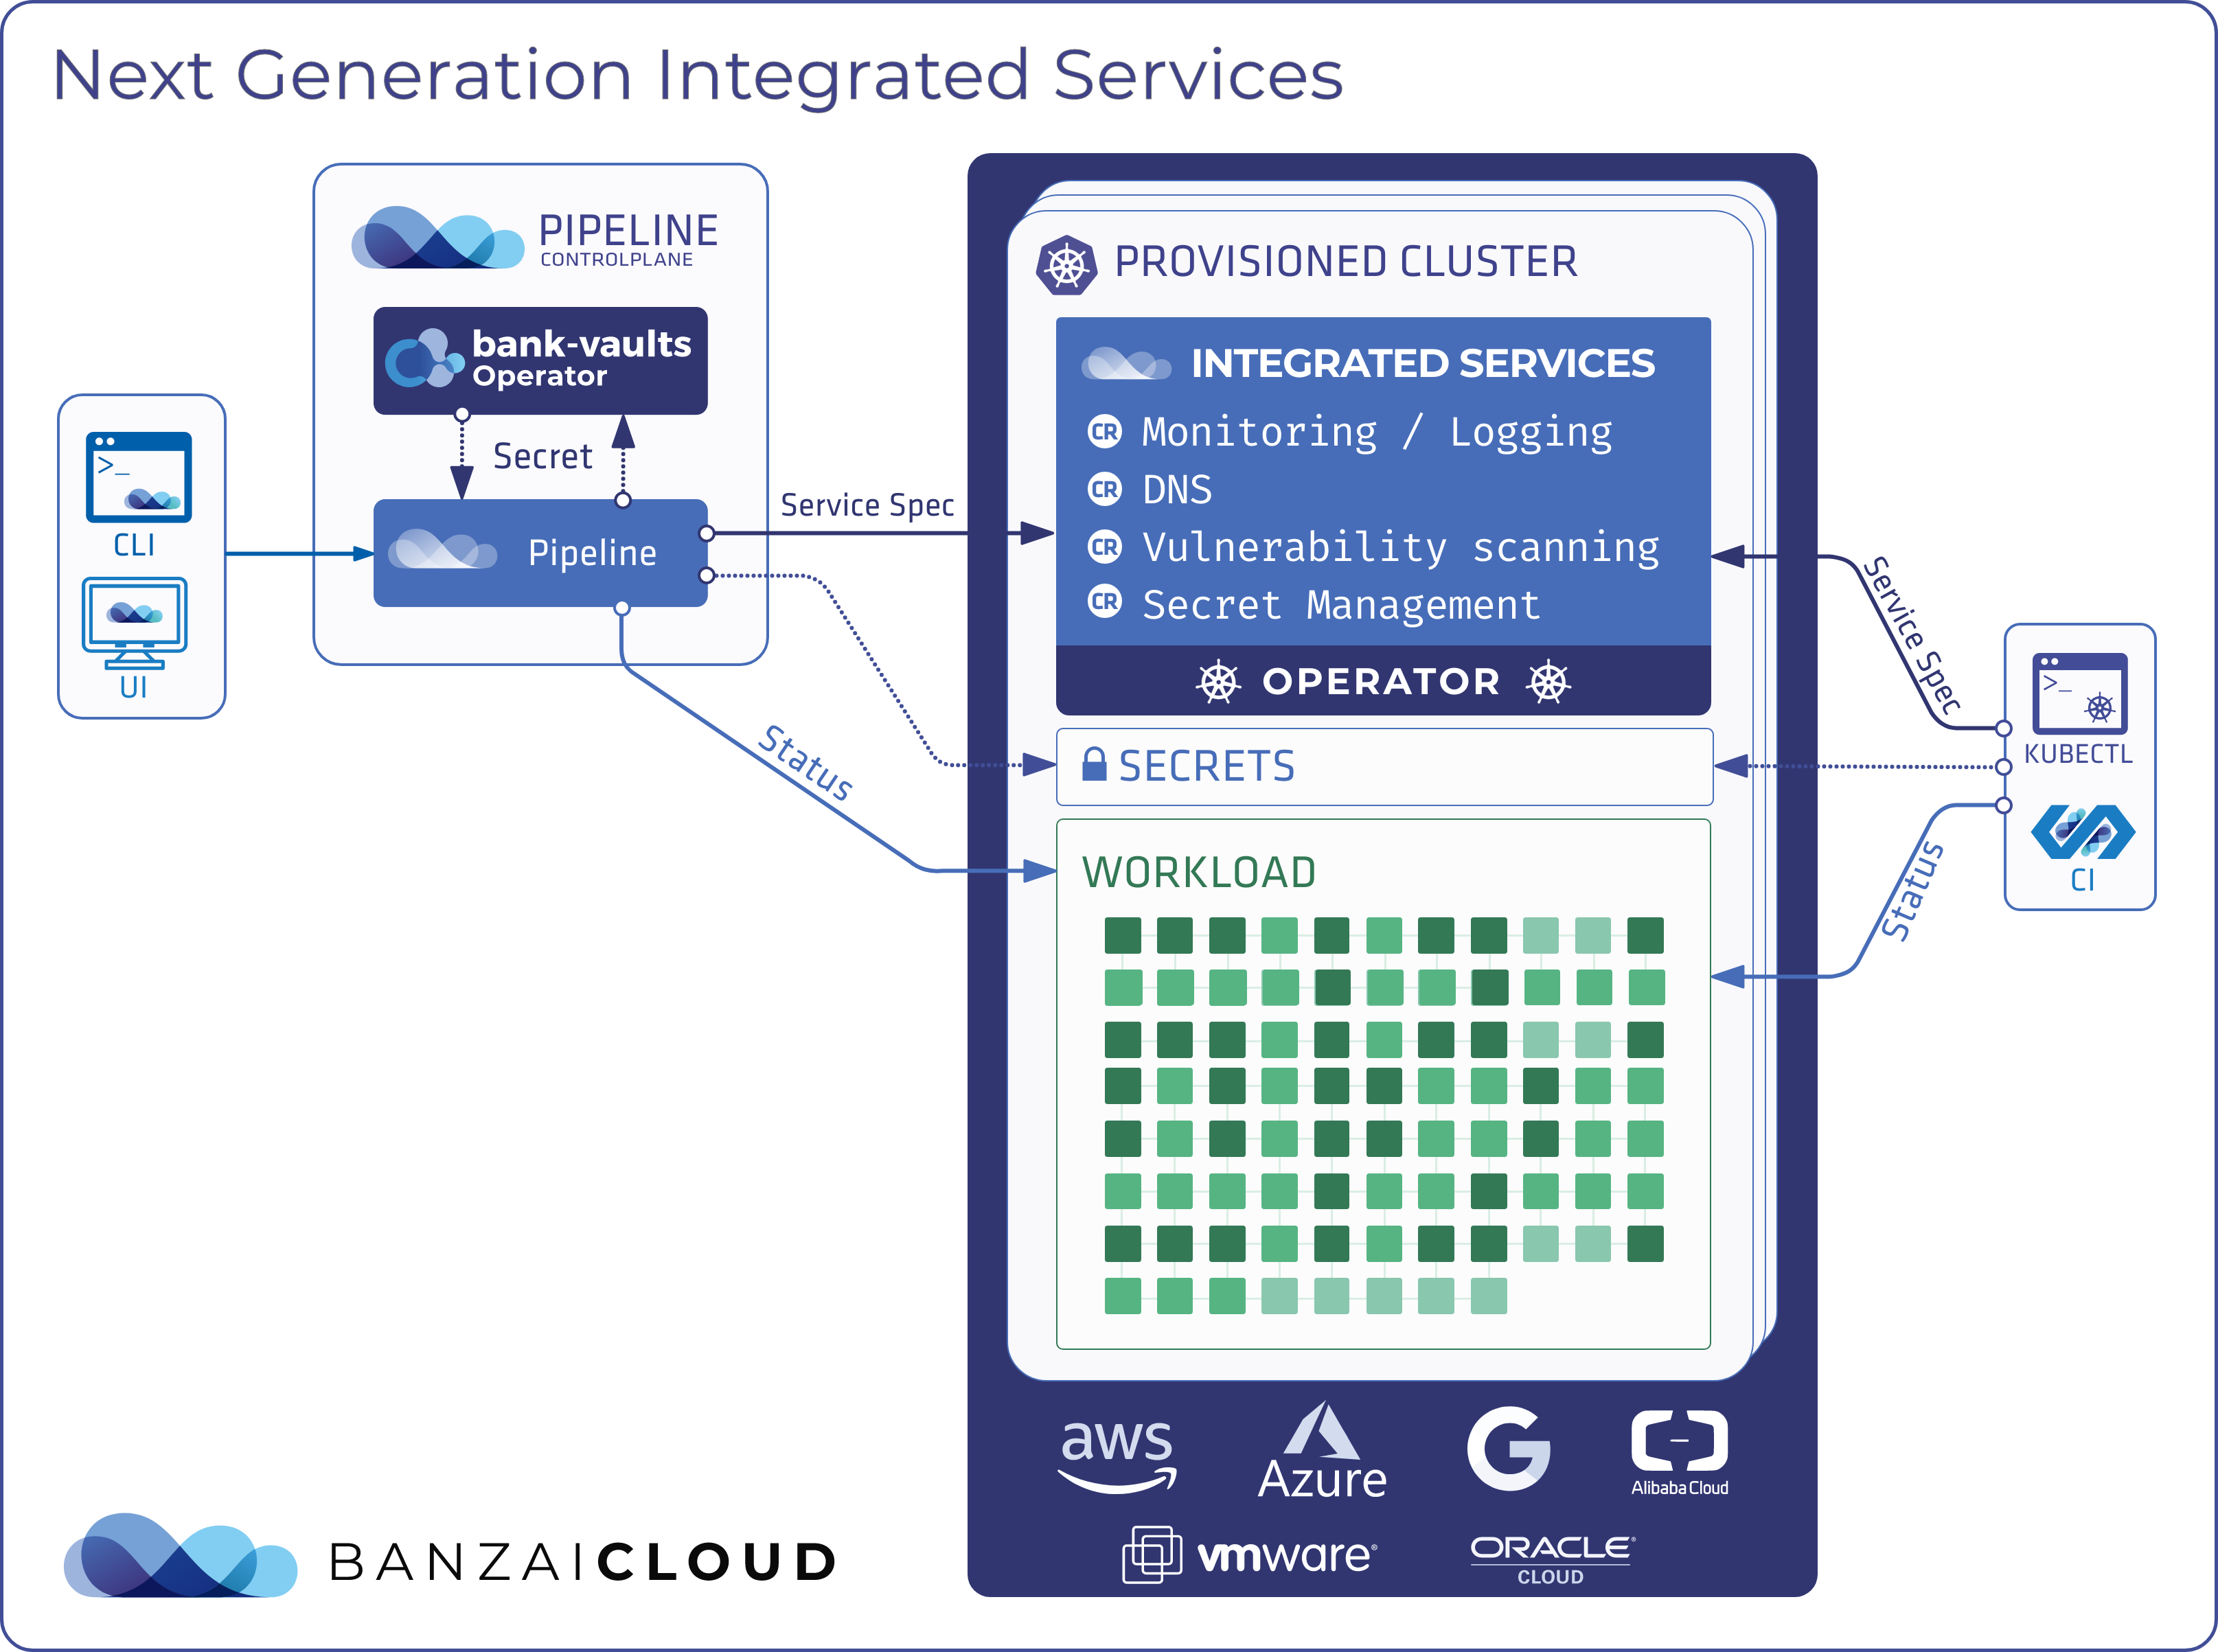
Banzai Cloud’s Pipeline provides a platform for enterprises to develop, deploy, and scale container-based applications. It leverages best-of-breed cloud components, such as Kubernetes, to create a highly productive, yet flexible environment for developers and operations teams alike. Strong security measures — multiple authentication backends, fine-grained authorization, dynamic secret management, automated secure communications between components using TLS, vulnerability scans, static code analysis, CI/CD, and so on — are default features of the Pipeline platform.
About Banzai Cloud 🔗︎
Banzai Cloud is changing how private clouds are built: simplifying the development, deployment, and scaling of complex applications, and putting the power of Kubernetes and Cloud Native technologies in the hands of developers and enterprises, everywhere.
#multicloud #hybridcloud #BanzaiCloud