


A few weeks ago we discussed the way that we integrated Kubernetes federation v2 into Pipeline, and took a deep dive into how it works. This is the next post in our federation multi cloud/cluster series, in which we’ll dig into some real world use cases involving one of Kubefed’s most interesting features: Replica Scheduling Preference.
tl;dr: 🔗︎
- ReplicaScheduler helps balance replicas between federated clusters, rebalancing if replicas on one or more clusters become (or are) unschedulable
- We’ll take a deep dive into how the ReplicaScheduler works
- And we’ll present some examples that we’re proof-of-concepting with our customers
Note that every multicloud or hybrid cloud use case requires different architectural approaches - built on our
cluster groupfeature, the Pipeline platform supports multiple scenarios, while maintaining the same clean and consistent UX experience
- Multi-cloud application management
- An Istio based automated service mesh for multi and hybrid cloud deployments
- Federated resource and application deployments built on Kubernetes federation v2
- the Pipeline hybrid cloud controller manager - a Kubernetes
nativehybrid cloud approach, which you can expect from our R&D lab soon
A sneak peek at how the ReplicaScheduler works 🔗︎
When you create a FederatedDeployment, by default the number of replicas will be the same across all member clusters.
You can override replica counts per cluster in the event that you don’t want to distribute replicas equally accross clusters/clouds.
An alternative way of specifying number of replicas in each cluster is to generate a ReplicaSchedulingPreference. By using a ReplicaSchedulingPreference, you can specify replica counts, while simultaneously specifying the total replica count and weight of each cluster. This is extremely useful when you want to scale your deployments and you have more than a few clusters to replicate across.
Even more interesting is the rebalance feature of ReplicaSchedulingPreference. When enabled - and by default it is not - this feature monitors the replica pods for a target replica workload from each federated cluster. If it finds that some clusters are not able to schedule those pods, it moves - rebalances - replicas to clusters where all the pods are running and healthy. In other words, it moves replica workloads away from those clusters which are running out of room and to those clusters which have the adequate capacity.
Below, you will find an example of 12 replicas being distributed, 66% of them on the cluster banzaionprem.
apiVersion: scheduling.kubefed.io/v1alpha1
kind: ReplicaSchedulingPreference
metadata:
  name: test-deployment
  namespace: test
spec:
  targetKind: FederatedDeployment
  clusters:
    banzaionprem:
      weight: 3
    banzaispot:
      weight: 1
  rebalance: true
  totalReplicas: 12
What is important, here, is that ReplicaSchedulingPreference have the same name as the target FederatedDeployment.
ReplicaScheduler will modify the FederatedDeployment resource, adding replica count overrides to the clusterOverrides section, and will similarly modify the placement section, which means that, if you’ve used clusterSelector to select target clusters, that selection will be overridden. You can check out how the FederatedDeployment resource is updated via ReplicaScheduler later in this example.
Also note that, once you delete the ReplicaSchedulingPreference, the deployment will remain scaled (as it is, we don’t know its prior state). And that ReplicaScheduler is able to handle Deployments and ReplicaSets as well.
SchedulerManager is responsible for starting up a controller for each Scheduling Preference, which in the case of ReplicaSchedulingPreference is ReplicaSchedulingPreferenceController. As you will see, the scheduling feature in Kubefed is implemented in a way that’s generic and extendable, so you’ll be able to write your own Scheduler if you need too. At this point, only ReplicaSchedulingPreference is available, but hopefully there’s more to come, like JobSchedulerPreference and HPASchedulerPreference (we’re even working on some of our own).
SchedulerManager starts a plugin for each target Kind - FederatedReplicaSet and FederatedDeployment - handled by the ReplicaScheduler. As you will see, these plugins are actually responsible for updating target resources. Besides the Scheduler, you have to implement a SchedulingPreferenceController and one or more plugins. ReplicaSchedulingPreferenceController starts the ReplicaScheduler and also watches for ReplicaSchedulingPreference resource changes.
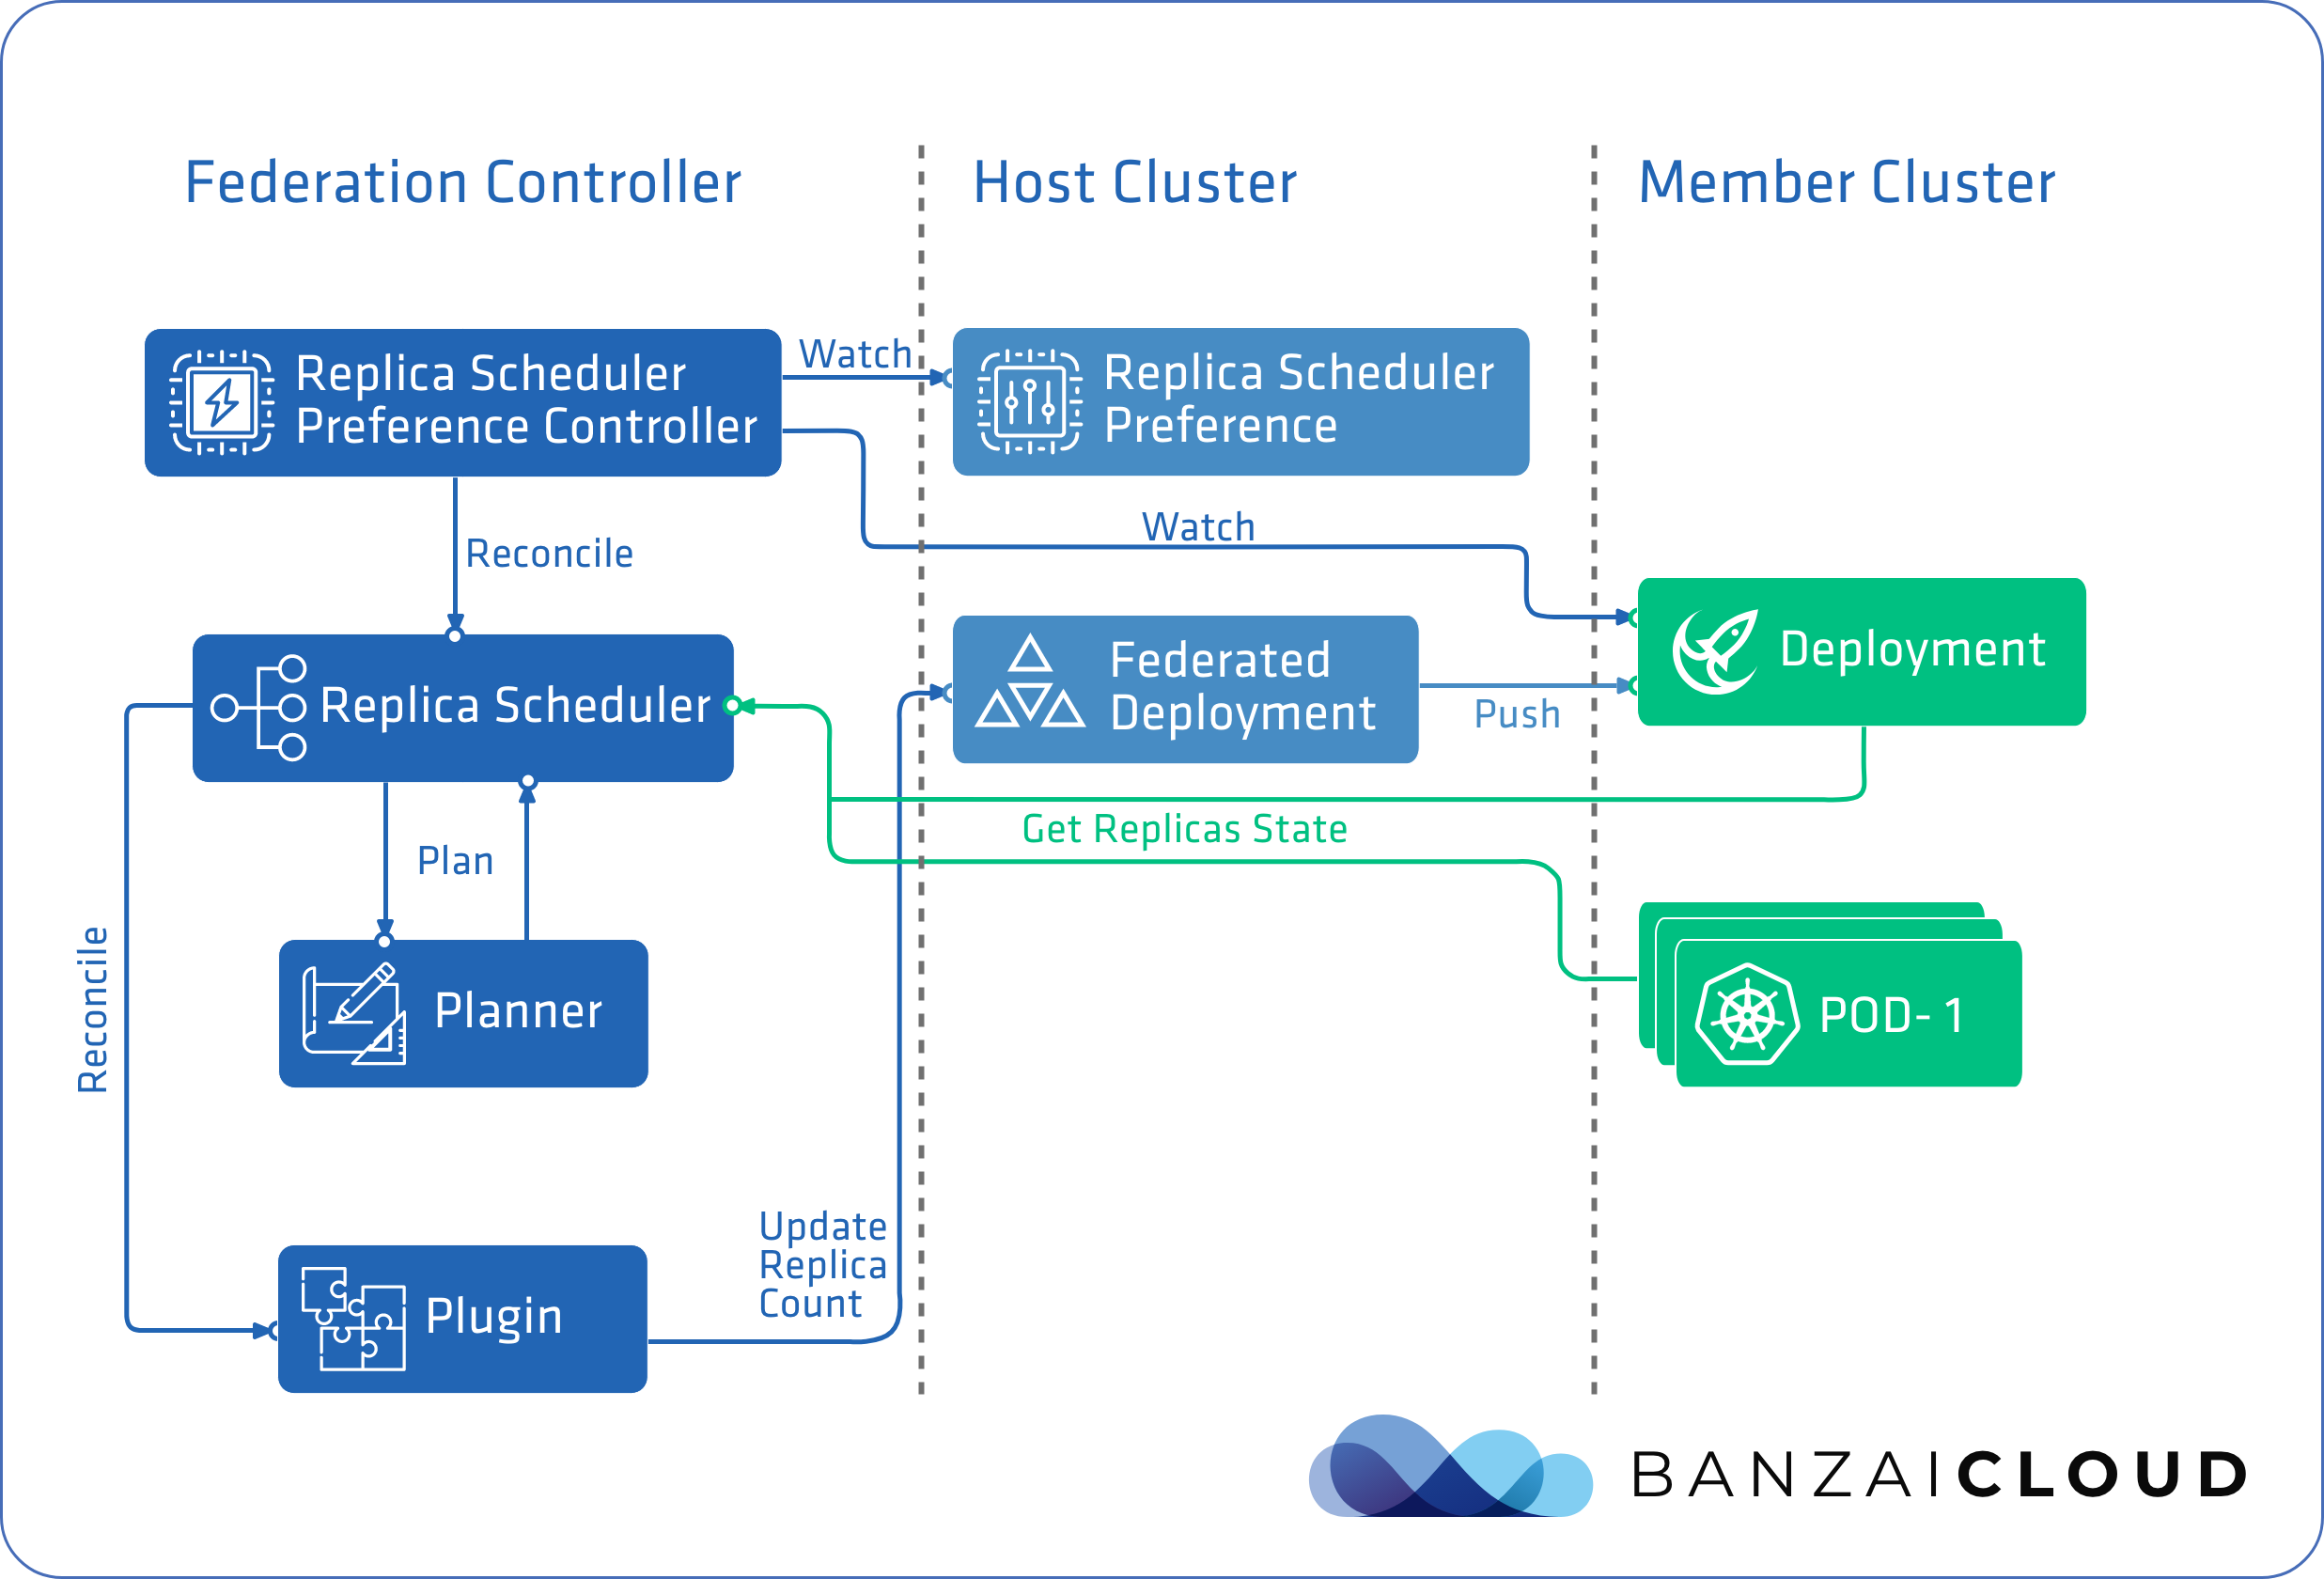
The completed flow can be seen in the diagram below:
ReplicaScheduler's schedule cycle is triggered by ReplicaSchedulingPreferenceController's reconcile loop, which is triggered by events related to deployments on a member cluster, or ReplicaSchedulingPreference resource changes. In other words, it’s triggered whenever the replica counts related to a given deployment on a member cluster change. For this to work, the ReplicaScheduler fetches pod statuses from each member cluster, counting running and unschedulable pods alike. The distribution of replica counts is implemented in Planner, while the actual update is done by the Plugin component that corresponds to the type of cluster federation.
What might this be good for? 🔗︎
While Kubefed is still in beta (but stable enough for us to start using it), we have customers who have already started their proof of concepts, using the Pipeline platform. While these vary based on whether they are on-prem, 100% cloud or a mix of multi and hybrid cloud deployments, we have collected some of the more interesting use cases we’ve seen or have been working together on with our enterprise customers.
-
Upgrading clusters
If you’re deploying to several clusters with
ReplicaSchedulingPreference, you can take down one or more clusters for upgrade or maintenance and, given the capacity is there (which is often the case on-premise, or is easily increased in the cloud), the desired number of replicas will be the same as the number that will be automatically scheduled on other member clusters. -
Handling load spikes and slow autoscaling
If you’re running most of your workload in the cloud and autoscaling it, and when there’s a sudden spike in pending pods, there will be a delay before new nodes join the cluster. If you want to avoid this on a small on-premise cluster, you can target your deployments with
ReplicaSchedulingPreference, so that you deploy 100% to the cloud. However, if you run out of resources temporarily, your deployment will be balanced to on-premise, until the clusters are scaled out. Note that Pipeline can provide predictive scaling based on metrics as well -
(Re)balancing in case of spot outages
If you keep most of your workload on spot or preemptible instances in the cloud, and in if some of your nodes become unavailable due to spot terminations, you can rebalance your deployments to an on-premise or on-demand cloud-based cluster. Of course, you can use Hollowtrees to minimize the risk or running out of spot instances (our users can safely run spot instance-based clusters with attached SLAS), however, this is one more way of saving cost.
-
Scale out less important workloads into the cloud
Run most of your workload on-premise and keep a scaleable backup cluster of spot instances in the cloud, so that you can scale out less important deployments to the cloud and make sure there’s space to run more important jobs on your primary on-premise cluster. The spot cluster can even be scaled down to 0 nodes.
Showtime 🔗︎
To demonstrate how ReplicaSchedulingPreference works in practice, we chose the latest usecase from the above list (customers running a large CI system on-premise with attached priorities that they scale out into the cloud).
We will be using the same Satellite application we did in this, previous post, and will create and federate clusters in much the same way.
-
Create two Kubernetes clusters.
In this step we’ll create two
Kubernetesclusters on AWS, using our own lightweight CNCF certified Kubernetes distribution, PKE - one fixed sized and one spot cluster with autoscaling enabled.banzaionpremis intended to play the role of an on-premise cluster, so will contain a fixed size on-demand nodepool with no scaling enabled, for demo purposes only, with one c4x.large on-demand instance.banzaispotwill have one nodepool with c4x.large spot instances with one node, but with the ability to scale to three nodes.The Pipeline platform automates all this for you and supports five clouds and six different
Kubernetesdistributions. As a matter of fact, it’s possible to import any Kubernetes distribution into Pipeline. -
Federate clusters, selecting the on-premise cluster as Host
In the Pipeline UI choose Cluster Federation, which will bring you to a simple four step wizard. First, choose your Host cluster, then the other clusters as members. Feel free to skip the second part of this step by creating a one member federation with only a single Host. Finally, you can target namespaces and enable features.

Should you inspect the API calls behind the UI wizard, you’ll find that there are two API calls: one to create a cluster group and a second to enable its federation feature.
-
Download kubeconfigs from Pipeline
Download the kubeconfig of the Host cluster, in order to deploy resources with
kubectl, and the kubeconfig of the Member cluster to watch replicas be moved over there. -
Deploy our Satellite application as a federated deployment with preferences set so that it runs 66% percent of its replicas on the
banzaionpremcluster.kubectl create ns test kubectl create -f https://raw.githubusercontent.com/banzaicloud/kubefed/demo-examples/example/demo-rsp/federatednamespace.yaml kubectl create -f https://raw.githubusercontent.com/banzaicloud/kubefed/demo-examples/example/demo-rsp/federateddeployment.yaml kubectl create -f https://raw.githubusercontent.com/banzaicloud/kubefed/demo-examples/example/demo-rsp/deployment_sched_pref.yaml -
Check replicas on both clusters
    banzaionprem  -> kubectl get deployments -n test

    NAME              READY   UP-TO-DATE   AVAILABLE   AGE
    test-deployment   9/9     9            9           26m

    banzaispot  ->  kubectl get deployments -n test

    NAME              READY   UP-TO-DATE   AVAILABLE   AGE
    test-deployment   3/3     3            3           26m
You can also take a look at the
FederatedDeploymentresourcespec.overridessection to see overrides made byReplicaScheduler:kubectl get federateddeployments.types.kubefed.io test-deployment -n test -o yaml ... spec: overrides: - clusterName: banzaionprem clusterOverrides: - path: /spec/replicas value: 9 - clusterName: banzaispot clusterOverrides: - path: /spec/replicas value: 3 ... -
Now let’s deploy some high priority workloads on our
banzaionpremcluster. Actually, we will place the same test application but with a much higher pod priority. To set priority for a pod, you have to first create aPodPriorityresource. Pods not associated with aPodPriorityresource will have 0 priority and will be preempted by thebanzaionpremcluster. Our expectation is that that will rebalancePendingpods to thebanzaispotcluster.kubectl create -f https://raw.githubusercontent.com/banzaicloud/kubefed/demo-examples/example/demo-rsp/high_prio_deployment.yaml -
After a few minutes you should see the following deployment replica counts:
    banzaionprem  -> kubectl get deployments -n test

    NAME              READY   UP-TO-DATE   AVAILABLE   AGE
    highprio          8/8     8            8           4m38s
    test-deployment   3/9     9            3           61m

    banzaispot  ->  kubectl get deployments -n test

    NAME              READY   UP-TO-DATE   AVAILABLE   AGE
    test-deployment   9/9     9            9           61m
Note how on
banzaionpremthere are 8 replicas of thehighpriodeployment running, meanwhile, there are only 3 of 9 replicas oftest-deploymentrunning. On thebanzaispotcluster, however, there are 9 replicas running. Note thatPendingpods oftest-deploymentdidn’t disappear from thebanzaionpremcluster, even when theReplicaSchedulerpushed replicas out to the spot cluster. -
Now scale down the
highprioapp, to see if replicas oftest-deploymentwill again be rebalanced to thebanzaionpremcluster.kubectl patch deployment highprio --patch '{"spec":{"replicas":1}}' -n test -
Give the
ReplicaSchedulera little time, then check deployments on both clusters:banzaionprem -> kubectl get deployments -n test NAME READY UP-TO-DATE AVAILABLE AGE highprio 1/1 1 1 39m test-deployment 9/9 9 9 96m banzaispot -> kubectl get deployments -n test NAME READY UP-TO-DATE AVAILABLE AGE test-deployment 3/3 3 3 97mAs you can see,
test-deploymentis back to its original state, right where it was before deploying high priority pods.
I hope that this raw technical content and demonstration was useful in helping you better understand Kubernetes federation v2. As usual, we are hard at work making the Pipeline platform the most complete and feature rich multi-/hybrid-cloud platform; we’re always looking to add options that allows us to experiment with the latest technology available. Therefore, if you have any questions or suggestions, don’t hesitate to contact us on GitHub, LinkedIn, Twitter or Slack. We’re happy to help.