


The last few versions of Istio have been released at a rate of about one every three months. Because of this rapid rate the upgrade of an Istio service mesh is an essential and recurring task to do when using Istio.
Upgrading an Istio control plane in a production environment with as little downtime as possible has been one of the many challenges that service mesh operators have routinely faced. This is why the new Istio control plane canary upgrade feature is such a game changer. It allows us to upgrade the control plane with much more confidence and with a greatly reduced risk of traffic disruptions.
In this post, we’ll first detail how the Istio canary control plane upgrade procedure works, in theory, and then demonstrate how the process works with a practical example, using the open source Banzai Cloud Istio operator. Lastly, we’ll demonstrate how the Istio canary upgrade workflow is assisted by Banzai Cloud’s Istio distribution, Backyards (now Cisco Service Mesh Manager).
History 🔗︎
In the early days of Istio, even its deployment and management was no straightforward task, and was originally managed by Helm. This was at a time when we built and opensourced the Banzai Cloud Istio operator to help overcome some of these issues.
Back then, upgrading the Istio control plane was more complicated, as well as a fully manual process. To enhance that, we added automated in-place control plane upgrades to our Istio operator.
While this provided a much better upgrade experience than was previously available, there were still issues. The main problem with this solution was that the whole upgrade process was essentially a single step. If not handled with great care, or if the mesh configuration was not prepared for new (sometimes breaking) changes of Istio, then the process might easily lead to traffic disruptions.
Still, in-place upgrades have been the preferred method of upgrading the Istio mesh so far. This was mainly because the Istio control plane had to go through some dramatic simplifications before it was possible to implement a safer upgrade flow. A couple of the bigger architectural changes that were necessary in order to reach the new upgrade model were the simplification of the control plane to a single istio service and the addition of Istio telemetry V2 (Mixerless). With these changes (and more) it finally became possible to implement a safer, canary-like control plane upgrade flow.
Istio control plane canary upgrade 🔗︎
Let us suppose that we have an Istio 1.6 control plane running in our cluster and we would like to upgrade to an Istio 1.7 control plane. Here are the high level steps necessary to accomplish this through the new canary upgrade flow:
- Deploy an Istio 1.7 control plane next to the Istio 1.6 control plane
- Migrate the data plane gradually to the new control plane
- When migration is fully finished, uninstall the Istio 1.6 control plane
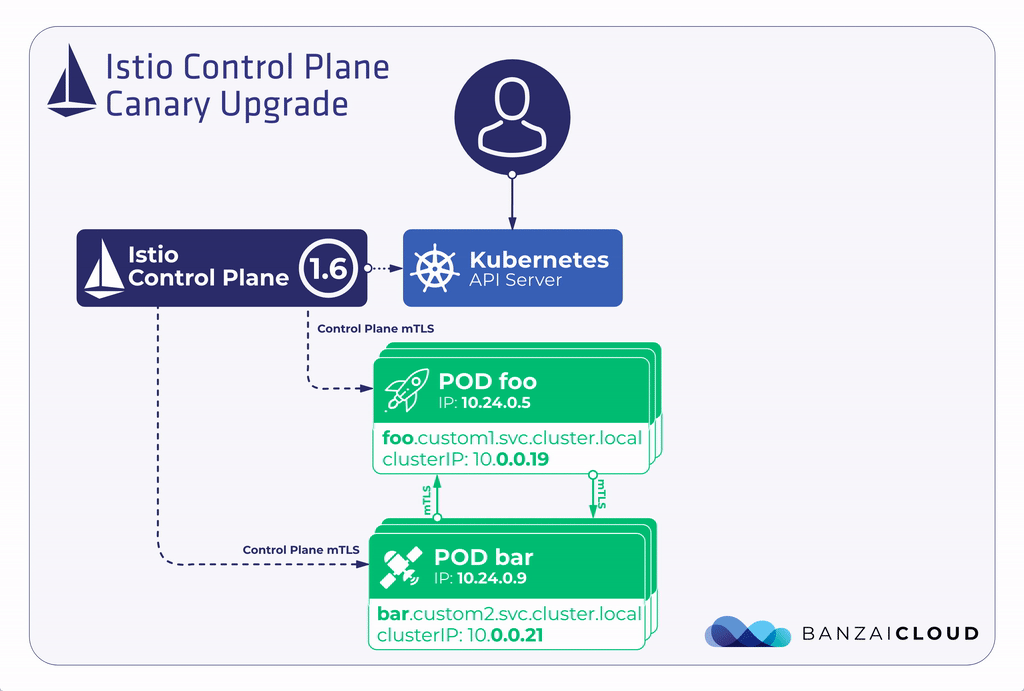
This canary upgrade model is much safer than the in-place upgrade workflow, mainly because it can be done gradually, at your own pace. If issues arise they will probably only affect a small portion of your applications, initially, and, if that does happen, it should be much easier to rollback only a part of your application for use with the original control plane.
This upgrade flow gives us more flexibility and confidence when making Istio upgrades, dramatically reducing the potential for service disruptions.
Canary upgrade with the Banzai Cloud Istio operator 🔗︎
Let’s take a closer look at how the process works in conjunction with our open source Banzai Cloud Istio operator. So our starting point is a running Istio operator and Istio 1.6 control plane, with applications using that control plane version.
-
Deploy another Istio operator (alongside the previous one), which has Istio 1.7 support
-
Apply a new Istio CR with Istio version 1.7 and let the operator reconcile an Istio 1.7 control plane
It is recommended that you turn off gateways for the new control plane and migrate the 1.6 gateway pods to the 1.7 control plane. That way the ingress gateway’s typically LoadBalancer-type service will not be recreated, neither will the cloud platform-managed LoadBalancer, and hence the IP address won’t change either.
This new control plane is often referred to as a canary, but, in practice, it is advisable that this be named based on Istio version, as it will remain on the cluster for the long term.
-
Migrate gateways to use the new Istio 1.7 control plane
This has been intentionally left as a manual step during the new control plane installation with the Banzai Cloud Istio operator (unlike in upstream Istio), so that users can make sure that they’re ready to use the control plane for their gateways, and only migrate after.
-
Migrate data plane applications
It is recommended that you perform this migration gradually. It’s important to keep in mind during the data plane migration that the two Istio control planes share trust (because they use the same certificates for encrypted communication). Therefore, when an application pod that still uses Istio’s 1.6 control plane calls another pod that already uses Istio’s 1.7 control plane, the encrypted communication will succeed because of that shared trust. That’s why this migration can be performed on a namespace by namespace basis and the communication of the pods won’t be affected.
Right now, migration is only possible on a per namespace basis, as it is not yet supported on the level of pods, although it probably will be in future releases.
-
Delete the Istio 1.6 control plane
Once the migration is finished, and we’ve made sure that our applications are working properly in conjunction with the new control plane, the older Istio 1.6 control plane can be safely deleted. It’s recommended that you take some time to make sure that everything is working on the new control plane before turning off the old one; it’s only an
istioddeployment running with practically no data plane pods attached.In the traditional sense, a canary upgrade flow ends with a rolling update of the old application into the new one. That’s not what’s happening here. Instead, the canary control plane will remain in the cluster for the long term and the original control plane won’t be rolled out, instead it is deleted (this is why it’s recommended that you name the new control plane based on a version number, rather than naming it canary).
We’re using the expression canary upgrade here, because that’s what’s used uniformly in Istio, and because we think it will be easier to understand and remember than trying to coin a new term for the flow that better paraphrases it.
Try it out! 🔗︎
First, we’ll deploy an Istio 1.6 control plane with the Banzai Cloud Istio operator and two demo applications in separate namespaces. Then, we’ll deploy an Istio 1.7 control plane alongside the other control plane and migrate the demo applications to the new control plane gradually. During the process we’ll make sure that the communication works even when the demo apps are on different control planes at the time. When the data plane migration is finished, we’ll delete the Istio 1.6 control plane and operator.
Setup 🔗︎
-
Create a Kubernetes cluster.
If you need a hand with this, you can use our free version of Banzai Cloud’s Pipeline platform to create a cluster.
Deploy Istio 1.6 control plane 🔗︎
-
Deploy an Istio operator version, which can install an Istio 1.6 control plane.
$ helm repo add banzaicloud-stable https://kubernetes-charts.banzaicloud.com $ helm install istio-operator-v16x --create-namespace --namespace=istio-system --set-string operator.image.tag=0.6.12 --set-string istioVersion=1.6 banzaicloud-stable/istio-operator -
Apply an
IstioCustom Resource and let the operator reconcile the Istio 1.6 control plane.$ kubectl apply -n istio-system -f https://raw.githubusercontent.com/banzaicloud/istio-operator/release-1.6/config/samples/istio_v1beta1_istio.yaml -
Check that the Istio 1.6 control plane is deployed.
$ kubectl get po -n=istio-system
NAME                                    READY   STATUS    RESTARTS   AGE
istio-ingressgateway-55b89d99d7-4m884   1/1     Running   0          17s
istio-operator-v16x-0                   2/2     Running   0          57s
istiod-5865cb6547-zp5zh                 1/1     Running   0          29s
Deploy demo app 🔗︎
-
Create two namespaces for the demo apps.
$ kubectl create ns demo-a $ kubectl create ns demo-b -
Add those namespaces to the mesh.
$ kubectl patch istio -n istio-system istio-sample --type=json -p='[{"op": "replace", "path": "/spec/autoInjectionNamespaces", "value": ["demo-a", "demo-b"]}]' -
Make sure that the namespaces are labeled for sidecar injection (if not, wait a few seconds).
$ kubectl get ns demo-a demo-b -L istio-injection NAME STATUS AGE ISTIO-INJECTION demo-a Active 2m11s enabled demo-b Active 2m9s enabled -
Deploy two sample applications in those two namespaces.
apiVersion: apps/v1 kind: Deployment metadata: name: app-a labels: k8s-app: app-a namespace: demo-a spec: replicas: 1 selector: matchLabels: k8s-app: app-a template: metadata: labels: k8s-app: app-a spec: terminationGracePeriodSeconds: 2 containers: - name: echo-service image: k8s.gcr.io/echoserver:1.10 ports: - containerPort: 8080 --- apiVersion: v1 kind: Service metadata: name: app-a labels: k8s-app: app-a namespace: demo-a spec: ports: - name: http port: 80 targetPort: 8080 selector: k8s-app: app-aapiVersion: apps/v1 kind: Deployment metadata: name: app-b labels: k8s-app: app-b namespace: demo-b spec: replicas: 1 selector: matchLabels: k8s-app: app-b template: metadata: labels: k8s-app: app-b spec: terminationGracePeriodSeconds: 2 containers: - name: echo-service image: k8s.gcr.io/echoserver:1.10 ports: - containerPort: 8080 --- apiVersion: v1 kind: Service metadata: name: app-b labels: k8s-app: app-b namespace: demo-b spec: ports: - name: http port: 80 targetPort: 8080 selector: k8s-app: app-b
Test communication 🔗︎
-
Save the application pod names for easier access.
$ APP_A_POD_NAME=$(kubectl get pods -n demo-a -l k8s-app=app-a -o=jsonpath='{.items[0].metadata.name}') $ APP_B_POD_NAME=$(kubectl get pods -n demo-b -l k8s-app=app-b -o=jsonpath='{.items[0].metadata.name}') -
Test to make sure that app-a can access app-b.
$ kubectl exec -n=demo-a -ti -c echo-service $APP_A_POD_NAME -- curl -Ls -o /dev/null -w "%{http_code}" app-b.demo-b.svc.cluster.local 200 -
Test to make sure that app-b can access app-a.
$ kubectl exec -n=demo-b -ti -c echo-service $APP_B_POD_NAME -- curl -Ls -o /dev/null -w "%{http_code}" app-a.demo-a.svc.cluster.local
200
Deploy Istio 1.7 control plane 🔗︎
-
Deploy an Istio operator version, which can install an Istio 1.7 control plane.
$ helm install istio-operator-v17x --create-namespace --namespace=istio-system --set-string operator.image.tag=0.7.1 banzaicloud-stable/istio-operator -
Apply an
IstioCustom Resource and let the operator reconcile the Istio 1.7 control plane.$ kubectl apply -n istio-system -f https://raw.githubusercontent.com/banzaicloud/istio-operator/release-1.7/config/samples/istio_v1beta1_istio.yaml -
Check that the Istio 1.7 control plane is also deployed.
$ kubectl get po -n=istio-system
NAME                                        READY   STATUS    RESTARTS   AGE
istio-ingressgateway-55b89d99d7-4m884       1/1     Running   0          6m38s
istio-operator-v16x-0                       2/2     Running   0          7m18s
istio-operator-v17x-0                       2/2     Running   0          76s
istiod-676fc6d449-9jwfj                     1/1     Running   0          10s
istiod-istio-sample-v17x-7dbdf4f9fc-bfxhl   1/1     Running   0          18s
Migrate data plane 🔗︎
Migrate ingress 🔗︎
-
Move the ingress gateway so as to utilize the new Istio 1.7 control plane.
$ kubectl patch mgw -n istio-system istio-ingressgateway --type=json -p='[{"op": "replace", "path": "/spec/istioControlPlane/name", "value": "istio-sample-v17x"}]'
Migrate first namespace 🔗︎
-
Label the first namespace for the new control plane.
$ kubectl label ns demo-a istio-injection- istio.io/rev=istio-sample-v17x.istio-systemThe new
istio.io/revlabel needs to be used for the new revisioned control planes to be able to perform sidecar injection. Theistio-injectionlabel must be removed because it takes precedence over theistio.io/revlabel for backward compatibility. -
Make sure that the labeling is correct.
$ kubectl get ns demo-a -L istio-injection -L istio.io/rev NAME STATUS AGE ISTIO-INJECTION REV demo-a Active 12m istio-sample-v17x.istio-system -
Restart the pod in the namespace.
$ kubectl rollout restart deployment -n demo-a -
Make sure that now the new 1.7 sidecar proxy is used for the new pod.
$ APP_A_POD_NAME=$(kubectl get pods -n demo-a -l k8s-app=app-a -o=jsonpath='{.items[0].metadata.name}')
$ kubectl get po -n=demo-a $APP_A_POD_NAME -o yaml | grep istio/proxyv2:
    image: docker.io/istio/proxyv2:1.7.0
    image: docker.io/istio/proxyv2:1.7.0
    image: docker.io/istio/proxyv2:1.7.0
    image: docker.io/istio/proxyv2:1.7.0
Test communication 🔗︎
Let’s make sure that encrypted communication still works between pods that use different control planes.
This is a very important part and the reason why the data plane migration can be done gradually, because the communication works even between pods on different control planes.
Remember that the pod in the demo-a namespace are already on Istio 1.7 control plane, but the pod in demo-b is still on Istio 1.6.
-
Save the application pod names for easier access.
$ APP_A_POD_NAME=$(kubectl get pods -n demo-a -l k8s-app=app-a -o=jsonpath='{.items[0].metadata.name}') $ APP_B_POD_NAME=$(kubectl get pods -n demo-b -l k8s-app=app-b -o=jsonpath='{.items[0].metadata.name}') -
Test to make sure that app-a can access app-b.
$ kubectl exec -n=demo-a -ti -c echo-service $APP_A_POD_NAME -- curl -Ls -o /dev/null -w "%{http_code}" app-b.demo-b.svc.cluster.local 200 -
Test to make sure that app-b can access app-a.
$ kubectl exec -n=demo-b -ti -c echo-service $APP_B_POD_NAME -- curl -Ls -o /dev/null -w "%{http_code}" app-a.demo-a.svc.cluster.local
200
Migrate second namespace 🔗︎
-
Label the second namespace for the new control plane.
$ kubectl label ns demo-b istio-injection- istio.io/rev=istio-sample-v17x.istio-system -
Make sure that the labeling is correct.
$ kubectl get ns demo-b -L istio-injection -L istio.io/rev NAME STATUS AGE ISTIO-INJECTION REV demo-b Active 19m istio-sample-v17x.istio-system -
Restart the pod in the namespace.
$ kubectl rollout restart deployment -n demo-b -
Make sure that now the new 1.7 sidecar proxy is used for the new pod.
$ APP_B_POD_NAME=$(kubectl get pods -n demo-b -l k8s-app=app-b -o=jsonpath='{.items[0].metadata.name}')
$ kubectl get po -n=demo-b $APP_B_POD_NAME -o yaml | grep istio/proxyv2:
    image: docker.io/istio/proxyv2:1.7.0
    image: docker.io/istio/proxyv2:1.7.0
    image: docker.io/istio/proxyv2:1.7.0
    image: docker.io/istio/proxyv2:1.7.0
Uninstall the Istio 1.6 control plane 🔗︎
When the data plane is fully migrated and we made sure it works as expected, we can delete the “old” Istio 1.6 control plane now.
-
Delete the 1.6
IstioCustom Resource to delete the Istio 1.6 control plane.$ kubectl delete -n istio-system -f https://raw.githubusercontent.com/banzaicloud/istio-operator/release-1.6/config/samples/istio_v1beta1_istio.yaml -
Uninstall the Istio operator for version 1.6.
$ helm uninstall -n=istio-system istio-operator-v16x
Istio control plane canary upgrade with Backyards (now Cisco Service Mesh Manager) 🔗︎
The Istio canary upgrade workflow gives us a much safer way of upgrading an Istio control plane, but as shown above, it consists of a lot of manual steps. At Banzai Cloud, we like to automate processes to hide some of the complexities inherent in our work, and to provide better UX for our users. This is exactly what we’ve done with the Istio control plane canary upgrade flow in Backyards (now Cisco Service Mesh Manager), Banzai Cloud’s Istio distribution.
Let’s say that we have Backyards 1.3.2 with an Istio 1.6 control plane running in our cluster and we’d like to upgrade to Backyards 1.4 with an Istio 1.7 control plane. Here are the high level steps we need to go through to accomplish this with Backyards:
- Deploy an Istio 1.7 control plane next to the Istio 1.6 control plane -> can be done with one single command
- Migrate the data plane gradually to the new control plane -> can be done with the help of Backyards
- Once migration is totally complete, uninstall the Istio 1.6 control plane -> can be done with one single command
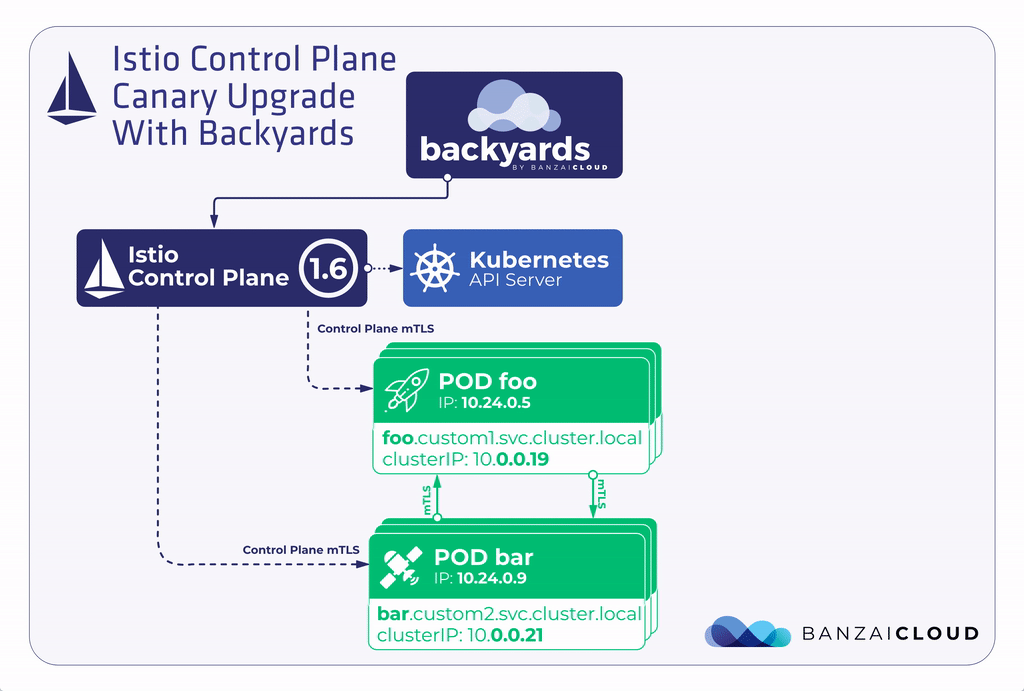
In the earlier sections we have described the commands which need to be performed to accomplish these high level steps, in Backyards those are all done in the background automatically with simple Backyards commands.
Try with Backyards! 🔗︎
First, we’ll deploy Backyards 1.3.2 with an Istio 1.6 control plane and a demo application. Then, we’ll deploy Backyards 1.4 with an Istio 1.7 control plane alongside the other control plane, and migrate the demo application to the new control plane. When the data plane migration is finished, we’ll delete the Istio 1.6 control plane.
Setup 🔗︎
-
Create a Kubernetes cluster.
Again, you can create a cluster with our free version of Banzai Cloud’s Pipeline platform.
Deploy Backyards 1.3.2 with an Istio 1.6 control plane and a demo app 🔗︎
-
Deploy Backyards 1.3.2 and a demo application.
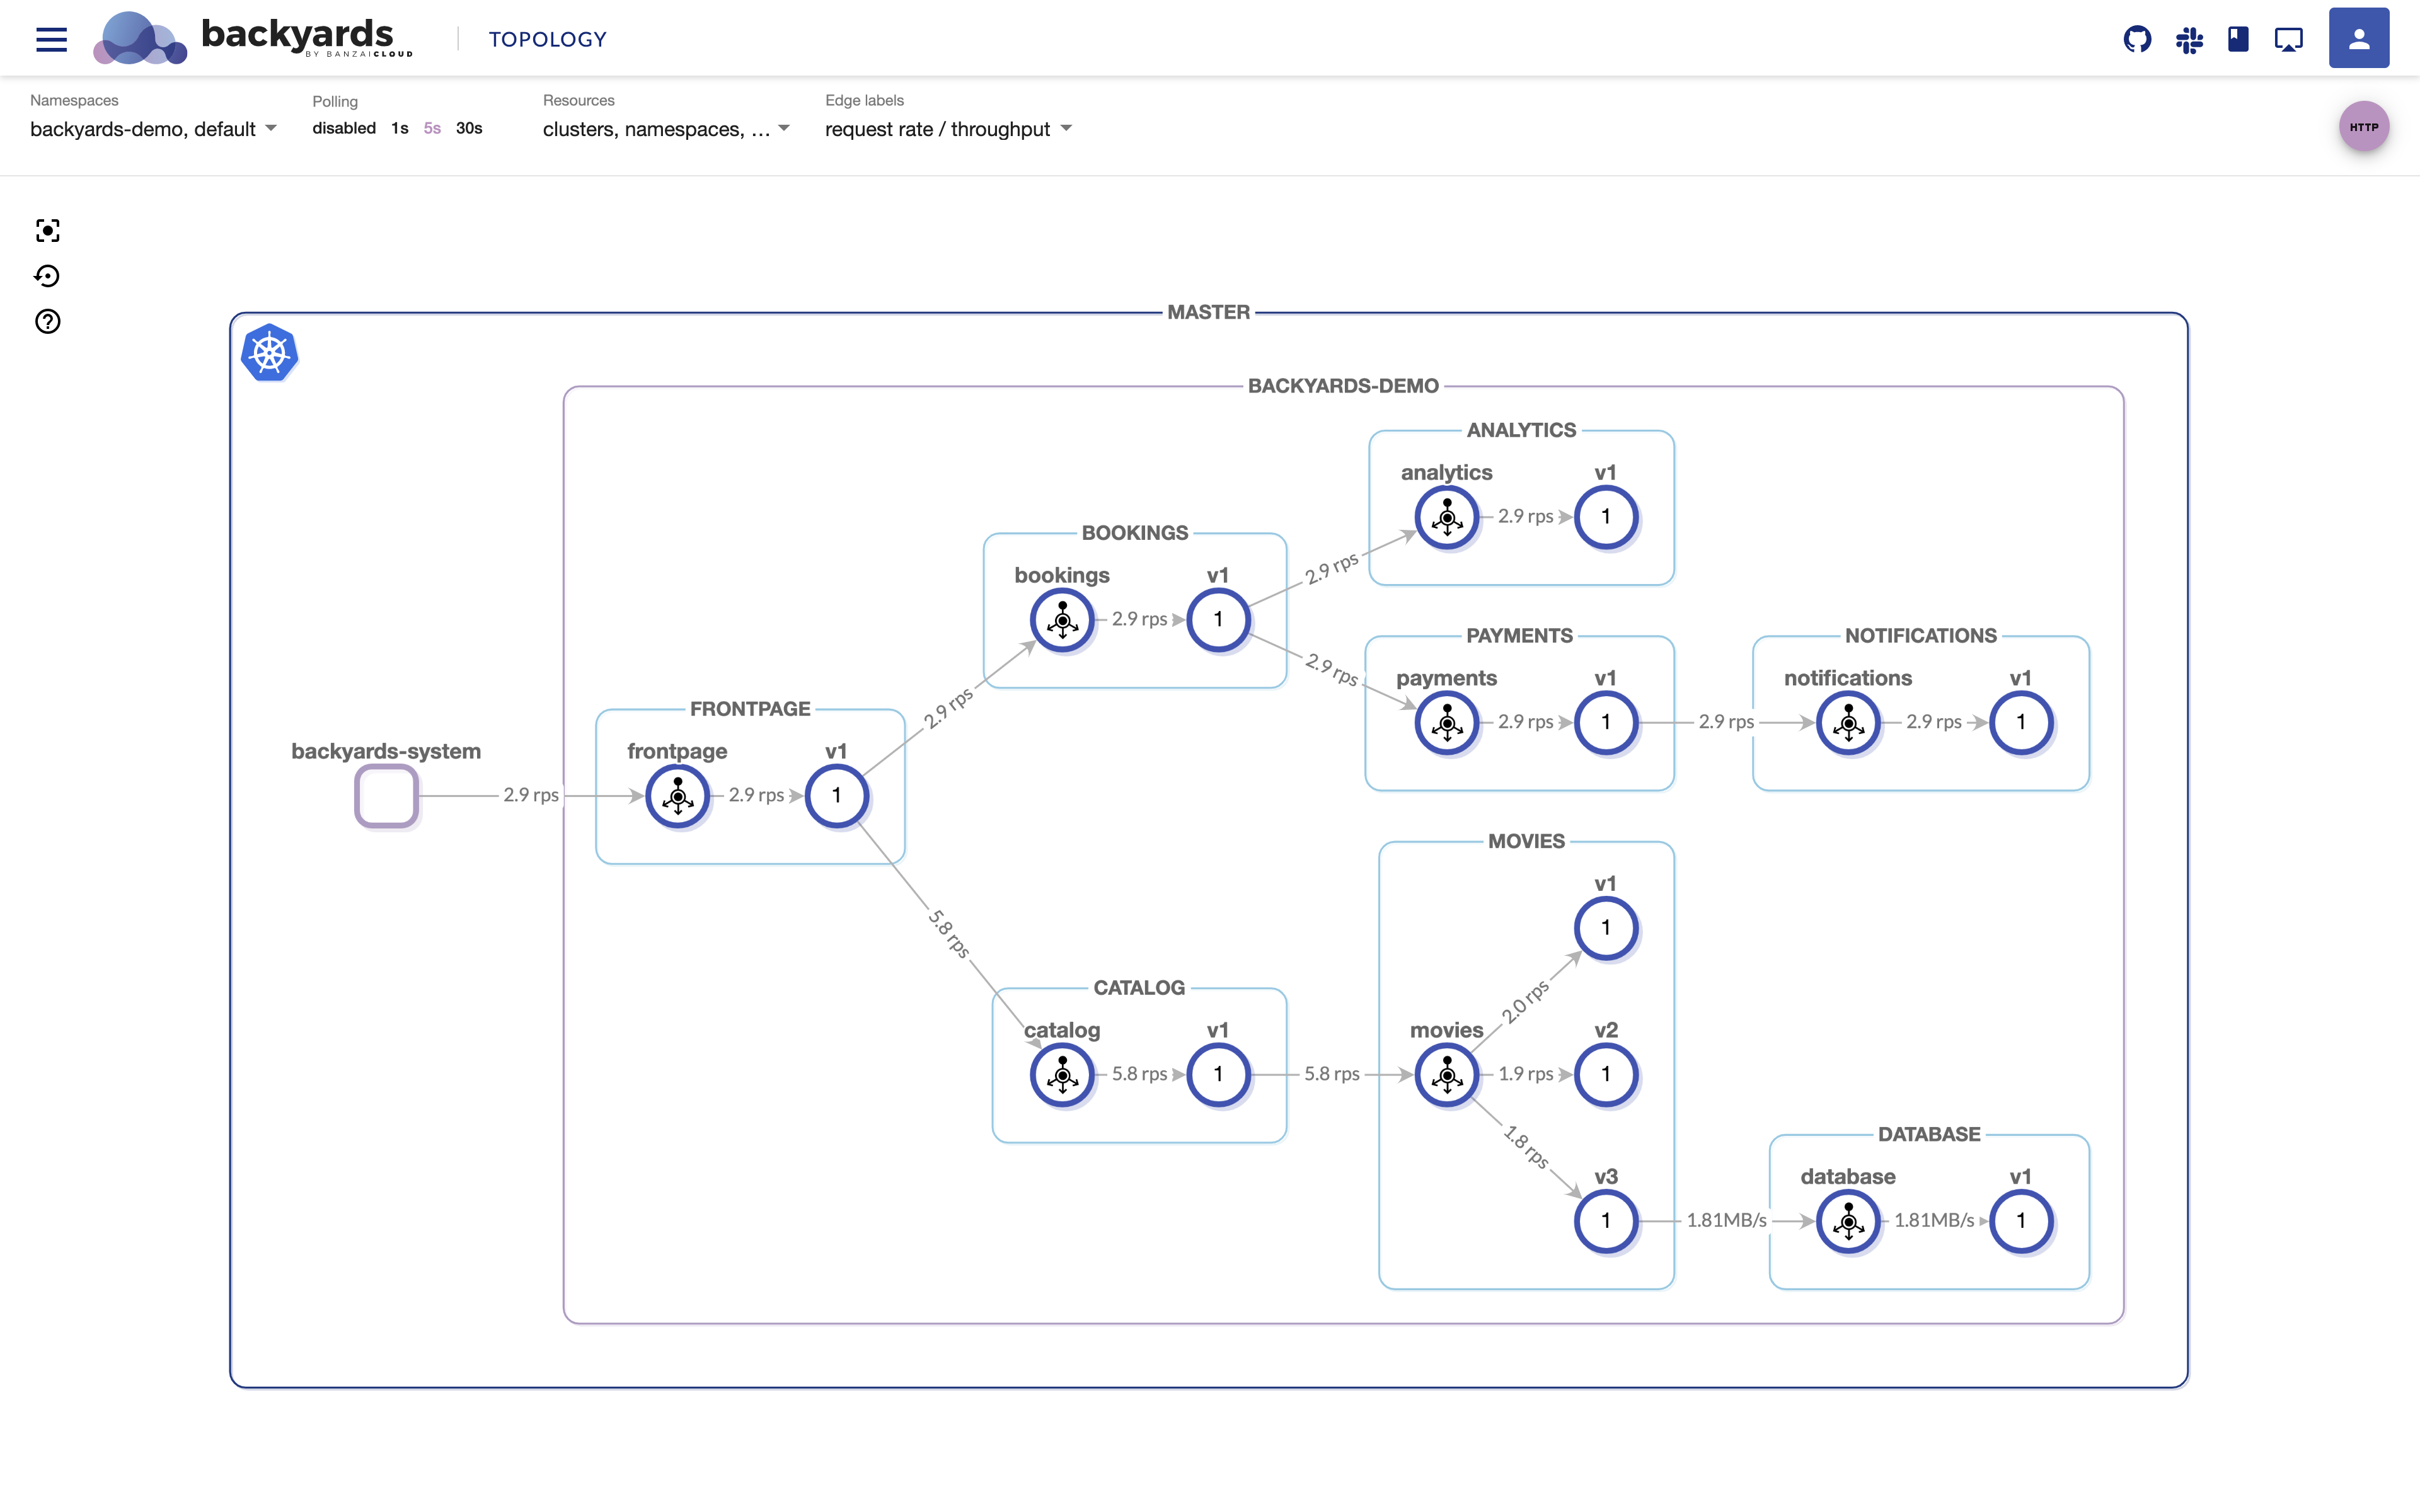
$ backyards-1.3.2 install -a --run-demoAfter the command is finished (the Istio operator, Istio 1.6 control plane, Backyards components and a demo application are installed) you should be able to see the demo application working on the Backyards UI, right away.
Validate 🔗︎
You can validate that the aformentioned steps are done.
-
Check that the Istio 1.6 control plane is deployed.
$ kubectl get po -n=istio-system NAME READY STATUS RESTARTS AGE istio-ingressgateway-b9b9b5fd-t54wc 1/1 Running 0 4m1s istio-operator-operator-0 2/2 Running 0 4m39s istiod-77bb4d75cd-jsl4v 1/1 Running 0 4m17s -
Make sure that the demo app’s namespace is labeled for sidecar injection.
$ kubectl get ns backyards-demo -L istio-injection NAME STATUS AGE ISTIO-INJECTION backyards-demo Active 2m21s enabled -
Make sure that the 1.6 sidecar proxy is used for one of the demo app pod.
$ BOOKINGS_POD_NAME=$(kubectl get pods -n backyards-demo -l app=bookings -o=jsonpath='{.items[0].metadata.name}')
$ kubectl get po -n=backyards-demo $BOOKINGS_POD_NAME -o yaml | grep istio-proxyv2:
    image: banzaicloud/istio-proxyv2:1.6.3-bzc
    image: docker.io/banzaicloud/istio-proxyv2:1.6.3-bzc
Deploy Backyards 1.4 with an Istio 1.7 control plane and migrate the demo app 🔗︎
-
Deploy Backyards 1.4 and migrate the demo app.
$ backyards-1.4 install -a --run-demo
...
Multiple control planes were found. Which one would you like to add the demo application to
?   [Use arrows to move, type to filter]
  mesh
> cp-v17x
This command first installs the Istio 1.7 control plane and then, as you can see above, detects the two control planes when reinstalling the demo application. The user can then choose the new 1.7 control plane to use for that namespace. On the Backyards UI, you can see that the communication still works, but now on the new control plane.
Validate 🔗︎
You can also validate here that the aformentioned steps are done.
-
Check that the new Istio 1.7 control plane is deployed as well.
$ kubectl get po -n=istio-system NAME READY STATUS RESTARTS AGE istio-ingressgateway-5df9c6c68f-vnb4c 1/1 Running 0 3m47s istio-operator-v16x-0 2/2 Running 0 3m59s istio-operator-v17x-0 2/2 Running 0 3m43s istiod-5b6d78cdfc-6kt5d 1/1 Running 0 2m45s istiod-cp-v17x-b58f95c49-r24tr 1/1 Running 0 3m17s -
Make sure that the demo app’s namespace is labeled for sidecar injection with the new control plane’s label.
$ kubectl get ns backyards-demo -L istio-injection -L istio.io/rev NAME STATUS AGE ISTIO-INJECTION REV backyards-demo Active 11m cp-v17x.istio-system -
Make sure that the new 1.7 sidecar proxy is used for one of the new demo app pod.
$ BOOKINGS_POD_NAME=$(kubectl get pods -n backyards-demo -l app=bookings -o=jsonpath='{.items[0].metadata.name}')
$ kubectl get po -n=backyards-demo $BOOKINGS_POD_NAME -o yaml | grep istio-proxyv2:
    image: banzaicloud/istio-proxyv2:1.7.0-bzc
    image: docker.io/banzaicloud/istio-proxyv2:1.7.0-bzc
Uninstall Istio 1.6 control plane 🔗︎
-
Uninstall the Istio 1.6 control plane.
$ kubectl delete -n=istio-system istio mesh
Future plans 🔗︎
In the future we’re planning to add features to Backyards (now Cisco Service Mesh Manager) that will allow us to manage and observe the canary upgrade process from the dashboard.
Imagine a dashboard where you could list and create/remove your Istio control planes. You’d be able to see which control plane all of your data plane applications were using, and could easily change their control planes from the UI (at both the namespace and pod level). You’d always be able to see the migration statistics for your applications and monitor their behavior with Backyards.
This is one area, among many others, where we’re planning to improve Backyards in the future, so if you are interested, stay tuned!
Takeaway 🔗︎
Istio control plane upgrades can finally be executed with much greater confidence and with a better chance of avoiding traffic disruptions with the new canary upgrade flow. Backyards (now Cisco Service Mesh Manager) further automates and assists in this process.
Check out Backyards in action on your own clusters!
Want to know more? Get in touch with us, or delve into the details of the latest release.
Or just take a look at some of the Istio features that Backyards automates and simplifies for you, and which we’ve already blogged about.