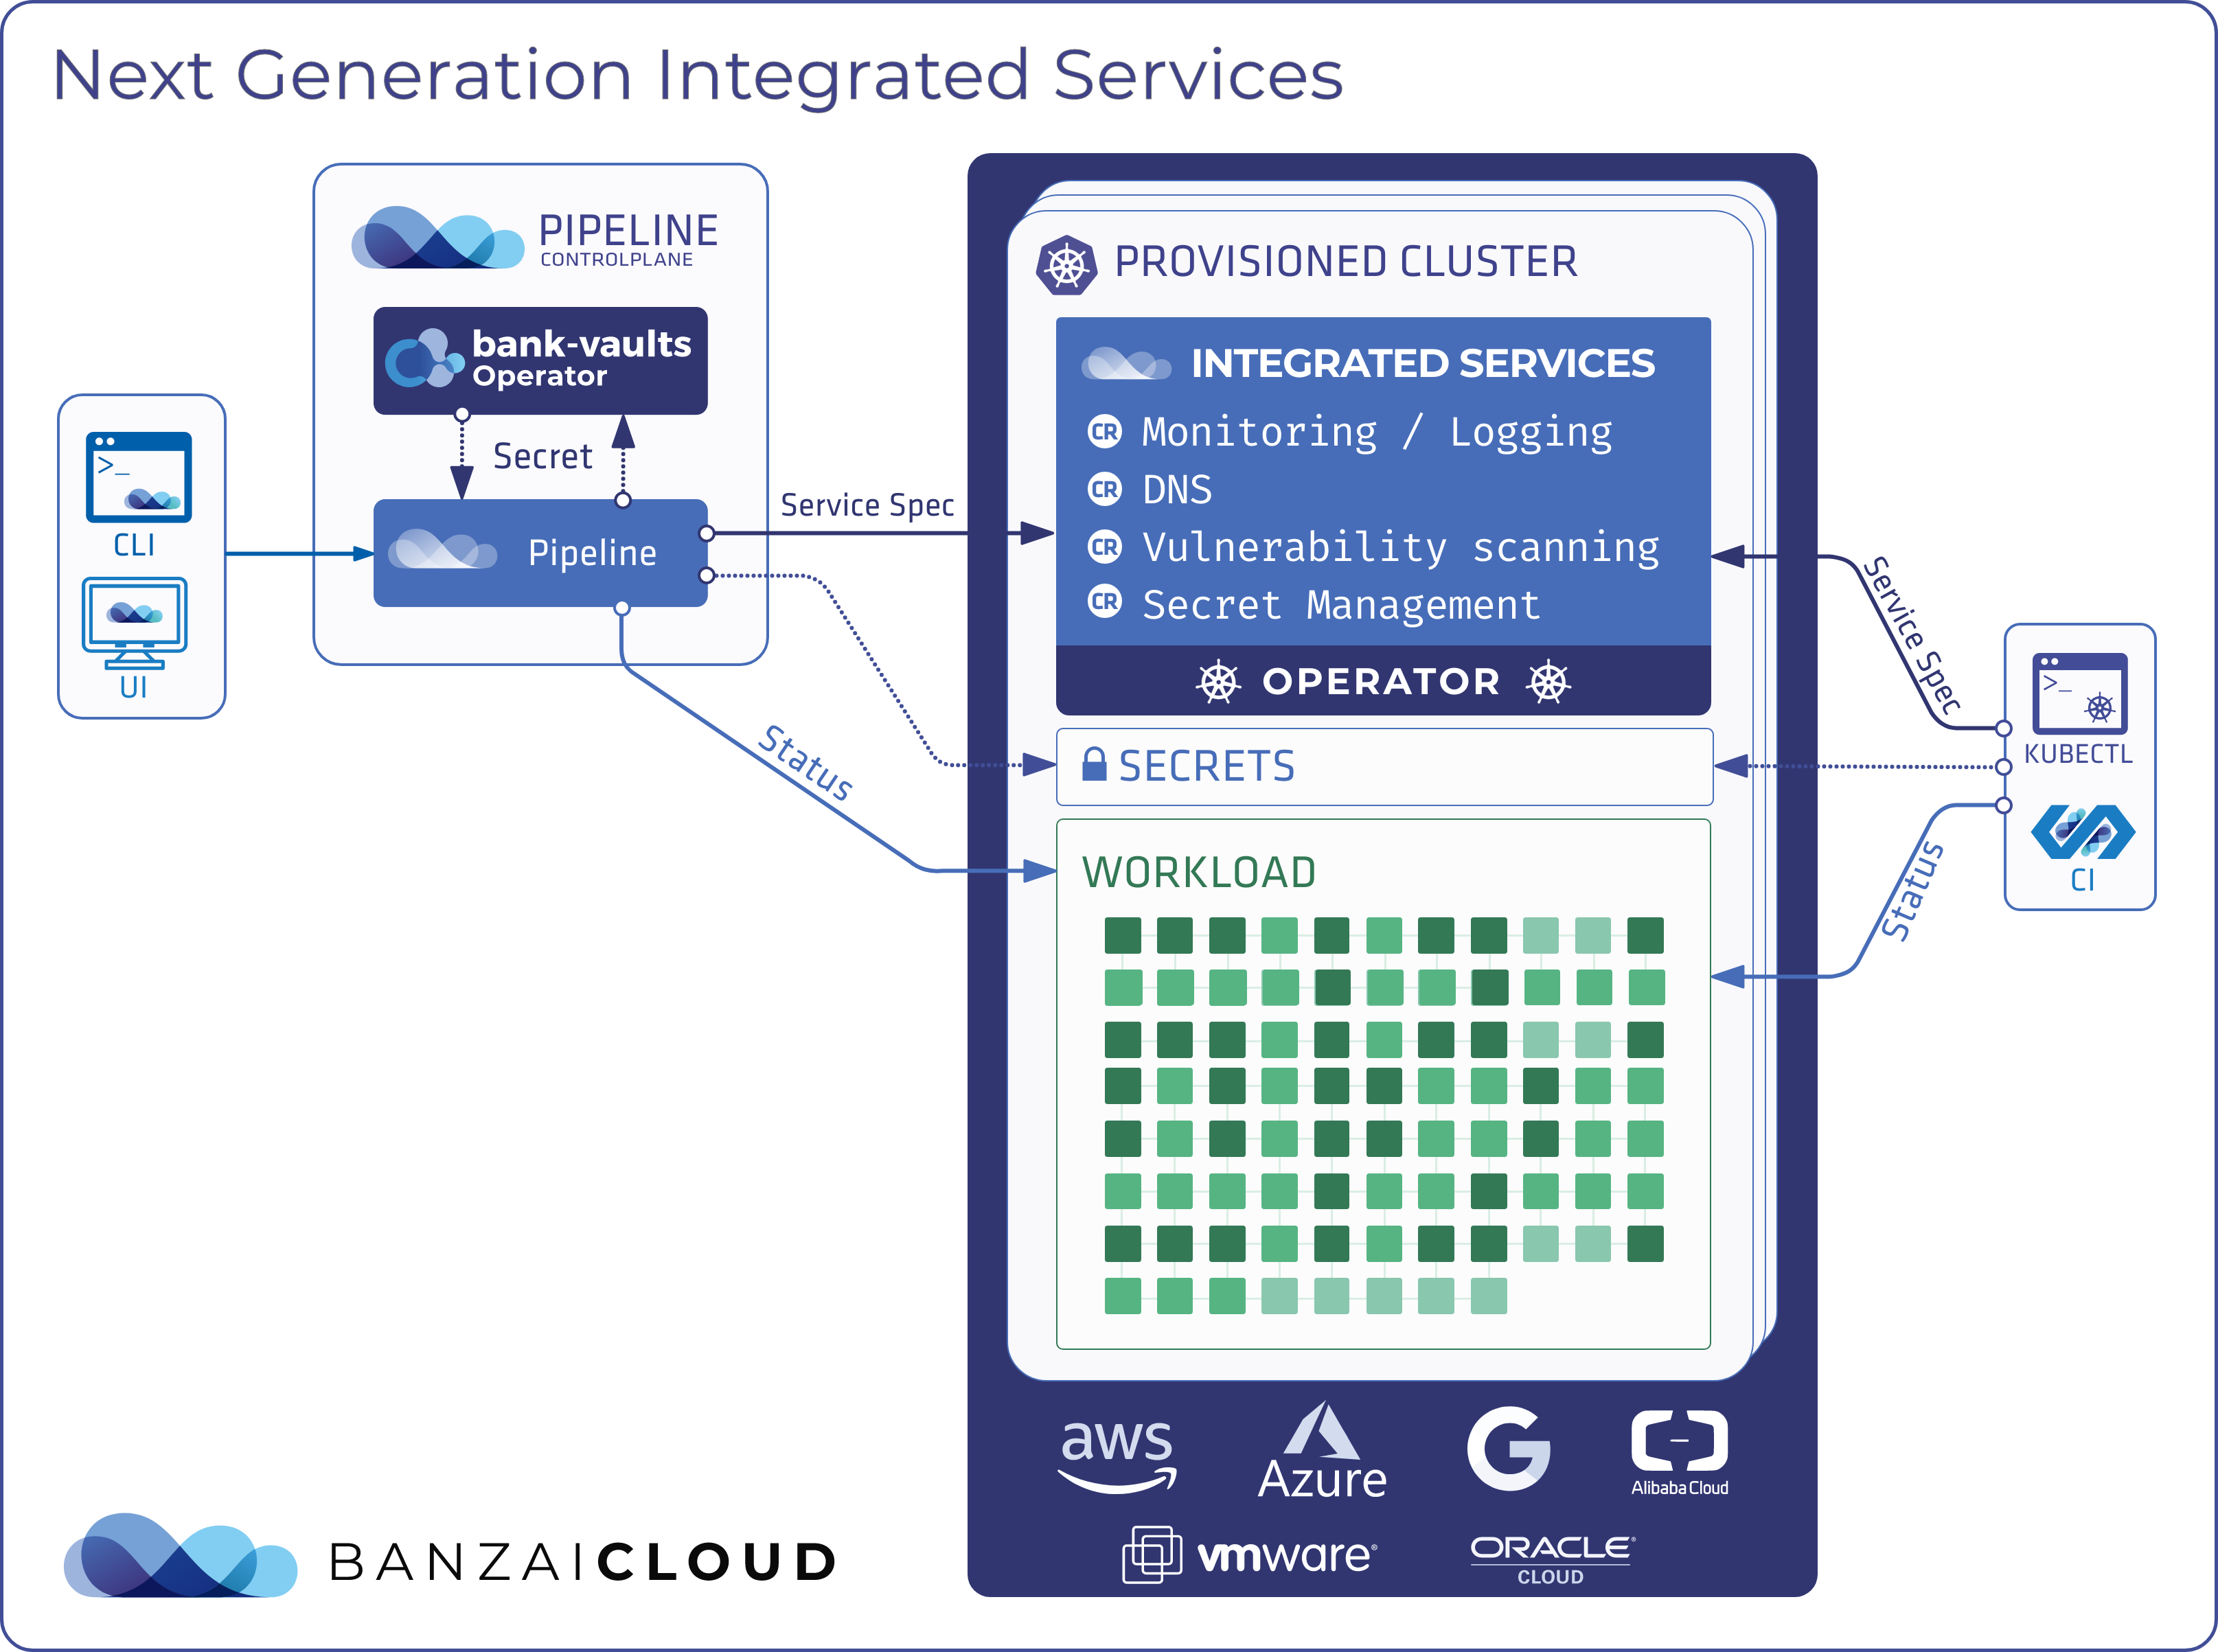


Banzai Cloud’s Pipeline platform allows enterprises to develop, deploy and scale container-based applications on several cloud providers, using multiple Kubernetes distributions. One significant difference between the cloud providers that support Kubernetes (we support ACSK, EKS, AKS, GKE) and our own Banzai Cloud Pipeline Kubernetes Engine is our ability to access the Kubernetes API server, and to configure it.
Whether our enterprise customers are using Banzai Cloud’s PKE distribution in a hybrid environment, or cloud provider-managed Kubernetes, they demand we meet the same high standards - the ability to authenticate and authorize (e.g.from LDAP, Active Directory or any other provider as GitHub, GitLab, Google, etc) utilizing a unified and provider-agnostic method.
This architecture provides the same strong security measures, multiple authentication backends, fine-grained authorization, dynamic secret management, automated secure communications between components using TLS, vulnerability scans, static code analysis, etc. whether in a managed environment or our PKE, and all through Pipeline.
tl;dr: 🔗︎
- The Banzai Cloud Pipeline platform can spin up clusters on 6 cloud providers
- either by using cloud provider-managed Kubernetes
- or via the Banzai Cloud Pipeline Kubernetes Engine whether on-prem, or in hybrid or cloud environments
- Enterprises prefer to use their own LDAP or AD to authenticate and authorize a user’s cloud agnostically
- Cloud provider-managed Kubernetes does not allow for customization of the K8s API server
- We use Dex and dynamically plug-in multiple backends
- Banzai Cloud open-sourced JWT-to-RBAC to automatically generate RBAC resources based on JWT tokens
In order to understand our options and their key differences, lets first go through the methods of authentication and authorization available to us in Kubernetes.
Authentication 🔗︎
There are quite a few methods for authentication in a Kubernetes cluster:
- X509 client certificates
- Static token file
- Bootstrap tokens
- Static password file
- Service account tokens
- OpenID Connect tokens
- Webhook token authentication
- Authenticating proxy
Regardless of whether you use your own Kubernetes cluster or our Pipeline Kubernetes Engine, you should have unrestricted control over your API server, so that any of the above authentication methods work.
X509 client certificates: client certificate authentication is enabled by passing the --client-ca-file=cacertfile option to the API server. This is the most popular method of user authentication in kubectl.
Static token file: the API server reads bearer tokens from a file when provided with the --token-auth-file=tokenfile flag in the command line.
Bootstrap Tokens: allows for streamlined bootstrapping of new clusters. The PKE deployment process backed by Pipeline uses these as well.
Static password file: basic authentication is enabled by passing the --basic-auth-file=authfile option to the API server.
Service account tokens: a service account is an automatically enabled authenticator that uses signed bearer tokens to verify requests (we will come back to these in more detail, later).
Authenticating proxy: the API server can be configured to identify users from request header values like X-Remote-User.
This article uses LDAP based authentication as an example
OpenID Connect tokens 🔗︎
The simplest way of enabling OAuth token-based authentication in a Kubernetes cluster is by running the API server with special flags.
--oidc-issuer-url=<openid-issuer>
--oidc-client-id=<client-id>
--oidc-ca-file=<CA-cert>
--oidc-username-claim=<JWT-claim-to-username>
--oidc-groups-claim=<JWT-claim-to-groups>
You can read more about OpenID Connect Tokens, here.
Webhook token authentication 🔗︎
The other preferred method of OAuth authentication is webhook token authentication. As when using OpenID connect tokens, this requires us to run the API server with special flags.
--authentication-token-webhook-config-file=<config-file-accessing-webhook-service>
--authentication-token-webhook-cache-ttl=<access-cache-timeout>
The config file provided to the API server is similar in structure to Kubeconfig files used by client tools like kubectl, and contains all the details that allow the API server to process user tokens.
 1# Kubernetes API version
 2apiVersion: v1
 3# variety of API object
 4kind: Config
 5# cluster, here, refers to a remote service.
 6clusters:
 7  - name: name-of-authn-service
 8    cluster:
 9      # CA for verifying the remote service.
10      certificate-authority: /path/to/ca.pem
11      # URL of remote service to query. Must use 'https'.
12      server: https://authn-service/authenticate
13
14# user refers to the API server's webhook configuration.
15users:
16  - name: name-of-api-server
17    user:
18      client-certificate: /path/to/cert.pem # cert for the webhook plugin to use
19      client-key: /path/to/key.pem          # key matching the cert
20
21# kubeconfig files require context. Provide one for the API server, here.
22current-context: webhook
23contexts:
24- context:
25    cluster: name-of-authn-service
26    user: name-of-api-sever
27  name: webhook
If you’re interested in the details, check out the official Kubernetes documentation.
Authorization 🔗︎
Authentication itself doesn’t allow you to do anything, but simply verifies that you are who you claim to be. After a successful authentication, a Kubernetes cluster will also need to validate that you are permitted to execute whichever action you are trying to perform. This is called authorization, or authz for short. There are four authorization modules in Kubernetes:
- node - Authorizes API requests made by kubelets
- ABAC - Attribute-based access control (ABAC was the main authorization module before RBAC)
- RBAC - Role-based access control
- Webhook - HTTP callback
Webhook mode 🔗︎
If you’d like to use OAuth-provided JWT tokens for authorization, then the webhook module is the choice for you. As per usual, webhook authorization can be configured in the API server by running it with certain flags.
--authorization-webhook-config-file=<authz-config-file> 1apiVersion: v1
2kind: Config
3clusters:
4 - name: name-of-authz-service
5 cluster:
6 # CA for verifying the remote service.
7 certificate-authority: /path/to/ca.pem
8 # URL of remote service to query. Must use 'https'. May not include parameters.
9 server: https://authz-service/authorize
10
11users:
12 - name: name-of-api-server
13 user:
14 client-certificate: /path/to/cert.pem # cert for the webhook plugin to use
15 client-key: /path/to/key.pem # key matching the cert
16
17current-context: webhook
18contexts:
19- context:
20 cluster: name-of-authz-service
21 user: name-of-api-server
22 name: webhookRole-based access control 🔗︎
You can enable RBAC authorization mode in Kubernetes clusters, but it’s usually enabled by default.
This K8s module gives us objects, which are the basis of authorization decisions. These objects are stored in etcd, just like other Kubernetes resources.
Objects:
- Role
- RoleBinding
- ClusterRole
- ClusterRoleBinding
Role and ClusterRole 🔗︎
A role contains rules that represent a set of permissions. A role can be defined within a namespace with a Role object, or cluster-wide via a ClusterRole object.
1kind: ClusterRole
2apiVersion: rbac.authorization.k8s.io/v1
3metadata:
4  name: example-clusterrole
5rules:
6- apiGroups: [ "", "extensions", "apps" ]
7  resources: [ "deployments", "replicasets", "pods" ]
8  verbs: ["get", "list"]
RoleBinding and ClusterRoleBinding 🔗︎
Role binding grants those permissions defined within a role to a user or set of users. It holds a list of subjects (users, groups, or service accounts) and a reference to the role being granted. Permissions can be granted within a namespace with a RoleBinding object, or cluster-wide with a ClusterRoleBinding object.
 1kind: ClusterRoleBinding
 2apiVersion: rbac.authorization.k8s.io/v1
 3metadata:
 4  name: example-clusterrole-binding
 5subjects:
 6- kind: Group
 7  name: example-group
 8  apiGroup: rbac.authorization.k8s.io
 9roleRef:
10  kind: ClusterRole
11  name: example-clusterrole
12  apiGroup: rbac.authorization.k8s.io
Subjects can be 🔗︎
- Users
- Groups
- ServiceAccounts
Users are human users, represented as strings. Group information is provided with Authenticator modules. Like users, Groups are represented as strings. Groups have no format requirements, other than that they use the prefix, system:. ServiceAccounts have usernames with the system:serviceaccount: prefix and belong to groups with the system:serviceaccounts: prefix.
Read more about authorization modules.
What about cloud provider-managed Kubernetes 🔗︎
Now that we have a fair understanding of Kubernetes security, let’s return to our original problem - how we might tackle authentication and authorization across all cloud providers and all Kubernetes distributions.
So, each of the above solutions needs access and the ability to configure the API server. We’re SOL, right? Not so much.
The Banzai Cloud Pipeline platform 🔗︎
We’ve always been committed to supporting Kubernetes and our container-based application platform on all major providers, however, we’re also committed to providing easy, seamless and automated portability between cloud vendors.
Accordingly, this post will highlight a few important aspects of a multi-cloud approach we learned from our users, and the open source code we developed and made part of the Pipeline platform.
We’ve been trying to find a solution which works across all providers and still gives our enterprise customers the confidence to use their own LDAP or AD.
Note that we support other authentication providers, such as GitHub, Google, GitLab, etc.
Within a Kubernetes cluster, we use service account tokens for authentication, so the corresponding ServiceAccount must be created before we can authenticate and use this type of token.
Automatically create ServiceAccounts based on LDAP in a managed K8s 🔗︎
For authentication we use Dex along with its LDAP connector. When a user in an LDAP has group memberships, Dex issues a JWT token containing those memberships. Our open source JWT-to-RBAC project is capable of creating ServiceAccount, ClusterRoles and ClusterroleBindings based on JWT tokens. When we create a new ServiceAccount, K8s automatically generates a service account token, as we discussed earlier, and the JWT-to-RBAC retrieves it.
Requirements 🔗︎
There are some prerequisites that must be met before you can begin your own tests:
- Configured Dex server which issues JWT tokens. If you want to issue tokens with Dex, you have to configure it with its LDAP connector. You can use the Banzai Cloud Dex chart to this effect.
- Configured LDAP server. You can use the openldap docker image for this.
- Authentication application which uses Dex as an OpenID connector.
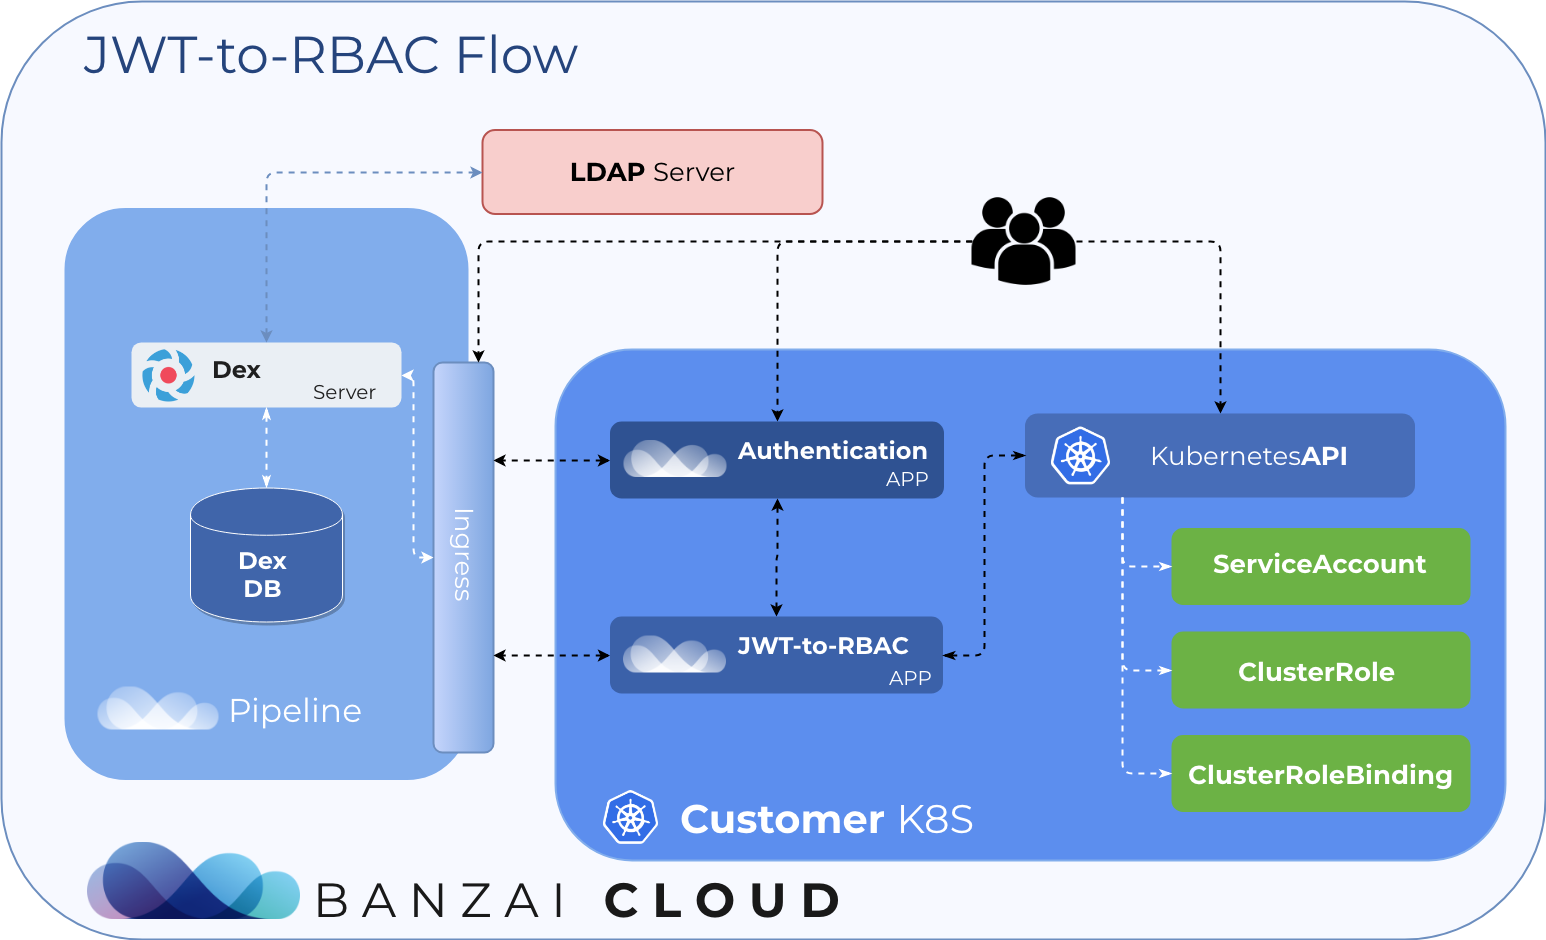
Dex acts as a shim between a client app and the upstream identity provider. The client only needs to understand OpenID Connect to query Dex.
The whole process is broken down into two main parts:
- Dex auth flow, and
- jwt-to-rbac ServiceAccount creation flow
Dex authentication flow:
- A user visits an Authentication App.
- The Authentication App redirects users to Dex with an OAuth2 request.
- Dex determines the user’s identity by looking up the configured upstream identity provider (in this case, LDAP).
- Dex redirects user to the Authentication App with a signed code.
- The Authentication App exchanges code with Dex for an access token.
jwt-to-rbac Flow:
- The Authentication App has an ID token (JWT)
- POST ID token to the jwt-to-rbac App
- jwt-to-rbac validates ID token with Dex
- jwt-to-rbac extracts username, groups, etc. from the token
- jwt-to-rbac calls the API server to create
ServiceAccount,ClusterRolesandClusterRoleBindings - jwt-to-rbac gets a
ServiceAccounttoken and sends it to the Authentication App - The Authentication App sends the service account token back to User
- The user authenticates on Kubernetes using the service account token
The access token issued by Dex contains the following:
 1{
 2  "iss": "http://dex/dex",
 3  "sub": "CiNjbj1qYW5lLG91PVBlb3BsZSxkYz1leGFtcGxlLGRjPW9yZxIEbGRhcA",
 4  "aud": "example-app",
 5  "exp": 1549661603,
 6  "iat": 1549575203,
 7  "at_hash": "_L5EkeNocRsG7iuUG-pPpQ",
 8  "email": "janedoe@example.com",
 9  "email_verified": true,
10  "groups": [
11    "admins",
12    "developers"
13  ],
14  "name": "jane",
15  "federated_claims": {
16    "connector_id": "ldap",
17    "user_id": "cn=jane,ou=People,dc=example,dc=org"
18  }
19}
After jwt-to-rbac extracts the information from the token, it creates a ServiceAccount and a ClusterRoleBinding, using one of the default K8s ClusterRoles as roleRef, or otherwise generates a token defined in the configuration if such a token doesn’t yet exist.
Default K8s ClusterRoles used by jwt-to-rbac 🔗︎
JWT-to-RBAC does not create a new ClusterRole in every case; for example, if a user is a member of an admin group, it doesn’t create a ClusterRole because K8s already has one by default.
| Default ClusterRole | Description |
|---|---|
| cluster-admin | Allows super-user access to perform any action on any resource. |
| admin | Allows admin access, intended to be granted within a namespace using a RoleBinding. |
| edit | Allows read/write access to most objects in a namespace. |
| view | Allows read-only access to most objects in a namespace. |
jwt-to-rbac creates a custom ClusterRole defined in config 🔗︎
In most cases, there are different LDAP groups, so custom groups are mapped to roles which have custom rules.
 1[[rbachandler.customGroups]]
 2groupName = "developers"
 3[[rbachandler.customGroups.customRules]]
 4verbs = [
 5  "get",
 6  "list"
 7]
 8resources = [
 9  "deployments",
10  "replicasets",
11  "pods"
12]
13apiGroups = [
14  "",
15  "extensions",
16  "apps"
17]
To conclude this discussion of our open-sourced JWT-to-RBAC project, consider following the steps below if you’d like to try it, or, check it out in action by subscribing to our free developer beta at /products/pipeline/.
1. Deploy jwt-to-rbac to Kubernetes 🔗︎
After cloning our GitHub repository, you can compile the code and create a Docker image with a single command:
make dockerIf you use docker-for-desktop or minikube, you’ll be able to easily deploy the solution, locally, with that newly built image.
kubectl create -f deploy/rbac.yaml
kubectl create -f deploy/configmap.yaml
kubectl create -f deploy/deployment.yaml
kubectl create -f deploy/service.yaml
# port-forward locally
kubectl port-forward svc/jwt-to-rbac 5555
Now, you can communicate with the jwt-to-rbac app.
2. POST the access token issued by Dex to jwt-to-rbac API 🔗︎
curl --request POST \
  --url http://localhost:5555/rbac/ \
  --header 'Content-Type: application/json' \
  --data '{"token": "example.jwt.token"}'

# response:
{
    "Email": "janedoe@example.com",
    "Groups": [
        "admins",
        "developers"
    ],
    "FederatedClaimas": {
        "connector_id": "ldap",
        "user_id": "cn=jane,ou=People,dc=example,dc=org"
    }
}ServiceAccount, ClusterRoles (if the access token contains those custom groups we mentioned earlier) and ClusterRoleBindings are created.
Listing the created K8s resources:
curl --request GET \
  --url http://localhost:5555/rbac \
  --header 'Content-Type: application/json'

#response:
{
    "sa_list": [
        "janedoe-example-com"
    ],
    "crole_list": [
        "developers-from-jwt"
    ],
    "crolebind_list": [
        "janedoe-example-com-admin-binding",
        "janedoe-example-com-developers-from-jwt-binding"
    ]
}
3. GET the default K8s token of ServiceAccount 🔗︎
curl --request GET \
  --url http://localhost:5555/tokens/janedoe-example-com \
  --header 'Content-Type: application/json'

# response:
[
    {
        "name": "janedoe-example-com-token-m4gbj",
        "data": {
            "ca.crt": "example-ca-cer-base64",
            "namespace": "ZGVmYXVsdA==",
            "token": "example-k8s-sa-token-base64"
        }
    }
]
or
4. Generate a ServiceAccount token with TTL 🔗︎
curl --request POST \
  --url http://localhost:5555/tokens/janedoe-example-com \
  --header 'Content-Type: application/json'
  --data '{"duration": "12h30m"}'

# response:
[
    {
        "name": "janedoe-example-com-token-df3re",
        "data": {
            "ca.crt": "example-ca-cer-base64",
            "namespace": "ZGVmYXVsdA==",
            "token": "example-k8s-sa-token-with-ttl-base64"
        }
    }
]
Now, you have a base64 encoded service account token.
5. Accessing K8s with the ServiceAccount token 🔗︎
You can use service account token from the command line:
kubectl --token $TOKEN_TEST --server $APISERVER get poOr create a kubectl context:
TOKEN=$(echo "example-k8s-sa-token-base64" | base64 -D)
kubectl config set-credentials "janedoe-example-com" --token=$TOKEN
# with kubectl config get-clusters, you can get cluster names
kubectl config set-context "janedoe-example-com-context" --cluster="clustername" --user="janedoe-example-com" --namespace=default
kubectl config use-context janedoe-example-com-context
kubectl get pod
As a final note - since we use Dex, which is an identity service that uses OpenID Connect to drive authentication for other apps, any other supported connector can be used for authentication to Kubernetes.
About Banzai Cloud Pipeline 🔗︎
Banzai Cloud’s Pipeline provides a platform for enterprises to develop, deploy, and scale container-based applications. It leverages best-of-breed cloud components, such as Kubernetes, to create a highly productive, yet flexible environment for developers and operations teams alike. Strong security measures — multiple authentication backends, fine-grained authorization, dynamic secret management, automated secure communications between components using TLS, vulnerability scans, static code analysis, CI/CD, and so on — are default features of the Pipeline platform.