


As a tech startup our main focus is on delivering value to our users and customers which means that the Developer Experience often comes second. Since we launched our beta platform Pipeline, we received an enormous amount of attention not just from users and customers, but from developers as well. Based on your feedback we’ve started to formalize our development processes.
This post contains instructions for setting up a basic development environment and explains our development workflow through a simple pull request as an example.
Setting up a development environment 🔗︎
We tried to make the development environment as self-contained as possible. Most of the tools and dependencies are installed automatically during the initial setup, but there are a few prerequisites that you have to take care of:
- Linux or Mac operating system (Windows is not officially supported at the moment)
- Docker (with Compose)
- Git
- Go 1.11.4 (or later)
- Make (preferably GNU)
The first step is forking and cloning the repository to your GOPATH. (You can skip forking for now and do it later)
mkdir -p $GOPATH/src/github.com/banzaicloud/pipeline
git clone git@github.com:banzaicloud/pipeline.git $GOPATH/src/github.com/banzaicloud/pipeline
Note: Pipeline does not support Go modules introduced in Go 1.11 yet, so for now the repository needs to be checked out in the GOPATH.
Setting up the rest of the environment is as easy as running a single command:
make up
Make will install all dependencies, generate example configuration, pull down all Docker images and start the development environment.
Please note that this quick setup requires the following ports to be free on your loopback interface.
- 3306 (MySQL)
- 8080 (Adminer)
- 8200 (Vault)
- 4200 (UI)
- 5556 (Dex)
- 5558 (Dex)
- 9090 (Pipeline)
If you want to customize the ports above, the setup is a bit more complicated. First, generate all configuration:
make config/config.toml config/dex.yml docker-compose.override.yml
Then edit the following files and update all occurrences of the ports you wish to modify:
- config/config.toml
- config/dex.yml
- docker-compose.override.yml
Finally, run the original command to set up the environment:
make up
In case you want to destroy the environment, you can do it with the following command:
make down
This will remove all temporary files, built binaries, test reports, Docker Compose environment, installed dependencies and binaries. It won’t remove pulled and built Docker images and generated configurations.
In case something goes wrong, you can easily reset the environment with the following command:
make reset # Same as make down up
Running Pipeline for the first time 🔗︎
After setting up the environment let’s check if everything works as expected.
First, check if all Docker containers are running or exited with 0. (Some containers are used for initialization only):
docker-compose ps
        	Name                       	Command           	State                               	Ports
---------------------------------------------------------------------------------------------------------------------------------------------
pipeline_adminer_1          	entrypoint.sh docker-php-e ...   Up   	127.0.0.1:8080->8080/tcp
pipeline_cicd-agent_1       	/bin/cicd-agent              	Up   	443/tcp, 80/tcp, 8000/tcp, 9000/tcp
pipeline_cicd-server_1      	/bin/cicd-server             	Up   	443/tcp, 80/tcp, 127.0.0.1:8000->8000/tcp, 127.0.0.1:9000->9000/tcp
pipeline_db_1               	docker-entrypoint.sh --cha ...   Up   	127.0.0.1:3306->3306/tcp, 33060/tcp
pipeline_dex_1              	dex serve /dex.yml           	Up   	127.0.0.1:5556->5556/tcp, 127.0.0.1:5558->5558/tcp
pipeline_ui_1               	/docker-entrypoint.sh ngin ...   Up   	80/tcp
pipeline_uiproxy_1          	/bin/sh -c dockerize -temp ...   Up   	127.0.0.1:4200->80/tcp
pipeline_vault-configurer_1 	./wait-for-it.sh db:3306 - ...   Up
pipeline_vault-token-helper_1   cp /vault/keys/vault-root  ...   Exit 0
pipeline_vault-unsealer_1   	/usr/local/bin/bank-vaults ...   Up
pipeline_vault_1            	docker-entrypoint.sh server  	Up   	127.0.0.1:8200->8200/tcp
If everything is running, you can proceed with starting the Pipeline process:
make run
Note: compiling Pipeline for the first time can take a few minutes.
You should see something like this in the log, once Pipeline gets ready to accept requests:
INFO[2019-02-03T18:19:51+01:00] [Pipeline](https://github.com/banzaicloud/pipeline) API listening on http://127.0.0.1:9090 function=main state=init
You can head over to the UI:
open http://localhost:4200
You should see the following screen:
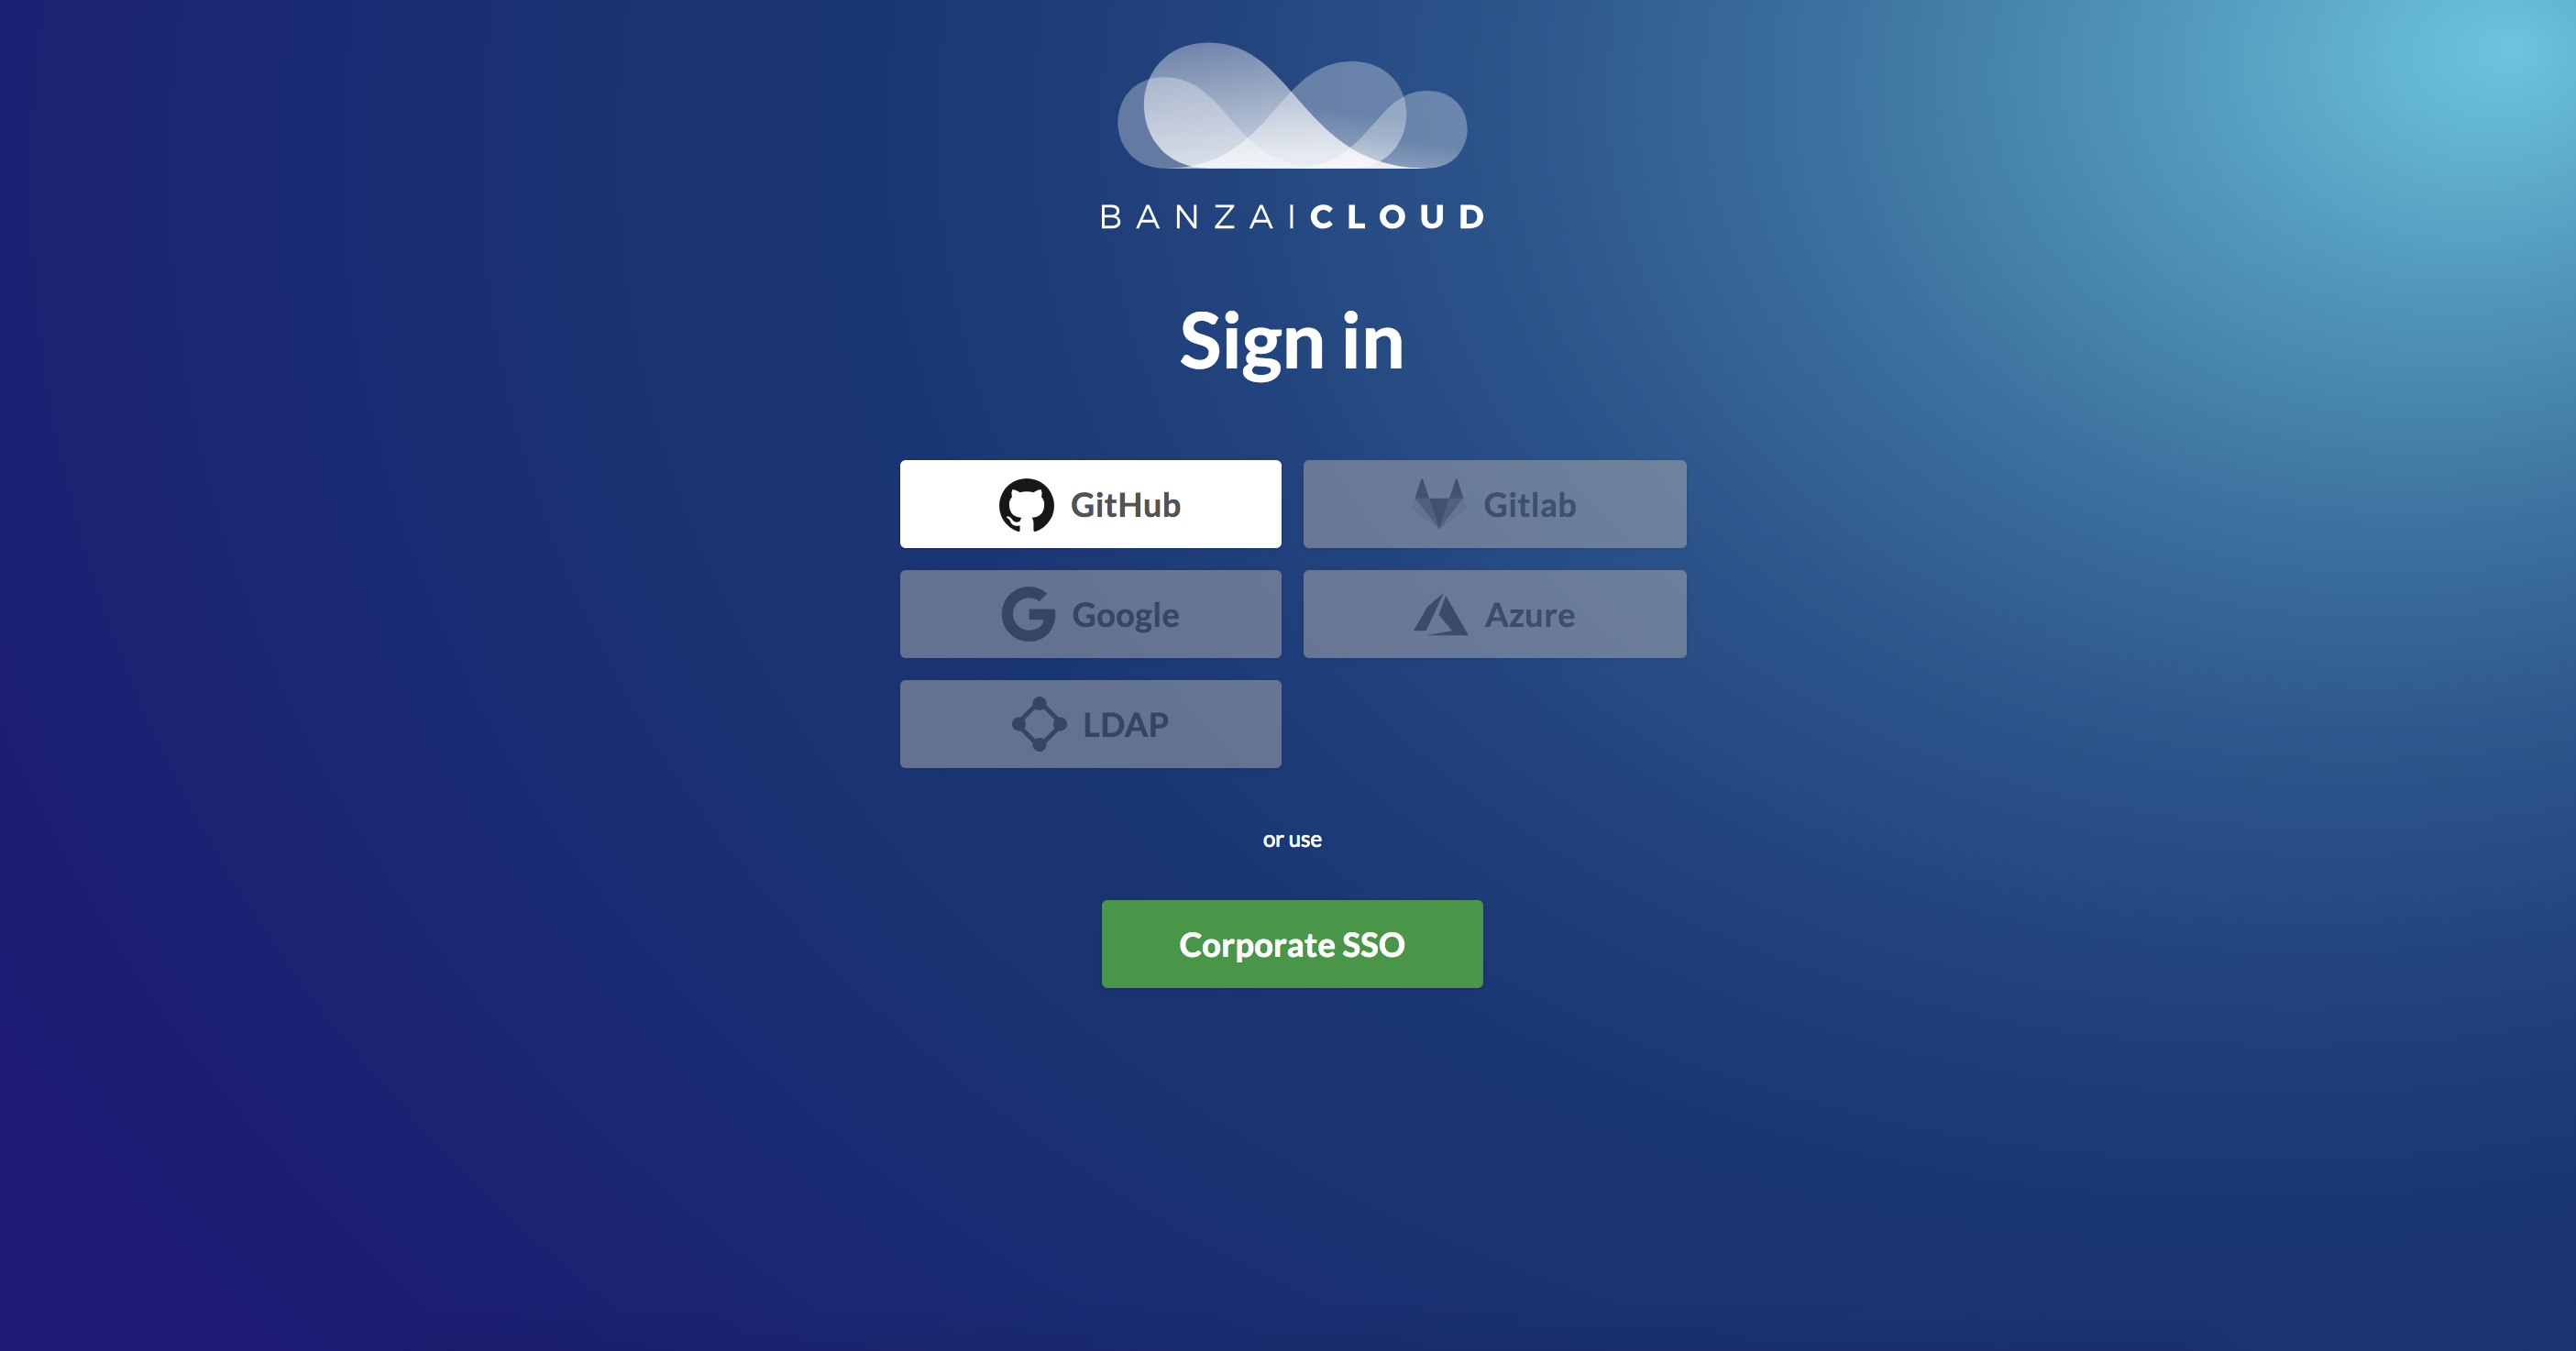
Choose login with email and use admin@example.com and password as credentials to log in. After logging in you should see the Pipeline dashboard.
Contributing to Pipeline 🔗︎
Now that Pipeline is running, let’s see how you can contribute to it through an example issue from the Pipeline issue tracker: issue #1594.
It’s a trivial change: we replace an old package (github.com/satori/go.uuid) with a new, maintained fork which contains a number of fixes (github.com/gofrs/uuid). Basically it’s just switching import paths, adding the new package to dep and replacing every uuid.NewV4() with uuid.Must(uuid.NewV4()).
Let’s create a new branch (we don’t accept PRs from master branches) and make the changes above. Here is the list of modified files after applying the changes:
On branch my-first-contribution
Changes not staged for commit:
  (use "git add <file>..." to update what will be committed)
  (use "git checkout -- <file>..." to discard changes in working directory)

    modified:   Gopkg.lock
    modified:   Gopkg.toml
    modified:   auth/authn.go
    modified:   dns/externaldns.go
    modified:   internal/cluster/cluster_model.go
    modified:   internal/platform/gin/correlationid/middleware.go
    modified:   model/cluster.go
    modified:   pkg/cluster/eks/action/actions.go
    modified:   pkg/providers/azure/extensions.go
Before commiting the changes, let’s run the test suite and the linter:
PIPELINE_CONFIG_DIR=$PWD/config VAULT_ADDR="http://127.0.0.1:8200" make check
If everything is fine, we can go ahead and commit the changes. If you haven’t forked our repository yet, now is the time to do it and update the origin remote to point to your fork. If you already forked the repository, go ahead and push the changes.
Note: unfortunately we have a few flaky tests. If a broken test seems to be unrelated, feel free to ignore it. The CI runs the tests in a clean environment every time, there shouldn’t be any breaking tests there. We are working hard to eliminate these flaky tests.
Opening a Pull Request 🔗︎
We use GitHub to track each step of our development. As such, we only accept contributions via GitHub Pull Requests. This ensures that the development process is transparent and trackable.
Every Pull Request starts with a simple form about the contents of the Pull Request. This helps us categorizing PRs. Unfilled or removed form results in the PR being rejected.
Once the PR is sent reviewers will be assigned to the PR, but before reviewers start looking at the code, they check if the following requirements are all fulfilled:
- Form is properly filled
- CLA is signed
- Tests are passing
- Branch is up to date with the latest master
You can make sure that your PR fulfills these requirements by taking a look at the PR status:
Once the PR passes the first checks, reviewers start looking at the code.
We are happy and feel honoured when someone contributes to our projects, so we tend to accept every contribution. That being said, in order to provide high quality services, we require that contributors follow a few guidelines:
To speed up the review process we recommend contributors to read these guidelines in advance and follow them when contributing code to our projects.
In some cases you might want to open a PR just to see if tests are passing in the CI environment. You can show that to us by placing [WIP] in front of the PR title. PRs with this prefix do not get reviewed and do not get merged until the prefix is removed.
If everything checks out and the reviewers accept your code, someone will push the merge button and say thanks to you for the contribution. We usually process PRs rather quickly, so you can expect quick response times.
Conclusion 🔗︎
Setting up Pipeline for local development is quite easy. Contributing code requires some knowledge about the platform, but it’s not hard either.
Although contributing is much easier now than before, we still have a long way ahead of us. If you are interested in what Developer Experience changes we plan, follow issues with DX label on the issue tracker.
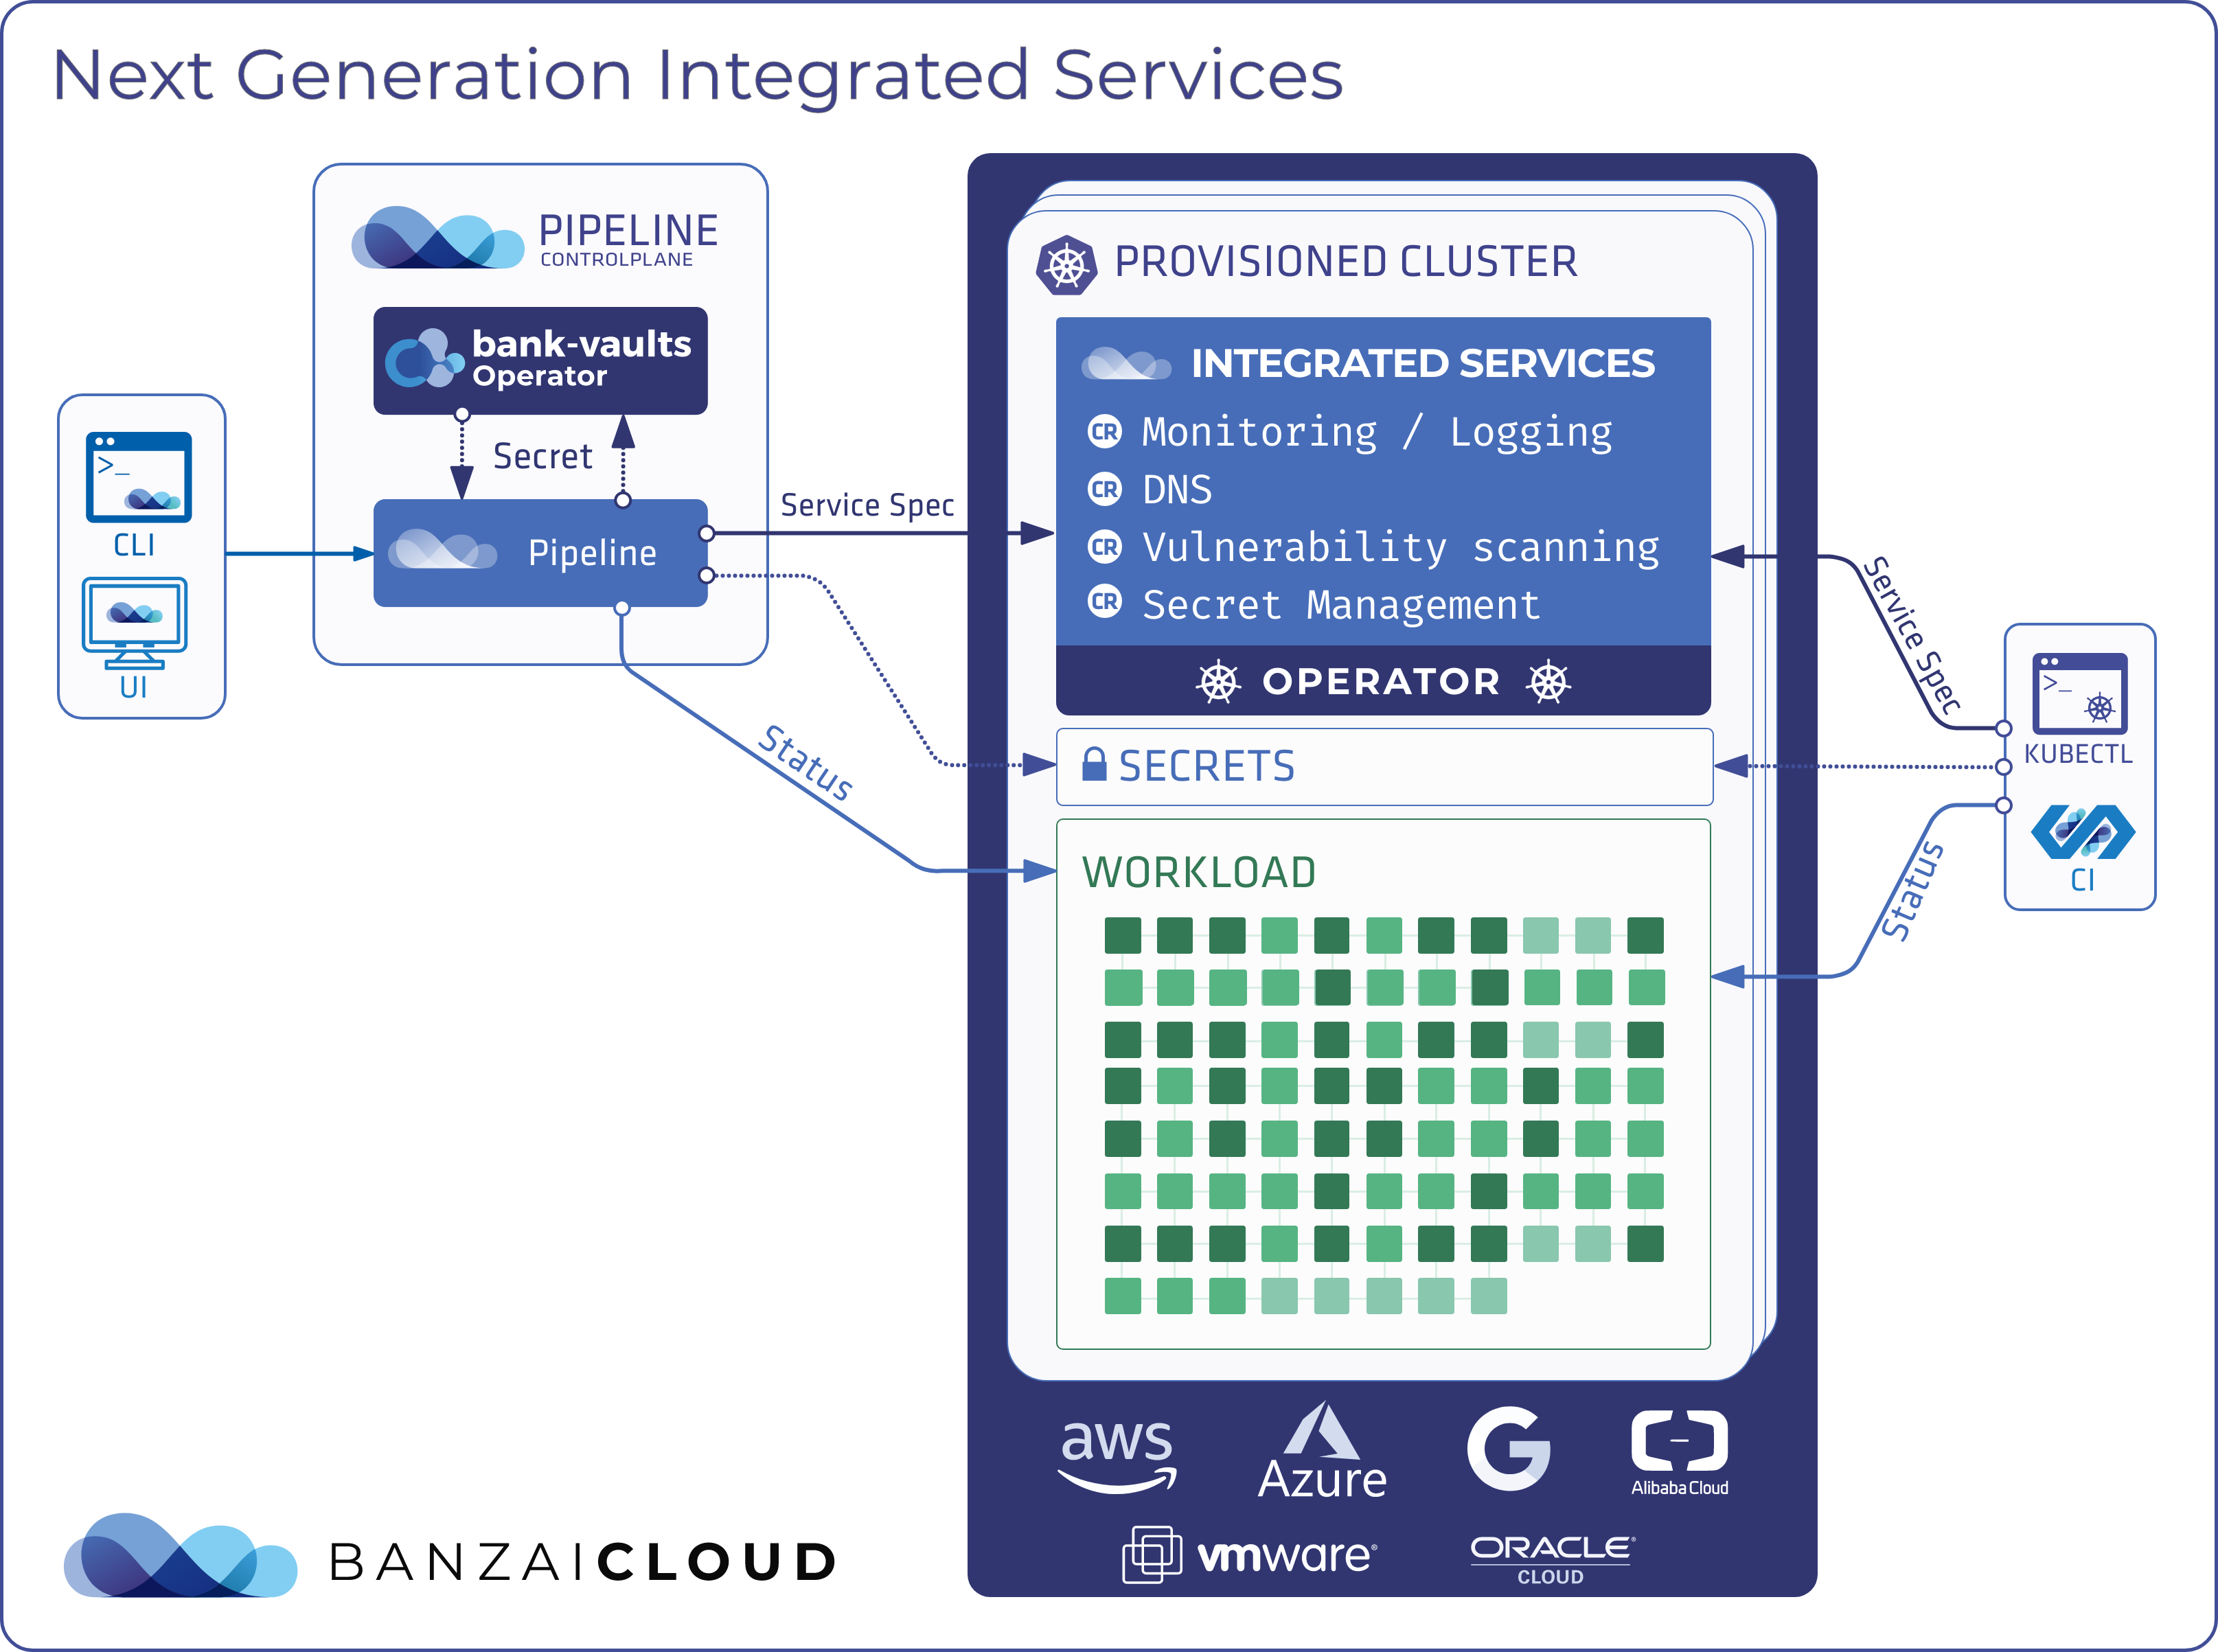
About Banzai Cloud Pipeline 🔗︎
Banzai Cloud’s Pipeline provides a platform for enterprises to develop, deploy, and scale container-based applications. It leverages best-of-breed cloud components, such as Kubernetes, to create a highly productive, yet flexible environment for developers and operations teams alike. Strong security measures — multiple authentication backends, fine-grained authorization, dynamic secret management, automated secure communications between components using TLS, vulnerability scans, static code analysis, CI/CD, and so on — are default features of the Pipeline platform.