


Our last two blog posts about the Kubernetes scheduler explained how taints and tolerations and different types of affinities are working. In today’s post we are going one layer deeper and we’ll discuss how to implement and deploy a custom Kubernetes scheduler. Writing a scheduler may sound intimidating at first, but if you’ll follow this article you’ll realise that creating something that works and schedules pods based on some simple rules is quite easy. The hard part comes when you need to start worrying about performance, error handling and complex rules like pod affinities.
Why should I read on if I’m not planning to write a scheduler? The default scheduler knows everything I can wish for…
Writing a custom scheduler is not something you’ll do often, because the default Kubernetes scheduler is working quite well for most of the cases. But you may want to read on because of these two reasons:
- Kubernetes allows running multiple schedulers in a cluster, so you can still run the default scheduler, use it for most of the pods, but also run a very simple custom scheduler for some special pods. It’s easier than you may think.
- Get to know how a custom scheduler works is the best way to better understand how the scheduler fits in the Kubernetes architecture.
Why we, at Banzai Cloud writing custom schedulers? One reason and a default feature of the Pipeline platform is that it allows enterprises to run workloads cost effectively by mixing spot/preemptible instances with regular ones, without sacrificing overall reliability. This requires quite a lot of behind the scenes magic to be built on top of core Kubernetes building blocks and also a custom scheduler on deployments when the cluster have spot instances and when Pipeline signals that the deployment should have at least some percent of replicas placed on on-demand instances.
The scheduling lifecycle 🔗︎
When someone first thinks about writing a scheduler, they usually think that it has to be a very hard thing, because probably it will need to have some kind of API that can be called by some other component when a new pod is created, then it will need to reach out to another component to start the pod.
Luckily, the Kubernetes scheduler - and all the other components in the K8S architecture - are very loosely coupled and neither of the above things have to be implemented.
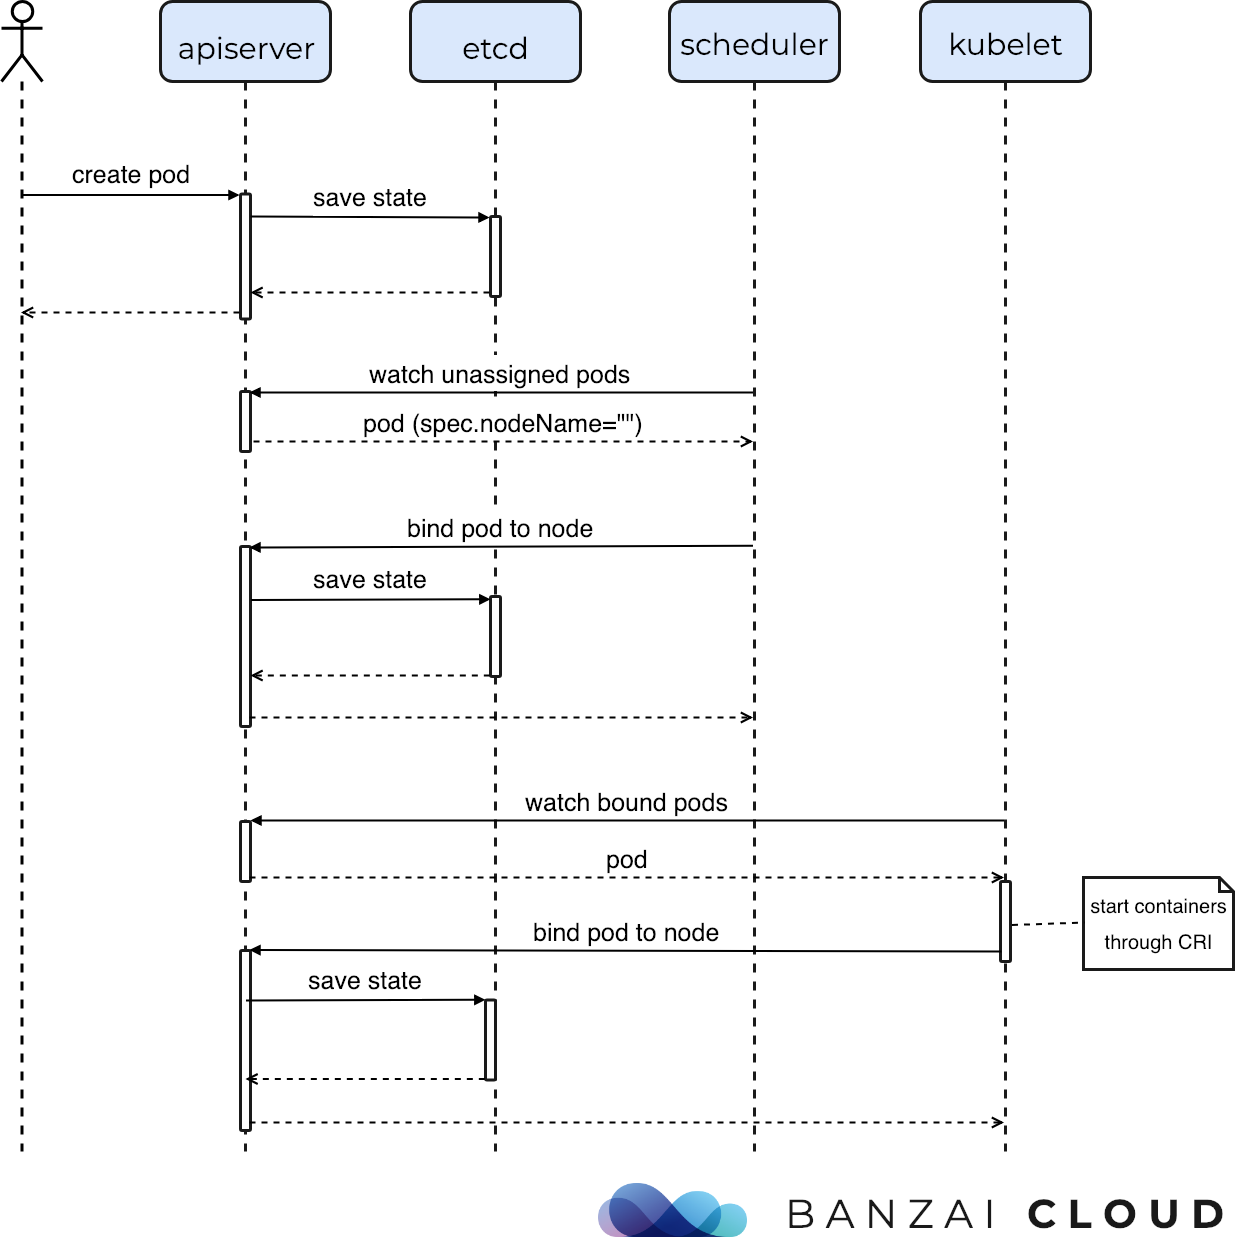
The Kubernetes scheduler has only one job: find a node for all pods in the cluster, and let the K8S apiserver know.
The apiserver and the kubelet will take care of the rest to start the actual containers.
So let’s see how the scheduling lifecycle really looks like:
- A pod is created and its desired state is saved to
etcdwith the node name unfilled. - The scheduler somehow notices that there is a new pod with no node bound.
- It finds the node that best fits that pod.
- Tells the
apiserverto bind the pod to the node -> saves the new desired state toetcd. Kubeletsare watching bound pods through theapiserver, and start the containers on the particular node.
This is how the complete pod lifecycle looks like:
Concept of a scheduler implementation 🔗︎
How does this look like from the scheduler’s point of view? In its simplest form, a scheduler implementation is very easy:
- A loop to watch the unbound pods in the cluster through querying the
apiserver. - Some custom logic that finds the best node for a pod.
- A request to the
bindendpoint on theapiserver.
We’ve implemented an example scheduler in Go that randomly selects a node for a new pod. We’ll walk through that code to demonstrate the above mentioned concept. Of course that scheduler is not suitable for production usage, but it’s a good example to understand how a scheduler works.
The random scheduler v1 🔗︎
The first important part of the scheduler is to watch the newly created pods in a continuous loop.
We can use the Kubernetes client-go SDK’s Watch method on pods that gives us a channel of events that we can range over.
watch, err := s.clientset.CoreV1().Pods("").Watch(metav1.ListOptions{
  FieldSelector: fmt.Sprintf("spec.schedulerName=%s,spec.nodeName=", schedulerName),
})

...

for event := range watch.ResultChan() {
  if event.Type != "ADDED" {
			continue
  }
  p := event.Object.(*v1.Pod)
  fmt.Println("found a pod to schedule:", p.Namespace, "/", p.Name)
  ...
}
The Watch function takes a FieldSelector as an input parameter.
We added two parts to that selector.
spec.nodeName= means that we are only interested in pods that doesn’t have a nodeName set.
If they have a nodeName, it means that they are already scheduled.
The spec.schedulerName=random-scheduler part is more interesting.
Kubernetes is able to run multiple schedulers in a cluster and a pod specification can contain a scheduler name (see example later).
If a scheduler name is set, it is expected that the corresponding scheduler will bind that pod to a node.
No scheduler name set means the default scheduler.
But this field selector means that it is the scheduler’s own responsibility to find the pods that belong to it.
If you’re leaving this field selector out of your implementation, you can mess things up, because multiple schedulers can think that this pod belongs to them and some kind of race condition can arouse.
When ranging through the events provided by the watch function, it’s also needed to filter for ADDED events, because we only want to care about newly added pods.
The next part is to find a fitting node.
In our very simple example, we’ll select a random node from the list of nodes.
Note that we are querying the apiserver for the list of nodes on every schedule event.
It’s not a good idea for performance reasons, but more on that later.
nodes, _ := s.clientset.CoreV1().Nodes().List(metav1.ListOptions{})
return &nodes.Items[rand.Intn(len(nodes.Items))], nil
After we’ve found a node for our pod, the only important thing that’s left is to let the apiserver know.
We can do it through the Bind function, it’s quite simple:
s.clientset.CoreV1().Pods(p.Namespace).Bind(&v1.Binding{
	ObjectMeta: metav1.ObjectMeta{
		Name:      p.Name,
		Namespace: p.Namespace,
	},
	Target: v1.ObjectReference{
		APIVersion: "v1",
		Kind:       "Node",
		Name:       randomNode.Name,
	},
})
This is enough for scheduling a pod, but we are adding one more thing.
Our scheduler emits a Kubernetes Scheduled event.
The default scheduler does this as well, so we’ll be able to track the events later when we’re trying out our scheduler.
timestamp := time.Now().UTC()
s.clientset.CoreV1().Events(p.Namespace).Create(&v1.Event{
	Count:          1,
	Message:        message,
	Reason:         "Scheduled",
	LastTimestamp:  metav1.NewTime(timestamp),
	FirstTimestamp: metav1.NewTime(timestamp),
	Type:           "Normal",
	Source: v1.EventSource{
		Component: schedulerName,
	},
	InvolvedObject: v1.ObjectReference{
		Kind:      "Pod",
		Name:      p.Name,
		Namespace: p.Namespace,
		UID:       p.UID,
	},
	ObjectMeta: metav1.ObjectMeta{
		GenerateName: p.Name + "-",
	},
})
You can check out the full code on Github here.
The random scheduler v2: Informers 🔗︎
If you don’t want to go into more details of a scheduler implementation (caching through informers) you can skip this section and move on to the next one.
In the v1 version of our scheduler we didn’t really care about performance.
But the default Kubernetes scheduler is known for its performance.
It is able to schedule thousands of pods in only a few minutes, so it’s worth checking out some of the tricks it is using.
One of those tricks is to use informers instead of querying all the nodes and pods all the time.
The Kubernetes documentation tells this about informers:
SharedInformers provide hooks to receive notifications of adds, updates, and deletes for a particular resource. They also provide convenience functions for accessing shared caches.
So for example if we add a node informer to our code, it will be able to cache the nodes in the cluster, and it will update the state of the cache if a new node is added, or an existing node is deleted.
We’ll no longer have to query the apiserver for the list of nodes every time we’re scheduling a pod!
When initializing the scheduler, we can create the informer and return its node lister.
nodeInformer := factory.Core().V1().Nodes()
nodeInformer.Informer().AddEventHandler(cache.ResourceEventHandlerFuncs{
	AddFunc: func(obj interface{}) {
		node := obj.(*v1.Node)
		log.Printf("New Node Added to Store: %s", node.GetName())
	},
})
factory.Start(quit)
return nodeInformer.Lister()
And when selecting the node to bind to, we can use this lister that returns the results from cache instead of going to the apiserver directly.
nodes, err := s.nodeLister.List(labels.Everything())
return nodes[rand.Intn(len(nodes))], nil
You can check out the full code on Github here.
There we’ve also changed the Watch function to a pod informer and created a simple “queue” to move closer to the default scheduler’s implementation.
Using only informers for caching is still not enough for a production grade scheduler, as it needs to track the current resource requests on nodes, pods running on each of the nodes, along a few other things. The default scheduler contains a custom cache implementation on top of the informers to achieve this. And there are also other things like handling errors during scheduling, using a proper queue implementation, achieving high availability, and of course writing some meaningful business logic to find a proper node just to name a few.
Deploying the random scheduler 🔗︎
Deploying a new scheduler in a Kubernetes cluster is quite easy (especially if you already have the default one running to schedule the pods for the new one). You can create a standard deployment with the container that contains your scheduler’s code:
kubectl apply -f deployment.yamlCheck if your scheduler is running:
kubectl get pods
NAME                                READY     STATUS    RESTARTS   AGE
random-scheduler-578b499878-bm8pv   1/1       Running   0          3s
The logs of the scheduler should show that the nodes in the cluster were added to the informer’s store.
kubectl logs -f random-scheduler-578b499878-bm8pv
I'm a scheduler!
2019/01/03 16:03:51 New Node Added to Store: gke-martonseregdgk7-system-d609a14b-lrj0
2019/01/03 16:03:51 New Node Added to Store: gke-martonseregdgk7-pool2-694b3996-3zg3
2019/01/03 16:03:51 New Node Added to Store: gke-martonseregdgk7-pool1-7c15ca6c-s0fg
Schedule pods using the custom scheduler 🔗︎
Now that the scheduler is running, it’s time to try it out.
We’ve created an example deployment that contains some sleeping containers, with the schedulerName changed in the pod spec.
You can find it here
spec:
  schedulerName: random-scheduler
Let’s apply this deployment and check if the pods were successfully scheduled. Our pods should be running, and the scheduler logs should show some new entries.
kubectl apply -f deployment/sleep.yaml
kubectl get pods
NAME                                READY     STATUS    RESTARTS   AGE
random-scheduler-578b499878-bm8pv   1/1       Running   0          9m
sleep-74d64f6bf8-5rfqc              1/1       Running   0          11s
sleep-74d64f6bf8-lfjjw              1/1       Running   0          11s

kubectl logs -f random-scheduler-578b499878-bm8pv
...
found a pod to schedule: default / sleep-74d64f6bf8-lfjjw
Placed pod [default/sleep-74d64f6bf8-lfjjw] on gke-martonseregdgk7-pool2-694b3996-3zg3

found a pod to schedule: default / sleep-74d64f6bf8-5rfqc
Placed pod [default/sleep-74d64f6bf8-5rfqc] on gke-martonseregdgk7-pool1-7c15ca6c-s0fg
At last, check the events with kubectl.
You should see that the sleep pods were scheduled by the random-scheduler.
kubectl get events | grep Scheduled
12m 12m 1 random-scheduler-578b499878-bm8pv.157662238c62b94e  Pod Normal Scheduled default-scheduler  Successfully assigned random-scheduler-578b499878-bm8pv to gke-martonseregdgk7-system-d609a14b-lrj0
3m  3m  1 sleep-74d64f6bf8-5rfqc-kzk9f                      Pod Normal Scheduled random-scheduler   Placed pod [default/sleep-74d64f6bf8-5rfqc] on gke-martonseregdgk7-pool1-7c15ca6c-s0fg
3m  3m  1 sleep-74d64f6bf8-lfjjw-d7kbm                      Pod Normal Scheduled random-scheduler   Placed pod [default/sleep-74d64f6bf8-lfjjw] on gke-martonseregdgk7-pool2-694b3996-3zg3
About Banzai Cloud Pipeline 🔗︎
Banzai Cloud’s Pipeline provides a platform for enterprises to develop, deploy, and scale container-based applications. It leverages best-of-breed cloud components, such as Kubernetes, to create a highly productive, yet flexible environment for developers and operations teams alike. Strong security measures — multiple authentication backends, fine-grained authorization, dynamic secret management, automated secure communications between components using TLS, vulnerability scans, static code analysis, CI/CD, and so on — are default features of the Pipeline platform.


