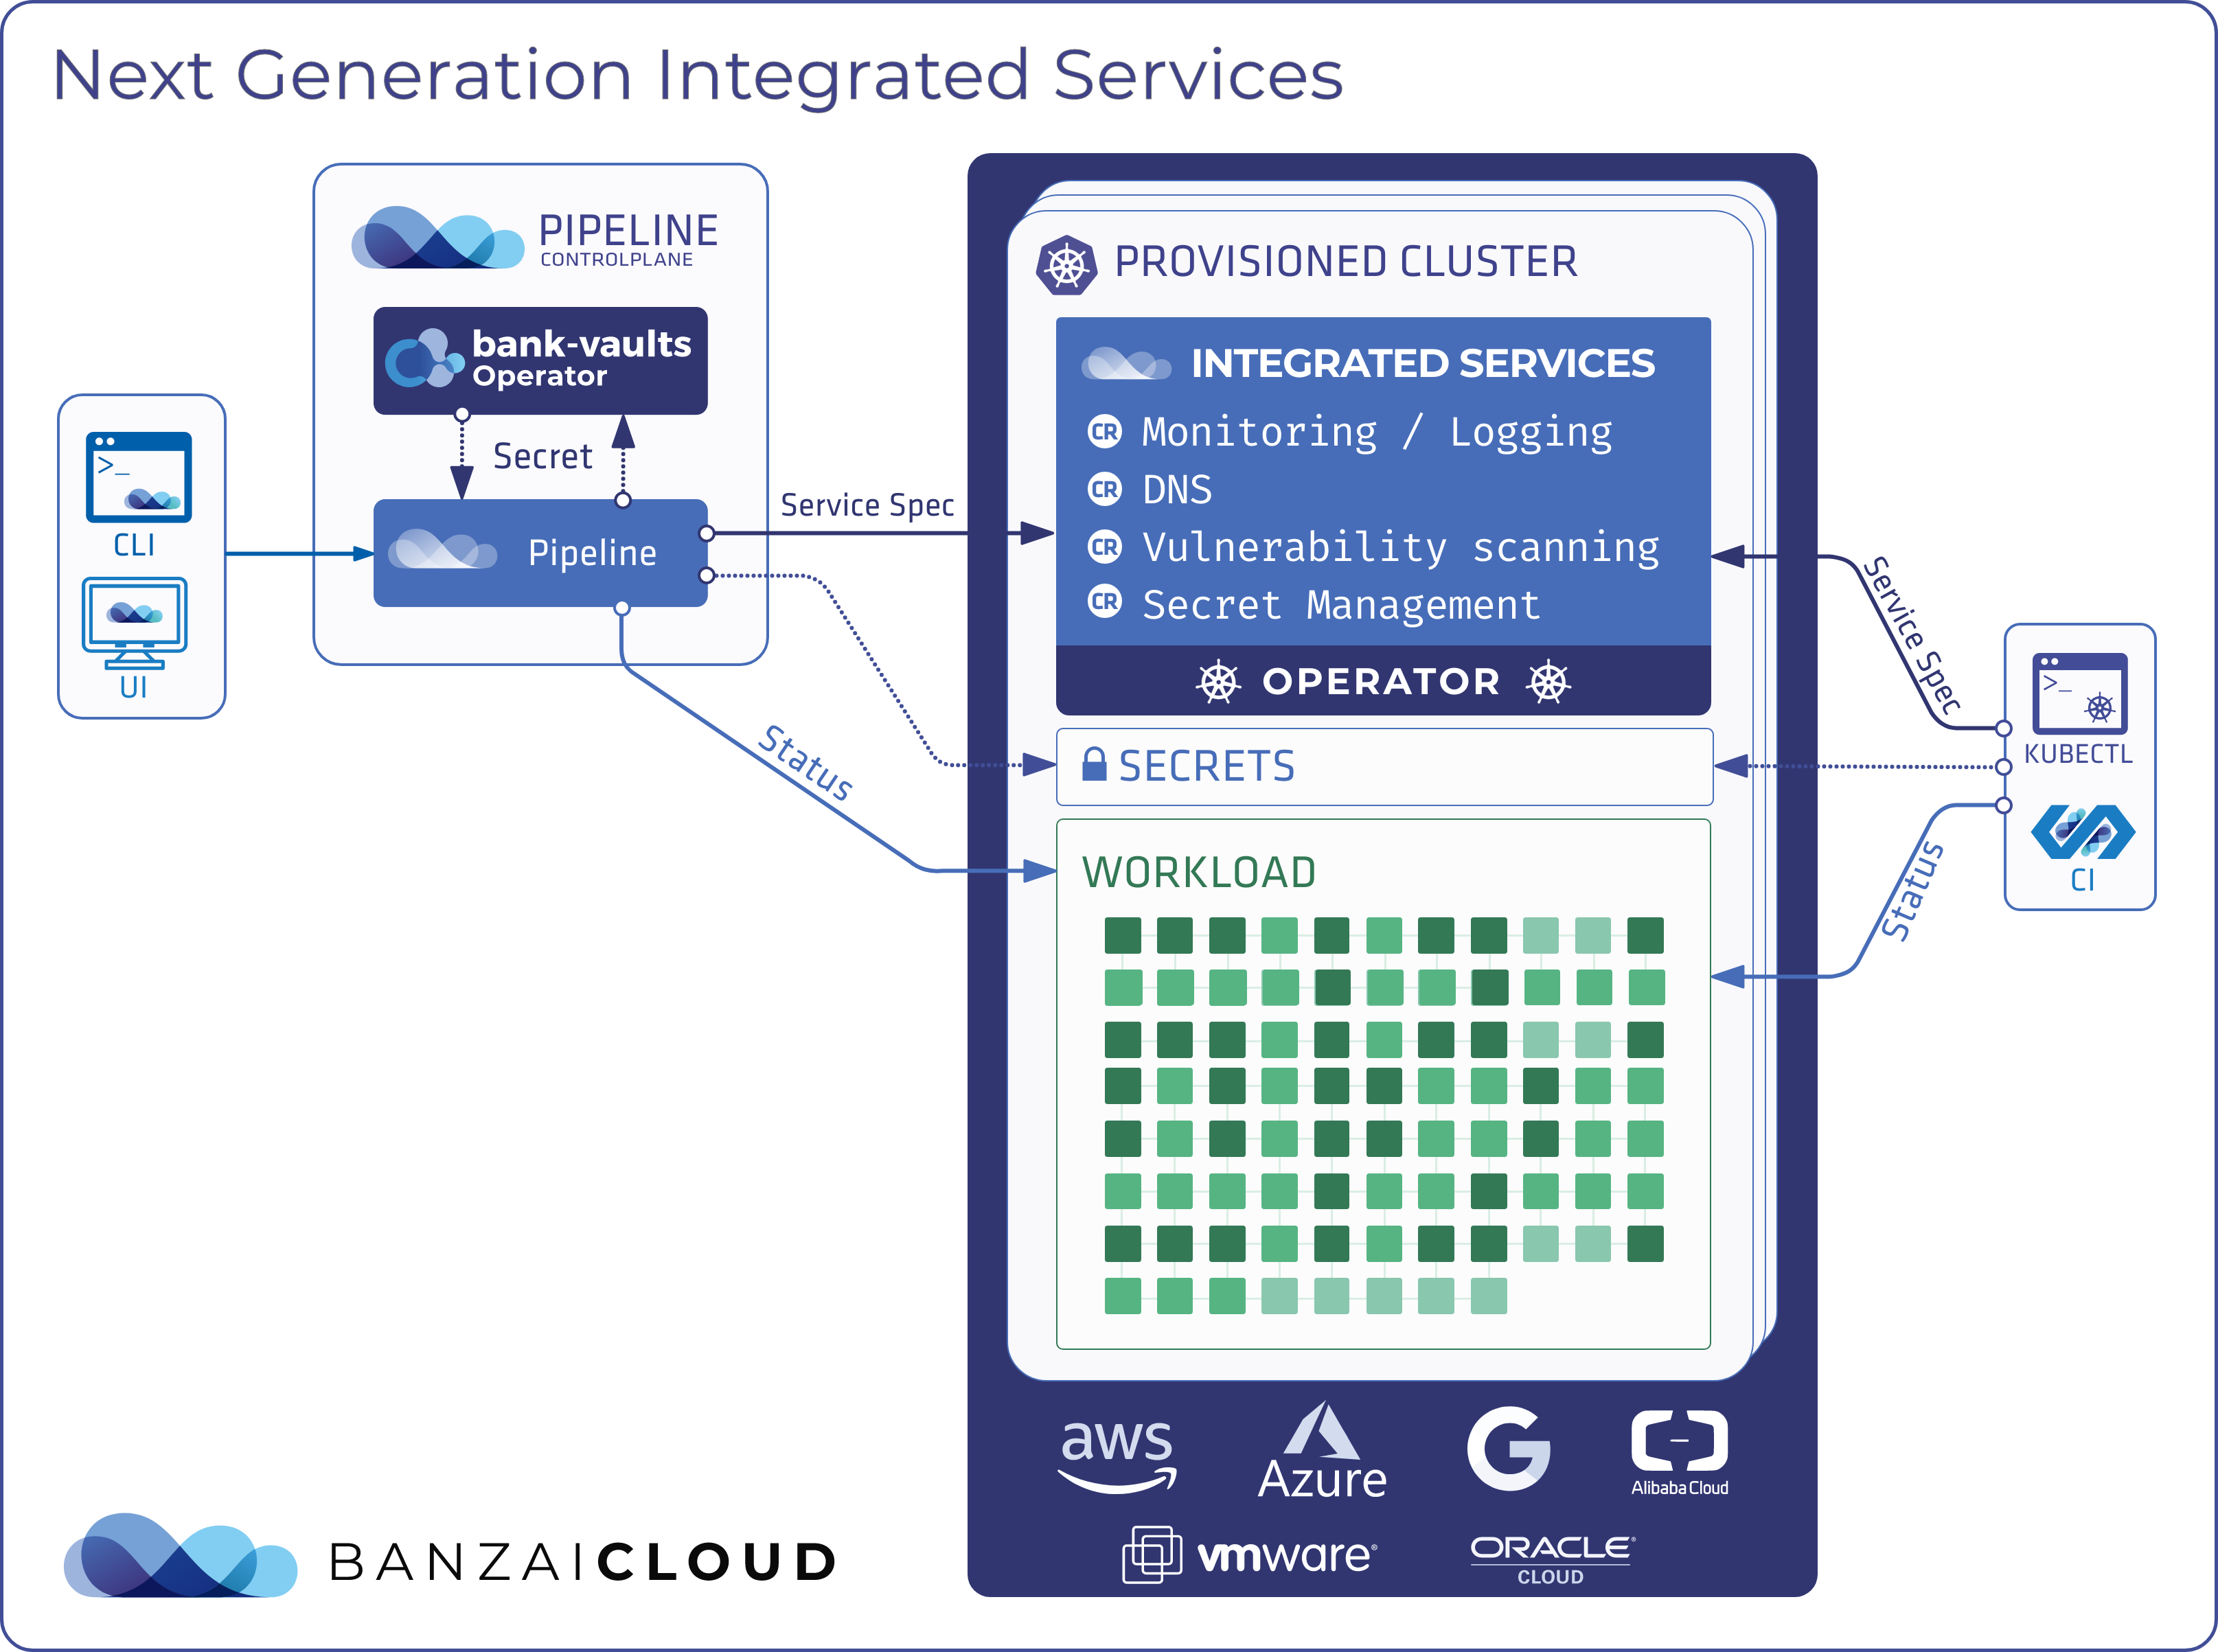
A strong focus on security has always been a key part of the Banzai Cloud’s Pipeline platform. We incorporated security into our architecture early in the design process, and developed a number of supporting components to be used easily and natively on Kubernetes. From secrets, certificates generated and stored in Vault, secrets dynamically injected in pods, through provider agnostic authentication and authorization using Dex, to container vulnerability scans and lots more: the Pipeline platform handles all these as a default tier-zero feature.
As we open sourced and certified our own Kubernetes distribution, PKE - Pipeline Kubernetes Engine - we followed the same security principles we did with the Pipeline platform itself, and battle tested PKE with the CIS Kubernetes benchmark.
Pod Security Policies are a vital but often overlooked piece of the security jigsaw; they are key building blocks of PKE and the Pipeline platform. This post will help to demystify PSP by taking a deep dive into real examples.
Note that pod security policies are likely to be specific to an organization’s or application’s requirements, so there’s no one-size-fits-all approach. Pipeline enforces different sets of policies, however they can always be changed or disregarded.
What is Pod Security Policy? 🔗︎
Pod Security Policies are cluster-wide resources that control security sensitive aspects of pod specification. PSP objects define a set of conditions that a pod must run with in order to be accepted into the system, as well as defaults for their related fields. PodSecurityPolicy is an optional admission controller that is enabled by default through the API, thus policies can be deployed without the PSP admission plugin enabled. This functions as a validating and mutating controller simultaneously.
Pod Security Policies allow you to control:
- The running of privileged containers
- Usage of host namespaces
- Usage of host networking and ports
- Usage of volume types
- Usage of the host filesystem
- A white list of Flexvolume drivers
- The allocation of an FSGroup that owns the pod’s volumes
- Requirments for use of a read only root file system
- The user and group IDs of the container
- Escalations of root privileges
- Linux capabilities, SELinux context, AppArmor, seccomp, sysctl profile
If you’re interested in more details, check out the official Kubernetes documentation
PSP examples using PKE 🔗︎
Our own managed Kubernetes version, Banzai Cloud PKE, supports PSP, and it’s what we’ll be using in the following examples. Note that PKE is certified and 100% API compatible with upstream Kubernetes and other certified K8s providers, so, in the upcoming PSP examples feel free to use whichever Kubernetes distribution you prefer.
In order to use (and understand) Pod Security Policies, we need a k8s cluster with an enabled PodSecurityPolicy admission controller. If you prefer a cloud environment you can use the Pipeline platform to spin up a Kubernetes cluster on one of our 5 supported cloud providers or on prem (VMware or bare metal).
For simplicity’s sake, let’s use PKE, but in a local Vagrant development environment.
0. Install PKE in Vagrant 🔗︎
If you already have vagrant and virtualbox installed, you can skip to the next section. Note, you will still need to launch a node though.
brew cask install virtualbox
brew cask install vagrant
vagrant plugin install vagrant-vbguest
git clone git@github.com:banzaicloud/pke.git
cd pke
vagrant up node1
To install PKE to a vagrant machine:
vagrant ssh node1
sudo -s
curl -v https://banzaicloud.com/downloads/pke/pke-0.2.3 -o /usr/local/bin/pke
chmod +x /usr/local/bin/pke
export PATH=$PATH:/usr/local/bin/
pke install single --with-plugin-psp
mkdir -p $HOME/.kube
cp -i /etc/kubernetes/admin.conf $HOME/.kube/config
chown $(id -u):$(id -g) $HOME/.kube/config
Now let’s check and see if the PSP admission-controller is enabled
grep -- --enable-admission-plugins /etc/kubernetes/manifests/kube-apiserver.yaml
   - --enable-admission-plugins=AlwaysPullImages,DenyEscalatingExec,EventRateLimit,NodeRestriction,ServiceAccount,PodSecurityPolicy
We’re all set. Now let’s take a deep dive into some examples.
1. Example of a restricted PodSecurityPolicy used cluster-wide 🔗︎
First, let’s create an example deployment as seen below. In this manifest there are also a few securityContexts defined at the pod and container level.
runAsUser: 1000means all containers in the pod will run as user UID 1000fsGroup: 2000means the owner for mounted volumes and any files created in that volume will be GID 2000allowPrivilegeEscalation: falsemeans the container cannot escalate privilegesreadOnlyRootFilesystem: truemeans the container can only read the root filesystem
example-restricted-deployment.yaml:
 1apiVersion: apps/v1
 2kind: Deployment
 3metadata:
 4  name: alpine-restricted
 5  labels:
 6    app: alpine-restricted
 7spec:
 8  replicas: 1
 9  selector:
10    matchLabels:
11      app: alpine-restricted
12  template:
13    metadata:
14      labels:
15        app: alpine-restricted
16    spec:
17      securityContext:
18        runAsUser: 1000
19        fsGroup: 2000
20      volumes:
21      - name: sec-ctx-vol
22        emptyDir: {}
23      containers:
24      - name: alpine-restricted
25        image: alpine:3.9
26        command: ["sleep", "3600"]
27        volumeMounts:
28        - name: sec-ctx-vol
29          mountPath: /data/demo
30        securityContext:
31          allowPrivilegeEscalation: false
32          readOnlyRootFilesystem: true
If we deploy this example now, it will fail.
kubectl apply -f example-deployment.yaml
kubectl get deploy,rs,pod
# output
NAME                                READY   UP-TO-DATE   AVAILABLE   AGE
deployment.extensions/alpine-test   0/1     0            0           67s

NAME                                          DESIRED   CURRENT   READY   AGE
replicaset.extensions/alpine-test-85c976cdd   1         0         0       67s
As we can see the pod is missing. What happened?
kubectl describe replicaset.extensions/alpine-test-85c976cdd | tail -n3
# output
 Type     Reason        Age                    From                   Message
  ----     ------        ----                   ----                   -------
  Warning  FailedCreate  114s (x16 over 4m38s)  replicaset-controller  Error creating: pods "alpine-test-85c976cdd-" is forbidden: unable to validate against any pod security policy: []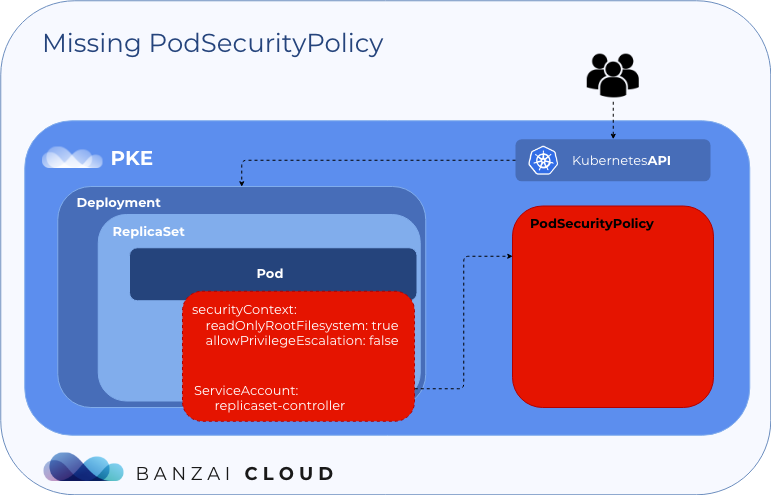
Without Pod Security Policies, the replicaset controller cannot create the pod. Let’s deploy a restricted PSP and create a ClusterRole and ClusterRolebinding, which will allow the replicaset-controller to use the PSP defined above.
kubectl apply -f psp-restricted.yamlpsp-restricted.yaml:
 1apiVersion: policy/v1beta1
 2kind: PodSecurityPolicy
 3metadata:
 4  name: psp.restricted
 5  annotations:
 6    seccomp.security.alpha.kubernetes.io/defaultProfileName:  'docker/default'
 7    seccomp.security.alpha.kubernetes.io/allowedProfileNames: 'docker/default'
 8spec:
 9  readOnlyRootFilesystem: true
10  privileged: false
11  allowPrivilegeEscalation: false
12  runAsUser:
13    rule: 'MustRunAsNonRoot'
14  supplementalGroups:
15    rule: 'MustRunAs'
16    ranges:
17      - min: 1
18        max: 65535
19  fsGroup:
20    rule: 'MustRunAs'
21    ranges:
22      - min: 1
23        max: 65535
24  seLinux:
25    rule: 'RunAsAny'
26  volumes:
27  - configMap
28  - emptyDir
29  - secret
30---
31apiVersion: rbac.authorization.k8s.io/v1
32kind: ClusterRole
33metadata:
34  name: psp:restricted
35rules:
36- apiGroups:
37  - policy
38  resourceNames:
39  - psp.restricted
40  resources:
41  - podsecuritypolicies
42  verbs:
43  - use
44---
45apiVersion: rbac.authorization.k8s.io/v1
46kind: ClusterRoleBinding
47metadata:
48  name: psp:restricted:binding
49roleRef:
50  apiGroup: rbac.authorization.k8s.io
51  kind: ClusterRole
52  name: psp:restricted
53subjects:
54  - kind: ServiceAccount
55    name: replicaset-controller
56    namespace: kube-system
In psp-restricted.yaml there are some restrictions for pods with the psp.restricted policy:
- the root filesystem must be readonly
- it doesn’t allow for privileged containers
- privilege escalations are forbidden
readOnlyRootFilesystem: true - the user must be nonroot
runAsUser: rule: 'MustRunAsNonRoot' - fsGroup and supplementalGroups cannot be root
defined allowed range - the pod can only use the volumes specified:
configMap,emptyDirandsecret - in the annotations section there is a
seccompprofile, which is used by containers. Due to these annotations, the PSP will mutate the podspec before deploying it. If we check the pod manifest in Kubernetes, we will seeseccompannotations defined there as well.
In psp:restricted ClusterRole and psp:restricted:binding ClusterRoleBinding allows us to use the psp.restricted policy for the replicaset-controller service account.
Now, let’s delete the example-deployment and apply it again:
kubectl delete -f example-deployment.yaml
kubectl apply -f example-deployment.yaml
kubectl get pod,deploy,rs
# output
NAME                              READY   STATUS    RESTARTS   AGE
pod/alpine-test-85c976cdd-k69cn   1/1     Running   0          24s

NAME                                READY   UP-TO-DATE   AVAILABLE   AGE
deployment.extensions/alpine-test   1/1     1            1           24s

NAME                                          DESIRED   CURRENT   READY   AGE
replicaset.extensions/alpine-test-85c976cdd   1         1         1       24s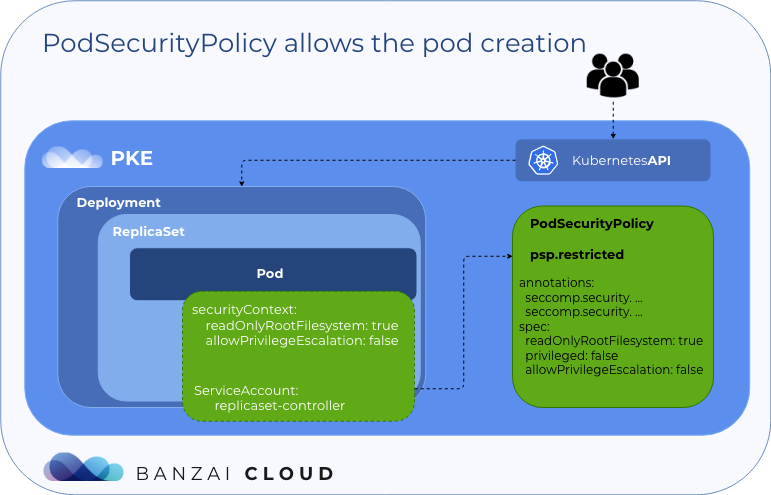
OK, let’s take a look at the pod's annotations:
kubectl get pod/alpine-test-85c976cdd-k69cn -o jsonpath='{.metadata.annotations}'
# output
map[kubernetes.io/psp:psp.restricted seccomp.security.alpha.kubernetes.io/pod:docker/default]
We can see that there are two annotations set:
- kubernetes.io/psp:psp.restricted
- seccomp.security.alpha.kubernetes.io/pod:docker/default
The first is the PodSecurityPolicy used by the pod. The second is the seccomp profile used by the pod. Seccomp (secure computing mode) is a Linux kernel feature used to restrict the actions available inside a container.
Does it really work?
You can check it in host via the status of the sleep 3600 process run by our alpine pod:
ps ax | grep "sleep 3600"
grep Seccomp /proc/<pid of sleep 3600>/status
# output
Seccomp:	2
The /proc filesystem gives some informations:
- 0 means SECCOMP_MODE_DISABLED
- 1 means SECCOMP_MODE_STRICT
- 2 means SECCOMP_MODE_FILTER
2. Create a privileged PodSecurityPolicy and use it with a specified service account 🔗︎
example-privileged-deployment.yaml:
 1apiVersion: apps/v1
 2kind: Deployment
 3metadata:
 4  name: alpine-privileged
 5  namespace: privileged
 6  labels:
 7    app: alpine-privileged
 8spec:
 9  replicas: 1
10  selector:
11    matchLabels:
12      app: alpine-privileged
13  template:
14    metadata:
15      labels:
16        app: alpine-privileged
17    spec:
18      securityContext:
19        runAsUser: 1000
20        fsGroup: 2000
21      volumes:
22      - name: sec-ctx-vol
23        emptyDir: {}
24      containers:
25      - name: alpine-privileged
26        image: alpine:3.9
27        command: ["sleep", "1800"]
28        volumeMounts:
29        - name: sec-ctx-vol
30          mountPath: /data/demo
31        securityContext:
32          allowPrivilegeEscalation: true
33          readOnlyRootFilesystem: false
At this juncture we want to start a pod with write permissions on the root filesystem, and to enable privilege escalation.
kubectl create ns privileged
kubectl apply -f example-privileged-deployment.yaml
kubectl get pod,deploy,rs -n privileged
# output
NAME                                      READY   UP-TO-DATE   AVAILABLE   AGE
deployment.extensions/alpine-privileged   0/1     0            0           4m

NAME                                                 DESIRED   CURRENT   READY   AGE
replicaset.extensions/alpine-privileged-7bdb64b569   1         0         0       4m
As you can see, the pod is missing. Let’s check the replicaset events:
kubectl describe replicaset.extensions/alpine-privileged-7bdb64b569 -n privileged | tail -n3
# output
  Type     Reason        Age                   From                   Message
  ----     ------        ----                  ----                   -------
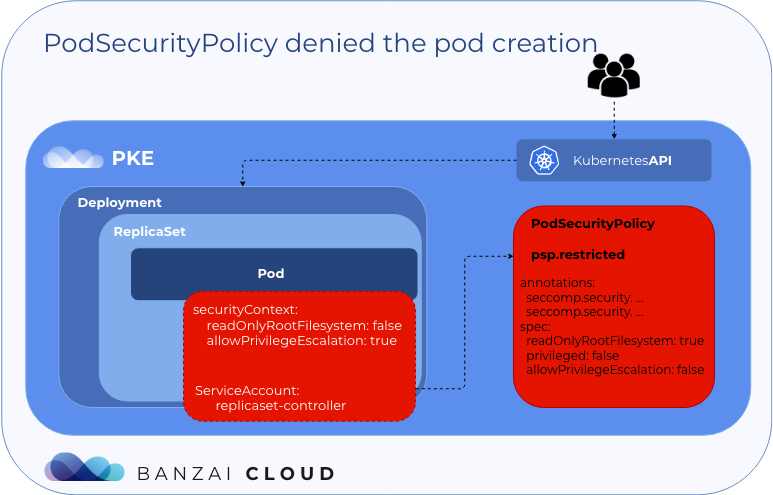
  Warning  FailedCreate  29s (x17 over 5m56s)  replicaset-controller  Error creating: pods "alpine-privileged-7bdb64b569-" is forbidden: unable to validate against any pod security policy: [spec.containers[0].securityContext.readOnlyRootFilesystem: Invalid value: false: ReadOnlyRootFilesystem must be set to true spec.containers[0].securityContext.allowPrivilegeEscalation: Invalid value: true: Allowing privilege escalation for containers is not allowed]
The pod is created with the replicaset-controller service account, which allows use of the psp.restricted policy. Pod creation failed because podspec contains the allowPrivilegeEscalation: true and readOnlyRootFilesystem: false securityContexts - at this time, these are invalid values as far as psp.restricted is concerned.
So let’s create a new PSP, which will allow us to use the serviceaccount we want.
First, we create a new service account in the privileged namespace:
kubectl create sa privileged-sa -n privilegedAfter that, let’s modify the example-privileged-deployment.yaml: manifest file, adding the service account for the pod:
12...
13  template:
14    metadata:
15      labels:
16        app: alpine-privileged
17    spec:
18      serviceAccountName: privileged-sa
19      securityContext:
20        runAsUser: 1
21        fsGroup: 1
22...
Finally, we’ll deploy a psp.privileged policy and create a Role and a Rolebinding to allow the privileged-sa to use the defined PSP.
kubectl apply -f psp-restricted.yamlpsp-privileged.yaml:
 1apiVersion: policy/v1beta1
 2kind: PodSecurityPolicy
 3metadata:
 4  creationTimestamp: null
 5  name: psp.privileged
 6spec:
 7  readOnlyRootFilesystem: false
 8  privileged: true
 9  allowPrivilegeEscalation: true
10  runAsUser:
11    rule: 'RunAsAny'
12  supplementalGroups:
13    rule: 'RunAsAny'
14  fsGroup:
15    rule: 'RunAsAny'
16  seLinux:
17    rule: 'RunAsAny'
18  volumes:
19  - configMap
20  - emptyDir
21  - secret
22---
23apiVersion: rbac.authorization.k8s.io/v1
24kind: Role
25metadata:
26  name: psp:privileged
27  namespace: privileged
28rules:
29- apiGroups:
30  - policy
31  resourceNames:
32  - psp.privileged
33  resources:
34  - podsecuritypolicies
35  verbs:
36  - use
37---
38apiVersion: rbac.authorization.k8s.io/v1
39kind: RoleBinding
40metadata:
41  name: psp:privileged:binding
42  namespace: privileged
43roleRef:
44  apiGroup: rbac.authorization.k8s.io
45  kind: Role
46  name: psp:privileged
47subjects:
48  - kind: ServiceAccount
49    name: privileged-sa
50    namespace: privileged
The psp.privileged policy contains readOnlyRootFilesystem: false and allowPrivilegeEscalation: true. The privileged-sa service account in the privileged namespace allows us to use the psp.privileged policy, so, if we deploy the modified example-privileged-deployment.yaml, the pod should start.
Now let’s apply it again example-privileged-deployment.yaml and check the deployment:
kubectl delete -f example-privileged-deployment.yaml
kubectl apply -f example-privileged-deployment.yaml
kubectl get po,deploy,rs -n privileged
# output
NAME                                     READY   STATUS    RESTARTS   AGE
pod/alpine-privileged-667dc5c859-q7mf6   1/1     Running   0          23s

NAME                                      READY   UP-TO-DATE   AVAILABLE   AGE
deployment.extensions/alpine-privileged   1/1     1            1           23s

NAME                                                 DESIRED   CURRENT   READY   AGE
replicaset.extensions/alpine-privileged-667dc5c859   1         1         1       23s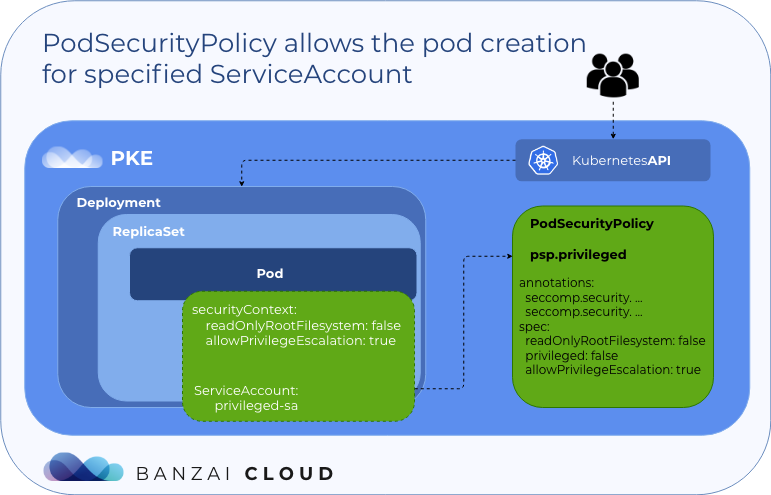
The service account is now defined for the replicaset, and the pod can use the psp.privileged policy:
kubectl get rs alpine-privileged-667dc5c859 -n privileged -o jsonpath='{.spec.template.spec.serviceAccount}'
# output
privileged-sa
Check pod annotations:
kubectl get pod/alpine-privileged-667dc5c859-q7mf6 -n privileged -o jsonpath='{.metadata.annotations}'
# output
map[kubernetes.io/psp:psp.privileged]
What about seccomp? In the psp.privileged policy no seccomp profile is defined. Let’s take a look. What we’re looking for is sleep 1800:
ps ax | grep "sleep 1800"
grep Seccomp /proc/<pid of sleep 1800>/status
# output
Seccomp:	0
3. Create multiple PodSecurityPolicies and check the policy order 🔗︎
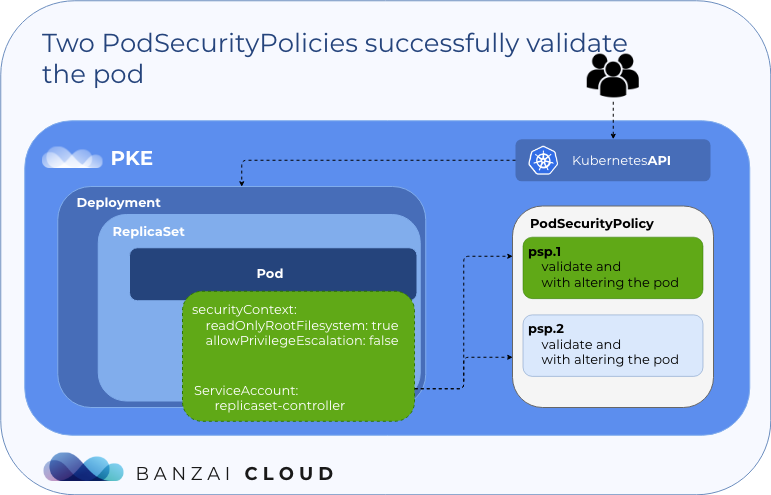
When multiple policies are available, the pod security policy controller selects policies in the following order:
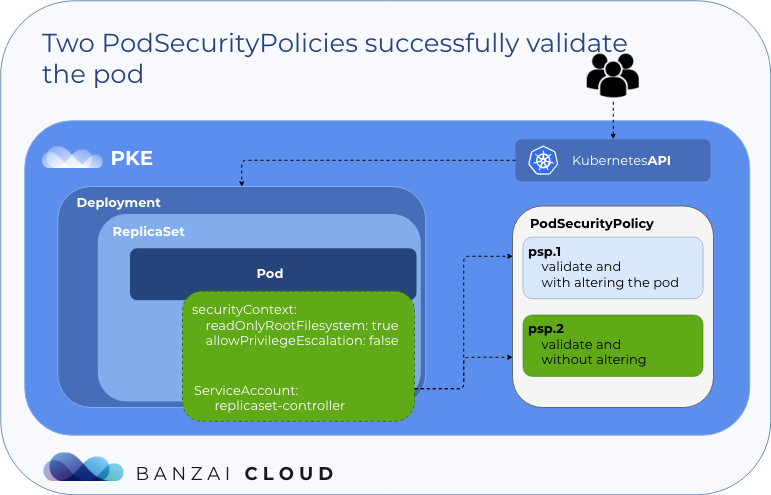
- If policies successfully validate the pod without altering it, they are used.
- In the event of a pod creation request, the first valid policy in alphabetical order is used.
- Otherwise, if there’s a pod update request an error is returned, because pod mutations are disallowed during update operations.
Let’s dive in!
First, we’ll create two Pod Security Policies with RBAC:
psp-multiple.yaml:
 1apiVersion: policy/v1beta1
 2kind: PodSecurityPolicy
 3metadata:
 4  name: psp.1
 5  annotations:
 6    seccomp.security.alpha.kubernetes.io/defaultProfileName:  'docker/default'
 7    seccomp.security.alpha.kubernetes.io/allowedProfileNames: 'docker/default'
 8spec:
 9  readOnlyRootFilesystem: false
10  privileged: false
11  allowPrivilegeEscalation: true
12  runAsUser:
13    rule: 'RunAsAny'
14  supplementalGroups:
15    rule: 'RunAsAny'
16  fsGroup:
17    rule: 'RunAsAny'
18  seLinux:
19    rule: 'RunAsAny'
20  volumes:
21  - configMap
22  - emptyDir
23  - secret
24---
25apiVersion: policy/v1beta1
26kind: PodSecurityPolicy
27metadata:
28  name: psp.2
29  annotations:
30    seccomp.security.alpha.kubernetes.io/defaultProfileName:  'docker/default'
31    seccomp.security.alpha.kubernetes.io/allowedProfileNames: 'docker/default'
32spec:
33  readOnlyRootFilesystem: false
34  privileged: false
35  allowPrivilegeEscalation: false
36  runAsUser:
37    rule: 'MustRunAsNonRoot'
38  supplementalGroups:
39    rule: 'RunAsAny'
40  fsGroup:
41    rule: 'RunAsAny'
42  seLinux:
43    rule: 'RunAsAny'
44  volumes:
45  - configMap
46  - emptyDir
47  - secret
48---
49apiVersion: rbac.authorization.k8s.io/v1
50kind: Role
51metadata:
52  name: psp:multy
53  namespace: multy
54rules:
55- apiGroups:
56  - policy
57  resourceNames:
58  - psp.1
59  - psp.2
60  resources:
61  - podsecuritypolicies
62  verbs:
63  - use
64---
65apiVersion: rbac.authorization.k8s.io/v1
66kind: RoleBinding
67metadata:
68  name: psp:multy:binding
69  namespace: multy
70roleRef:
71  apiGroup: rbac.authorization.k8s.io
72  kind: Role
73  name: psp:multy
74subjects:
75  - kind: ServiceAccount
76    name: replicaset-controller
77    namespace: kube-system
As you can see below, there are two PSPs in psp-multiple.yaml, which are almost identical. Now, Role and RoleBinding in the multy namespace will allow us to use a predefined psp.1 and psp.2 for the replicaset-controller.
Let’s deploy it:
kubectl create ns multy
kubectl apply -f psp-multiple.yaml
kubectl get psp
# output
NAME             PRIV    CAPS   SELINUX    RUNASUSER          FSGROUP     SUPGROUP    READONLYROOTFS   VOLUMES
...
psp.1            false          RunAsAny   RunAsAny           RunAsAny    RunAsAny    true             configMap,emptyDir,secret
psp.2            false          RunAsAny   MustRunAsNonRoot   RunAsAny    RunAsAny    true             configMap,emptyDir,secret
...
psp.restricted   false          RunAsAny   MustRunAsNonRoot   MustRunAs   MustRunAs   true             configMap,emptyDir,secret
...
This list contains only those policies which are allowed to be used by the replicaset-controller service account.
Now let’s create a sample deployment:
example-multy-psp-deployment.yaml:
 1apiVersion: apps/v1
 2kind: Deployment
 3metadata:
 4  name: alpine-multy
 5  namespace: multy
 6  labels:
 7    app: alpine-multy
 8spec:
 9  replicas: 1
10  selector:
11    matchLabels:
12      app: alpine-multy
13  template:
14    metadata:
15      labels:
16        app: alpine-multy
17    spec:
18      securityContext:
19        runAsUser: 1000
20        fsGroup: 2000
21      containers:
22      - name: alpine-multy
23        image: alpine:3.9
24        command: ["sleep", "2400"]
25        securityContext:
26          allowPrivilegeEscalation: false
27          readOnlyRootFilesystem: false
kubectl apply -f example-multy-psp-deployment.yaml
kubectl get po -n multy
# output
NAME READY STATUS RESTARTS AGE
alpine-multy-5864df9bc8-mgg68 1/1 Running 0 20sCheck used PSP:
kubectl get pod alpine-multy-5864df9bc8-mgg68 -n multy -o jsonpath='{.metadata.annotations}'
# output
map[kubernetes.io/psp:psp.1 seccomp.security.alpha.kubernetes.io/pod:docker/default]
As you can see, this pod uses the psp.1 PodSecurityPolicy, which is the first valid policy in alphabetical order, though it is the second rule in the PSP selection.
Let’s modify psp.2 by deleting seccomp's annotations:
1apiVersion: policy/v1beta1
2kind: PodSecurityPolicy
3metadata:
4  name: psp.2
5spec:
6  readOnlyRootFilesystem: false
kubectl apply -f psp-multy.yaml
kubectl delete -f example-multy-psp-deployment.yaml
kubectl apply -f example-multy-psp-deployment.yaml
kubectl get po -n multy
# output
NAME READY STATUS RESTARTS AGE
alpine-multy-5864df9bc8-lj2fz 1/1 Running 0 29sCheck the used PSP:
kubectl get pod alpine-multy-5864df9bc8-lj2fz -n multy -o jsonpath='{.metadata.annotations}'
# output
map[kubernetes.io/psp:psp.2]
Now, the pod uses psp.2 due to the annotations being deleted, since, in this case, the policy successfully validated the pod without altering it; it’s the 1st rule in PSP selection.
Conclusion 🔗︎
As these three examples demonstrate, PSP enables admins to apply fine grain control over pods and containers running in Kubernetes, either by granting or denying access to specific resources. These policies are relatively easy to create and deploy, and should be useful components of any Kubernetes security strategy.
About Banzai Cloud Pipeline 🔗︎
Banzai Cloud’s Pipeline provides a platform for enterprises to develop, deploy, and scale container-based applications. It leverages best-of-breed cloud components, such as Kubernetes, to create a highly productive, yet flexible environment for developers and operations teams alike. Strong security measures — multiple authentication backends, fine-grained authorization, dynamic secret management, automated secure communications between components using TLS, vulnerability scans, static code analysis, CI/CD, and so on — are default features of the Pipeline platform.


