


Banzai Cloud’s Pipeline provides a platform which allows enterprises to develop, deploy and scale container-based applications. It leverages best-of-breed cloud components, such as Kubernetes, to create a highly productive, yet flexible environment for developers and operations teams alike. Strong security measures—multiple authentication backends, fine-grained authorization, dynamic secret management, automated secure communications between components using TLS, vulnerability scans, static code analysis, etc.—are a tier zero feature of the Pipeline platform, which we strive to automate and enable for all enterprises.
Spotguides 🔗︎
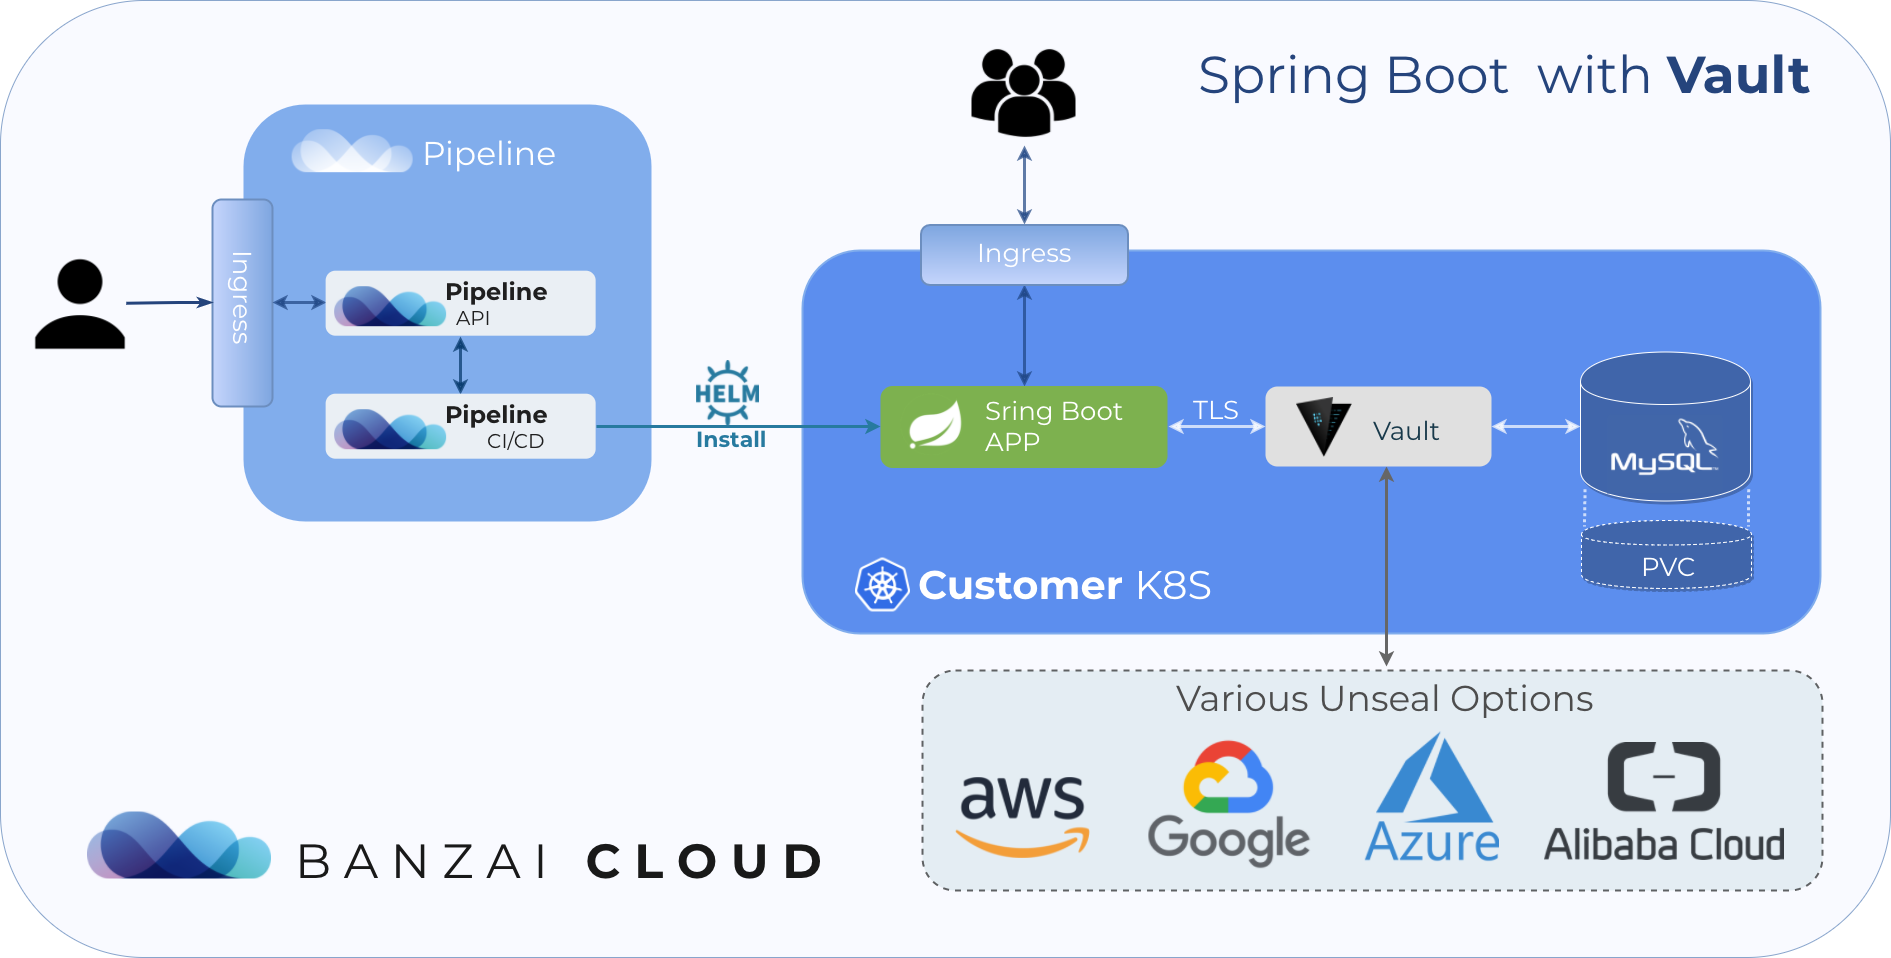
We are in the process of releasing the first set of spotguides we’d like to share with our users. Spotguides are created from skeleton projects by Pipeline, and you can configure them as necessary during the creation phase and after. We have already heavily invested in Vault through our Bank-Vaults project and the Vault Helm chart. Additionally, we think that any modern enterprise application platform without Java support is simply infeasible. Spring Boot is one of the most well-known Java application frameworks; it builds on the Spring Framework and automatically supports DI, web, and configuration support, with a seemingly limitless number of sub-projects for taking care of cloud, data, mobile, security, etc. Luckily, there’s also great Vault integration written for Spring, called Spring Vault. This blog post will attempt to describe how to work with Spring Boot on Kubernetes and access Vault in the proper way from your Java application. It will highlight what the workflow should look like, from packaging your application and building your Docker container to releasing your service to the wild on Kubernetes with Helm, and describe future enhancement possibilities. Last, this project will serve as a spotguide template.
Spring Boot setup 🔗︎
Creating a Java project from scratch can be a tedious process, but there’s a nice website for Spring Boot, which generates a template for your application and offers a number of configuration possibilities. This bootstrapping page is called SPRING INITIALIZR. For our service, we will be using Maven, Java, Spring 2.0.5 (the most recently released version at time of publicaiton). The extra dependencies will be Vault Configuration and Reactive Web. Download your application after configuration and open it in your IDE or text editor of choice (IntelliJ IDEA in my case). We will be using Java 11 with the latest language features available, in order to benefit from Java’s new release schedule. After importing this project it should already be runnable (search for *.java under src). It won’t do much (though, it does a great deal) but should be enough to allow us to stop for a second and think about how we’ll package the app and build a Docker image from it in an effective way (our sample project is available on GitHub).
Building a Docker image from a JVM based application 🔗︎
I have seen many tutorials describing how to do this, and I can tell you, it’s hard to get it right. Java is a compiled language which means you have to create a JAR file before running it with the JVM. With the introduction of multi-stage Docker builds, this process is easier than ever before. This is what our Dockerfile looks like.
 1FROM maven:3.5-jdk-11-slim as build
 2
 3# Resolve all the dependencies and cache them to save a LOT of time
 4COPY pom.xml /usr/src/myapp/
 5RUN mvn -f /usr/src/myapp/pom.xml dependency:resolve dependency:resolve-plugins
 6
 7# Build the application - usually this is the only part that gets rebuilt locally - use offline mode and skip tests
 8COPY src /usr/src/myapp/src
 9RUN mvn -f /usr/src/myapp/pom.xml clean package -DskipTests -o
10
11
12# The final image should have a minimal number of layers
13FROM openjdk:11-jre-slim
14
15COPY --from=build /usr/src/myapp/target/app.jar app.jar
16
17ENTRYPOINT java -Djava.security.egd=file:/dev/./urandom -jar app.jar
Multi-stage builds help create a final Docker image with minimal layers and size, so only the final application JAR, packaged with JVM, is what you ship in the image. But building this application takes a significant amount of time, even on my fairly new 2017 MacBook Pro; Spring has a lot of dependencies (and plugins) and Maven downloads them every time you run:
1docker build -t banzaicloud/spotguide-java-vault:latest .To overcome this issue the packaging of the JAR file is split into two parts:
- Downloading all project dependencies and plugins (this depends only on your
pom.xml) - Compiling your code and building your application JAR
With this technique, if you don’t change your pom.xml (and you won’t change it as often as your Java code) you can leverage the Docker build cache to save yourself a lot of build time. This way it’s possible to put your Docker image into local testing in the course of a few seconds, instead of over several minutes.
 1» docker build -t banzaicloud/spotguide-java-vault:latest .
 2Sending build context to Docker daemon  586.8kB
 3Step 1/8 : FROM maven:3.5-jdk-11-slim as build
 4 ---> 3f31430076c8
 5Step 2/8 : COPY pom.xml /usr/src/myapp/
 6 ---> Using cache
 7 ---> 4efc687be56a
 8Step 3/8 : RUN mvn -f /usr/src/myapp/pom.xml dependency:resolve dependency:resolve-plugins
 9 ---> Using cache
10 ---> 4fe04ff7dad5
11Step 4/8 : COPY src /usr/src/myapp/src
12 ---> Using cache
13 ---> d05e6bf6588b
14Step 5/8 : RUN mvn -f /usr/src/myapp/pom.xml clean package -DskipTests -o
15 ---> Running in c0b92c27204f
16[INFO] Scanning for projects...
17[INFO]
18[INFO] ------------------< com.banzaicloud:vault-spotguide >-------------------
19[INFO] Building vault-spotguide 0.0.1-SNAPSHOT
20[INFO] --------------------------------[ jar ]---------------------------------
21[INFO]
22[INFO] --- maven-clean-plugin:3.0.0:clean (default-clean) @ vault-spotguide ---
Creating a Helm Chart for the Java application 🔗︎
A new Helm chart can be rapidly created from scratch with helm create [APP]. To make your application runnable on Kubernetes with Helm, replace the standard image.repository and image.tag values. Don’t forget to change the livenessProbe of the container, because starting up the JVM, loading all the Spring resources, and making the application run and open the TCP port, takes some time (usually in excess of the default probe values):
1      livenessProbe:
2        httpGet:
3          path: /
4          port: http
5        initialDelaySeconds: 30 # When using resource limits the JVM needs some time to start-up
This chart will serve as the umbrella chart for the whole application.
Setting up an HA Vault with MySQL storage backend 🔗︎
The MySQL storage backend for Vault has been available for a long time now, but Vault 0.11 has also recently introduced HA storage backend support for MySQL. This means that you can run Vault in a highly-available way if it is backed by MySQL. Vault doesn’t store any data, but it uses so-called storage backends to store encrypted data, see its Architecture documentation for more details.
With the help of the community MySQL chart and the Banzai Cloud Vault chart, it’s very easy to complete the aforementioned setup on top of Kubernetes. In your umbrella chart’s values.yaml file you have to add the following two blocks:
 1# Configure MySQL to create a user and a database called `vault` and give the user access to to the db:
 2mysql:
 3  mysqlUser: vault
 4  mysqlPassword: vault
 5  mysqlDatabase: vault
 6
 7vault:
 8  # Configure Vault to have two instances (required for the HA setup)
 9  replicaCount: 2
10
11  # Use the latest version of the bank-vaults Vault unsealer
12  # (by default it uses Kubernetes secrets)
13  unsealer:
14    image:
15      tag: latest
16
17  vault:
18    image: 0.11.1
19    config:
20      storage:
21        # Tell Vault to use MySQL as the storage backend in HA mode
22        # and give the access details to it
23        mysql:
24          # The Kubernetes service name of MySQL
25          address: spotguide-java-vault-mysql:3306
26          username: vault
27          password: vault
28          ha_enabled: "true"
29      # The Kubernetes service name of Vault
30      api_addr: "https://spotguide-java-vault-vault:8200"
For ease of reading, all MySQL passwords are simply vault, but you can change them at anytime with Helm’s --set flags:
1export MYSQL_PASSWORD=myS3cr3tPassw0rd
2
3helm upgrade --install spotguide-java-vault .banzaicloud/charts/spotguide-java-vault \
4  --set mysql.mysqlPassword=${MYSQL_PASSWORD} \
5  --set vault.vault.config.storage.mysql.password=${MYSQL_PASSWORD}
It’s worth it to check out how the Banzai Cloud Vault chart supports automatic Vault configurations through its API, like applying Vault policies and mounting Auth backends. These help the user to utilize Helm to configure a full blown Vault installation:
 1    externalConfig:
 2      policies:
 3      - name: allow_secrets
 4        rules:
 5          path "secret/data/*" {
 6            capabilities = ["create", "read", "update"]
 7          }
 8          path "secret/metadata/*" {
 9            capabilities = ["delete", "list"]
10          }
11          path "sys/mounts" {
12            capabilities = ["read", "list"]
13          }
14      auth:
15      - type: kubernetes
16        # Allows creating roles in Vault, which can be used later on for the Kubernetes based
17        # authentication.
18        # See https://www.vaultproject.io/docs/auth/kubernetes.html#creating-a-role for
19        # more information.
20        roles:
21        # Allows the application pod in the all namespaces to use the secret kv store
22        - name: application
23          bound_service_account_names: default
24          bound_service_account_namespaces: "*"
25          policies: allow_secrets
26          ttl: 10m
Finally, add both charts to your requirements.yaml:
1dependencies:
2  - name: mysql
3    version: 0.10.1
4    repository: "@stable"
5  - name: vault
6    repository: http://kubernetes-charts.banzaicloud.com/branch/master
7    version: 0.5.13
You won’t have to initialize and unseal Vault because the Bank-Vaults project takes care of that. In this example, Kubernetes Secrets are used for storing the unseal keys and the root token, which is only useful for development purposes. In the Vault Spotguide, you’ll be able to choose which KMS backend you’d like to use.
Writing your Spring Boot/Vault application 🔗︎
Writing the Spring application was the easiest part of this journey. Because it’s a very basic application which proxies some parts of the Vault API, it can list mounts, as well as create, and list, secrets.
Our subject relies on VaultController.java:
 1@RestController
 2public class VaultController {
 3
 4    @Autowired
 5    private VaultOperations vaultOperations;
 6
 7    @GetMapping("/mounts")
 8    public Map<String, VaultMount> mounts() {
 9        return vaultOperations.opsForSys().getMounts();
10    }
11
12    @GetMapping("/secrets")
13    public List<Map<String, Object>> secrets() {
14        return vaultOperations.list("secret/metadata/")
15                .stream()
16                .map((key) -> Map.of("id", key, "data", readSecret(key)))
17                .collect(Collectors.toList());
18    }
19
20    @GetMapping("/secrets/{id}")
21    public Map<String, Object> secrets(@PathVariable("key") String key) {
22        return readSecret(key);
23    }
24
25    private Map<String, Object> readSecret(String key) {
26        return vaultOperations.read("secret/data/" + key).getData();
27    }
28
29    @PostMapping(value = "/secrets")
30    public void createSecret(@RequestBody Map<String, String> body) {
31        vaultOperations.write(
32                "secret/data/" + UUID.randomUUID().toString(),
33                Map.of("data", body)
34        );
35    }
36
37    @RequestMapping("/")
38    public String health() {
39        return "OK";
40    }
41}
Exercise the API with cURL:
1# Create a secret
2curl -H "Content-Type: application/json" http://localhost:8080/secrets \
3  -d '{"i-have-to-say":"spring-boot-is-great"}'
4
5# List secrets
6curl http://localhost:8080/secrets | jq
7
8# List mounts
9curl http://localhost:8080/mounts | jq
TLS between Spring Boot and Vault 🔗︎
The Banzai Cloud Vault helm chart enforces the usage of TLS for accessing the Vault Kubernetes Service. It does this with self-signed certificates. To be able to trust a self-signed server certificate, you need to have a CA certificate (ca.crt) to make sure that the signer is trustworthy.
Storing certificates in PEM format is standard. Vault uses PEM, and Helm, which generates the certificate.
However, Java has its own way of storing certificates, called the JKS (Java KeyStore) format.
So we have to convert the ca.crt from PEM to JKS format. Ideally, there’s a tool for just that, shipped with the JRE, called keytool. Let’s do this in an init container:
 1    spec:
 2      initContainers:
 3        - name: {{ .Chart.Name }}-jks
 4          image: "{{ .Values.image.repository }}:{{ .Values.image.tag }}"
 5          imagePullPolicy: {{ .Values.image.pullPolicy }}
 6          command:
 7            - keytool
 8            - -importcert
 9            - -storepass
10            - {{ derivePassword 1 "long" (.Release.Time | toString) "banzai" "cacert" }}
11            - -noprompt
12            - -file
13            - /vault/cacert/ca.crt
14            - -keystore
15            - /vault/jkscacert/ca.jks
16          volumeMounts:
17            - mountPath: /vault/cacert
18              name: vault-cacert
19            - mountPath: /vault/jkscacert
20              name: vault-jks-cacert
21
22// ... the main container
23
24          env:
25            - name: VAULT_URI
26              value: https://{{ .Release.Name }}-vault:8200
27            - name: VAULT_SSL_TRUST_STORE
28              value: file:///vault/cacert/ca.jks
29            - name: VAULT_SSL_TRUST_STORE_PASSWORD
30              value: {{ derivePassword 1 "long" (.Release.Time | toString) "banzai" "cacert" }}
31          volumeMounts:
32          - mountPath: /vault/cacert
33            name: vault-jks-cacert
34
35// ... the volumes
36
37      # Mount the Secret holding the generated self-signed certificate for Vault
38      # Create an ephemeral Volume for holding the converted version of the ca.crt to JKS
39      volumes:
40        - name: vault-cacert
41          secret:
42            secretName: {{ .Release.Name }}-vault-tls
43        - name: vault-jks-cacert
44          emptyDir: {}
Spring Vault has to know about this certificate to be able to use it to access Vault. Since it has a nice 12 factor app-style configuration class, called EnvironmentVaultConfiguration, it’s easy to let it know (see the env: block of the main container).
Note: Helm’s derivePassword function is used here to generate the same random literal at two different places of the template.
We have already described how root and leaf certificates relate to each other in one of our previous posts, see that for more details.
Summary 🔗︎
You can download the whole project from GitHub and start it on your machine:
1# This assumes Docker for Mac with Kubernetes enabled
2
3docker build -t banzaicloud/spotguide-java-vault:latest .
4helm dep update .banzaicloud/charts/spotguide-java-vault
5helm upgrade --install spotguide-java-vault \
6             .banzaicloud/charts/spotguide-java-vault \
7             --set ingress.enabled=true \
8             --set "ingress.hosts[0]=localhost"
9open http://localhost
We’re happy to hear from you about anything to do with this subject that we did not cover in this post.
Learn more about Bank-Vaults:
- Secret injection webhook improvements
- Backing up Vault with Velero
- Vault replication across multiple datacenters
- Vault secret injection webhook and Istio
- Mutate any kind of k8s resources
- HSM support
- Injecting dynamic configuration with templates
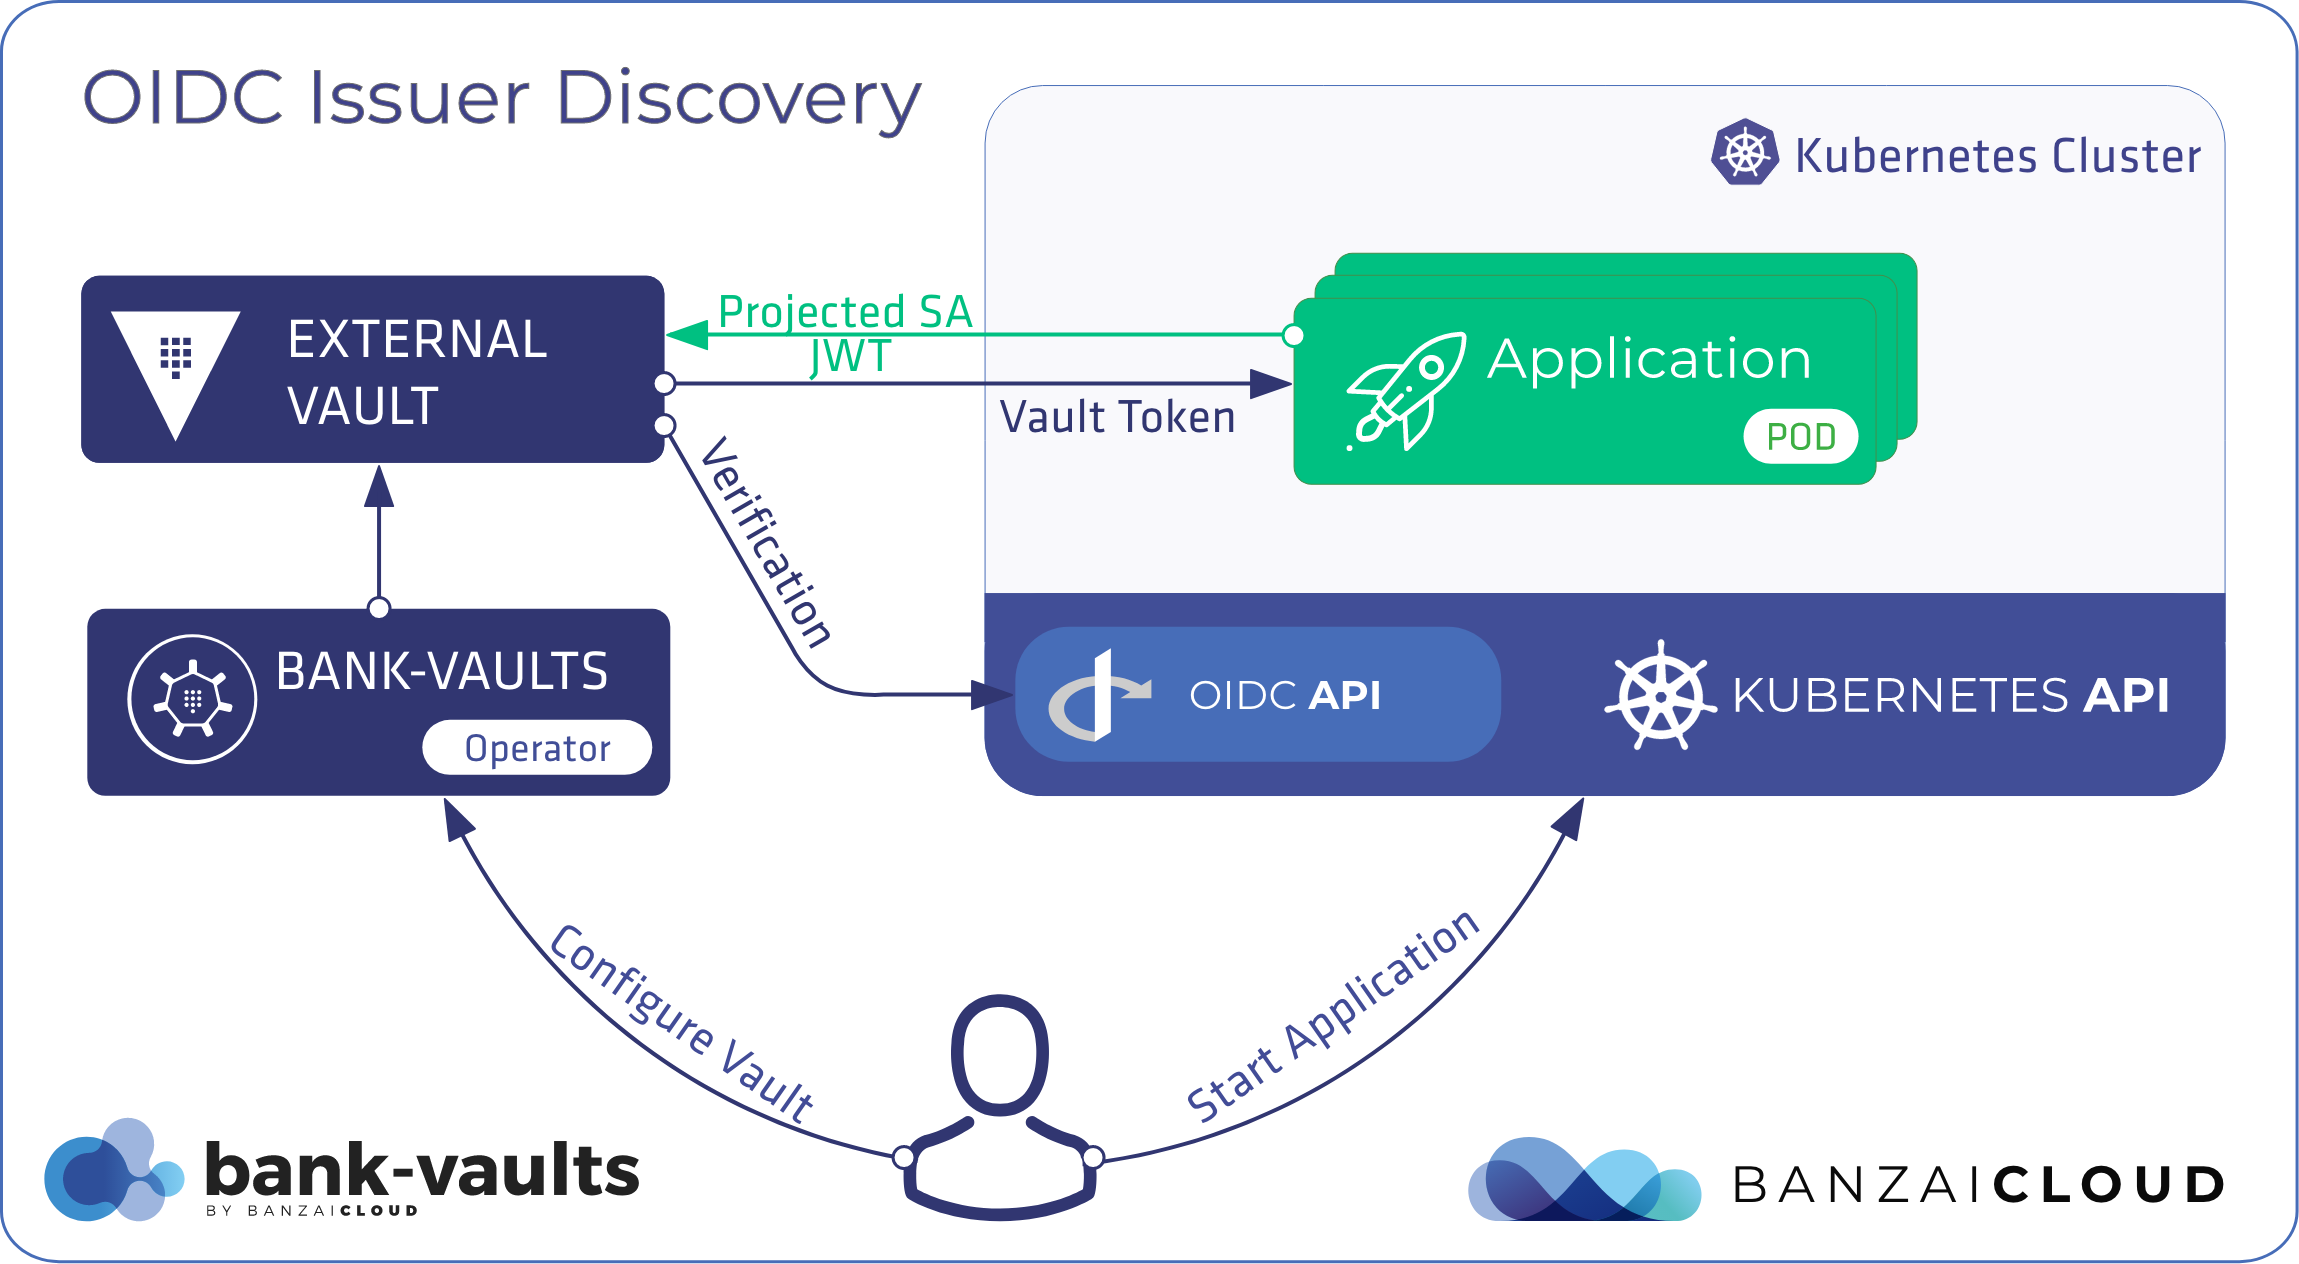
- OIDC issuer discovery for Kubernetes service accounts
- Show all posts related to Bank-Vaults