


One of the Pipeline platform’s key open-source component is Bank-Vaults - the Vault swiss-army knife for Kubernetes. Feature requirements are a big part of the Pipeline platform, but a community has also built up around Bank-Vaults, and now it has its own use cases and requirements. We’ve received a lot of these external contributions and feature requests since our last blog update, which was about Bank-Vaults 0.4.7 in February. We’d like to walk you through some of these festures as 0.5.0 has just been released; we’ll be using a broad example in this post’s second part, but, first, let’s take a look at a full list of new features.
A big changelog since Bank-Vaults 0.4.7 -> 0.5.0 🔗︎
New, community-based features have received a lot of focus, but we’ve also been paying particular attention to security and stability:
- Global changes:
- migrated to Go modules
- a lot of small fixes (like linting, memory/connection leaks, etc…)
- acceptance test and CI extended
- ALL resources have resource limits now
- Configurer/CLI additions:
- JWT Auth backend support
- Cert Auth backend support
- OKTA Auth backend support
- Token Auth backend support
- OIDC Auth backend support
- configurer code was refactored to make adding these ☝️ easier
- support for multiple configuration files (and directories)
- added --once and --fatal flag to configure
- implemented common kv backend test before initializing Vault (
preFlightChecks) - reduced unseal periods (and logs as well) to up resiliency
- policies were formatted (now look better in the UI)
- Vault Groups support
- configuration errors are handled by re-injecting configuration files
- Vault recovery keys are saved to storage as well
- Vault configurations with seal stanza (Vault auto-unseal) support
- support for rotating Database and AWS and GCP root credentials via the
rotate: truefield
- Vault operator:
- HA setup is refactored and is now based on request forwarding (The Kubernetes friendly way)
- leader field added to CR statuses
- resource version mismatch issues fixed on updates (for etcd cluster and Vault statuses)
- various RBAC fixes and scope reductions
- support for configuration files as Secrets with label selectors (besides ConfigMaps)
- through CR customization of ports, TLS SANs, annotations, etcd, nodeselectors, tolerations
- Prometheus metrics are exported from operator SDK’s manager
- added Prometheus ServiceMonitor resource creation
- updated to operator-sdk 0.9.0 (with Go modules)
- added complete Vault Transit unsealing example (Vault with Vault Transit unsealing)
- added complete MySQL backend with HA setup example
- added complete Google Secret backend example
- added complete GKE Ingress example
- GCP auto-unseal example added
- TLS certificates are automatically regenerated before defined expiry in CR
- Vault TLS CA distribution to specified namespaces
- TLS certificates are now in an Ingress friendly format (tls.crt, tls.key)
- using the k8s-objectmatcher library avoids unnecessary object updates
- added support for “create_only” field to secrets engines
- Secrets mutating webhook:
- support for mutating
valueFromandenvFrom - VAULT_ environment variable sanitization
- can run as nobody on an unprivileged port
- support for dynamic secrets (not just KV)
- Consul template sidecar support for Vault
- support for injecting KV secrets by version
- a lot of Pod security policy fixes
- reads container command and args from the source image registry
- handles pod spec when CMD is absent but ARGS are present
- the webhook now supports mutating Secrets (imagePullSecrets as well) and ConfigMaps
- added ability to only warn for missing secrets
- added the option to pass VAULT env vars to the main process
- all Kubernetes Service FQDNs added to TLS cert hosts
- Vault configuration can now be Go templated with environment variables (and Sprig functions) the same way as a configurer configuration
- added a lazy connection to Vault when using ConfigMaps and Secrets
- support for special
VAULT_TOKEN=vault:loginpass through a requested Vault Token to an application
- support for mutating
- Go library:
- added support for generating wildcard certificates
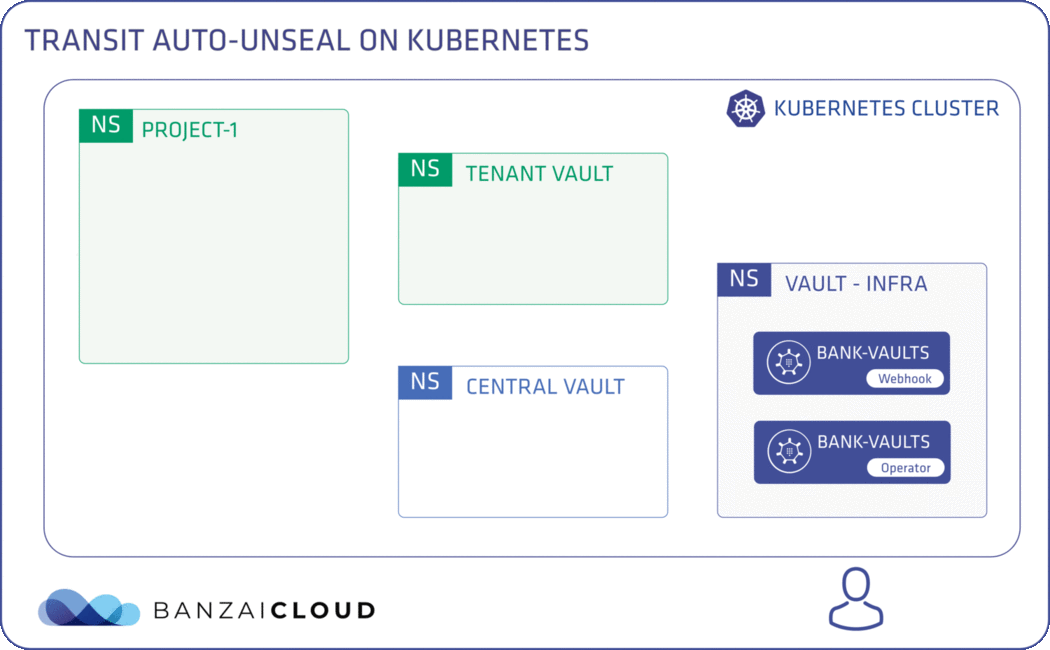
A comprehensive example of Bank-Vaults - Transit Auto-Unseal on Kubernetes 🔗︎
We’ve written more than a few posts that cover Bank-Vaults’ features one by one, but to demonstrate how all these features work together, it’s better to look at an example that exercises all of its components: let’s see how we can achieve that.
When we analyzed the new features in Vault 1.1, one of the most interesting was Transit Auto-Unseal. Vault can now be configured to use the Transit Secrets Engine in a seperate Vault cluster as an auto-unseal provider. In other words, it is now possible to create a hierarchy of Vault nodes.
We’ve tried to keep up with these new features and adopt them for use in Bank-Vaults. This particular feature wouldn’t have worked well in Bank-Vaults 0.4.7, but now, in 0.5.0, we can easily set up a multi-level Vault cluster on top of Kubernetes. There’s an extremely detailed, high quality tutorial on Auto-unseal using Transit Secrets Engine on the Vault documentation site. Let’s see if we can automate this tutorial on Kubernetes. All of Bank-Vaults’ components with new, highlighted features from the changelog will be working in concert to make this possible. We’ve implemented all these components (more or less) in such way that they can provision, configure and connect to Vault instances so you don’t have to.
NOTE: The Hashicorp guide uses the terms Vault 1 and Vault 2. We changed these to Central Vault and Tenant Vault.
Prerequisites:
We’re going to install a few components with Helm, so please add the Banzai Cloud Helm repository:
helm repo add banzaicloud-stable https://kubernetes-charts.banzaicloud.com
If you’ve added our repo previously, just run an update to get the latest charts:
helm repo update
First, you have to install the Vault secrets webhook:
helm upgrade --install vault-secrets-webhook banzaicloud-stable/vault-secrets-webhook --namespace vault-infra
Next, install the Vault operator:
helm upgrade --install vault-operator banzaicloud-stable/vault-operator --namespace vault-infra
Our vault-infra namespace is now ready. This namespace is responsible for provisioning our Vault instances and mutating requested resources, so we can start to apply our Vault Custom Resources. Our CR is the cr-transit-unseal.yaml file, which sets up the whole transit auto-unseal flow.
Read inline comments carefully, as they describe what’s happening in the given block (we feel that using inline descriptions, in this case, provides better locality of “reference”):
# Create a namespace called "tenant" for the Tenant Vault instance,
# the Central instance will be running in "default"

apiVersion: "v1"
kind: Namespace
metadata:
  name: tenant

---

# This Vault CR describes the setup of the Central Vault instance
apiVersion: "vault.banzaicloud.com/v1alpha1"
kind: "Vault"
metadata:
  name: central-vault
  namespace: default
spec:
  size: 1
  image: vault:1.2.3
  bankVaultsImage: banzaicloud/bank-vaults:latest

  # Specify the ServiceAccount where the Vault Pod and the Bank-Vaults
  # configurer/unsealer will be running
  serviceAccount: vault

  # Unsealing will be done via Kubernetes Secrets if not otherwise defined,
  # which is not highly secure. This is only an example. In production, please
  # use one of the KMS based unseal options.
  # unsealConfig:
  # ...

  # A YAML representation of a final Vault config file: this will be mounted
  # to the Vault container directly.
  # {{ Go .Templates | can | be | used }}
  config:
    storage:
      file:
        path: /vault/file
    listener:
      tcp:
        address: "0.0.0.0:8200"
        tls_cert_file: /vault/tls/server.crt
        tls_key_file: /vault/tls/server.key
    api_addr: https://central-vault.default:8200
    ui: true

  # This is how the Bank-Vaults configurer should configure Vault to enable the
  # transit auto-unseal flow for the tenant instance.
  # The automated version of:
  # https://learn.hashicorp.com/vault/operations/autounseal-transit#cli-command
  externalConfig:
    # Configure the Transit Secrets Engine and create a key for auto-unseal
    secrets:
      - type: transit
        path: tenant/transit
        description: Transit engine for the tenant
        configuration:
          keys:
            - name: autounseal
              type: aes256-gcm96
              exportable: false

    # The tenant Vault needs to call the Transit Secrets Engine's endpoints.
    # Create the necessary policies to permit it.
    policies:
      - name: allow_tenant_transit
        rules: path "tenant/transit/encrypt/autounseal" {
                 capabilities = ["update"]
                }
               path "tenant/transit/decrypt/autounseal" {
                 capabilities = ["update"]
               }

    # Instead of creating a token by hand, we allow the tenant Vault to request
    # one with the Kubernetes auth method, via vault-env and webhook.
    auth:
      - type: kubernetes
        path: tenant/kubernetes
        roles:
          # Allow every tenant Vault Pod in the tenant namespace to use
          # its transit engine.
          - name: tenant
            bound_service_account_names: vault
            bound_service_account_namespaces: tenant
            policies: allow_tenant_transit
            ttl: 1m

  # This instruct the vault-operator to distribute the CA certificate that
  # corresponds to the central Vault instance to other namespaces. This way a
  # secure TLS connection can be built between the tenant and central Vault
  # instances.
  caNamespaces:
    - "tenant"
    - "vault-infra"

  # Request and mount a Persistent Volume to this Vault instance.
  volumes:
    - name: vault-file
      persistentVolumeClaim:
        claimName: vault-file

  volumeMounts:
    - name: vault-file
      mountPath: /vault/file

---

apiVersion: v1
kind: PersistentVolumeClaim
metadata:
  name: vault-file
  namespace: default
spec:
  accessModes:
    - ReadWriteOnce
  resources:
    requests:
      storage: 1Gi

---

# This Vault CR describes the setup of the Tenant Vault instance

kind: ServiceAccount
apiVersion: v1
metadata:
  name: vault
  namespace: tenant

---

kind: Role
apiVersion: rbac.authorization.k8s.io/v1
metadata:
  name: vault-secrets
  namespace: tenant
rules:
  - apiGroups:
      - ""
    resources:
      - secrets
    verbs:
      - "*"

---

kind: RoleBinding
apiVersion: rbac.authorization.k8s.io/v1
metadata:
  name: vault-secrets
  namespace: tenant
roleRef:
  kind: Role
  name: vault-secrets
  apiGroup: rbac.authorization.k8s.io
subjects:
  - kind: ServiceAccount
    name: vault

---

apiVersion: "vault.banzaicloud.com/v1alpha1"
kind: "Vault"
metadata:
  name: "tenant-vault"
  namespace: tenant
spec:
  size: 1
  image: vault:1.2.3
  bankVaultsImage: banzaicloud/bank-vaults:latest

  # Specify the ServiceAccount where the Vault Pod and the Bank-Vaults
  # configurer/unsealer will be running
  serviceAccount: vault

  # Even if unsealing will be done via the Transit Auto-Unseal flow the root token
  # and recovery keys will be stored in Kubernetes Secrets if not defined otherwise,
  # not highly secure, but this is just an example, in production please use one of
  # the KMS based options.
  # unsealConfig:
  # ...

  # This is how the Bank-Vaults configurer should configure Vault to enable the
  # transit auto-unseal flow for an instance. The seal stanza is the interesting
  # part, wherein we connect to the central instance. The token will be injected
  # by the webhook automatically; the automated version of:
  # https://learn.hashicorp.com/vault/operations/autounseal-transit#step-2-configure-auto-unseal-vault-2
  config:
    seal:
      transit:
        address: "https://central-vault.default:8200"
        # token: will be injected via webhook through VAULT_TOKEN="vault:login"
        key_name: autounseal
        mount_path: tenant/transit
        tls_ca_cert: "/central-vault/tls/ca.crt"
    storage:
      file:
        path: /vault/file
    listener:
      tcp:
        address: "0.0.0.0:8200"
        tls_cert_file: /vault/tls/server.crt
        tls_key_file: /vault/tls/server.key
    api_addr: https://tenant-vault.tenant:8200
    ui: true

  externalConfig:
    # Mount the kv2 secrets engine for general Secrets CRUD access.
    secrets:
      - path: secret
        type: kv
        description: General secrets for the applications.
        options:
          version: 2

    # The Vault application will call the secrets engine's endpoints, so create
    # the necessary policies to permit that.
    policies:
      - name: allow_secrets
        rules: path "secret/*" {
          capabilities = ["create", "read", "update", "delete", "list"]
          }

    # Now we'll configure the auth backend for the apps in the application
    # namespace. Allow every Pod in that namespace to use the secret kv store
    # that we've just configured above.
    auth:
      - type: kubernetes
        roles:
          - name: application
            bound_service_account_names: ["default"]
            bound_service_account_namespaces: ["application"]
            policies: allow_secrets
            ttl: 1h

  # The VAULT_TOKEN environment variable will be read by Vault to login
  # for unsealing. The "vault:" special prefix instructs the webhook to
  # mutate the Pod and pass a variable directly to the process with
  # vault-env.
  vaultEnvsConfig:
    - name: VAULT_TOKEN
      value: "vault:login"

  # vault-env from the above block needs some extra information in order to know
  # how to log into Vault with the Kubernetes auth method, and where to
  # find the TLS CA certificate to do so. Because the operator was asked
  # to distribute the CA of the central-vault instance to other namespaces
  # with `caNamespaces:`, it will find the Secrets in "central-vault-tls".
  # This is automatically mounted by the webhook into the Pod.
  vaultAnnotations:
    vault.security.banzaicloud.io/vault-addr: https://central-vault.default:8200
    vault.security.banzaicloud.io/vault-role: tenant
    vault.security.banzaicloud.io/vault-path: tenant/kubernetes
    vault.security.banzaicloud.io/vault-tls-secret: "central-vault-tls"

  # Persistence, here, is achieved in the same way as it was for central-vault
  volumes:
    - name: vault-file
      persistentVolumeClaim:
        claimName: vault-file
    - name: central-vault-tls
      secret:
        secretName: central-vault-tls

  volumeMounts:
    - name: vault-file
      mountPath: /vault/file
    - name: central-vault-tls
      mountPath: /central-vault/tls

---

apiVersion: v1
kind: PersistentVolumeClaim
metadata:
  name: vault-file
  namespace: tenant
spec:
  accessModes:
    - ReadWriteOnce
  resources:
    requests:
      storage: 1Gi
Apply the RBAC rules for our Vault instances, first. For secruity reasons, the operator doesn’t have the RBAC scope necessary to CRUD RBAC, so this has to be done manually:
kubectl apply -f https://raw.githubusercontent.com/banzaicloud/bank-vaults/master/operator/deploy/rbac.yaml
Now apply the Vault CRs to instruct the vault-operator to reconcile our two Vault instances:
kubectl apply -f https://raw.githubusercontent.com/banzaicloud/bank-vaults/master/operator/deploy/cr-transit-unseal.yaml
After a few seconds (61s on my machine), you should see that all the Vault instances have been created and configured:
I use -w to first watch all Pod changes across the cluster:
kubectl get pods --all-namespaces -w
$ kubectl get pods -n default
NAME                                        READY   STATUS    RESTARTS   AGE
central-vault-0                             3/3     Running   0          2m
central-vault-configurer-5fb556566d-knw58   1/1     Running   0          2m

$ kubectl get pods -n tenant
NAME                                      READY   STATUS    RESTARTS   AGE
tenant-vault-0                            3/3     Running   0          1m
tenant-vault-configurer-8588d8f49-xsz5c   1/1     Running   0          1m
Let’s check and see how the tenant Vault has behaved, since it’s had to do a lot in this example:
$ kubectl logs -f -n tenant tenant-vault-0 -c vault
2019/08/02 12:59:03 Received new Vault token
2019/08/02 12:59:03 Initial Vault token arrived
Using eth0 for VAULT_CLUSTER_ADDR: https://10.1.2.65:8201
==> Vault server configuration:

               Seal Type: transit
         Transit Address: https://central-vault.default:8200
        Transit Key Name: autounseal
      Transit Mount Path: tenant/transit
             Api Address: https://tenant-vault.tenant:8200
                     Cgo: disabled
         Cluster Address: https://10.1.2.65:8201
              Listener 1: tcp (addr: "0.0.0.0:8200", cluster address: "0.0.0.0:8201", max_request_duration: "1m30s", max_request_size: "33554432", tls: "enabled")
               Log Level: info
                   Mlock: supported: true, enabled: true
                 Storage: file
                 Version: Vault v1.1.5
             Version Sha: f08b88029d959e1318746b188fecaad54468230b

==> Vault server started! Log data will stream in below:

2019-08-02T12:59:03.975Z [INFO]  core: stored unseal keys supported, attempting fetch
2019-08-02T12:59:03.975Z [WARN]  failed to unseal core: error="stored unseal keys are supported, but none were found"
2019-08-02T12:59:04.289Z [INFO]  core: security barrier not initialized
2019-08-02T12:59:04.327Z [WARN]  core: stored keys supported on init, forcing shares/threshold to 1
2019-08-02T12:59:04.328Z [INFO]  core: security barrier not initialized
2019-08-02T12:59:04.334Z [INFO]  core: security barrier initialized: shares=1 threshold=1
2019-08-02T12:59:04.361Z [INFO]  core: post-unseal setup starting
2019-08-02T12:59:04.381Z [INFO]  core: loaded wrapping token key
2019-08-02T12:59:04.381Z [INFO]  core: successfully setup plugin catalog: plugin-directory=
2019-08-02T12:59:04.382Z [INFO]  core: no mounts; adding default mount table
2019-08-02T12:59:04.388Z [INFO]  core: successfully mounted backend: type=cubbyhole path=cubbyhole/
2019-08-02T12:59:04.388Z [INFO]  core: successfully mounted backend: type=system path=sys/
2019-08-02T12:59:04.389Z [INFO]  core: successfully mounted backend: type=identity path=identity/
2019-08-02T12:59:04.410Z [INFO]  core: successfully enabled credential backend: type=token path=token/
2019-08-02T12:59:04.411Z [INFO]  core: restoring leases
2019-08-02T12:59:04.411Z [INFO]  rollback: starting rollback manager
2019-08-02T12:59:04.412Z [INFO]  expiration: lease restore complete
2019-08-02T12:59:04.418Z [INFO]  identity: entities restored
2019-08-02T12:59:04.418Z [INFO]  identity: groups restored
2019-08-02T12:59:04.419Z [INFO]  core: post-unseal setup complete
2019-08-02T12:59:04.440Z [INFO]  core: root token generated
2019-08-02T12:59:04.440Z [INFO]  core: pre-seal teardown starting
2019-08-02T12:59:04.440Z [INFO]  rollback: stopping rollback manager
2019-08-02T12:59:04.440Z [INFO]  core: pre-seal teardown complete
2019-08-02T12:59:04.441Z [INFO]  core: stored unseal keys supported, attempting fetch
2019-08-02T12:59:04.460Z [INFO]  core: vault is unsealed
As you can see from the logs, the tenant Vault has requested a Vault Token and performed transit-based auto-unseal with the central Vault. Now, it’s unsealed.
How did the tenant Vault log into the Central Vault? - Webhook did it! 🔗︎
First of all, check the logs from the webhook, because there should be some interesting log entries in there:
$ kubectl logs -f -n vault-infra deployment/vault-secrets-webhook
time="2019-08-02T12:53:48Z" level=warning msg="no metrics recorder active"
time="2019-08-02T12:53:48Z" level=warning msg="no tracer active"
time="2019-08-02T12:53:48Z" level=warning msg="no metrics recorder active"
time="2019-08-02T12:53:48Z" level=warning msg="no tracer active"
time="2019-08-02T12:53:48Z" level=warning msg="no metrics recorder active"
time="2019-08-02T12:53:48Z" level=warning msg="no tracer active"
time="2019-08-02T12:53:48Z" level=info msg="Listening on :8443"
time="2019-08-02T12:58:07Z" level=info msg="I'm using registry https://index.docker.io"
2019/08/02 12:58:07 registry.ping url=https://index.docker.io/v2/
2019/08/02 12:58:09 registry.manifest.get url=https://index.docker.io/v2/library/vault/manifests/1.1.5 repository=library/vault reference=1.1.5
2019/08/02 12:58:11 registry.blob.download url=https://index.docker.io/v2/library/vault/blobs/sha256:f894bfe406dc2a48efc23347c2f69df279a116221f6b54f997d4f79f371dc03f repository=library/vault digest=sha256:f894bfe406dc2a48efc23347c2f69df279a116221f6b54f997d4f79f371dc03f
Remember that we have added a VAULT_TOKEN="vault:login" environment variable to the tenant Vault instance. This instructs the webhook to inject the environment variable into the Pod. "vault:login" is a special value: after vault-env is injected into the Pod it should log into the central Vault instance (see the vault-addr annotation for how to target a Vault instance with a webhook) and, instead of doing anything else, pass the Vault token it’s received as an environment variable to the process originally intended to run in the Pod (the tenant Vault).
It should have already contacted the source registry of the Vault container image while the tenant Vault POD was mutating, and queried the Docker ENTRYPOINT and CMD parameters of that image. This was done so the webhook could inject vault-env as the first process to start, and pass in the original process as parameters, so that vault-env can fork the process after it has requested and set the requested environment variables from Vault.
$ kubectl describe pod -n tenant tenant-vault-0
...
Containers:
  vault:
    Container ID:  docker://b7dff8dc94150c4b86809614b7ac98bb256bb1b4931107041583fa4e5044d96a
    Image:         vault:1.1.5
    Image ID:      docker-pullable://vault@sha256:3ee63d4b492c31c3b490772c4f9561c20243503253572910c022b9a4711d433e
    Ports:         8200/TCP, 8201/TCP
    Host Ports:    0/TCP, 0/TCP
    Command:
      /vault/vault-env
    Args:
      docker-entrypoint.sh
      server
    State:          Running
      Started:      Fri, 02 Aug 2019 14:59:03 +0200
    Ready:          True
...
 Environment:
      VAULT_CLUSTER_INTERFACE:       eth0
      VAULT_TOKEN:                   vault:login
...
The central Vault instance has no vault-env prepended to the startup command, because it has no environment variable values starting with the "vault:" prefix. Accordingly, it will use the original ENTRYPOINT defined in the official Hashicorp Vault image.
$ kubectl describe pod -n default central-vault-0
...
Containers:
  vault:
    Container ID:  docker://9ec90a732b7d25fb02f49486cf68b3393948a72fbbb19029ed27012f777812df
    Image:         vault:1.1.5
    Image ID:      docker-pullable://vault@sha256:3ee63d4b492c31c3b490772c4f9561c20243503253572910c022b9a4711d433e
    Ports:         8200/TCP, 8201/TCP
    Host Ports:    0/TCP, 0/TCP
    Args:
      server
    State:          Running
      Started:      Fri, 02 Aug 2019 14:58:15 +0200
    Ready:          True
...
That was easy enough, since all we did was send a few resources to the Kubernetes API. Of course, a proper KMS-based setup has been excluded from the example for simplicity’s sake, as well as to maintain focus on the new features. Bear in mind that that’s something which can be done with Bank-Vaults; please check the documentation and examples in the repository!
Learn more about Bank-Vaults:
- Secret injection webhook improvements
- Backing up Vault with Velero
- Vault replication across multiple datacenters
- Vault secret injection webhook and Istio
- Mutate any kind of k8s resources
- HSM support
- Injecting dynamic configuration with templates
- OIDC issuer discovery for Kubernetes service accounts
- Show all posts related to Bank-Vaults
New release and project schedule 🔗︎
Feature requests and bug reports are coming in every day, and we also have our ideas of what we’d would like to see happen in the future with this project. We need to prioritize community requested features and our own features as well. To make this as simple, trackable and visible as possible, we’ve created a Project board on GitHub that we are planning to maintain from this point forward, so that people can have a better sense of when a certain feature is about to land in the master. Vault 1.2 came out a few days ago, so we have a lot of on our plates right now!
Bank-Vaults is changing to a new versioning scheme. The next release is 0.5.0, which will break with the old patch version bump for each release. Up until now, we’ve tried to maintain compatibility on a best-effort basis, but, as this is a young project (started last February), some incompatibilities have nonetheless been introduced. From now on, we are targeting stability around the end of the year (version 1.0.0!). In an effort to meet this goal, we have plans to create upgrade tests from previous versions which will be integrated into our CI workflow, just before release (run on pre-release tags).
If you have any questions about any recently added or forthcoming features, or about Bank-Vaults in general, and would like to talk to us and other members of the Banzai Cloud community, please join our #bank-vaults channel on Slack.
Thank you!
About Banzai Cloud Pipeline 🔗︎
Banzai Cloud’s Pipeline provides a platform for enterprises to develop, deploy, and scale container-based applications. It leverages best-of-breed cloud components, such as Kubernetes, to create a highly productive, yet flexible environment for developers and operations teams alike. Strong security measures — multiple authentication backends, fine-grained authorization, dynamic secret management, automated secure communications between components using TLS, vulnerability scans, static code analysis, CI/CD, and so on — are default features of the Pipeline platform.