


UPDATE: For a newer Istio control plane upgrade method using the canary upgrade flow see the Safe and sound canary upgrade for your Istio control plane post.
Check out Backyards in action on your own clusters!
Want to know more? Get in touch with us, or delve into the details of the latest release.
Or just take a look at some of the Istio features that Backyards automates and simplifies for you, and which we’ve already blogged about.
Since releasing our open-source Istio operator, we’ve been doing our best to add support for the latest Istio versions as rapidly as possible. Today, we’re happy to announce that we have added Istio 1.2 support for the Banzai Cloud Istio operator.
When we added Istio 1.1 support for the operator, we wrote a detailed blog post about how to employ a seamless Istio control plane upgrade in a single-mesh, single-cluster setup. In this post, we’ll be outlining how to easily upgrade Istio control planes to 1.2 with the Banzai Cloud Istio operator, even within a single-mesh multi-cluster topology or across a multi-cloud or hybrid-cloud service mesh.
Additionally, we will demonstrate how to use Istio’s Locality Load Balancing feature with our operator.
Supporting Istio 1.2 🔗︎
The new Istio 1.2 release added quite a few new features and bug fixes. The full list of changes can be found in the official release notes.
Here are a few highlighted features which were also added to the operator:
- Injection on pods can be controlled with label selectors
- Health checking on the Citadel CSR signing API can be enabled
- Lifetime of Istio certificates are now configurable
- DNS refresh rates for Envoy are now configurable
- Log levels are now configurable
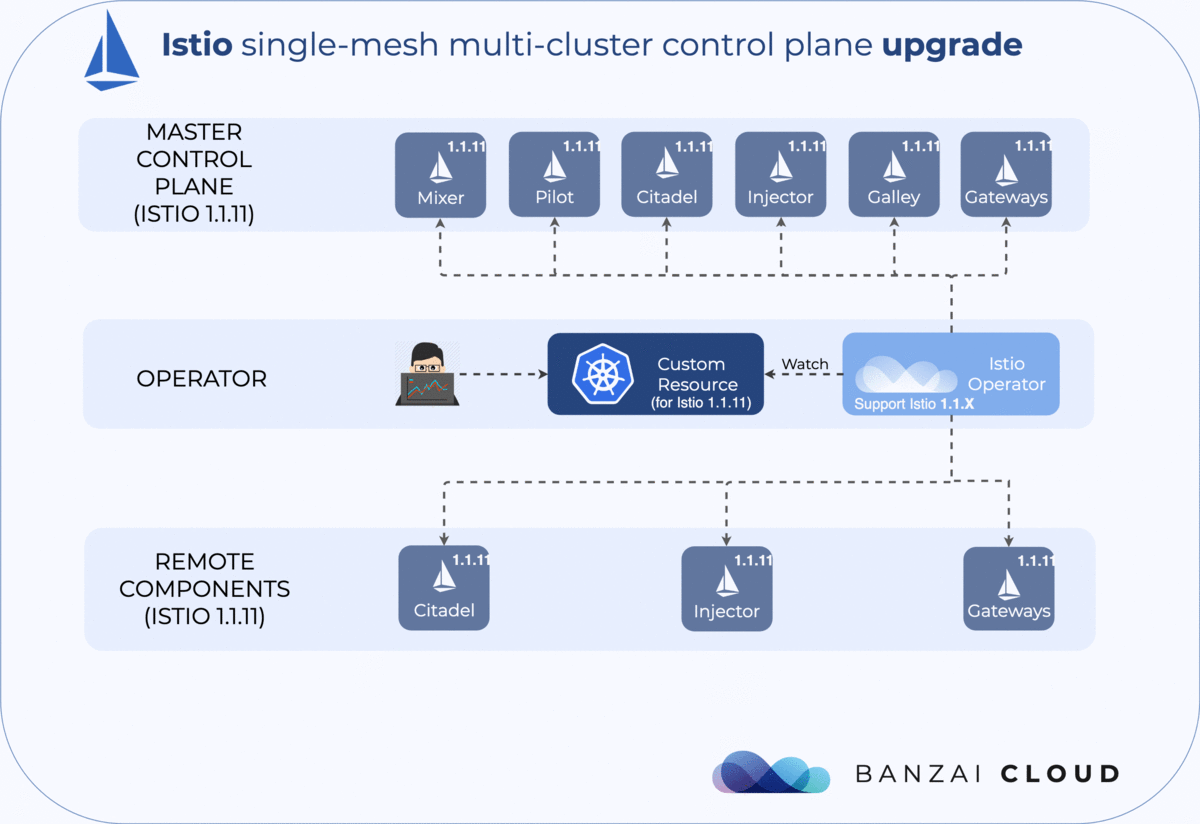
Single-mesh multi-cluster control plane upgrade with Istio operator 🔗︎
Let’s suppose we have a Kubernetes master and remote cluster connected to a single-mesh multi-cluster topology with Istio 1.1.11, and we’d like to upgrade our Istio components on both clusters to Istio version 1.2.2. Here are the steps we’d need to go through in order to accomplish that with our operator:
- Deploy a version of our operator which supports Istio 1.2.x
- Apply a Custom Resource using Istio 1.2.2 components
It really is that easy!
Once the operator discerns that the Custom Resources it’s watching has changed, it reconciles all Istio-related components so as to perform a control plane upgrade. First, this happens on the master cluster, but then the modified images are automatically propagated to the remotes as well, and the Istio components installed on the remotes (usually Citadel, Sidecar Injector and Gateways) are also reconciled for use with new image versions.
Locality Load Balancing 🔗︎
Istio’s Locality Load Balancing feature is described in the official docs.
To summarize, Istio prioritizes traffic to whichever healthy pods are closest by default. This is calculated based on the pod’s Region, Zone and Sub-zone labels.
Example for a locality of us-west/zone2:
- Priority 0:
us-west/zone2 - Priority 1:
us-west/zone1,us-west/zone3 - Priority 2:
us-east/zone1,us-east/zone2,eu-west/zone1
There are two additional features that can be configured here, which are: Locality Fail-over and Locality-weighted load balancing.
- Locality Fail-over: This feature controls where traffic is sent in the event that there are no healthy pods in a given locality.
- Locality-weighted load balancing: This feature controls the distribution of traffic between specific localities.
We’ll go into more detail about these features later in this blog post via examples.
Try it out! 🔗︎
In this demo, we’ll perform the following steps:
- We’ll create two Kubernetes clusters
- We’ll form a single-mesh multi-cluster setup from the two clusters with Istio 1.1.11 installed on each of them
- We’ll deploy an example application on both clusters
- The Istio components will be upgraded to 1.2.2 with the operator (both on the master and on the remote)
- Istio’s Locality Load Balancing feature will be presented on Istio 1.2.2
Creating the clusters 🔗︎
For this demo we’ll need two Kubernetes clusters.
For this step I created one Kubernetes cluster on GKE and one on AWS, using Banzai Cloud’s lightweight, CNCF-certified Kubernetes distribution, PKE via the Pipeline platform. If you’d like to do likewise, go ahead and create your clusters on any of the several cloud providers we support or on-premise using Pipeline for free.
Form a mesh 🔗︎
Next, we’ll take our clusters and form a single-mesh multi-cluster topology with Istio 1.1.11. If you need help with this, take a look at the demo part of our detailed blog post, Multi-cloud service mesh with the Istio operator. There, we describe precisely how to setup a single-mesh multi-cluster topology with Split Horizon EDS.
The mesh can also be created via the Pipeline UI with just a few clicks. On Pipeline, the entire process is streamlined, automated with all the work being done behind the scenes.
Deploy an app on multiple clusters 🔗︎
Next we install a simple echo service as a way of checking if everything works after the control plane upgrade. This app will also be used to explain our Locality Load Balancing feature.
Create
GatewayandVirtualServiceresources to reach the service through an ingress gateway.
First, deploy to the master cluster:
$ kubectl --context ${CTX_MASTER} -n default apply -f https://raw.githubusercontent.com/banzaicloud/istio-operator/release-1.1/docs/federation/multimesh/echo-service.yaml
$ kubectl --context ${CTX_MASTER} -n default apply -f https://raw.githubusercontent.com/banzaicloud/istio-operator/release-1.1/docs/federation/multimesh/echo-gw.yaml
$ kubectl --context ${CTX_MASTER} -n default apply -f https://raw.githubusercontent.com/banzaicloud/istio-operator/release-1.1/docs/federation/multimesh/echo-vs.yaml

$ kubectl --context ${CTX_MASTER} -n default get pods
NAME                    READY   STATUS    RESTARTS   AGE
echo-5c7dd5494d-k8nn9   2/2     Running   0          1m
Then deploy to the remote cluster:
$ kubectl --context ${CTX_REMOTE} -n default apply -f https://raw.githubusercontent.com/banzaicloud/istio-operator/release-1.1/docs/federation/multimesh/echo-service.yaml

$ kubectl --context ${CTX_REMOTE} -n default get pods
NAME                    READY   STATUS    RESTARTS   AGE
echo-595496dfcc-6tpk5   2/2     Running   0          1m
Determine the external hostname of the ingress gateway and make sure the echo service responds from both clusters:
$ export MASTER_INGRESS=$(kubectl --context=${CTX_MASTER} -n istio-system get svc/istio-ingressgateway -o jsonpath='{.status.loadBalancer.ingress[0].ip}')
$ for i in `seq 1 100`; do curl -s "http://${MASTER_INGRESS}/" | grep "Hostname"; done | sort | uniq -c
   61 Hostname: echo-5c7dd5494d-k8nn9
   39 Hostname: echo-595496dfcc-6tpk5
Upgrade control planes to Istio 1.2.2 🔗︎
To install Istio 1.2.2, we need to check out the release-1.2 branch of our operator (this branch supports Istio versions 1.2.x):
$ git clone git@github.com:banzaicloud/istio-operator.git
$ git checkout release-1.2
Install the Istio Operator
Simply run the following make goal from the project root in order to install the operator (KUBECONFIG must be set for your master cluster):
$ make deploy
This command will install a Custom Resource Definition in the cluster, and will deploy the operator to the istio-system namespace.
Apply the new Istio Custom Resource
If you’ve installed Istio 1.1.11 with the Istio operator, and if you check the logs of the operator pod at this point, you will see the following error message:
intended Istio version is unsupported by this version of the operator. We need to update the Istio Custom Resource with Istio 1.2’s components so the operator will be reconciled with the Istio control plane.
To deploy Istio 1.2.2 with its default configuration options, use the following command:
$ kubectl --context=${CTX_MASTER} apply -n istio-system -f config/samples/istio_v1beta1_istio.yaml
After a little while, the Istio components on the master cluster will start using 1.2.2 images:
$ kubectl --context=${CTX_MASTER} get pod -n istio-system -o yaml | grep "image: docker.io/istio"
    image: docker.io/istio/citadel:1.2.2
    image: docker.io/istio/galley:1.2.2
    image: docker.io/istio-mixer:1.2.2
    image: docker.io/istio-pilot:1.2.2
    image: docker.io/istio/proxyv2:1.2.2
    image: docker.io/istio/sidecar_injector:1.2.2
Notice, Istio components are now using 1.2.2 images on the remote cluster as well:
$ kubectl --context=${CTX_REMOTE} get pod -n istio-system -o yaml | grep "image: docker.io/istio"
    image: docker.io/istio-citadel:1.2.2
    image: docker.io/istio/proxyv2:1.2.2
    image: docker.io/istio/sidecar_injector:1.2.2
Check the app
At this point, your Istio control plane will be upgraded to Istio 1.2.2 and your echo application will still be available at:
$ curl -s "http://${MASTER_INGRESS}/"
In order to change older versions of the istio-proxy sidecar in the echo pods (to perform a data plane upgrade), we need to restart the pods manually.
Locality Load Balancing with the operator 🔗︎
Traffic without Locality Load Balancing
First, let’s call our echo service from both clusters:
$ for i in `seq 1 100`; do curl -s "http://${MASTER_INGRESS}/"; done

$ export REMOTE_INGRESS=$(kubectl --context=${CTX_REMOTE} -n istio-system get svc/istio-ingressgateway -o jsonpath='{.status.loadBalancer.ingress[0].hostname}')
$ for i in `seq 1 100`; do curl -s "http://${REMOTE_INGRESS}/"; done
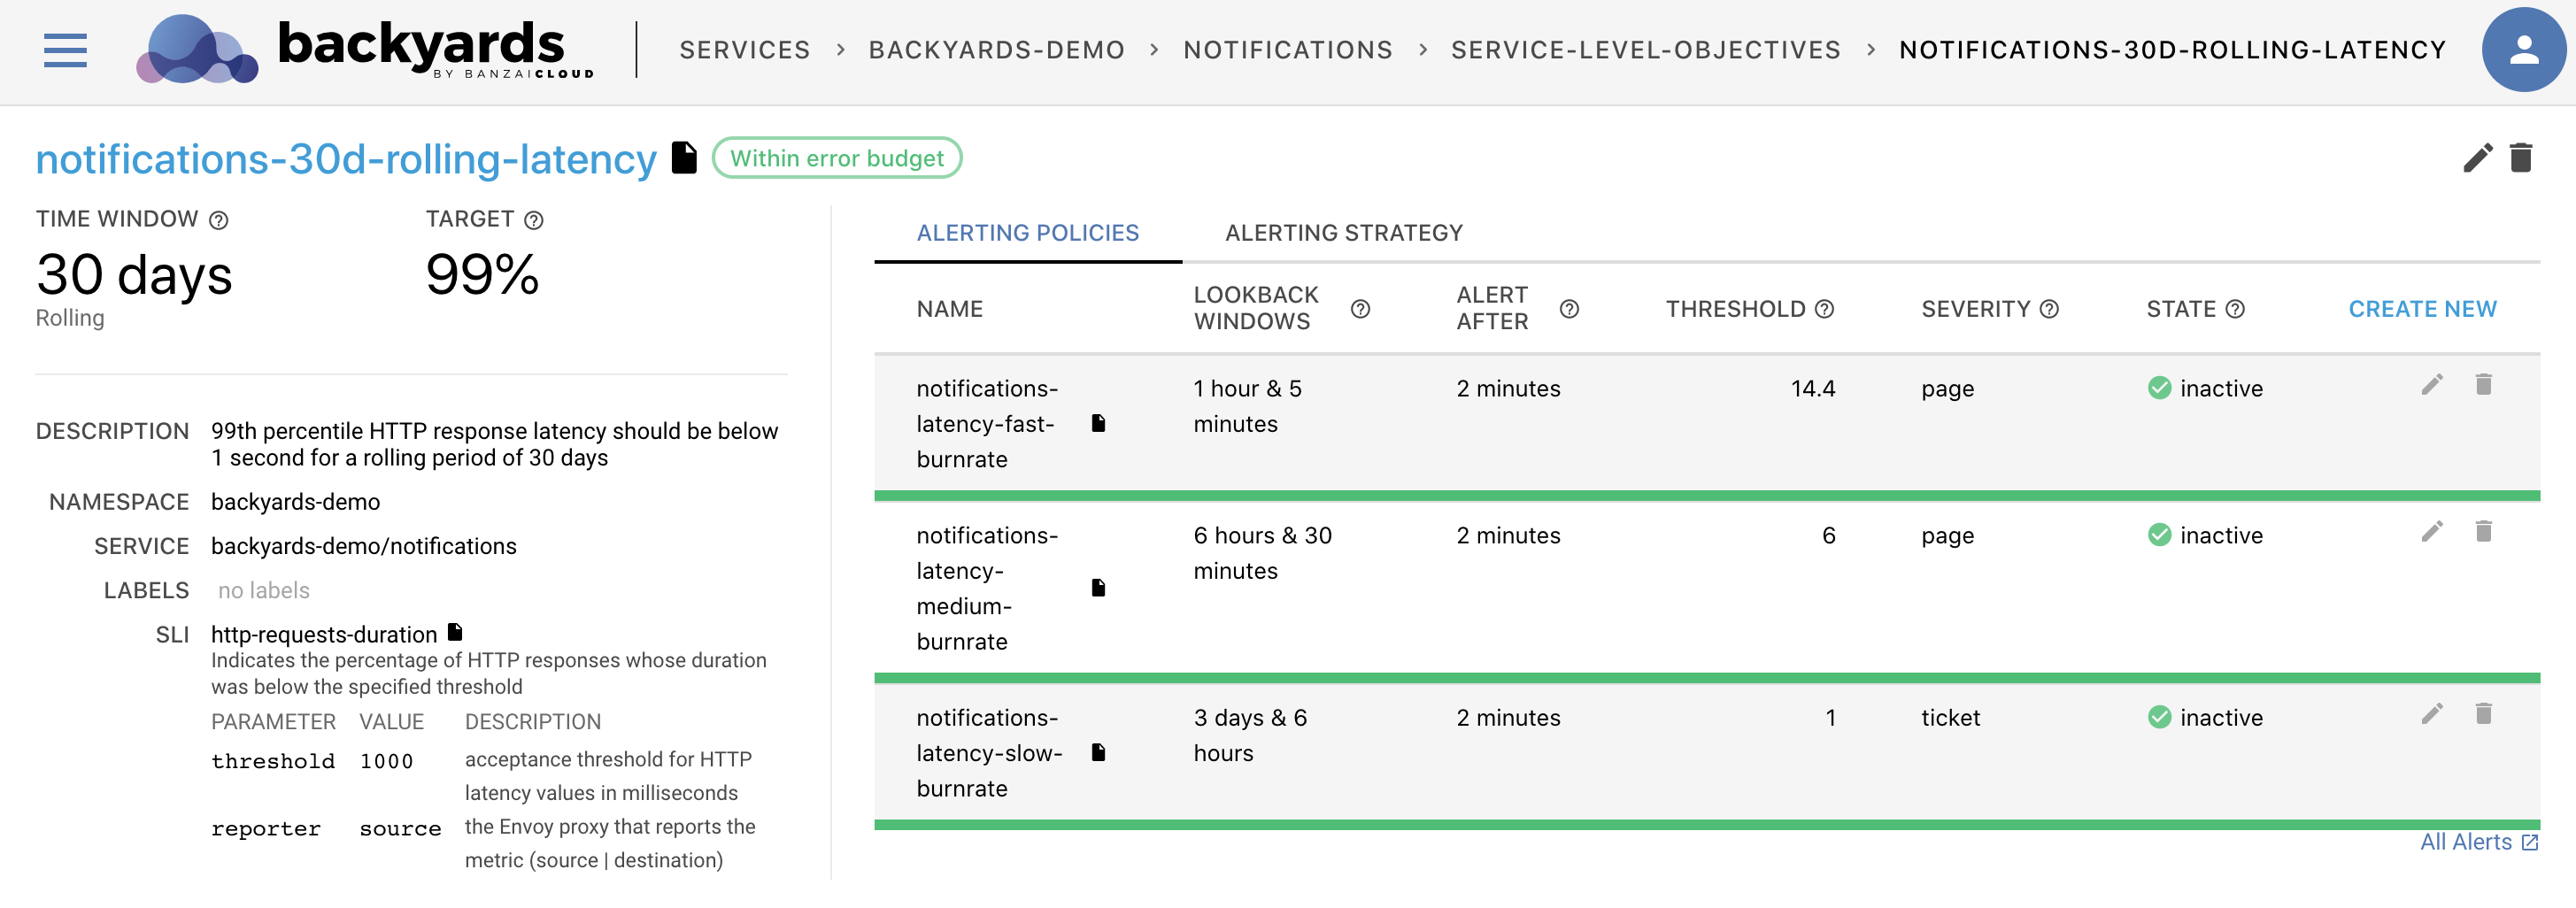
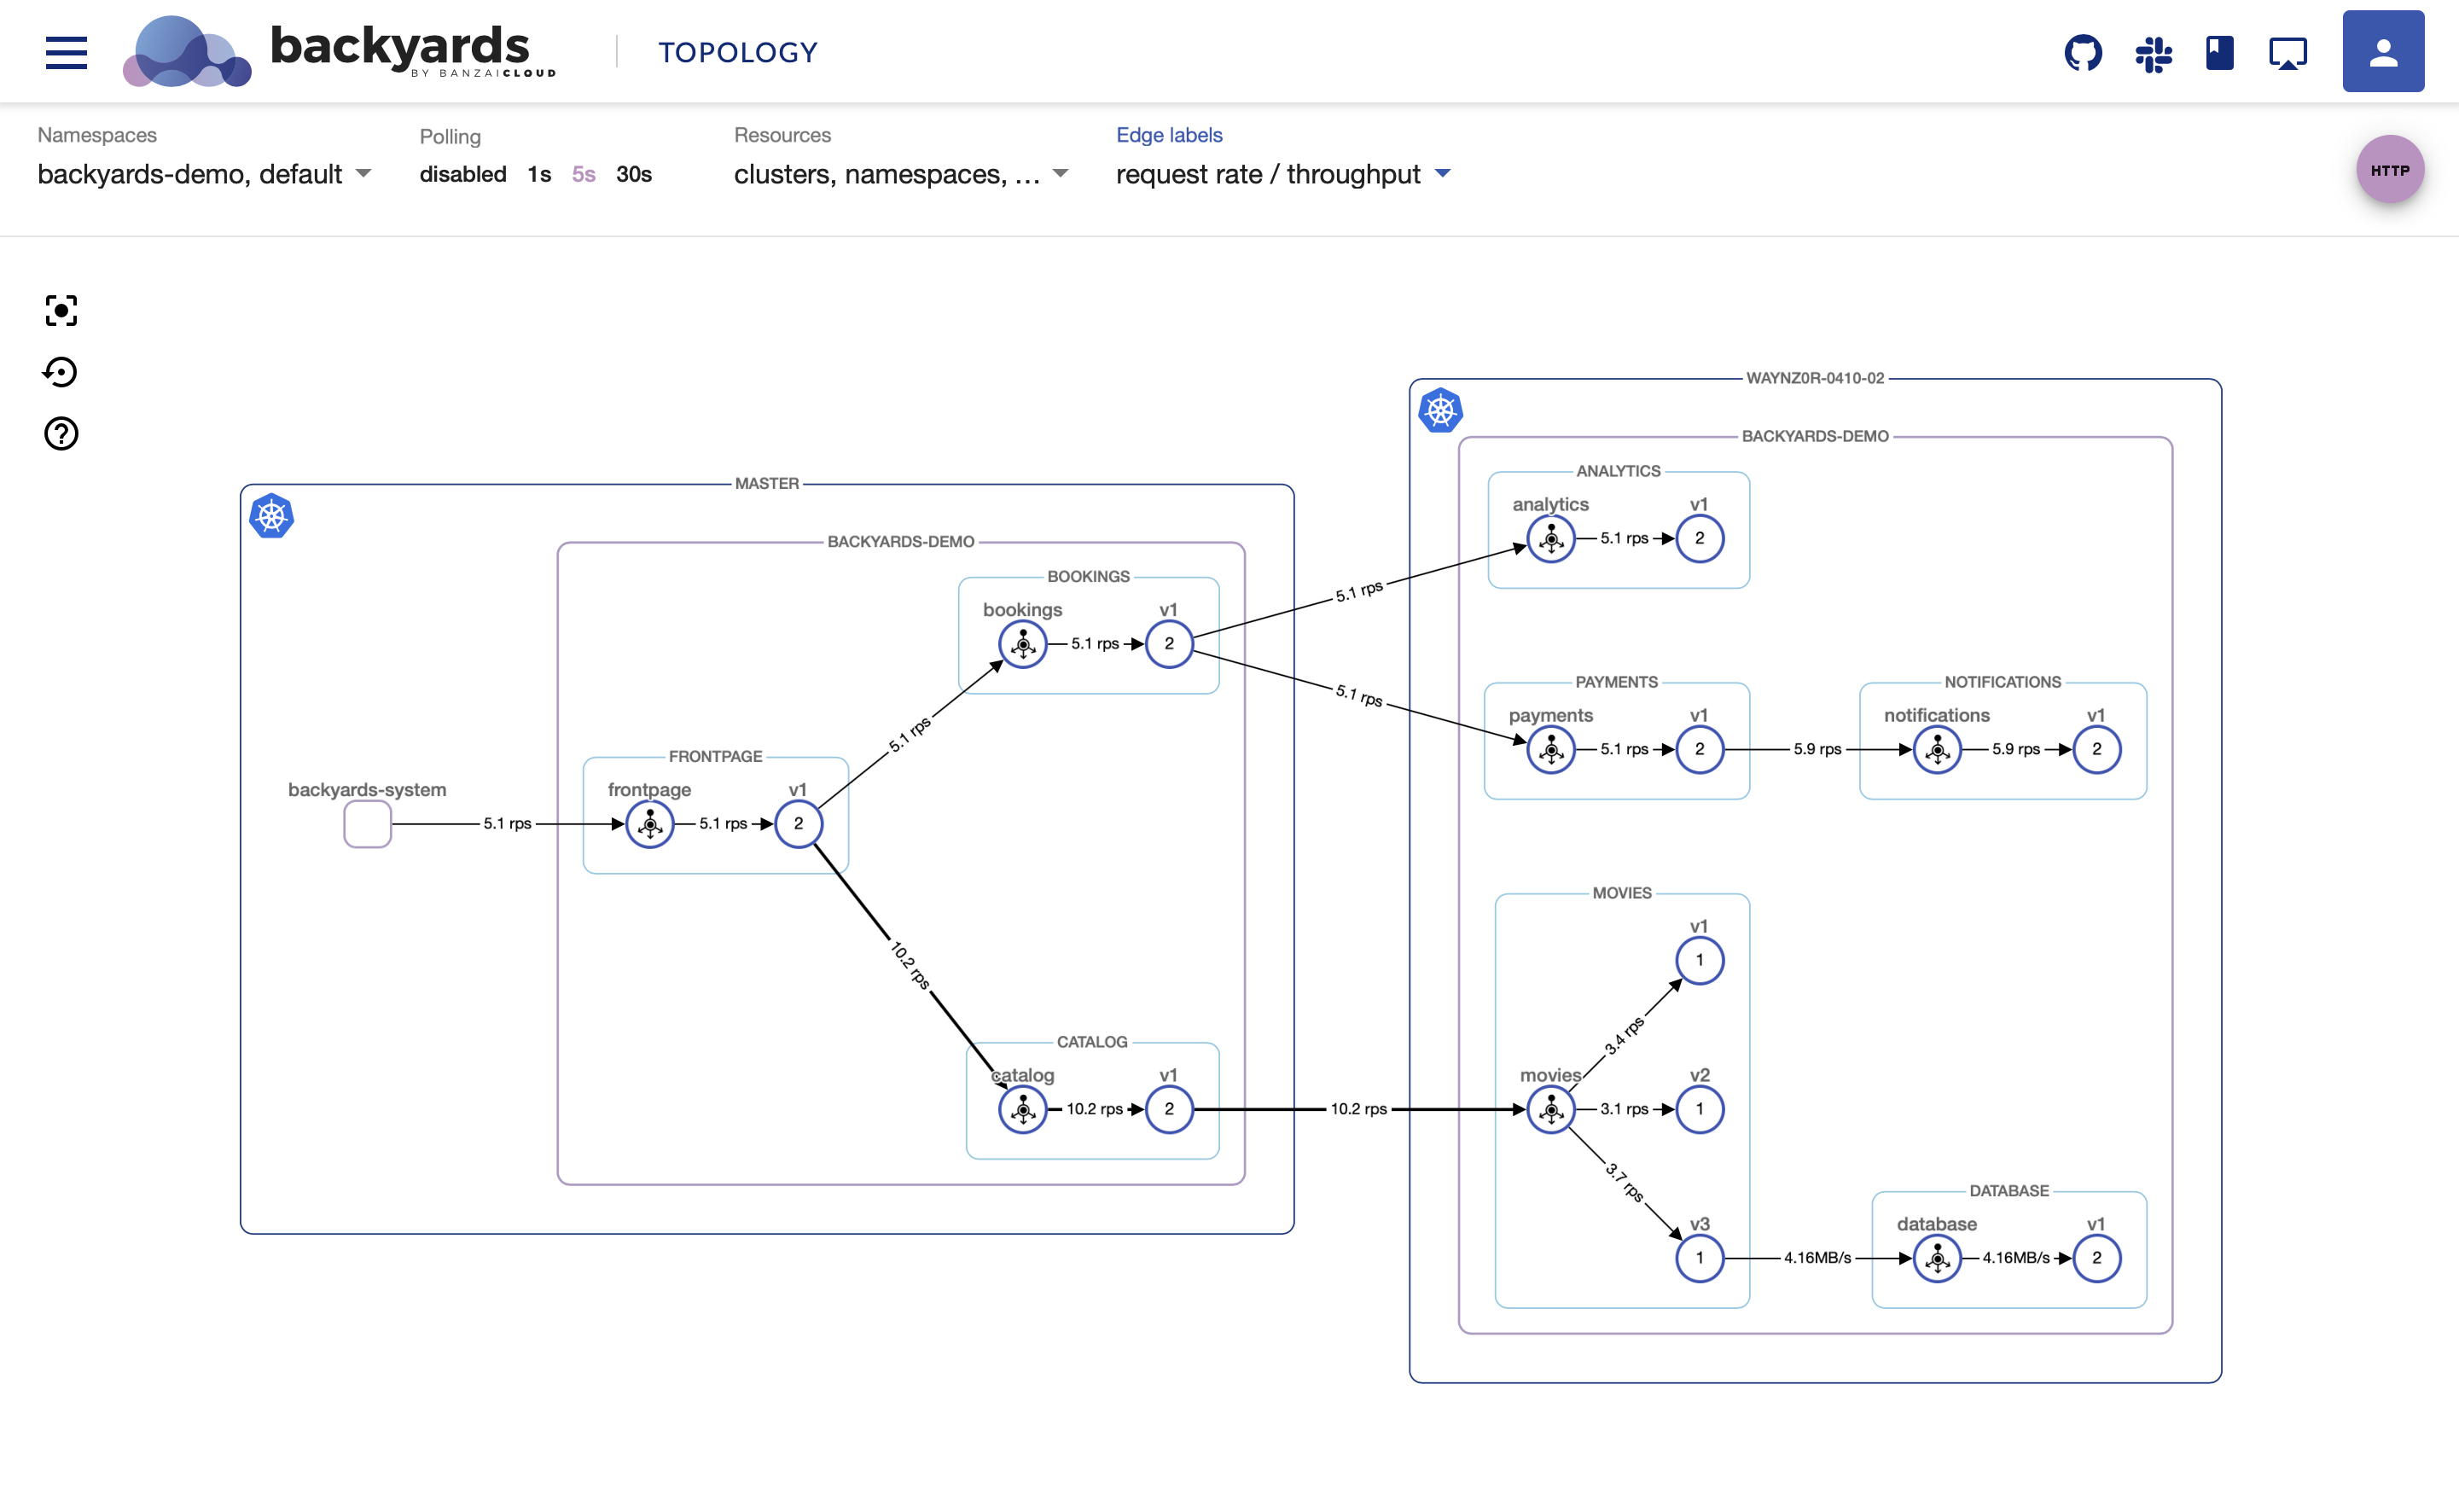
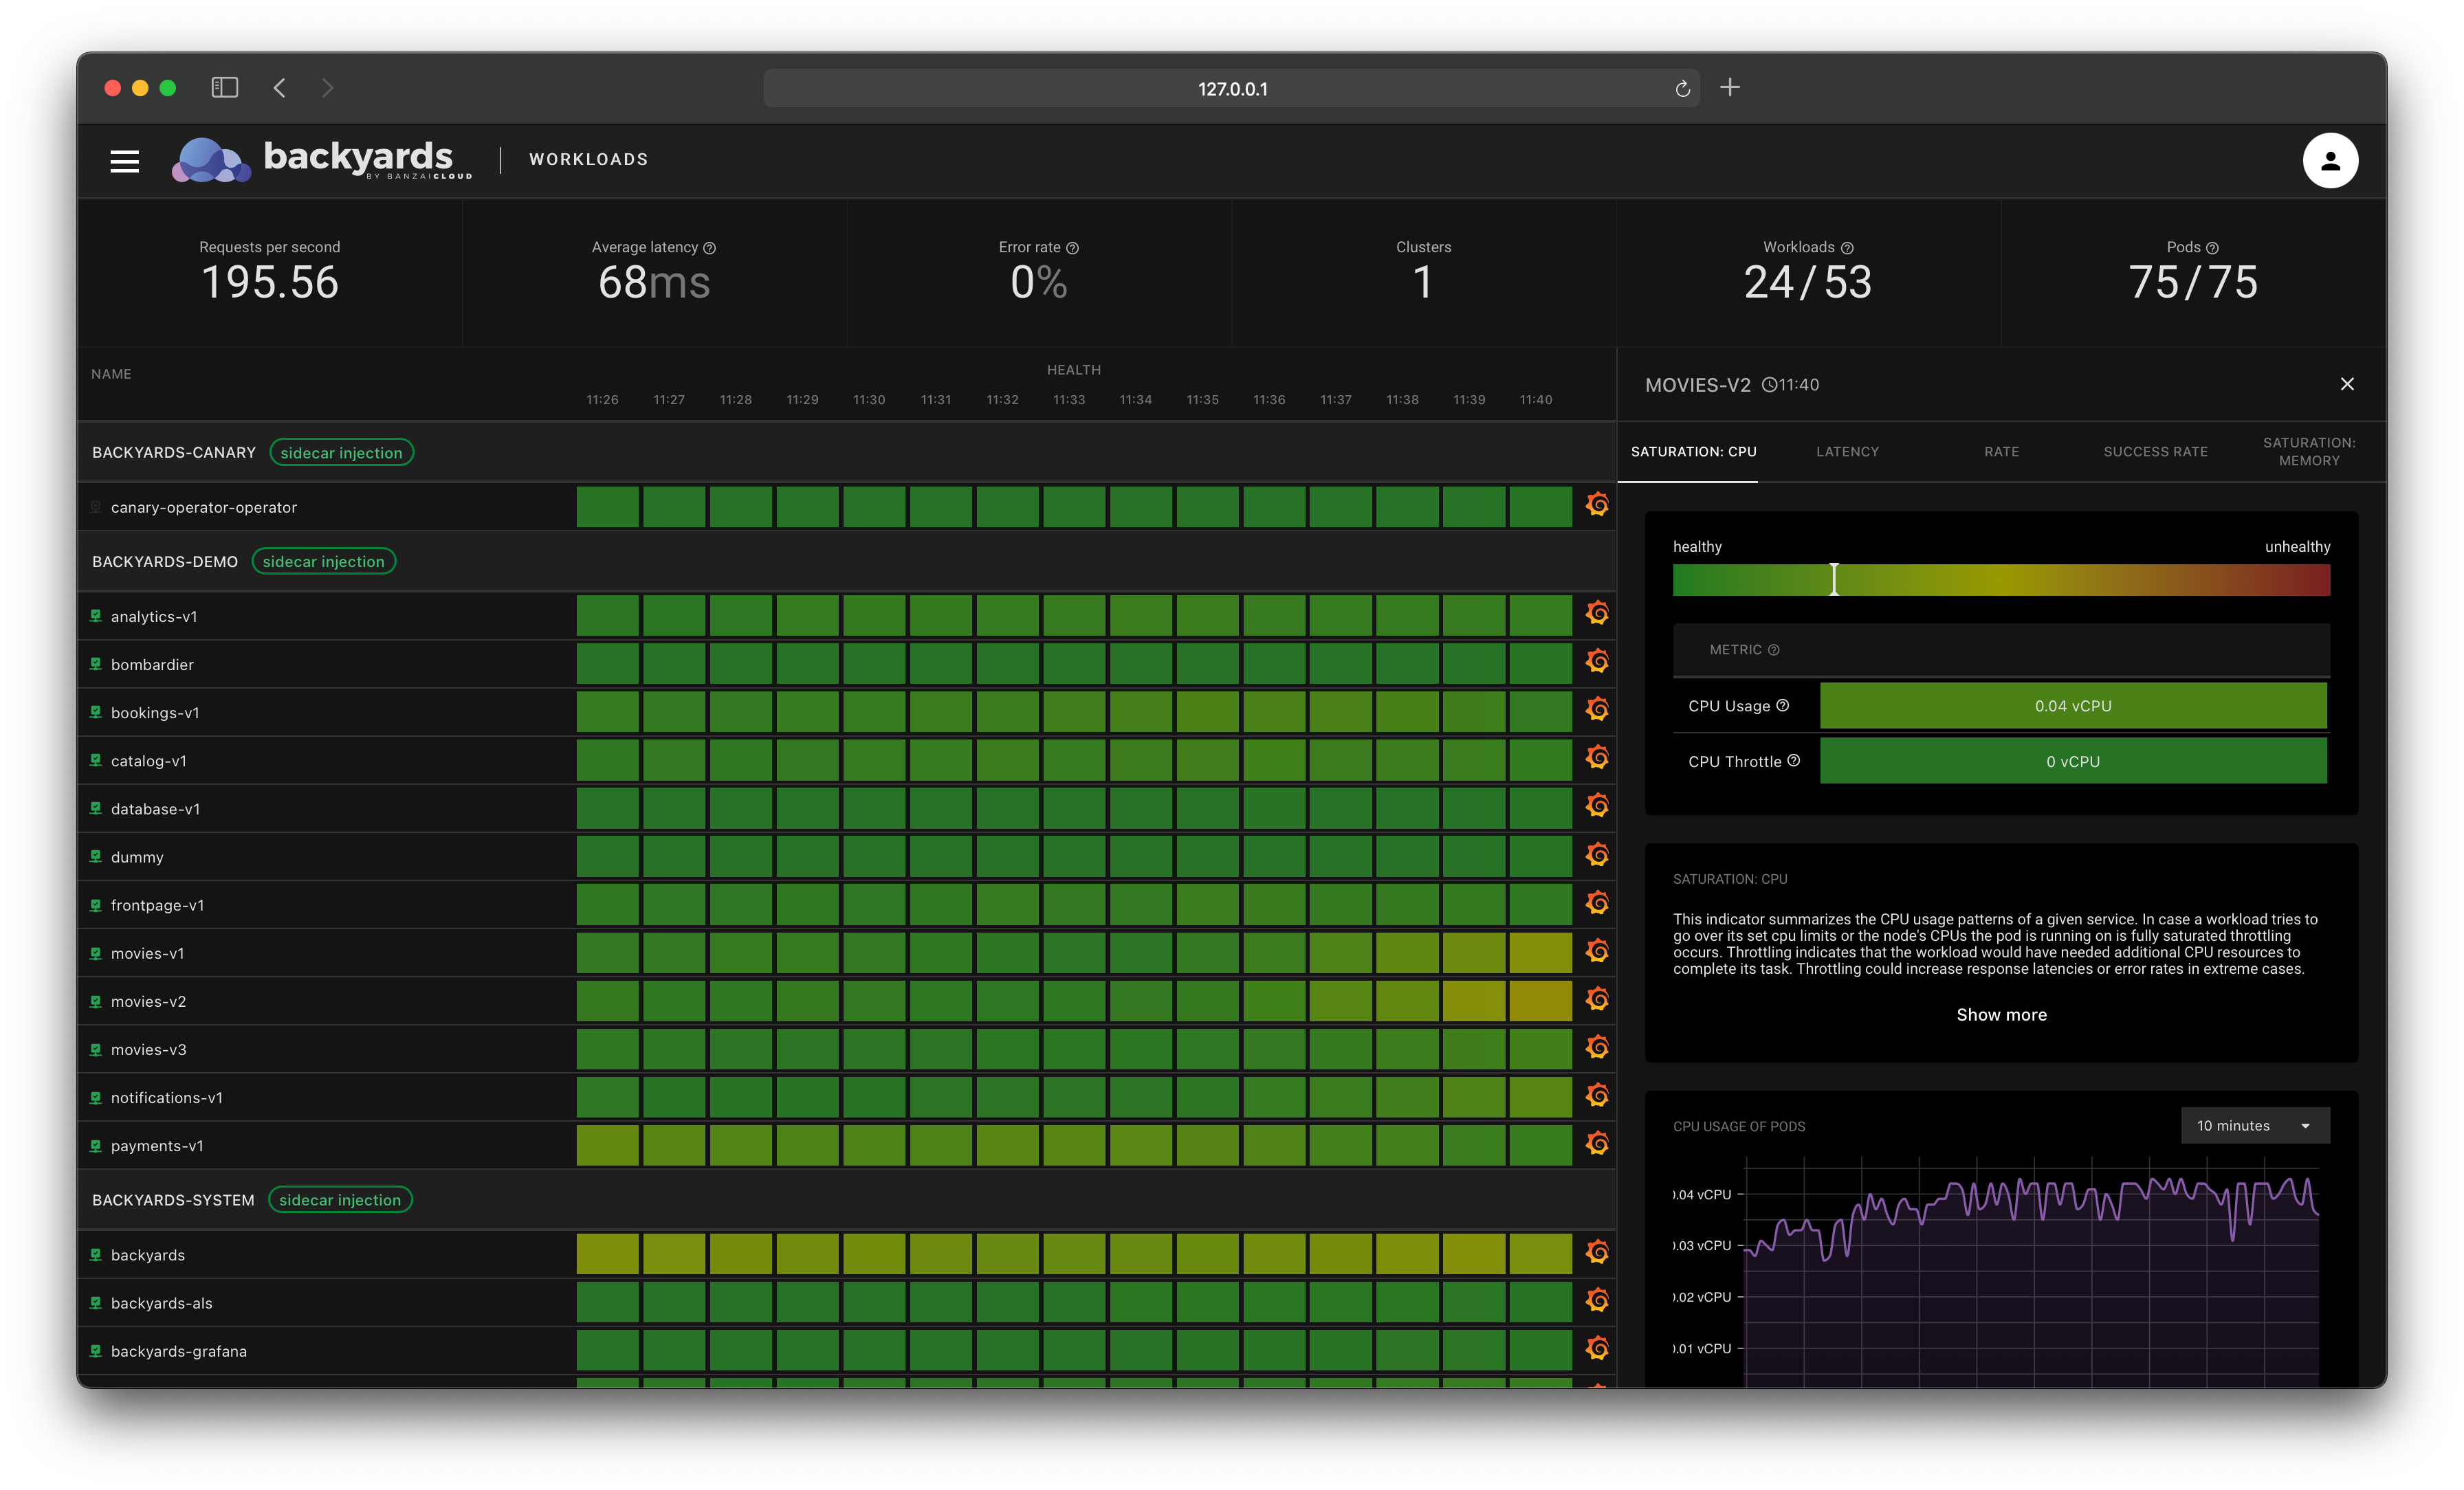
To see and manage traffic flow, we’ll use Banzai Cloud’s automated service mesh, Backyards (now Cisco Service Mesh Manager), which allows us to easily visualize what’s happening and how.
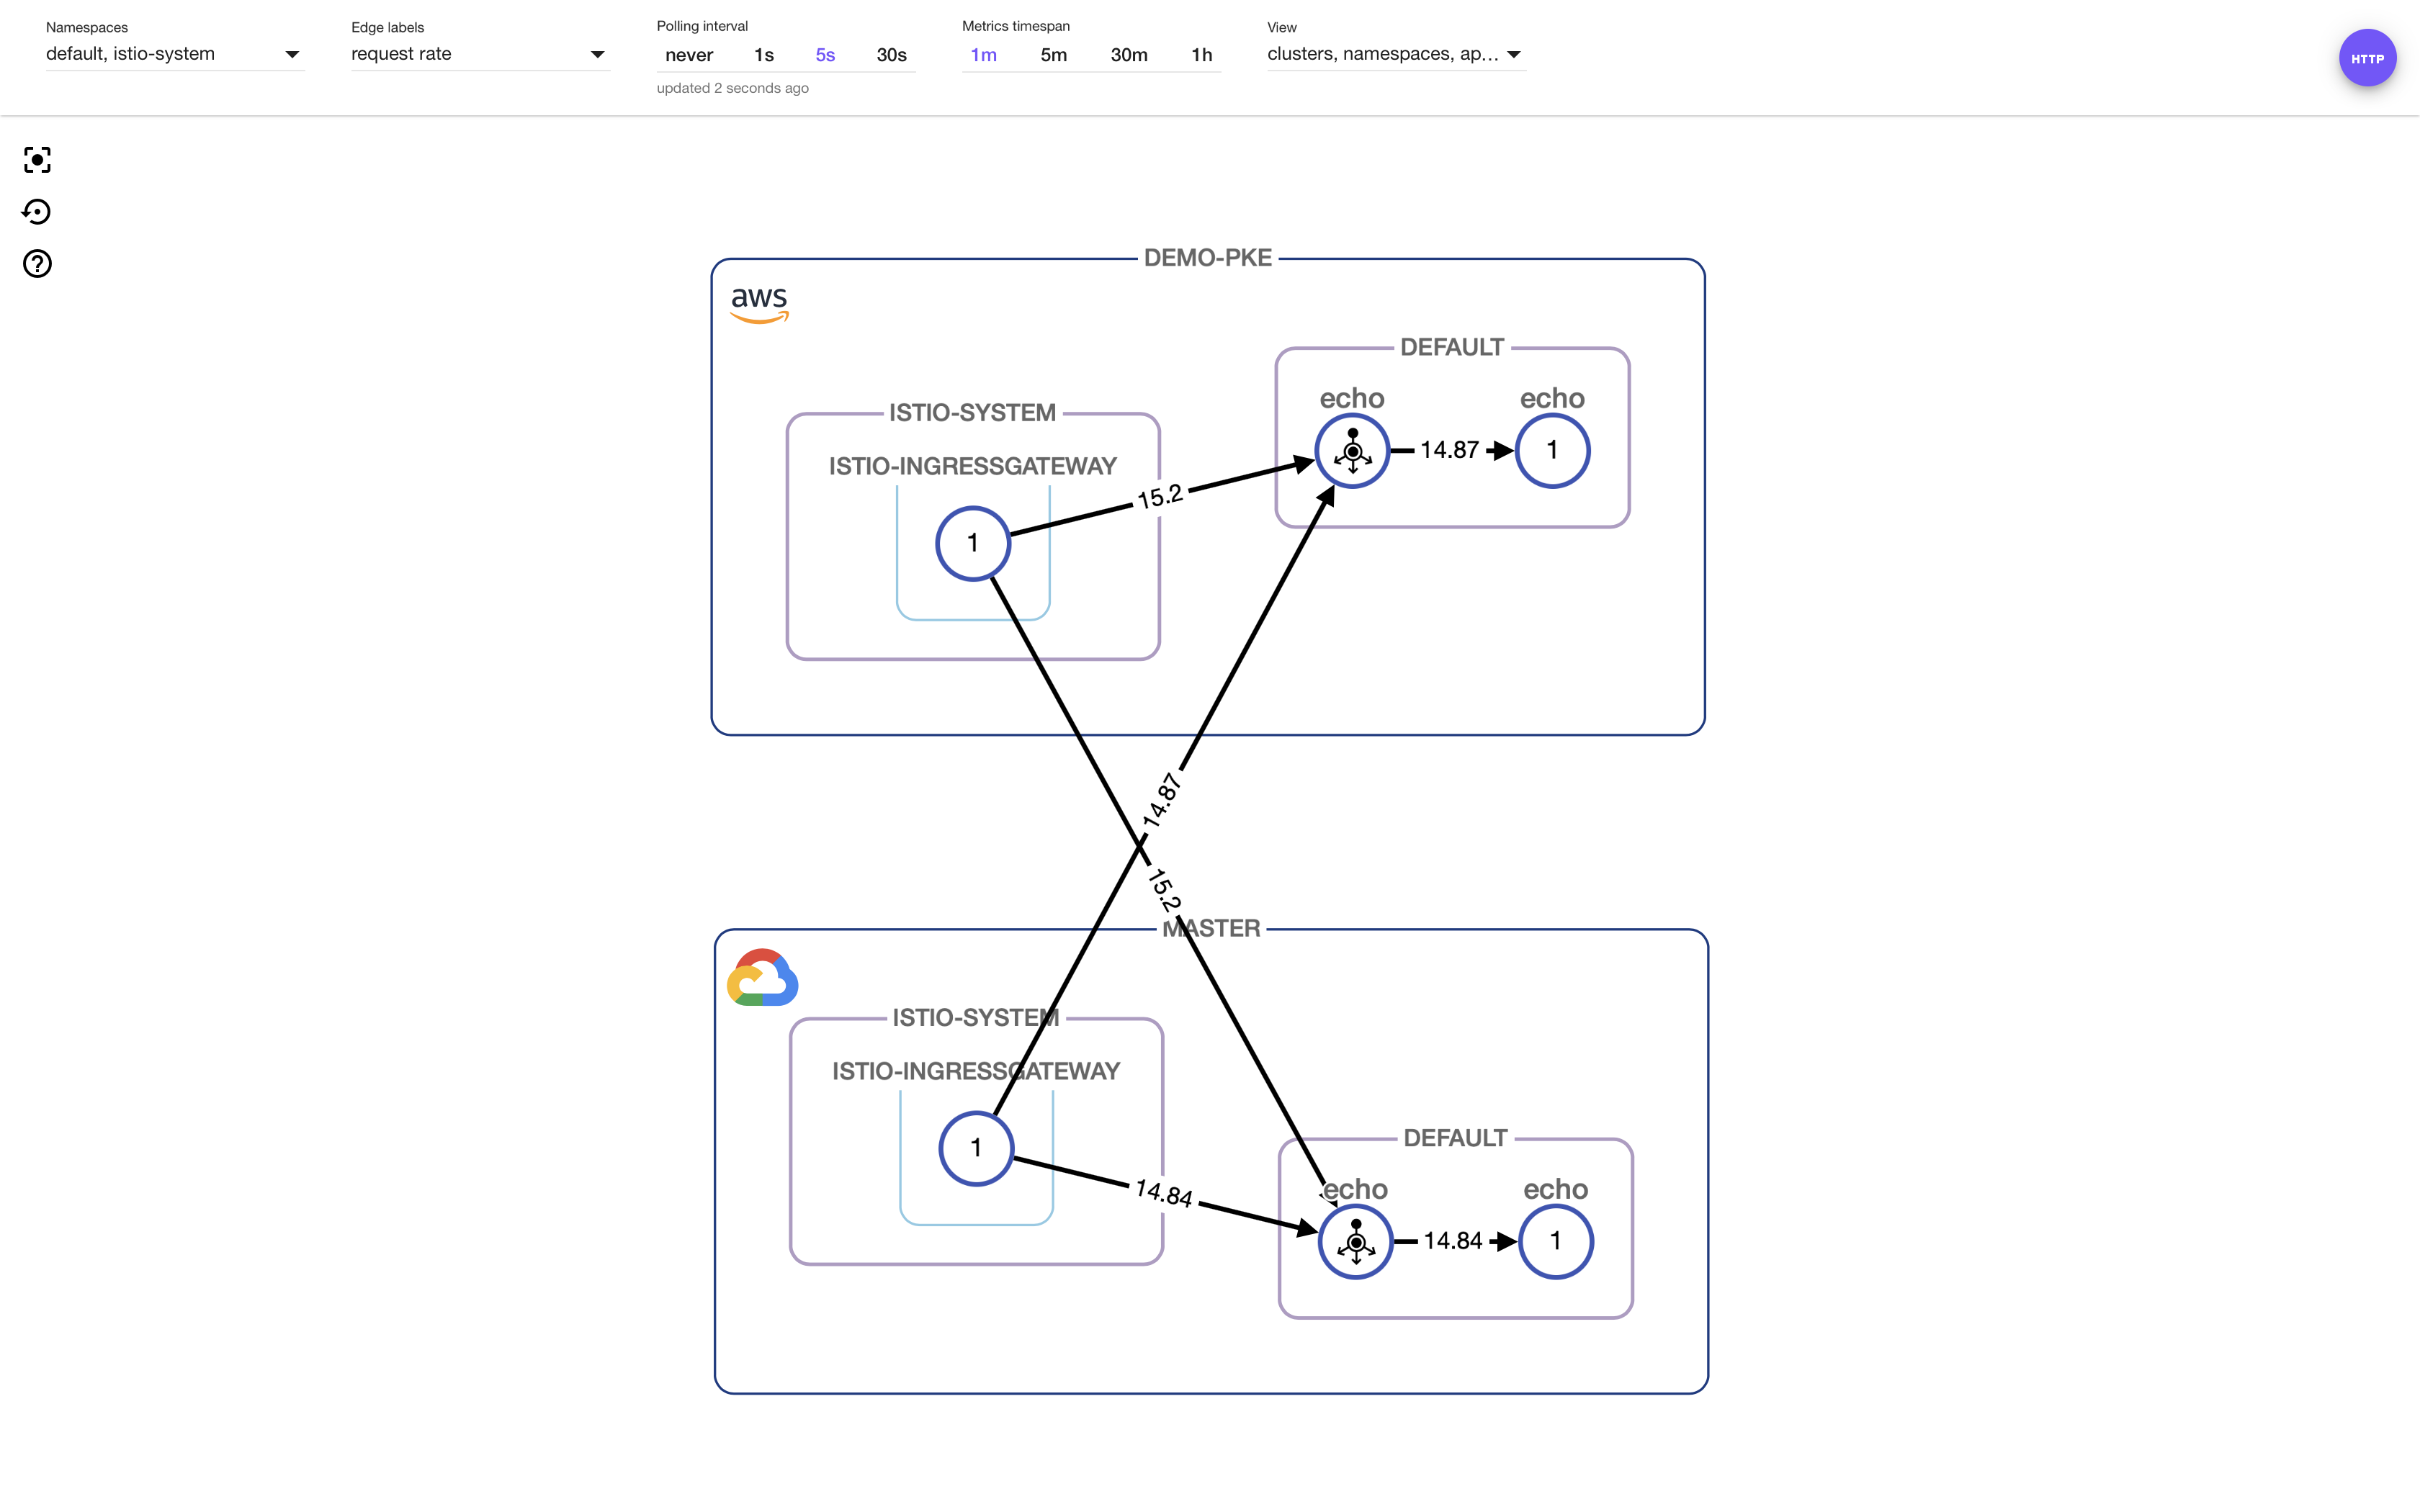
Locality Load Balancing is not enabled by default, so traffic is being routed to both clusters.
Traffic with Locality Load Balancing
To enable Locality Load Balancing, all we need to add to the operator spec is as follows:
localityLB:
    enabled: true
Its default mode is Locality Fail-over. To make that work, we need to have OutlierDetection defined on our service, so that Envoy can determine if instances are unhealthy:
$ kubectl apply -f - <<EOF
  apiVersion: networking.istio.io/v1alpha3
  kind: DestinationRule
  metadata:
    name: echo-outlier-detection
  spec:
    host: echo.default.svc.cluster.local
    trafficPolicy:
      tls:
        mode: ISTIO_MUTUAL
      connectionPool:
        tcp:
          maxConnections: 1000
        http:
          http2MaxRequests: 1000
          maxRequestsPerConnection: 10
      outlierDetection:
        consecutiveErrors: 7
        interval: 30s
        baseEjectionTime: 30s
  EOF
Hit the echo service again to see how traffic is routed with Locality Load Balancing enabled:
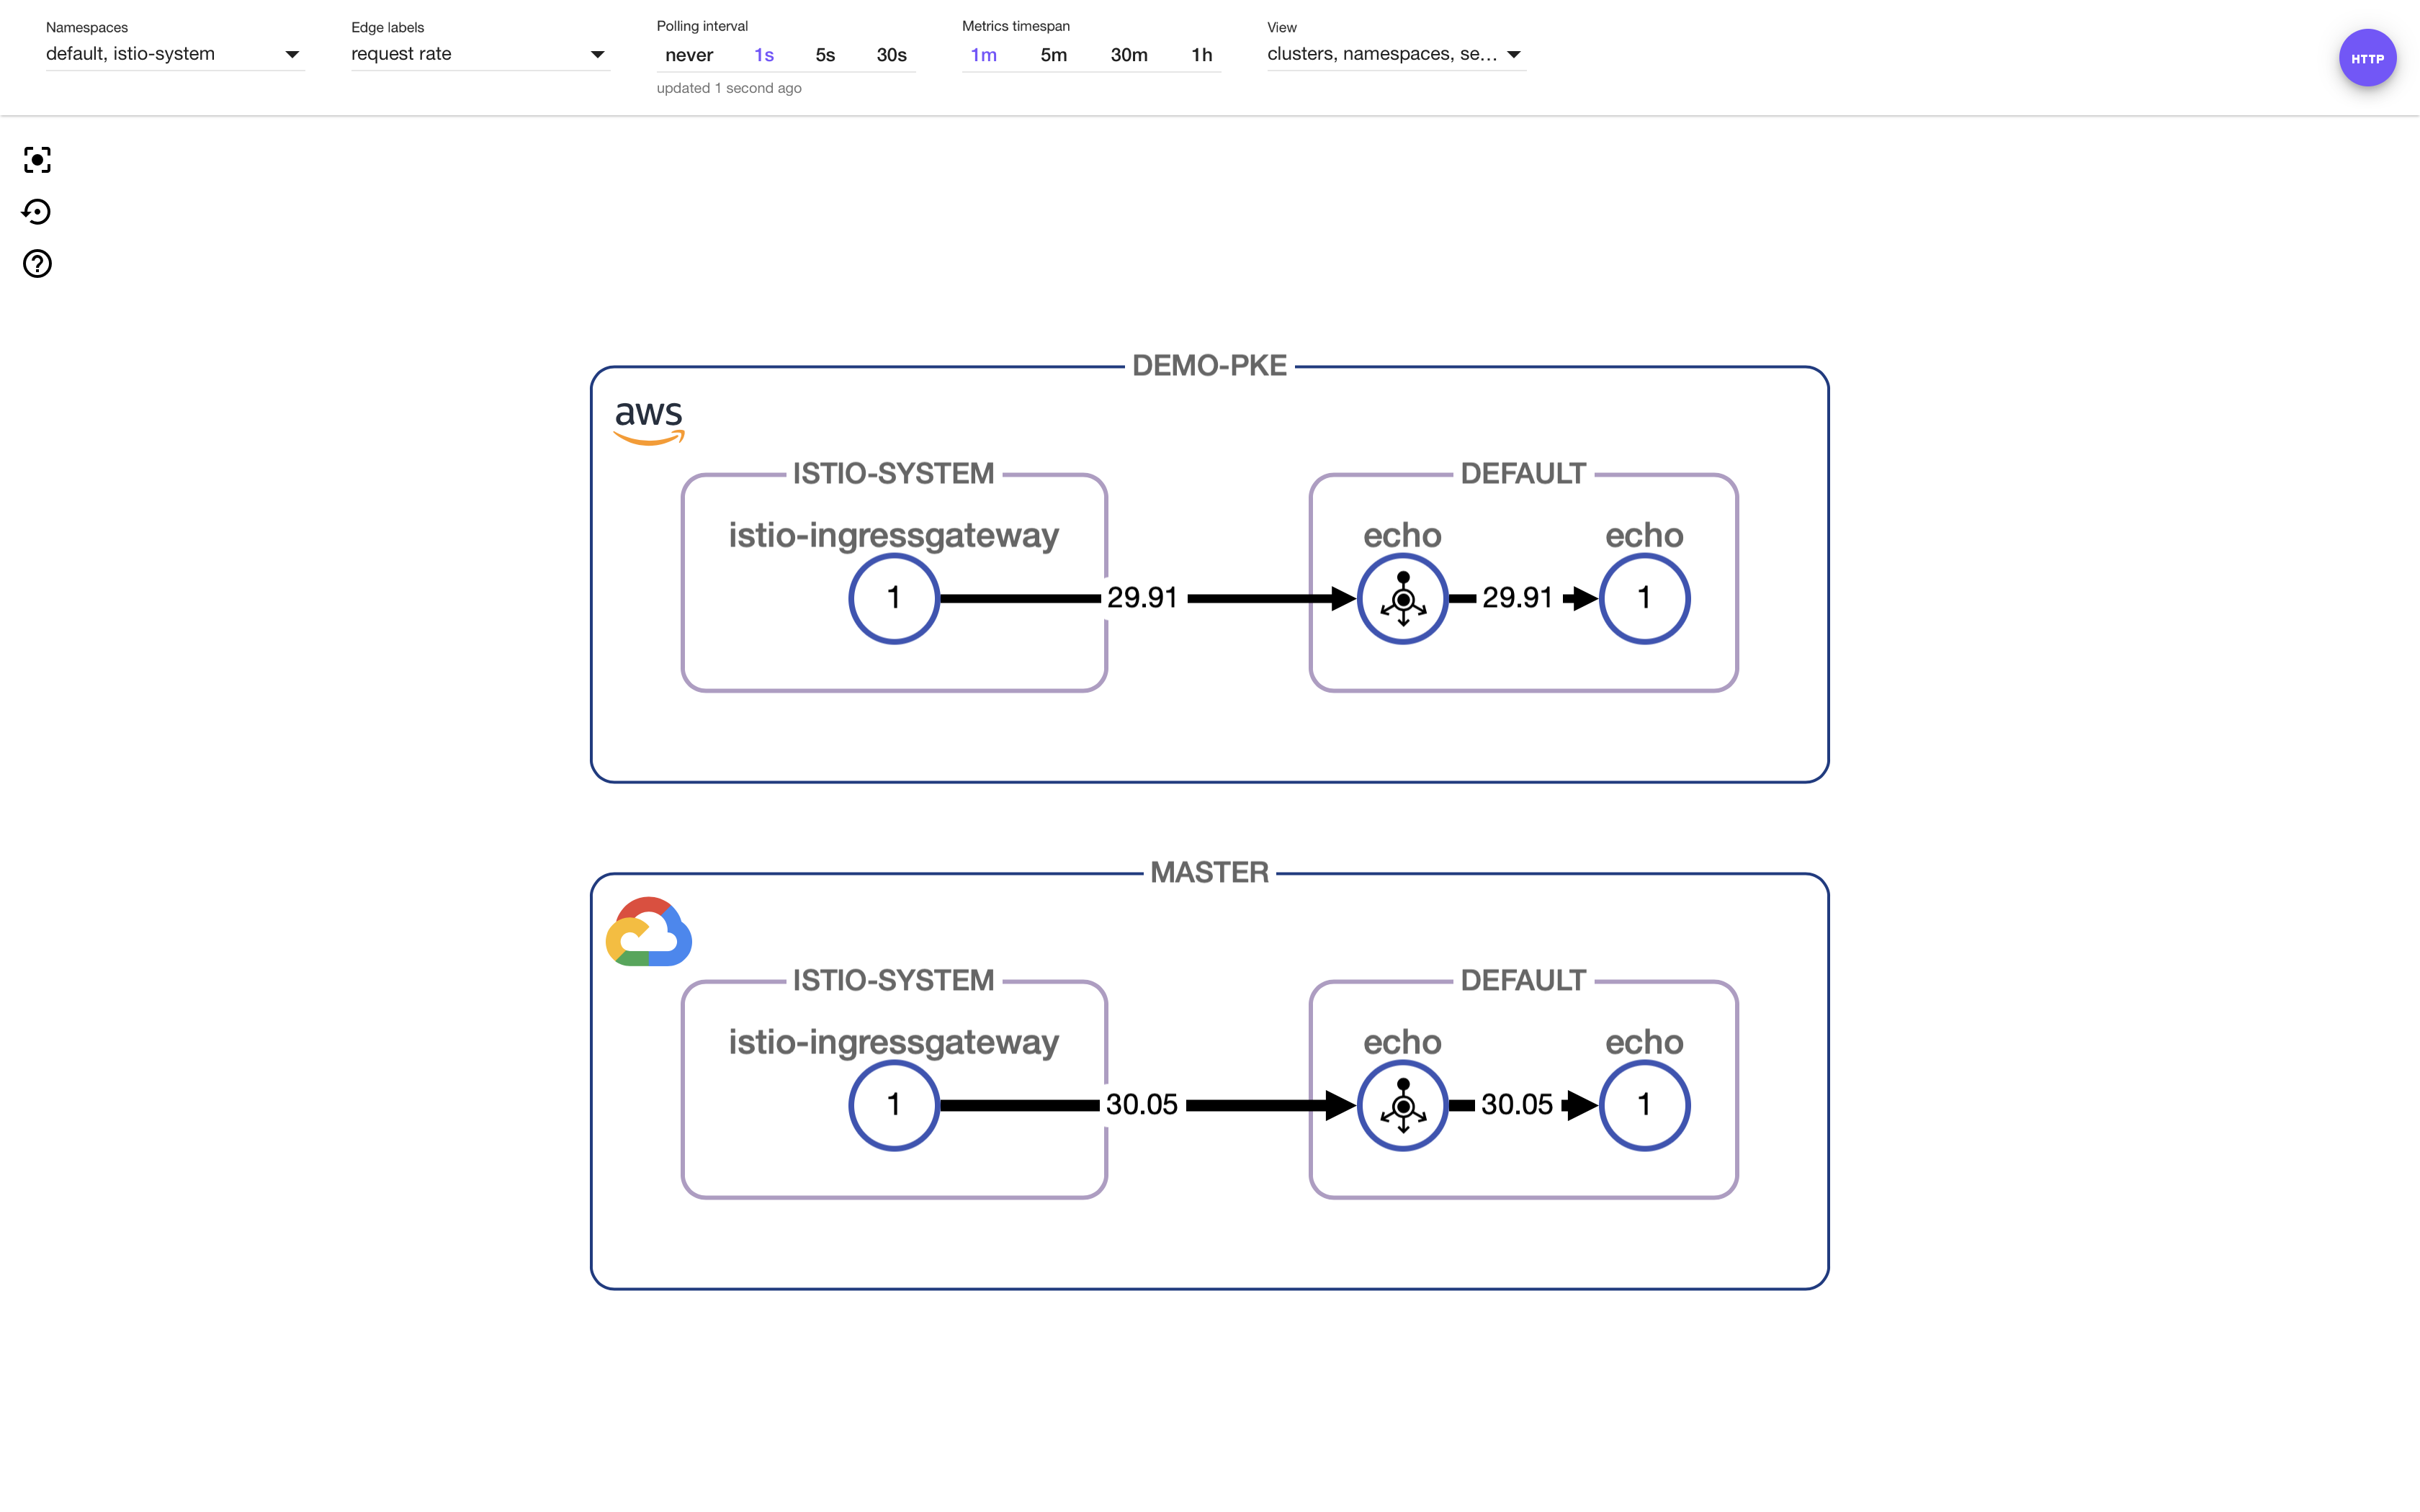
Traffic is now flowing inside clusters as there are healthy pods in the closest locality.
Lastly, let’s take a look at Locality Fail-over and Locality-weighted load balancing.
Locality Fail-over
Locality Fail-over is turned on by default when Locality Load Balancing is enabled.
Let’s scale the pod down on the remote to show what happens when a pod is unhealthy.
$ kubectl --context=${CTX_REMOTE} -n=default scale deployment echo --replicas=0
We’ll call the echo service again to see what happens:
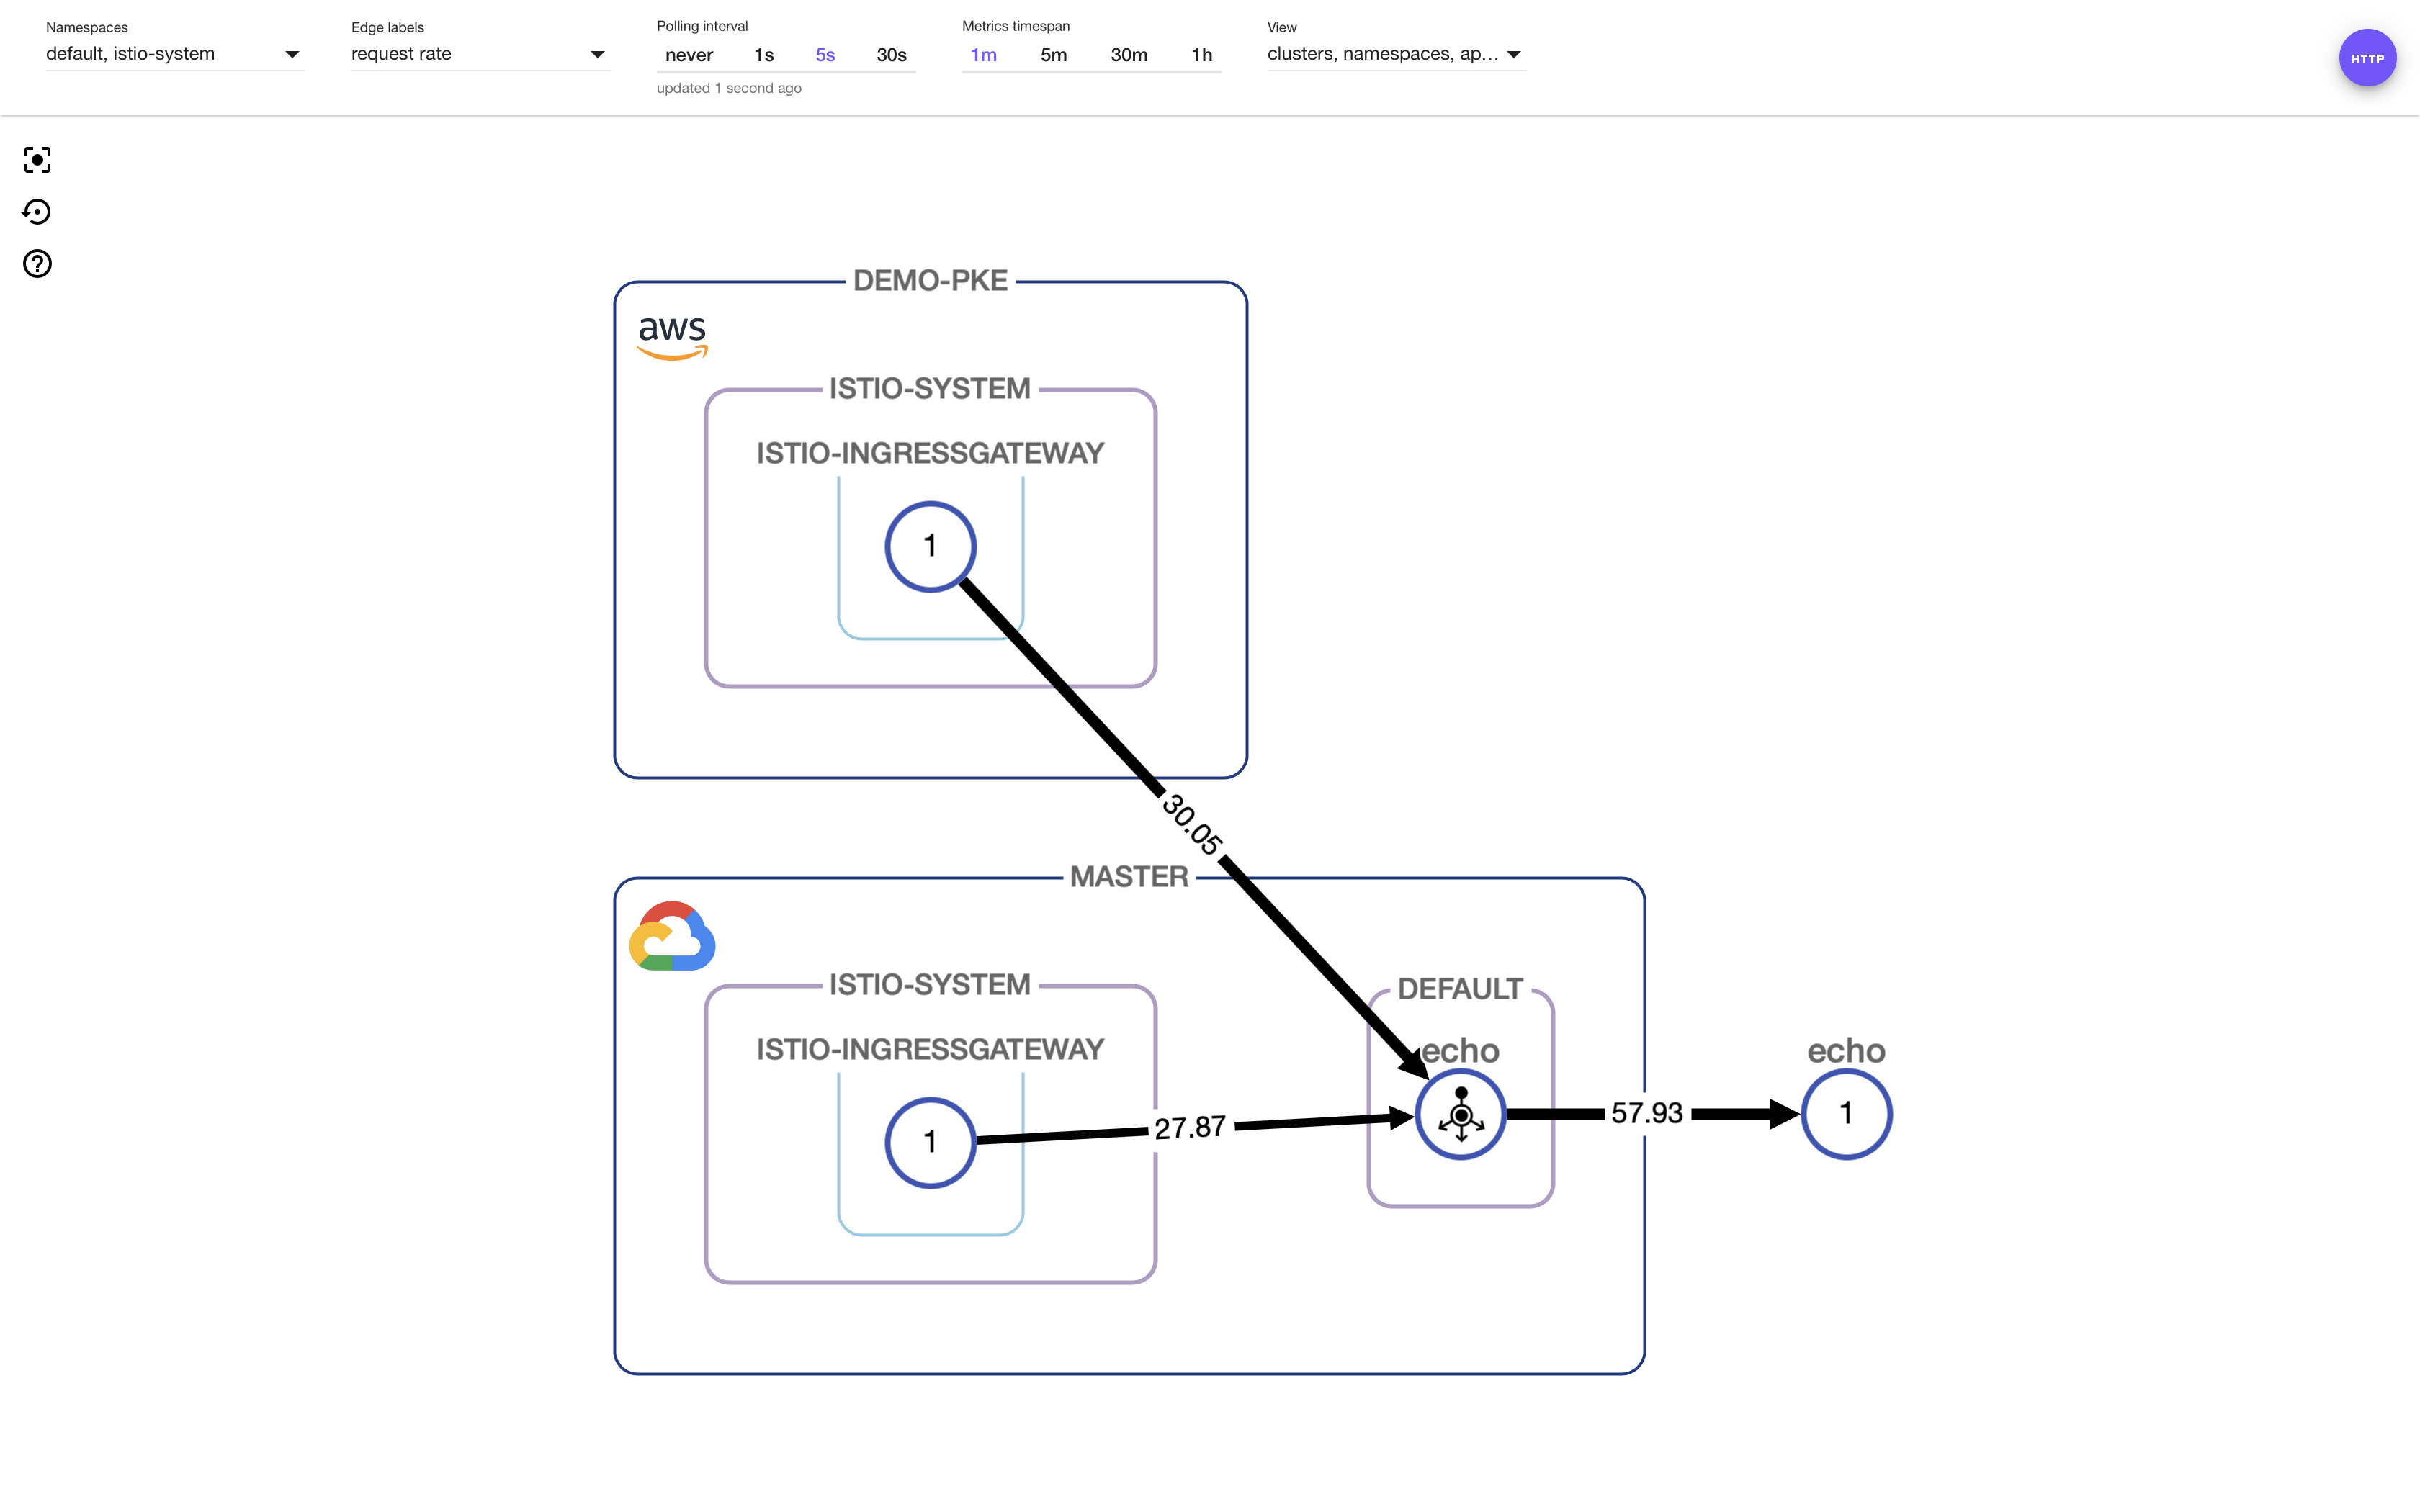
Traffic is flowing from the remote cluster to the fail-over pod, which is on the master cluster.
Locality-weighted load balancing
To configure weighted load balancing with the operator, we need to adjust the following changes in the CR spec:
localityLB:
    enabled: true
    distribute:
    - from: europe-west2/*
      to:
        eu-north-1/*: 10
        europe-west2/*: 90
    - from: eu-north-1/*
      to:
        eu-north-1/*: 90
        europe-west2/*: 10
My clusters were started in
europe-west2andeu-north-1regions; values should be set for your clusters accordingly.
Call echo again and visualize/manage what happens with Backyards:

We can see that nine times more requests are flowing to the local pod than to the remote pod in each cluster (90-10 distributions are configured).
Takeaway 🔗︎
The Istio operator now supports Istio 1.2. Upgrading Istio control planes between Istio’s major versions, even in a single-mesh multi-cluster setup with our operator is as easy as deploying a new version of the operator, then applying a new Custom Resource using your desired component versions.
We’ve also shown how Istio’s Locality Load Balancing feature can be utilized in a multi-cluster topology by using the operator, and how easy this is to visualize and manage with Backyards (now Cisco Service Mesh Manager).
About Backyards 🔗︎
Banzai Cloud’s Backyards (now Cisco Service Mesh Manager) is a multi and hybrid-cloud enabled service mesh platform for constructing modern applications. Built on Kubernetes, our Istio operator and the Banzai Cloud Pipeline platform gives you flexibility, portability, and consistency across on-premise datacenters and on five cloud environments. Use our simple, yet extremely powerful UI and CLI, and experience automated canary releases, traffic shifting, routing, secure service communication, in-depth observability and more, for yourself.
About Banzai Cloud Pipeline 🔗︎
Banzai Cloud’s Pipeline provides a platform for enterprises to develop, deploy, and scale container-based applications. It leverages best-of-breed cloud components, such as Kubernetes, to create a highly productive, yet flexible environment for developers and operations teams alike. Strong security measures — multiple authentication backends, fine-grained authorization, dynamic secret management, automated secure communications between components using TLS, vulnerability scans, static code analysis, CI/CD, and so on — are default features of the Pipeline platform.
About Banzai Cloud 🔗︎
Banzai Cloud is changing how private clouds are built: simplifying the development, deployment, and scaling of complex applications, and putting the power of Kubernetes and Cloud Native technologies in the hands of developers and enterprises, everywhere.
#multicloud #hybridcloud #BanzaiCloud