A strong focus on security has always been a key part of the Banzai Cloud’s Pipeline platform. We incorporated security into our architecture early in the design process, and developed a number of supporting components to be used easily and natively on Kubernetes. From secrets, certificates generated and stored in Vault, secrets dynamically injected in pods, through provider agnostic authentication and authorization using Dex, to container vulnerability scans and lots more: the Pipeline platform handles all these as a default tier-zero feature.
As we open sourced and certified our own Kubernetes distribution, PKE - Pipeline Kubernetes Engine - we followed the same security principles we did with the Pipeline platform itself, and battle tested PKE with the CIS Kubernetes benchmark.
Network policies are a vital but often overlooked piece of the security jigsaw; they are key building blocks of PKE and the Pipeline platform. This post will help to demystify network policies by taking a deep dive with lots of examples.
If you are interested in Pod Security Policy - another vital jigsaw in K8s security - read our revious post about PSP.
Network policies 🔗︎
Network policies are Kubernetes resources that control the traffic between pods and/or network endpoints. They uses labels to select pods and specify the traffic that is directed toward those pods using rules. Most CNI plugins support the implementation of network policies, however, if they don’t and we create a NetworkPolicy, then that resource will be ignored.
The most popular CNI plugins with network policy support are:
- Weave
- Calico
- Cilium
- Kube-router
- Romana
Now let’s examine network policies in greater detail. In Kubernetes, pods are capable of communicating with each other and will accept traffic from any source, by default. With NetworkPolicy we can add traffic restrictions to any number of selected pods, while other pods in the namespace (those that go unselected) will continue to accept traffic from anywhere. The NetworkPolicy resource has mandatory fields such as apiVersion, kind, metadata and spec. Its spec field contains all those settings which define network restrictions within a given namespace:
podSelectorselects a group of pods for which the policy appliespolicyTypesdefines the type of traffic to be restricted (inbound, outbound, both)ingressincludes inbound traffic whitelist rulesegressincludes outbound traffic whitelist rules
In order to go into further detail, let’s analyze three basic network policies
Deny all traffic in the default namespace 🔗︎
To use the default deny policy, you must create a policy which isolates all the pods in a selected namespace.
 1apiVersion: networking.k8s.io/v1
 2kind: NetworkPolicy
 3metadata:
 4  name: deny-all
 5  namespace: default
 6spec:
 7  podSelector: {}
 8  policyTypes:
 9  - Ingress
10  - Egress
Since this resource defines both policyTypes (ingress and egress), but doesn’t define any whitelist rules, it blocks all the pods in the default namespace from communicating with each other.
Note that allowing pods to communicate is straightforward, since we haven’t defined a default
NetworkPolicy.
We can also define an allow all policy which overrides the previous deny all policy.
Allow all traffic in the default namespace 🔗︎
 1apiVersion: networking.k8s.io/v1
 2kind: NetworkPolicy
 3metadata:
 4  name: allow-all
 5  namespace: default
 6spec:
 7  podSelector: {}
 8  policyTypes:
 9  - Ingress
10  - Egress
11  ingress: {}
12  egress: {}
As this resource defines both ingress and egress whitelist rules for all traffic, the pods in the default namespace can now communicate with each other.
Simple namespace isolation 🔗︎
 1apiVersion: networking.k8s.io/v1
 2kind: NetworkPolicy
 3metadata:
 4  name: isolate-namespace
 5  namespace: default
 6spec:
 7  podSelector: {}
 8  policyTypes:
 9  - Ingress
10  - Egress
11  ingress:
12  - from:
13    - namespaceSelector:
14        matchLabels:
15          nsname: default
16  egress:
17  - to:
18    - namespaceSelector:
19        matchLabels:
20          nsname: default
In this case, the pods within the default namespace are isolated and they can communicate only with pods in the namespace which are labeled nsname=default.
kubectl label ns default nsname=defaultSo pods in the default namespace with the label nsname=default can also communicate with each other.
Now that we’ve got a handle on what network policies are, and on some of the basics of how they work, let’s take an even closer look.
Anatomy of a network policy 🔗︎
First, there are couple of mandatory fields, such as:
1apiVersion: networking.k8s.io/v1
2kind: NetworkPolicy
3metadata:
4  name: db-connection
5  namespace: default
Keeping that in mind, let’s isolate some pods. We’re going to isolate pods which have the label role=db:
 6spec:
 7  podSelector:
 8    matchLabels:
 9      role: db
10  policyTypes:
11  - Ingress
12  - Egress
Now that we have an understanding of how to isolate pods, we’ll add some ingress rules.
Here’s how to add an ingress rule that allows connections to any pod labeled role=db in default namespace:
- to demonstrate how this works, we’ll be allowing all connections from ipblock
172.17.0.0/16except ipblock172.17.1.0/24
13  ingress:
14  - from:
15    - ipBlock:
16        cidr: 172.17.0.0/16
17        except:
18 - 172.17.1.0/24- and from any pod in the namespace which has the label
nsname=allowedns
19    - namespaceSelector:
20        matchLabels:
21 nsname: allowedns- now, from any pod in
defaultwith the labelrole=frontend
22    - podSelector:
23        matchLabels:
24 role: frontend- and on TCP port
3306
25    ports:
26    - protocol: TCP
27      port: 3360
Since we’ve had an opportunity to explore and digest ingress rules, let’s move on to those that govern egress.
You can add egress rules to allow connections from any pod labeled role=db in namespace default: so let’s follow a roughly parallel route of exploration to that above, adding more and more rules.
- to ipblock
10.0.0.0/24
28  egress:
29  - to:
30    - ipBlock:
31 cidr: 10.0.0.0/24- on TCP port
8000
32    ports:
33    - protocol: TCP
34      port: 8000
OK, now that we have a good understanding of how network policies work, let’s try putting them into action.
Demo time 🔗︎
1. Start a Kubernetes cluster on your laptop 🔗︎
The easiest way to test network policies is to start a single or multi node CNCF certified K8s cluster in Vagran, using the Banzai Cloud’s PKE - default installation uses the Weave network plugin, so supports NetworkPolicy out-of-the-box.
If you plan to use Minikube with its default settings, the NetworkPolicy resources will have no effect due to the absence of a network plugin and you’ll have to start it with --network-plugin=cni.
minikube start --network-plugin=cni --memory=4096Once that’s accomplished, you have to install the correct Cilium DaemonSet.
kubectl create -f https://raw.githubusercontent.com/cilium/cilium/HEAD/examples/kubernetes/1.14/cilium-minikube.yamlThat’s it. Now you should have a NetworkPolicy resource in Minikube.
2. Deploy some test pods 🔗︎
kubectl run --generator=run-pod/v1 busybox1 --image=busybox -- sleep 3600
kubectl run --generator=run-pod/v1 busybox2 --image=busybox -- sleep 3600
kubectl get po -o wide
NAME READY STATUS RESTARTS AGE IP NODE NOMINATED NODE READINESS GATES
busybox1 1/1 Running 0 25m 10.1.235.88 minikube <none> <none>
busybox2 1/1 Running 0 25m 10.1.14.240 minikube <none> <none>3. Create a deny-all policy 🔗︎
cat << EOF > deny-all.yaml
apiVersion: networking.k8s.io/v1
kind: NetworkPolicy
metadata:
  name: deny-all
  namespace: default
spec:
  podSelector: {}
  policyTypes:
  - Ingress
  - Egress
EOF
kubectl create -f deny-all.yaml
kubectl exec -ti busybox2 -- ping -c3 10.1.235.88
PING 10.1.235.88 (10.1.235.88): 56 data bytes
--- 10.1.235.88 ping statistics ---
3 packets transmitted, 0 packets received, 100% packet loss
command terminated with exit code 1As you can see, you can no longer ping the nodes in the cluster.
4. Create an allow-out-to-in policy, and add labels to pods 🔗︎
cat << EOF > allow-out-to-in.yaml
apiVersion: networking.k8s.io/v1
kind: NetworkPolicy
metadata:
  name: allow-out-to-in
  namespace: default
spec:
  podSelector: {}
  ingress:
  - from:
    - podSelector:
        matchLabels:
          test: out
  egress:
  - to:
    - podSelector:
        matchLabels:
          test: in
  policyTypes:
  - Ingress
  - Egress
EOF
To isolate all pods in namespace default:
- allow traffic from pods in namespace
defaultwith the labeltest=out - allow traffic to pods in namespace
defaultwith the labeltest=in
Now let’s deploy our NetworkPolicy and add some labels to our pods:
kubectl crate -f allow-out-to-in.yaml
kubectl label pod busybox1 test=in
kubectl label pod busybox2 test=out
kubectl exec -ti busybox2 -- ping -c3 10.1.235.88
PING 10.1.235.88 (10.1.235.88): 56 data bytes
64 bytes from 10.1.235.88: seq=0 ttl=63 time=0.128 ms
64 bytes from 10.1.235.88: seq=1 ttl=63 time=0.254 ms
64 bytes from 10.1.235.88: seq=2 ttl=63 time=0.204 ms
--- 10.1.235.88 ping statistics ---
3 packets transmitted, 3 packets received, 0% packet loss
round-trip min/avg/max = 0.128/0.195/0.254 msWe can now ping from the pod labeled test=out to the pod labeled test=in. Now let’s refocus our attention on an example we’d be more likely to encounter in the real world.
A more realistic example 🔗︎
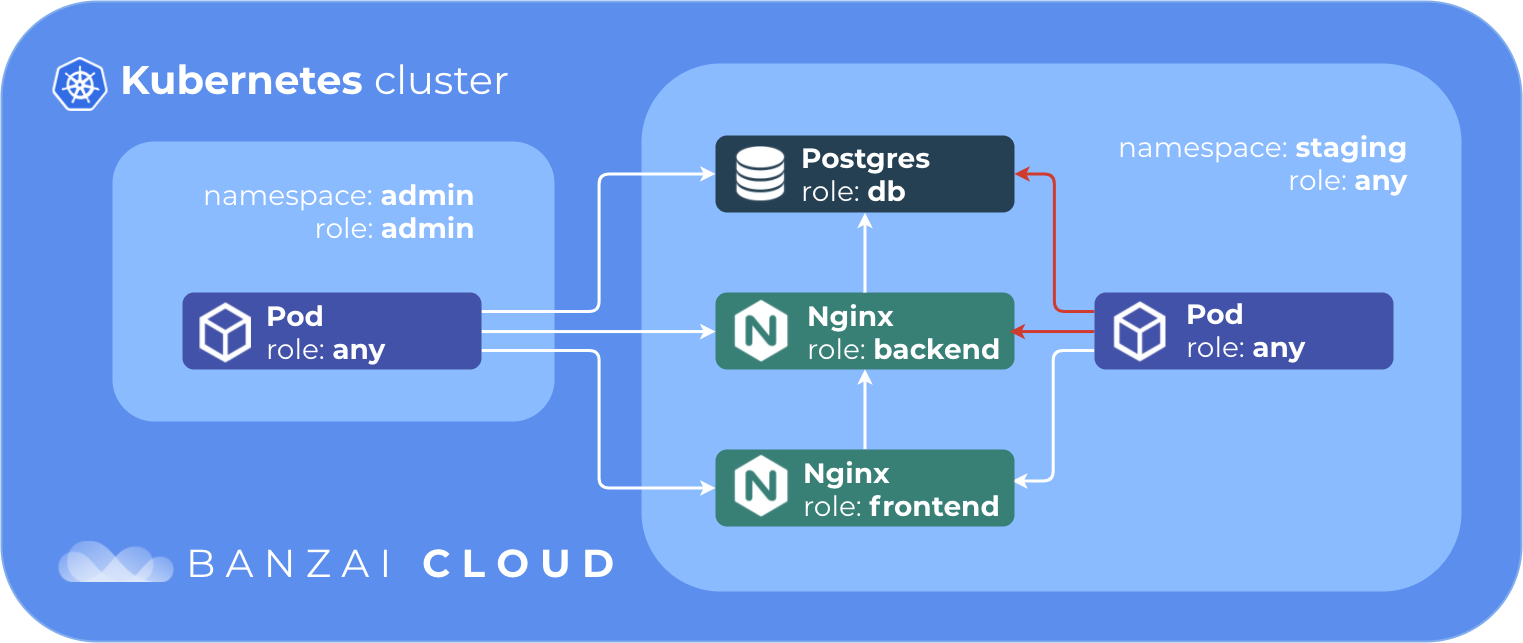
In this example we’ll have one db, one backend and one frontend service.
The database will accept connections from the backend, the backend will accept connections from the frontend, and the frontend from any pod in the staging namespace. All our services will accept connections from the admin namespace.

To clean our network policies in namespace default, and create two namespaces:
kubectl delete networkpolicy --all
kubectl create ns staging
kubectl create -f - << EOF
apiVersion: v1
kind: Namespace
metadata:
  name: admin
  labels:
    role: admin
EOF
Create pods and services
kubectl create -f - << EOF
apiVersion: v1
kind: Pod
metadata:
  name: frontend
  namespace: staging
  labels:
    role: frontend
spec:
  containers:
  - name: nginx
    image: nginx
    ports:
    - name: http
      containerPort: 80
      protocol: TCP
---
apiVersion: v1
kind: Service
metadata:
  name: frontend
  namespace: staging
  labels:
    role: frontend
spec:
  selector:
    role: frontend
  ports:
  - protocol: TCP
    port: 80
    targetPort: http
---
apiVersion: v1
kind: Pod
metadata:
  name: backend
  namespace: staging
  labels:
    role: backend
spec:
  containers:
  - name: nginx
    image: nginx
    ports:
    - name: http
      containerPort: 80
      protocol: TCP
---
apiVersion: v1
kind: Service
metadata:
  name: backend
  namespace: staging
  labels:
    role: backend
spec:
  selector:
    role: backend
  ports:
  - protocol: TCP
    port: 80
    targetPort: http
---
apiVersion: v1
kind: Pod
metadata:
  name: db
  namespace: staging
  labels:
    role: db
spec:
  containers:
  - name: postgres
    image: postgres
    ports:
    - name: postgres
      containerPort: 5432
      protocol: TCP
---
apiVersion: v1
kind: Service
metadata:
  name: db
  namespace: staging
  labels:
    role: db
spec:
  selector:
    role: db
  ports:
  - protocol: TCP
    port: 5432
    targetPort: postgres
EOF
Let’s create out network policies:
kubectl create -f - << EOF
apiVersion: networking.k8s.io/v1
kind: NetworkPolicy
metadata:
  name: staging.db
  namespace: staging
spec:
  podSelector:
    matchLabels:
      role: db
  ingress:
  - from:
    - podSelector:
        matchLabels:
          role: backend
    - namespaceSelector:
        matchLabels:
          role: admin
    ports:
    - protocol: TCP
      port: 5432
  policyTypes:
  - Ingress
---
apiVersion: networking.k8s.io/v1
kind: NetworkPolicy
metadata:
  name: staging.backend
  namespace: staging
spec:
  podSelector:
    matchLabels:
      role: backend
  ingress:
  - from:
    - podSelector:
        matchLabels:
          role: frontend
    - namespaceSelector:
        matchLabels:
          role: admin
    ports:
    - protocol: TCP
      port: 80
  policyTypes:
  - Ingress
---
apiVersion: networking.k8s.io/v1
kind: NetworkPolicy
metadata:
  name: staging.frontend
  namespace: staging
spec:
  podSelector:
    matchLabels:
      role: frontend
  ingress:
  - from:
    - podSelector: {}
    - namespaceSelector:
        matchLabels:
          role: admin
    ports:
    - protocol: TCP
      port: 80
  policyTypes:
  - Ingress
EOF
Let’s check the frontend and backend services from the staging namespace.
kubectl run --namespace=staging --generator=run-pod/v1 curl --image=pstauffer/curl -- sleep 3600
kubectl exec -ti curl -n staging -- curl frontend.staging.svc.cluster.local:80
...
<title>Welcome to nginx!</title>
...
kubectl exec -ti curl -n staging -- curl backend.staging.svc.cluster.local:80 --max-time 5
curl: (28) Connection timed out after 5001 milliseconds
command terminated with exit code 28
The frontend service is reachable from any pod in the staging namespace but the backend service is not.
Now let’s check the backend service from the admin namespace.
kubectl run --namespace=admin --generator=run-pod/v1 curl --image=pstauffer/curl -- sleep 3600
kubectl exec -ti curl -n admin -- curl backend.staging.svc.cluster.local:80
...
<title>Welcome to nginx!</title>
...
As you can see the backend service is reachable from the admin namespace.
Check the db service from the admin namespace.
kubectl run --namespace=admin --generator=run-pod/v1 pclient --image=jbergknoff/postgresql-client -- -h db.staging.svc.cluster.local -U postgres -p 5432 -d postgres -c "\l"
kubectl logs pclient -n admin
                                 List of databases
   Name    |  Owner   | Encoding |  Collate   |   Ctype    |   Access privileges
-----------+----------+----------+------------+------------+-----------------------
 postgres  | postgres | UTF8     | en_US.utf8 | en_US.utf8 |
 template0 | postgres | UTF8     | en_US.utf8 | en_US.utf8 | =c/postgres          +
           |          |          |            |            | postgres=CTc/postgres
 template1 | postgres | UTF8     | en_US.utf8 | en_US.utf8 | =c/postgres          +
           |          |          |            |            | postgres=CTc/postgres
(3 rows)
You may be wondering, how does this simple example work when running Kubernetes in the cloud?
Network policies and provider managed K8s (including our own PKE) 🔗︎
Amazon EKS 🔗︎
We’ll try one of the exercises above on EKS. If you’d like to deploy an EKS cluster, the easiest way to do it is by using Pipeline.
To deploy our test pods:
kubectl run --generator=run-pod/v1 busybox1 --image=busybox -- sleep 3600
kubectl run --generator=run-pod/v1 busybox2 --image=busybox -- sleep 3600
Check the IP addresses:
kubectl get po -o wide
NAME       READY   STATUS    RESTARTS   AGE   IP               NODE                                           NOMINATED NODE
busybox1   1/1     Running   0          17m   192.168.76.157   ip-192-168-65-145.us-east-2.compute.internal   <none>
busybox2   1/1     Running   0          16m   192.168.64.133   ip-192-168-65-207.us-east-2.compute.internal   <none>
Deploy your deny-all policy and run a test:
kubectl create -f deny-all.yaml
kubectl exec -ti busybox2 -- ping -c3 192.168.76.157
PING 192.168.76.157 (192.168.76.157): 56 data bytes
64 bytes from 192.168.76.157: seq=0 ttl=253 time=0.341 ms
64 bytes from 192.168.76.157: seq=1 ttl=253 time=0.308 ms
64 bytes from 192.168.76.157: seq=2 ttl=253 time=0.354 ms

--- 192.168.76.157 ping statistics ---
3 packets transmitted, 3 packets received, 0% packet loss
round-trip min/avg/max = 0.308/0.334/0.354 ms
As you can see, EKS doesn’t support NetworkPolicy by default. Thus, we will have to deploy a Calico DaemonSet:
kubectl apply -f https://raw.githubusercontent.com/aws/amazon-vpc-cni-k8s/master/config/v1.4/calico.yamlLet’s take a look:
kubectl get daemonset calico-node --namespace kube-system
NAME          DESIRED   CURRENT   READY   UP-TO-DATE   AVAILABLE   NODE SELECTOR                 AGE
calico-node   2         2         2       2            2           beta.kubernetes.io/os=linux   19m
Now let’s give it another try:
kubectl exec -ti busybox1 -- ping -c3 192.168.76.157
PING 192.168.76.157 (192.168.76.157): 56 data bytes

--- 192.168.64.157 ping statistics ---
3 packets transmitted, 0 packets received, 100% packet loss
command terminated with exit code 1
This time our deny-all policy funcitons properly.
Let’s try our allow-out-to-in policy:
kubectl label pod busybox1 test=in
kubectl label pod busybox2 test=out
kubectl apply -f allow-from-out-to-in.yaml
kubectl exec -ti busybox2 -- ping -c3 192.168.76.157
PING 192.168.76.157 (192.168.76.157): 56 data bytes
64 bytes from 192.168.76.157: seq=0 ttl=253 time=0.327 ms
64 bytes from 192.168.76.157: seq=1 ttl=253 time=0.353 ms
64 bytes from 192.168.76.157: seq=2 ttl=253 time=0.264 ms

--- 192.168.76.157 ping statistics ---
3 packets transmitted, 3 packets received, 0% packet loss
round-trip min/avg/max = 0.264/0.314/0.353 ms
It works fine as well.
Google GKE 🔗︎
We can do something similar on GKE. Again, the easiest way to proceed is by using Pipeline.
First, deploy some test pods and create a deny-all policy:
kubectl run --generator=run-pod/v1 busybox1 --image=busybox -- sleep 3600
kubectl run --generator=run-pod/v1 busybox2 --image=busybox -- sleep 3600
kubectl create -f deny-all.yaml
Then check our pods’ IP addresses:
kubectl get po  -o wide
NAME       READY   STATUS    RESTARTS   AGE   IP          NODE                                           NOMINATED NODE
busybox1   1/1     Running   0          16m   10.48.2.3   gke-gkenetworkpolicytest-pool1-be61d694-b955   <none>
busybox2   1/1     Running   0          26m   10.48.0.9   gke-gkenetworkpolicytest-pool2-ae162894-996p   <none>
kubectl exec -ti busybox1 -- ping -c3 10.48.0.9
PING 10.48.0.9 (10.48.0.9): 56 data bytes
64 bytes from 10.48.0.9: seq=0 ttl=62 time=1.498 ms
64 bytes from 10.48.0.9: seq=1 ttl=62 time=0.308 ms
64 bytes from 10.48.0.9: seq=2 ttl=62 time=0.272 ms
--- 10.48.0.9 ping statistics ---
3 packets transmitted, 3 packets received, 0% packet loss
round-trip min/avg/max = 0.272/0.692/1.498 msAs you can see, the deny-all policy has had no effect. Why? When using Google GKE we have to create a cluster with the --enable-network-policy flag:
gcloud container clusters create networkpolicytest --enable-network-policy
NAME               LOCATION    MASTER_VERSION  MASTER_IP       MACHINE_TYPE   NODE_VERSION  NUM_NODES  STATUS
networkpolicytest  us-east1-b  1.12.8-gke.6    104.196.128.76  n1-standard-1  1.12.8-gke.6  3          RUNNING
Getting cluster credentials:
gcloud container clusters get-credentials networkpolicytest --zone us-east1 --project <project-name>What’s changed?
kubectl get daemonset calico-node --namespace kube-system
NAME          DESIRED   CURRENT   READY   UP-TO-DATE   AVAILABLE   NODE SELECTOR                     AGE
calico-node   3         3         3       3            3           projectcalico.org/ds-ready=true   3m58s
Well, now we’ve enabled the network policy.
kubectl run --generator=run-pod/v1 busybox1 --image=busybox -- sleep 3600
kubectl run --generator=run-pod/v1 busybox2 --image=busybox -- sleep 3600
kubectl create -f deny-all.yaml
kubectl exec -ti busybox2 -- ping -c3  10.4.2.3
PING 10.4.2.3 (10.4.2.3): 56 data bytes

--- 10.4.2.3 ping statistics ---
3 packets transmitted, 0 packets received, 100% packet loss
command terminated with exit code 1
And the deny-all policy is working.
Banzai Cloud PKE on AWS 🔗︎
As mentioned, we have our own CNCF certified Kubernetes distribution, PKE. When starting PKE on Vagrant (as suggested at the beginning of this post) or launching it on one of our supported cloud providers, it’s possible to jump straight to the deploying of pods. You can install PKE on AWS, automated by Pipeline.
kubectl run --generator=run-pod/v1 busybox1 --image=busybox -- sleep 3600
kubectl run --generator=run-pod/v1 busybox2 --image=busybox -- sleep 3600
kubectl create -f deny-all.yaml
kubectl exec -ti busybox2 -- ping -c3  10.20.160.2
PING 10.4.2.3 (10.4.2.3): 56 data bytes

--- 10.4.2.3 ping statistics ---
3 packets transmitted, 0 packets received, 100% packet loss
command terminated with exit code 1
Why does it work on PKE out-of-the-box?
kubectl get daemonset weave-net -n kube-system
NAME        DESIRED   CURRENT   READY   UP-TO-DATE   AVAILABLE   NODE SELECTOR   AGE
weave-net   4         4         4       4            4           <none>          44m
PKE uses Weave’s network plugin (this is by default, but PKE supports Calico as well), and thus supports NetwportPolicy out-of-the-box.
Other providers 🔗︎
When using other cloud provider-managed Kubernetes solutions, you have to create your cluster with the following additional settings:
- When creating an Azure AKS cluster, you must use the
--network-policyflag. You can read more about it in the official Azure AKS documentation - If you’re creating an Alibaba ACK cluster, you have to create it with the
Terwaynetwork plugin instead of its default,Flannel. You can read more about this in the Alibaba ACK documentation
Let’s finish this marathon post, here. There are still a lot of other things we could say about network policies, but, considering the breadth of the material we’ve already covered, I think it’s better to save those for another day.
About Banzai Cloud Pipeline 🔗︎
Banzai Cloud’s Pipeline provides a platform for enterprises to develop, deploy, and scale container-based applications. It leverages best-of-breed cloud components, such as Kubernetes, to create a highly productive, yet flexible environment for developers and operations teams alike. Strong security measures — multiple authentication backends, fine-grained authorization, dynamic secret management, automated secure communications between components using TLS, vulnerability scans, static code analysis, CI/CD, and so on — are default features of the Pipeline platform.
About Banzai Cloud 🔗︎
Banzai Cloud is changing how private clouds are built in order to simplify the development, deployment, and scaling of complex applications, putting the power of Kubernetes and Cloud Native technologies in the hands of developers and enterprises, everywhere.
#multicloud #hybridcloud #BanzaiCloud


