


One of the earliest features of our hybrid cloud container management platform, Pipeline, was to standardize the running of applications on Kubernetes with a framework we called Spotguides. Spotguides allowed us to build domain specific knowledge into apps, avoid writing boilerplate code, and go from commit to a production ready deployment in minutes. All of this while meeting enterprise-grade requirements such as federated monitoring, centralized log collection, security scans, cluster lifecycle management and lots more.
For a list of out-of-the-box supported Spotguides check our GitHub repostiory
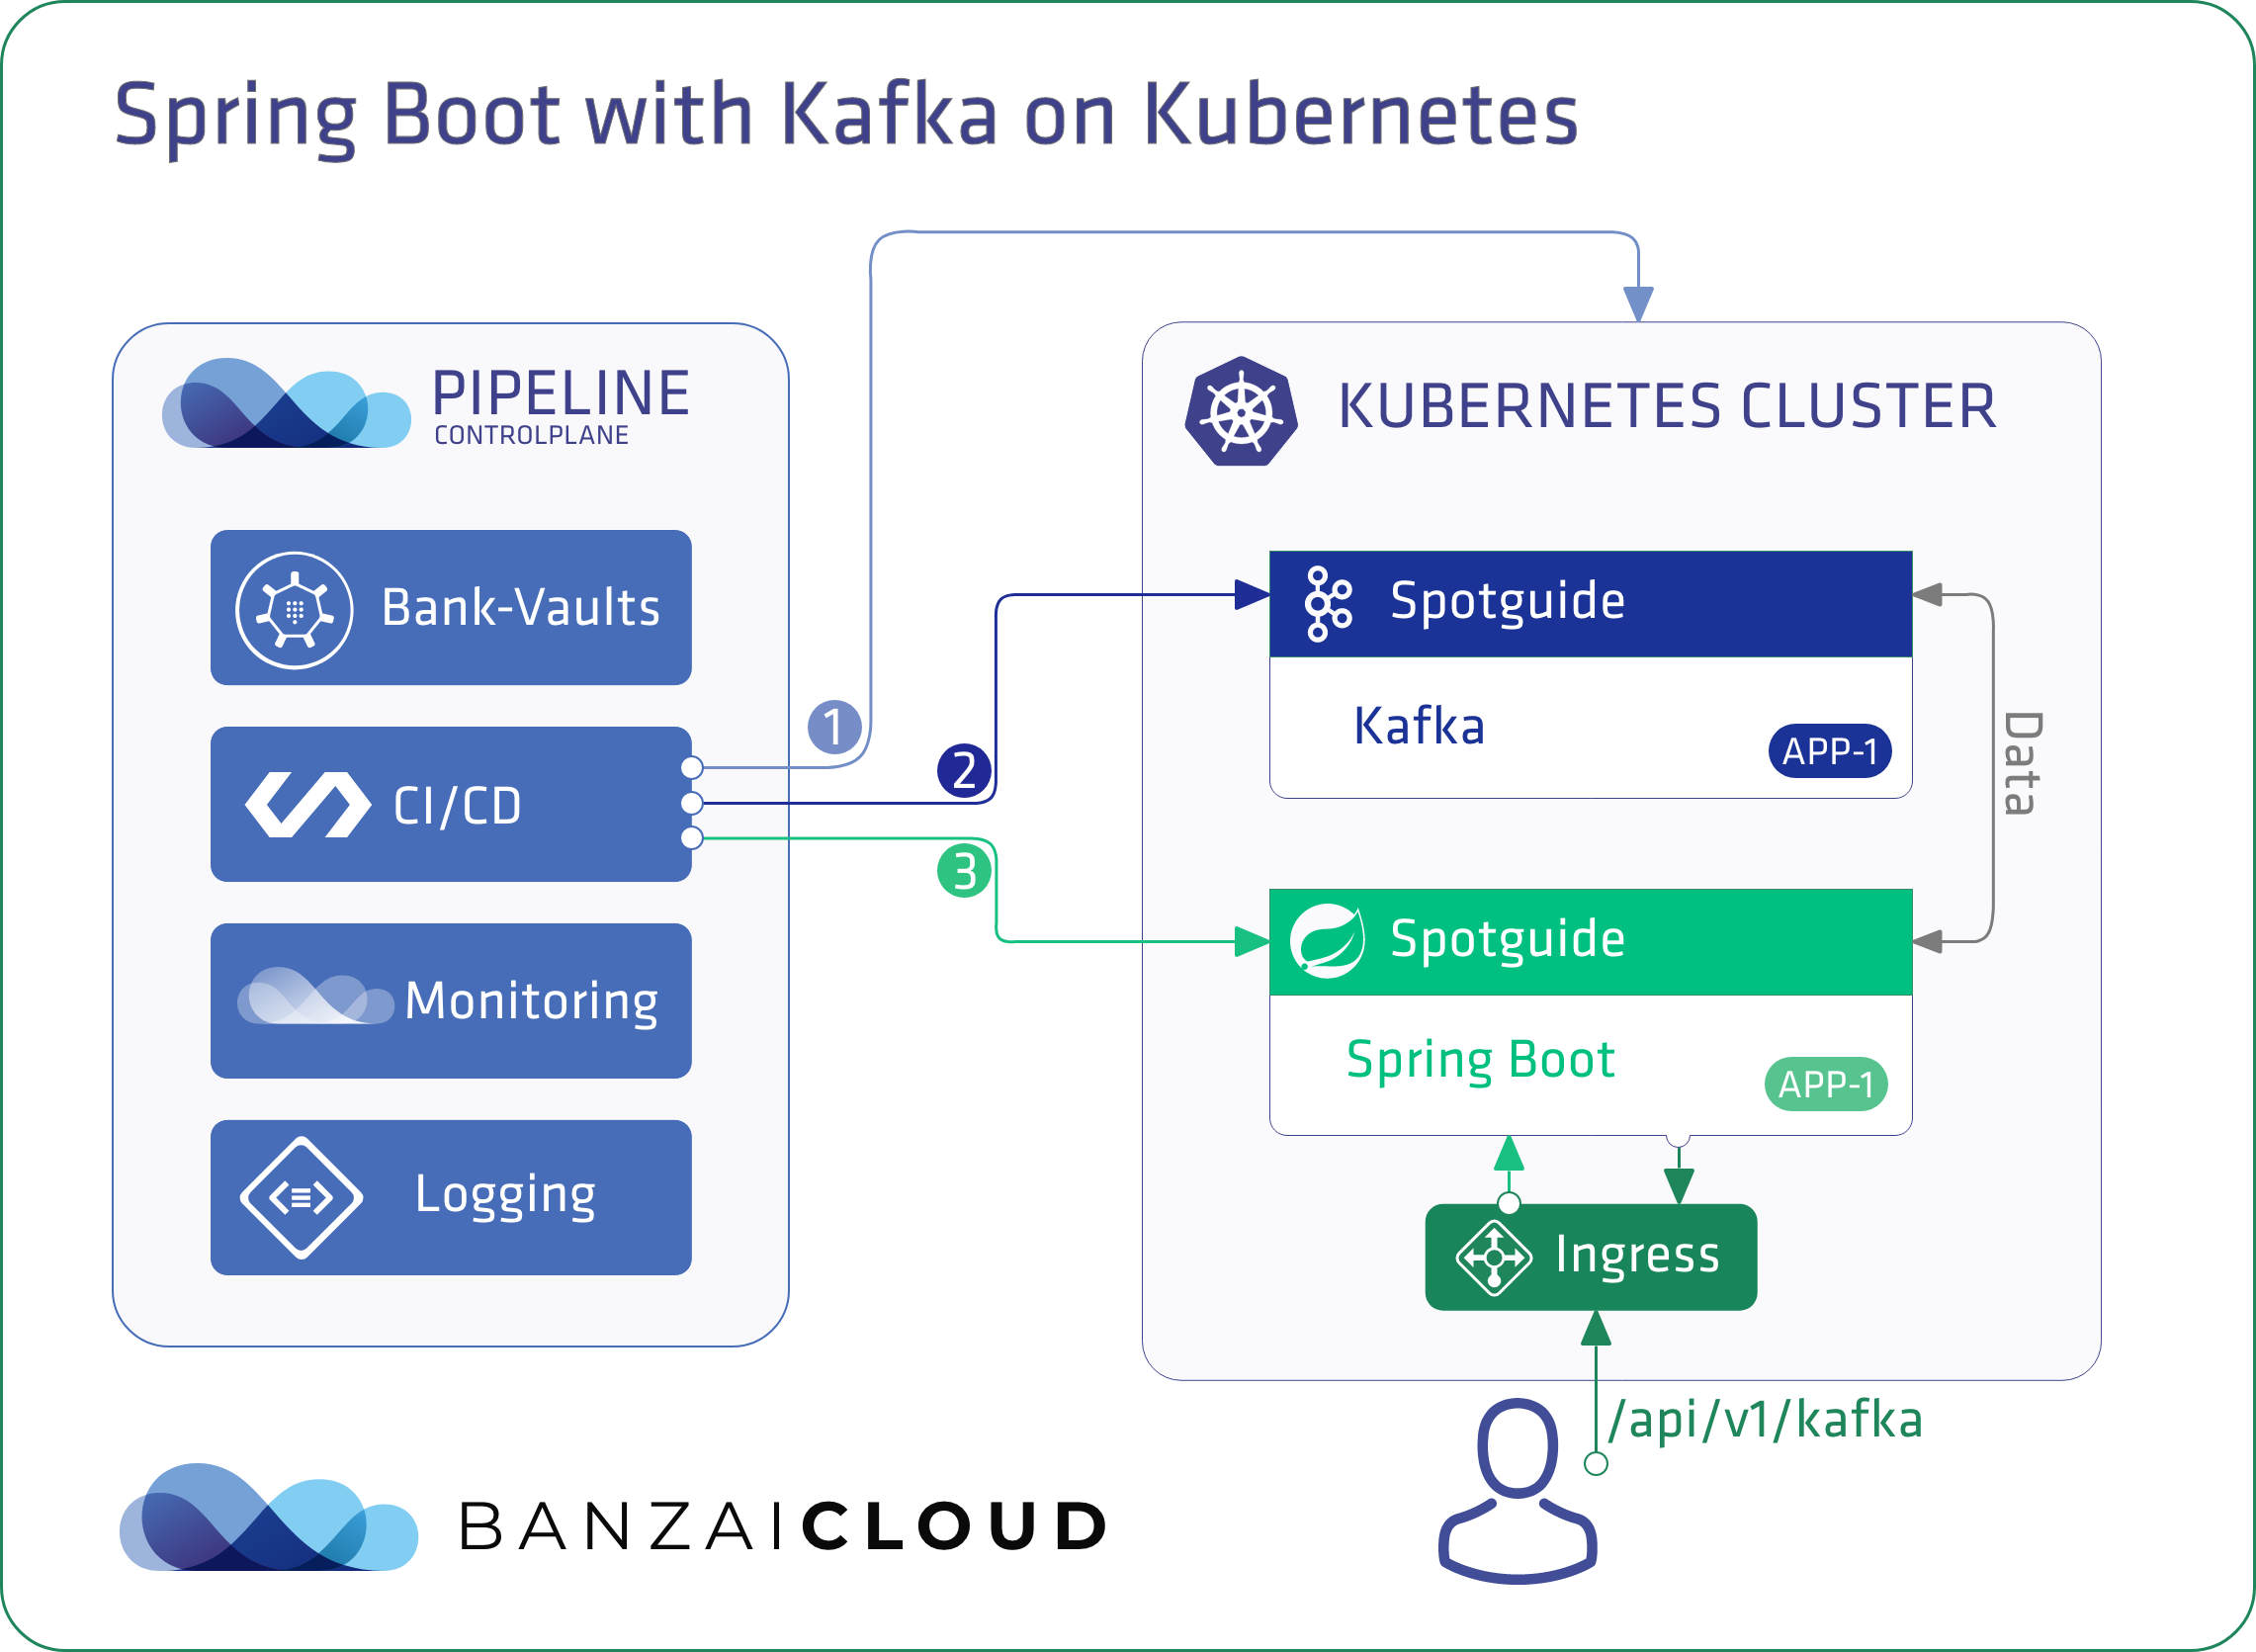
Spring Boot and Kafka on Kubernetes 🔗︎
Kafka on Kubernetes is one of the most popular spotguides we’ve ever made, and we believe that it’s the easiest way to operate Kafka on Kubernetes. Built on our open source Koperator it features advanced security, rack awereness, out-of-the-box Kafka monitoring, rolling upgrades and more.
Since Kafka is so popular within enterprises as a result of being the unified data exchange platform. It is used in all different languages by a huge variety clients, one of which is the Spring Boot framework. Luckily, there’s a fantastic Spring Boot/Kafka integration written for Spring, called Spring Kafka. This blog post will attempt to describe how to work with Spring Boot on Kubernetes: how to provision your Kafka cluster, write your Spring Boot code, and push it to GitHub while Pipeline does all the heavy lifting.
Cluster setup 🔗︎
If you haven’t installed the Banzai CLI yet, install it by following the documentation.
Use the following command to quickly install the CLI:
$ curl https://getpipeline.sh/cli | sh -s -- auto
Now lets setup the CLI and log in:
$ banzai login -e <your-pipeline-url>/pipeline
? Login using web browser? Yes
INFO[0004] Opening web browser at http://localhost:5555
INFO[0015] successfully logged in
? Create permanent token? No
? Organization: spotguidetest
Let’s create a cluster. We’ll be using our CNCF-certified Kubernetes distribution, PKE on AWS, but note that Pipeline supports five cloud providers as well as on-prem installations (cloud provider-managed K8s like EKS or our own PKE).
Note: you will need to add your own cloud provider specific secret, which will be stored in Vault
$ banzai cluster create
? Load a JSON or YAML file: skip
? Provider: pke-on-aws
? Secret: aws
? Cluster name: kafka-and-spring-boot
? Do you want to edit the cluster request in your text editor? No
? Do you want to CREATE the cluster "kafka-and-spring-boot" now? Yes
INFO[0072] cluster is being created
INFO[0072] you can check its status with the command `banzai cluster get "kafka-and-spring-boot"`
Id    Name
2600  kafka-and-spring-boot
Wait for the cluster to be created (Status: RUNNING):
$ banzai cluster list
Id    Name                   Distribution  CreatorName    CreatedAt             Status
2600  kafka-and-spring-boot  pke           bonifaido      2019-11-06T08:34:54Z  CREATING
An alternative way of creating the cluster is to send a create request JSON with the CLI and circumvent the wizard entirely:
banzai cluster create <<EOF
{
  "name": "kafka-and-spring-boot",
  "location": "eu-west-3",
  "cloud": "amazon",
  "secretId": "7d1507284a5757cac6b62csdsda4ef004f12b4b9e6255df2",
  "properties": {
    "pke": {
      "nodepools": [
        {
          "name": "master",
          "roles": [
            "master"
          ],
          "provider": "amazon",
          "autoscaling": false,
          "providerConfig": {
            "autoScalingGroup": {
              "name": "master",
              "zones": [
                "eu-west-3a"
              ],
              "instanceType": "c5.large",
              "launchConfigurationName": "master",
              "spotPrice": "",
              "size": {
                "desired": 1,
                "min": 1,
                "max": 1
              }
            }
          }
        },
        {
          "name": "pool1",
          "roles": [
            "worker"
          ],
          "provider": "amazon",
          "autoscaling": false,
          "providerConfig": {
            "autoScalingGroup": {
              "name": "pool1",
              "zones": [
                "eu-west-3a"
              ],
              "instanceType": "c5.large",
              "launchConfigurationName": "pool1",
              "spotPrice": "0.101",
              "size": {
                "desired": 4,
                "min": 4,
                "max": 4
              }
            }
          }
        }
      ],
      "kubernetes": {
        "version": "1.15.3",
        "rbac": {
          "enabled": true
        }
      },
      "cri": {
        "runtime": "containerd"
      }
    }
  }
}
EOF
You can also perform these step in the UI, using our hosted free developer version of Pipeline
Kafka Spotguide 🔗︎
Okay, back to the original problem. We now have a fully functional cluster, so let’s install some Spotguides.
We’ll start with the Kafka spotguide, which compounds the installation of the Koperator and a Kafka instance into one simple step.
Open the Pipeline UI and start up the spotguide.
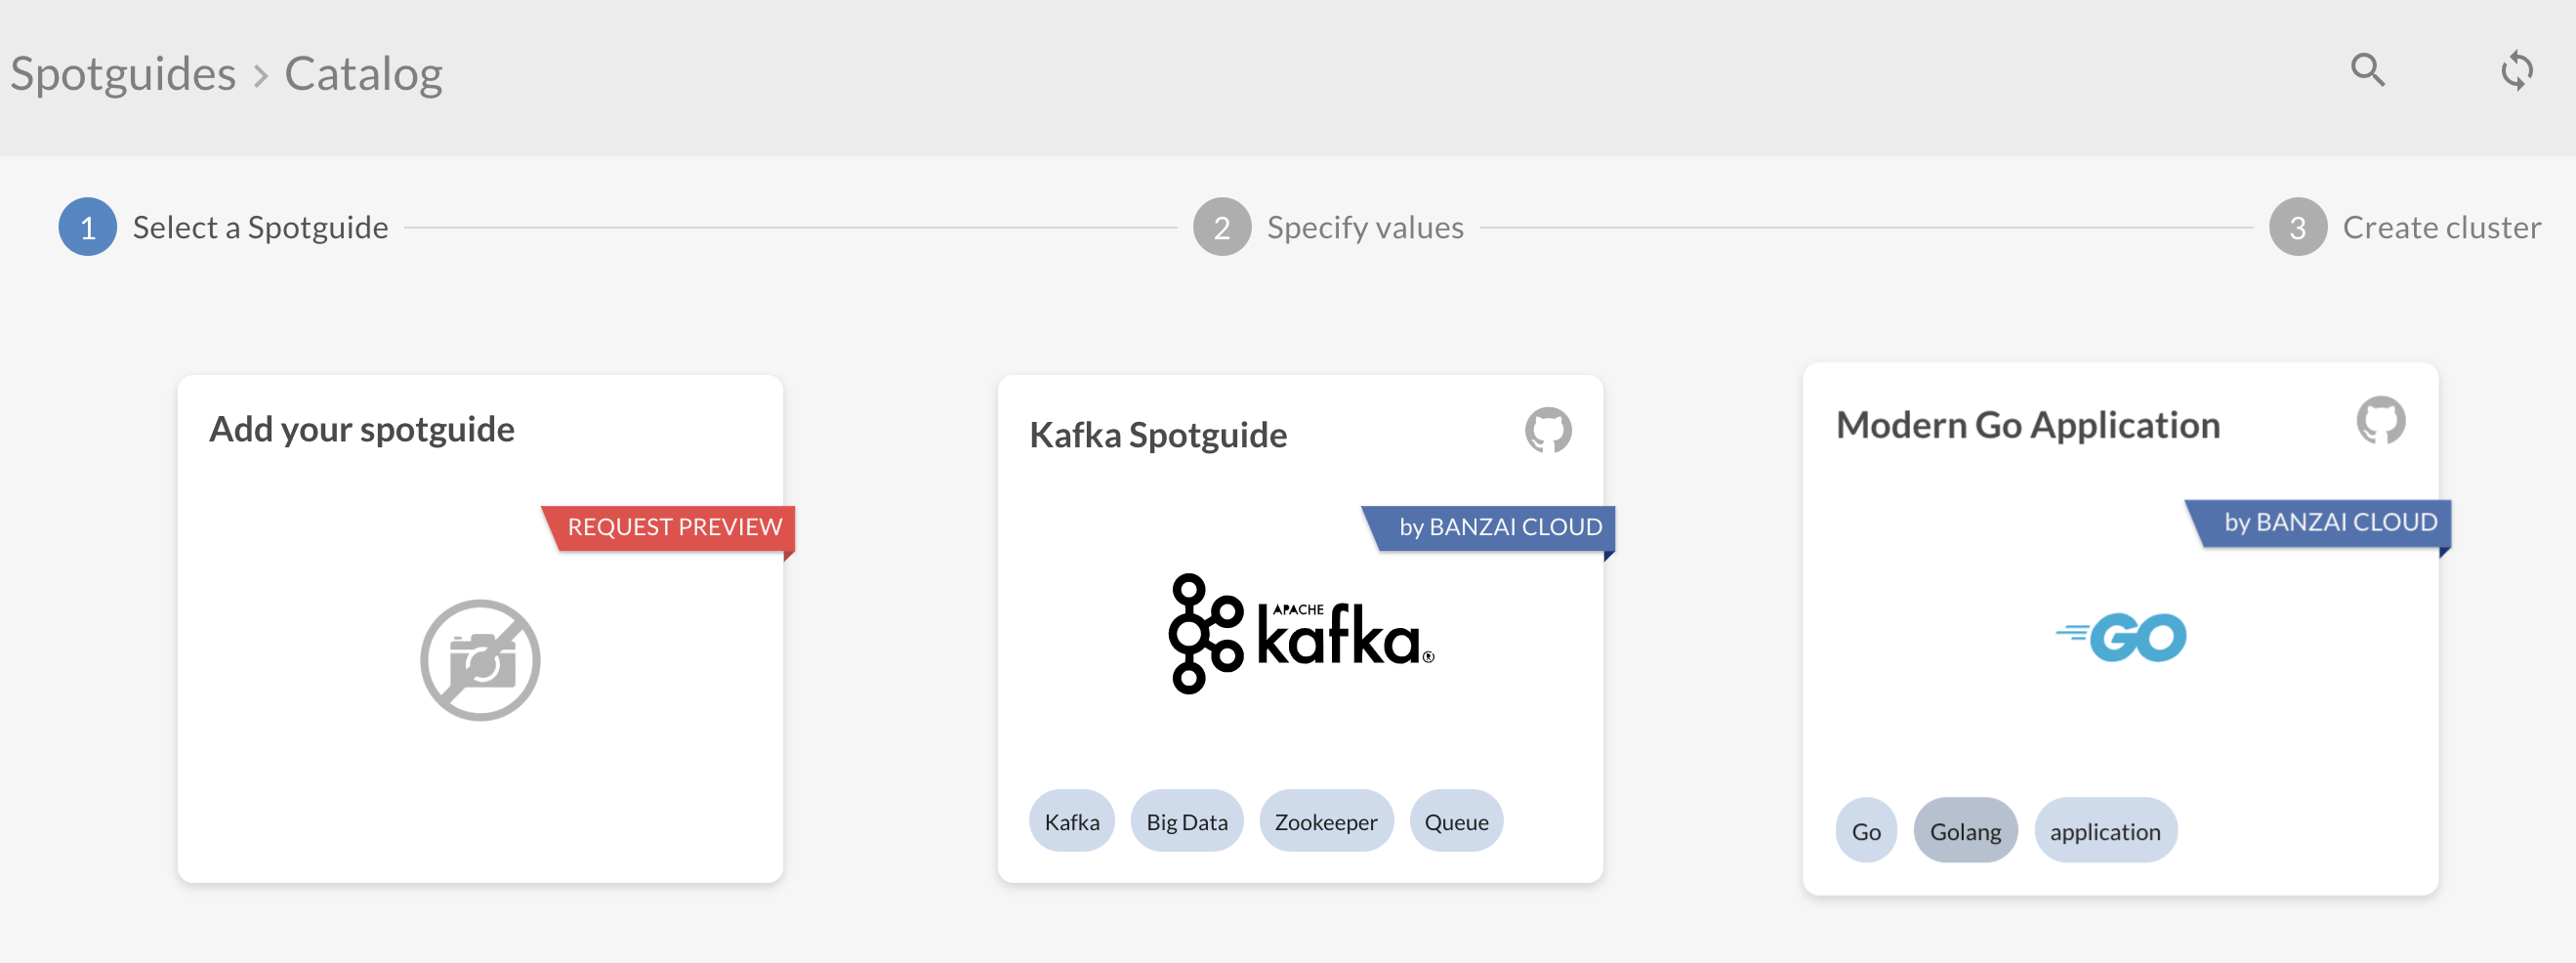
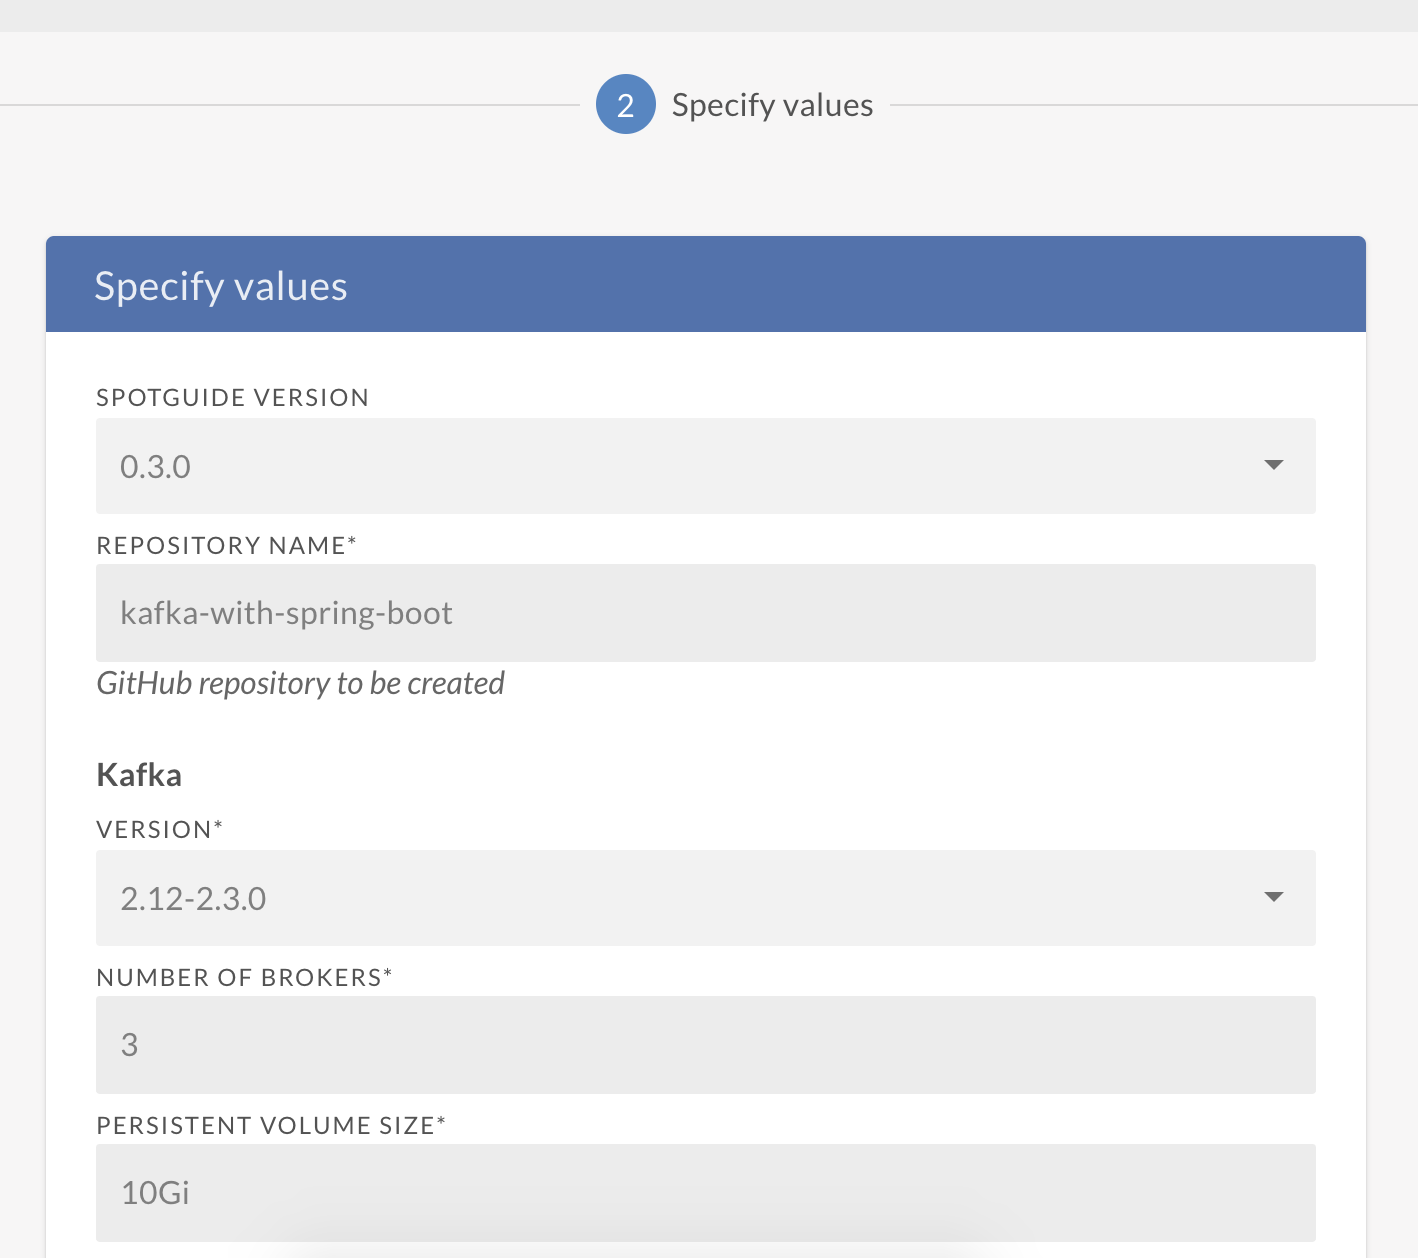
The Spotguide wizard will pop-up, and you’ll have to answer some questions. Don’t worry, the only thing you have to specify at this point is the name of the spotguide; default values will do just fine for now.
In the next step the wizard will let you select an existing cluster or create a new one. Select the cluster we previously created (or any cluster that you have imported to Pipeline).

Then click Create and Launch Spotguide.
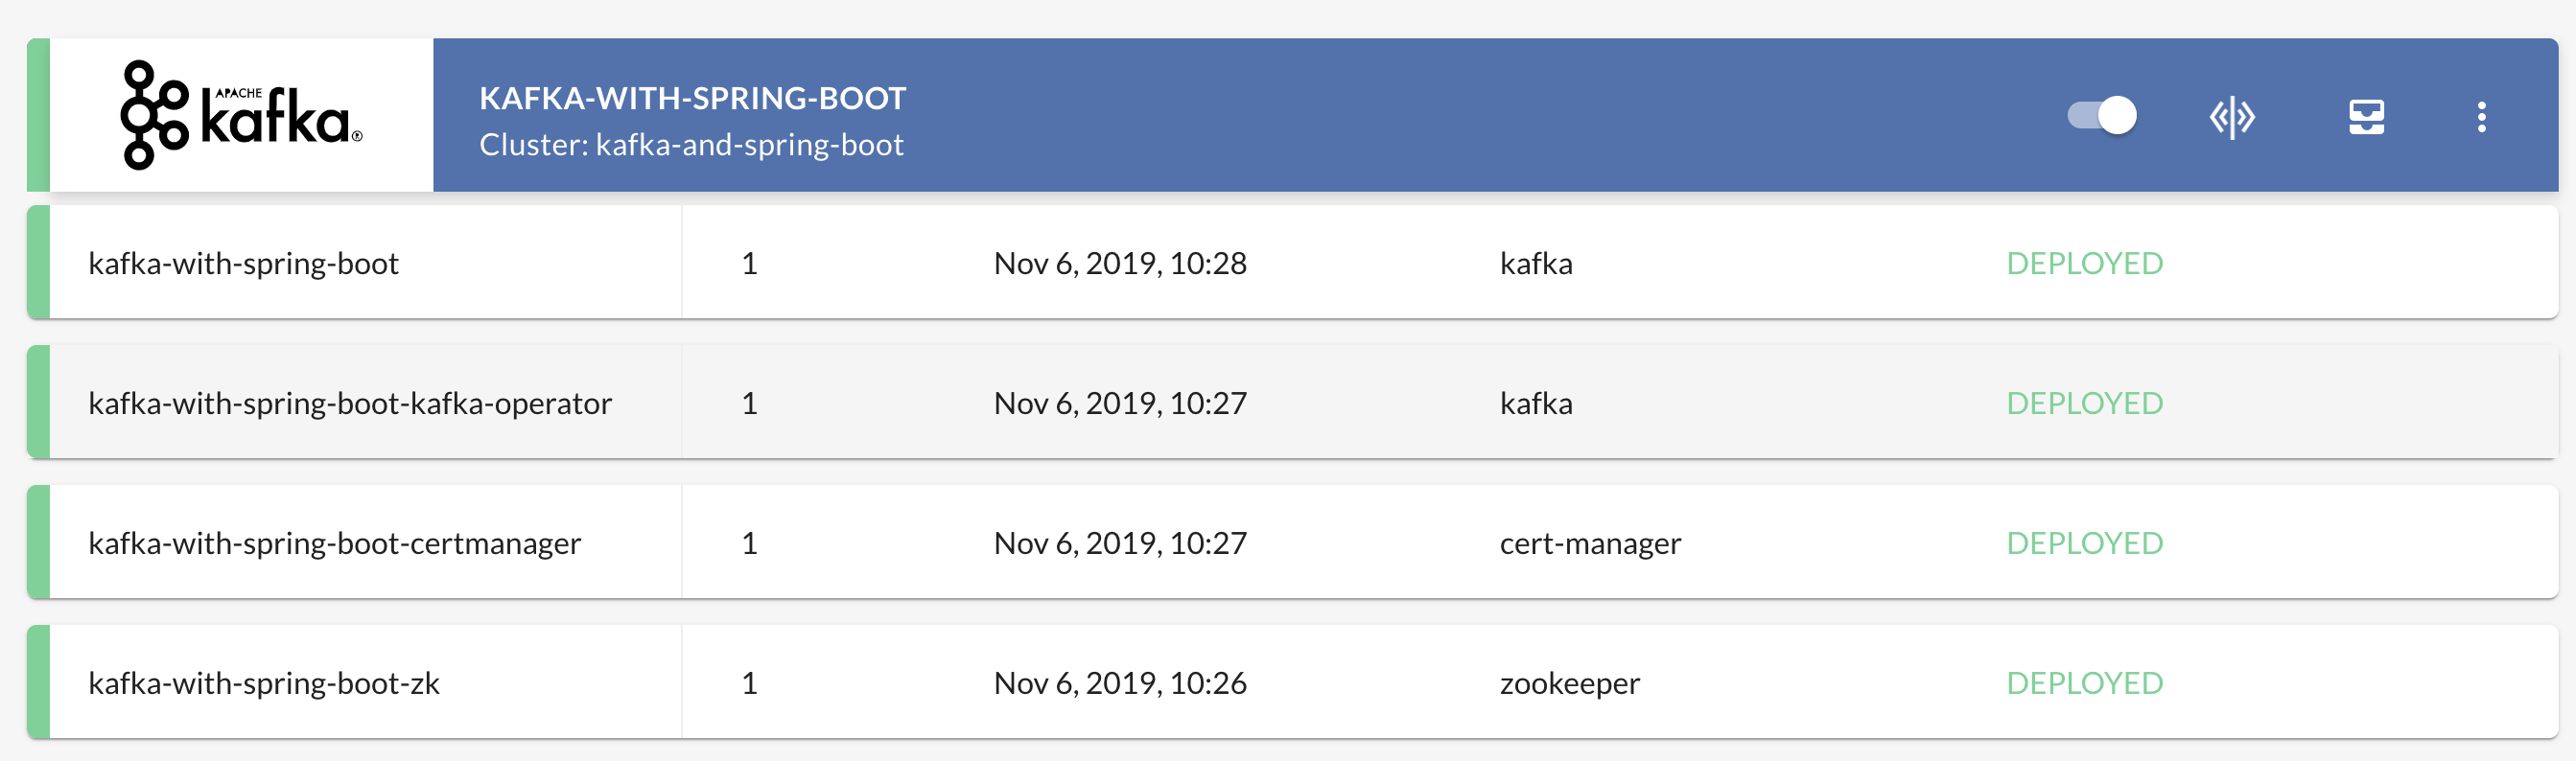
The CI/CD flow will install the Kafka spotguide for you on the selected cluster, which may take a few minutes. In the meantime, let’s continue to the next step and install the Spring Boot application that will be talking with Kafka!
Spring Boot Spotguide 🔗︎
Spring Boot has a separate spotguide. This is a Kubernetes-native Java application written with the Spring Boot application framework, and following best practices, allowing it to work flawlessly on Kubernetes. Originally, the sample application was only backed by MySQL, but we’ve added Kafka integration as well, which can be enabled but is optional.
Go back to to the Spotguide wizard on the UI and select the Spring Boot with SQL Spotguide.
The Spotguide wizard will pop-up again. You’ll have to do two things: tell it the name of your Spotguide and select an image registry secret (remember secrets are stored in Vault), in order to push the application’s Docker image.

In the next step the wizard will offer to create a new cluster again. Again, select the previously created cluster where we installed the Kafka Spotguide.
Then click Create and Launch Spotguide. After a few minutes your application will be deployed to that cluster.

The Spring Boot Kafka app 🔗︎
The Spring Boot application that talks with Kafka is a very simple REST application. It’s capable of sending messages into a Kafka topic ("spring-boot"), and it can list messages that it receives on the same topic. It creates this topic if it doesn’t already exist in Kafka with the NewTopic Bean.
// KafkaController.java

@RestController
@RequestMapping("/api/v1/kafka")
@ConditionalOnProperty(value = "spring.kafka.enabled", havingValue = "true")
public class KafkaController {

    private static final String BOOT_TOPIC = "spring-boot";

    private final List<String> messages = new ArrayList<>();

    @Autowired
    private KafkaTemplate<String, String> kafkaTemplate;

    @PostMapping
    public ResponseEntity sendMessage(@RequestBody Map<String, String> body) {
        kafkaTemplate.send(BOOT_TOPIC, body.get("message"));
        return new ResponseEntity(HttpStatus.ACCEPTED);
    }

    @GetMapping
    public List<String> listMessages() {
        return messages;
    }

    @KafkaListener(topics = KafkaController.BOOT_TOPIC)
    public void consume(String message) {
        messages.add(message);
    }

    @Bean
    public NewTopic newTopic() {
        return new NewTopic(BOOT_TOPIC, 1, (short) 1);
    }
}
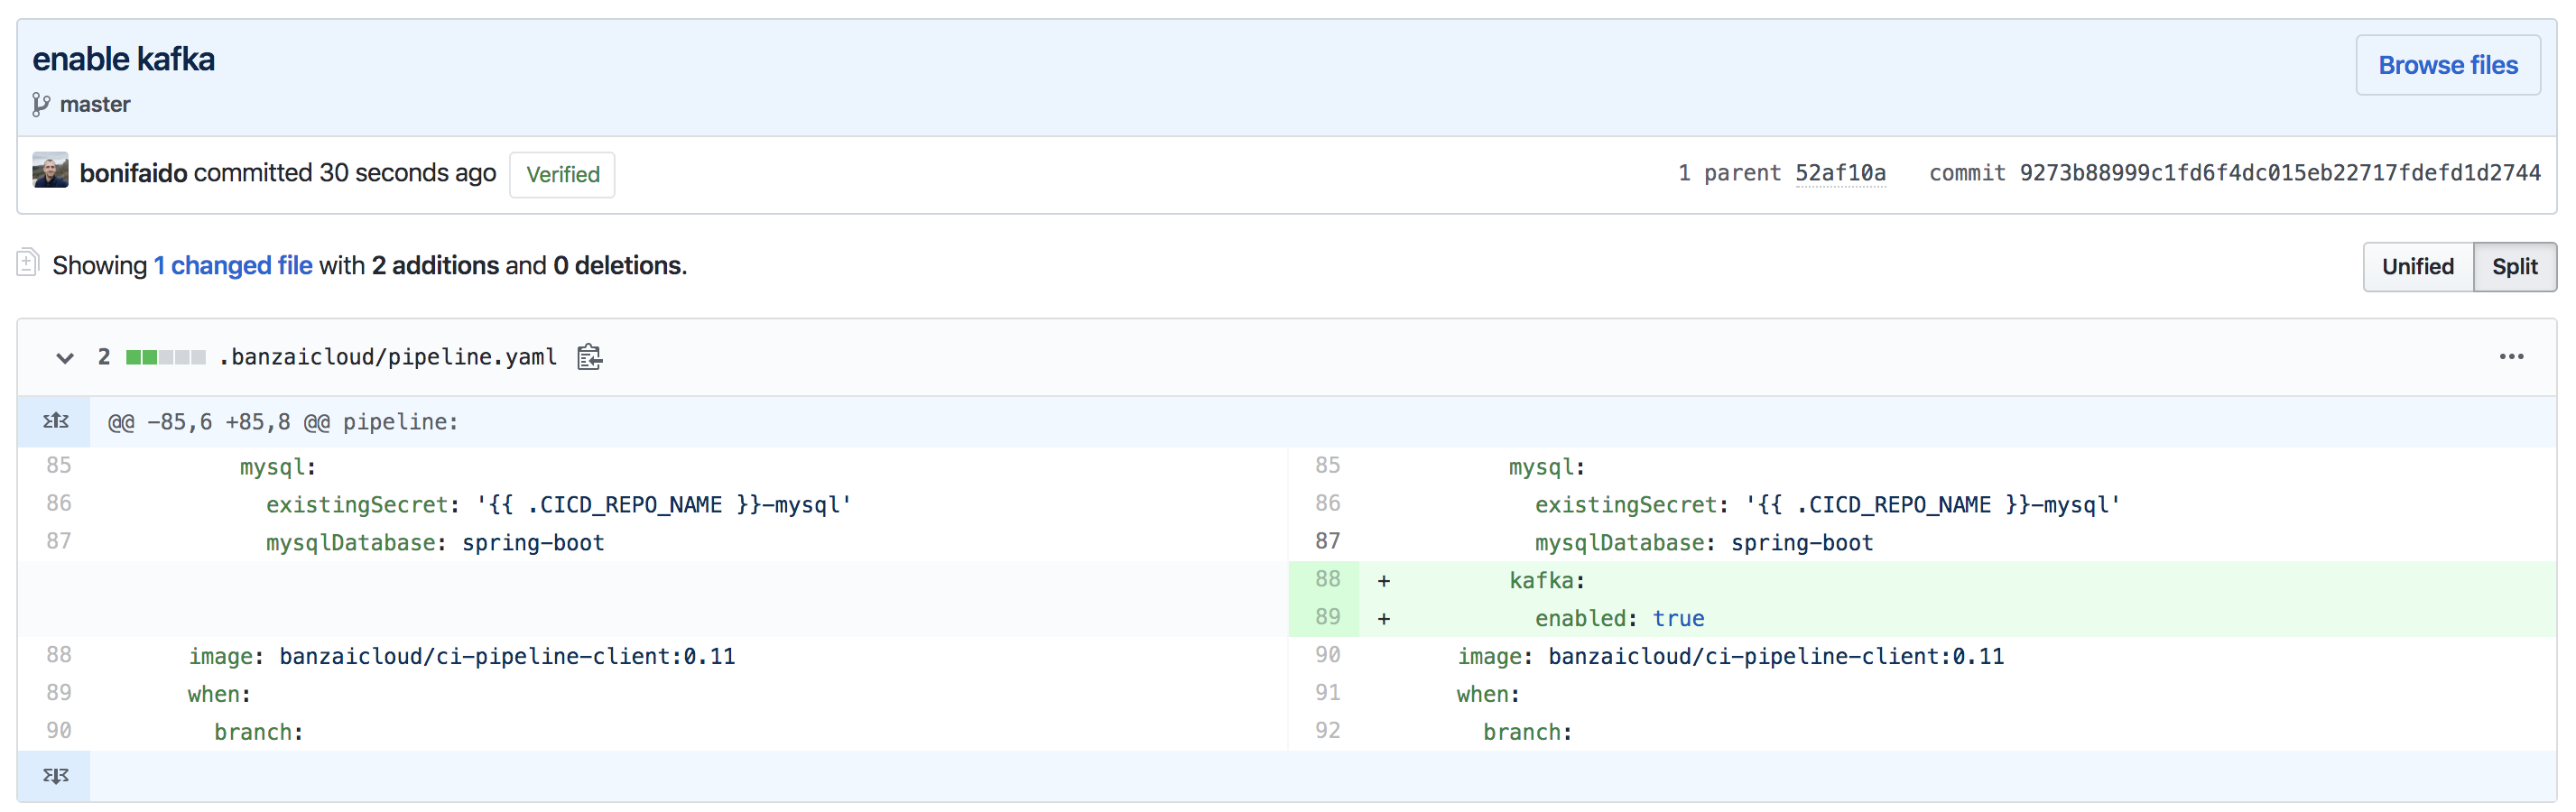
As you can see, this class is annotated with @ConditionalOnProperty which triggers if the spring.kafka.enabled property has the value true, so it is not enabled by default. Since the whole Spotguide instance is saved to a GitHub repository - here in my case - we only need to add a few edits and commit it, then Pipeline will redeploy our Spring Boot app with Kafka integration enabled.
After this, let’s port-forward the Spring Boot service to our machine and put it through its paces (you can get the kubeconfig from the UI on the cluster page):
# Start port-forward and move it to the background
$ kubectl port-forward services/spring-boot-with-kafka-spotguide-spring-boot 8080:80 &
Forwarding from 127.0.0.1:8080 -> 8080
Forwarding from [::1]:8080 -> 8080

# Check that we have no messages received yet (I use HTTPie)
$ http localhost:8080/api/v1/kafka
HTTP/1.1 200 OK
Content-Length: 2
Content-Type: application/json;charset=UTF-8

[]

# Send a message to Kafka with the REST endpoint
$ http POST localhost:8080/api/v1/kafka message=sunny-sunday
HTTP/1.1 202 Accepted
content-length: 0


# Check that we have received the message
$ http localhost:8080/api/v1/kafka
HTTP/1.1 200 OK
Content-Length: 16
Content-Type: application/json;charset=UTF-8

["sunny-sunday"]
That’s it; at this point you should have a working Spring Boot application publishing and consuming messages using Kafka, all running on Kubernetes.
Summary 🔗︎
We hope that his has clarified Spotguides, and that you now have everything you need to quickstart your own Spring Boot application on Kubernetes. Let’s recap. The Spotguide creates or reuses a cluster, and deploys a template application on top of it (even in Bring Your Own Cluster scenarios), allowing you to focus exclusively on your application’s business logic. The whole deployment mechanism is automated (based on the internal CI/CD engine). In this post we have combined two existing spotguides (Kafka and Spring Boot) with a single line Git commit in the “application” spotguide. The deployment was automatically rolled out thanks to Kubernetes’ deployment rollouts. In a forthcoming post, we’ll combine the spotguide concept with Backyards (now Cisco Service Mesh Manager), and update this deployment strategy using Backyards canary-releases support.