


Note: The Spotguides feature mentioned in this post is outdated and not available anymore. In case you are interested in a similar feature, contact us for details.
Our last post about the Banzai Cloud CI/CD flow described how to build/deploy a Spring Boot application on Kuberbetes. This post does the same for a Node.js application. We’ve teamed up with our friends at RisingStack to streamline Node.js application deployments to Kubernetes (pushable to any cloud provider) with Pipeline, which does all the heavylifting and allows developers to focus on writing the code.
Note: The Pipeline CI/CD module mentioned in this post is outdated and not available anymore. You can integrate Pipeline to your CI/CD solution using the Pipeline API. Contact us for details.
CI/CD series:
CI/CD flow for Zeppelin notebooks CI/CD for Kubernetes, through a Spring Boot example Deploy Node.js applications to Kubernetes
Goal 🔗︎
Given a simple Node.js application, we want a complete CI/CD flow triggered upon each commit to the GitHub repository that stores the code of the Node.js application being developed:
- check the latest code out of the repository
- reuse or provision a Kubernetes cluster on one of the supported cloud providers (Amazon, Google, Azure)
- build the (Docker) image with the latest code and publish it to an image repository
- deploy additional tools for the application (database, monitoring)
- deploy a fresh version of the Node.js application to the cluster (or upgrade the application to the new version)
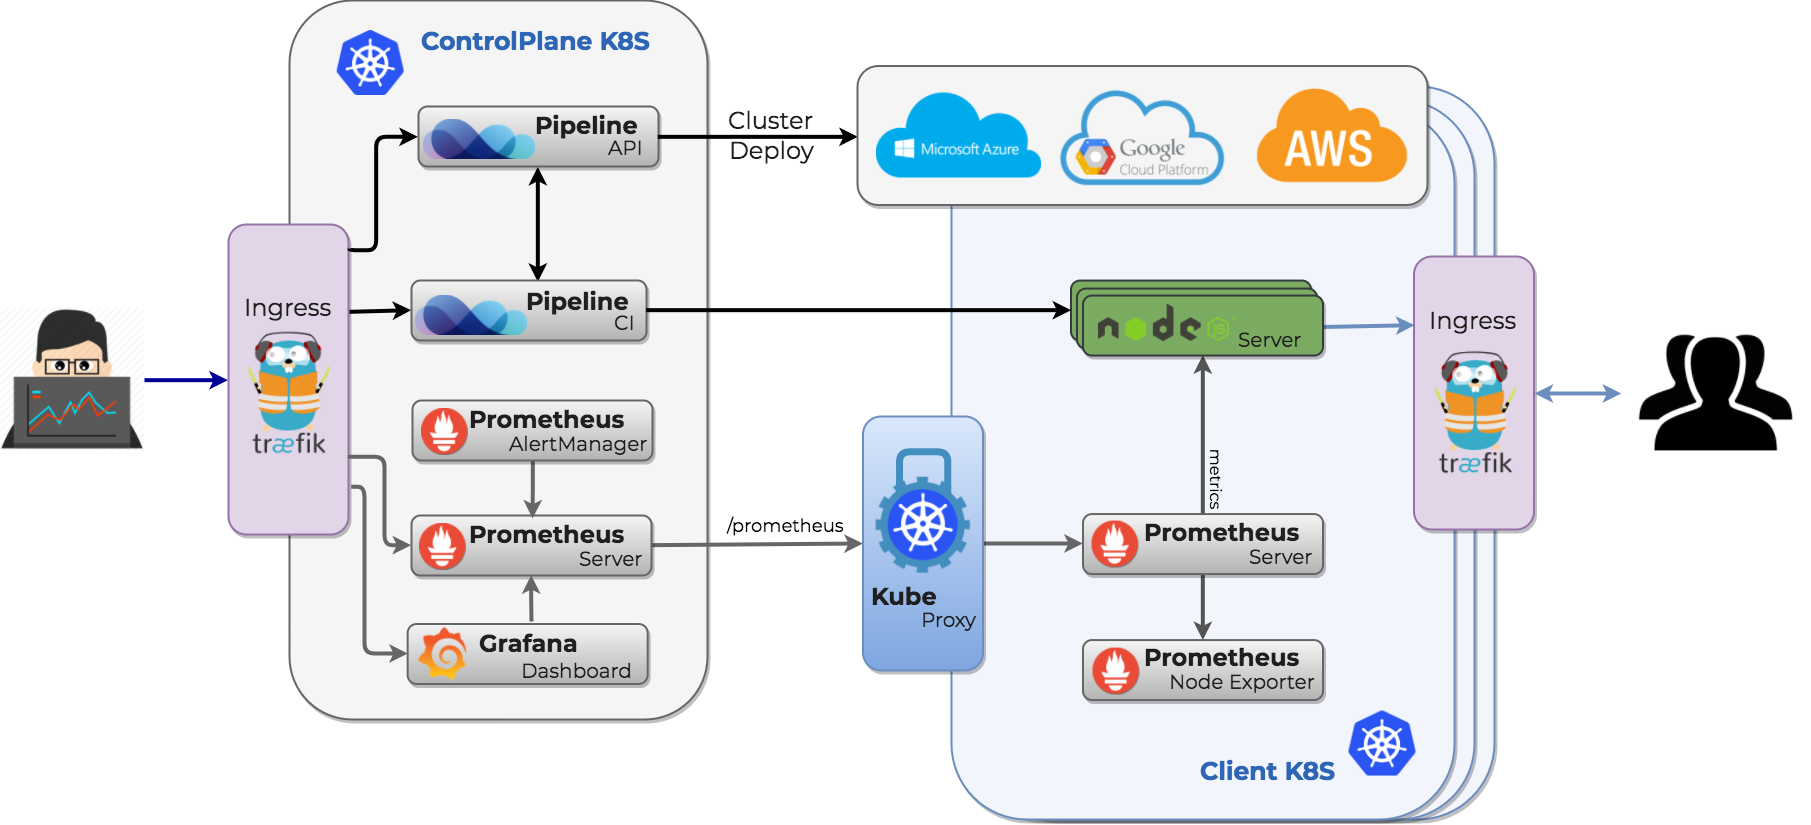
After deployment the infrastructure should look like this:
Prerequisites 🔗︎
As is the case with our other examples, there are a few things we need set up before the Node.js project can be enabled for the Banzai Cloud CI/CD flow:
-
Set up a Pipeline Control Plane running on a cloud provider;
These resources will help set up the Pipeline Control Plane:
-
You’ll need to register the credentials of your chosen cloud provider in the Pipeline application by posting them to the Pipeline endpoint; example payloads are as follows:
Important! This prerequisite is new; formerly cloud credentials had to be added as “drone secrets”; after the latest release (0.3.0) of Pipeline, we added a safer and more convenient way for handling these credentials: once added, cloud credentials are stored safely (in Vault) and can be easily reused by referencing them via their identifiers as “drone secrets”
Register your cloud credentials by adding your details to one of the following cloud specific request bodies, and issuing a POST request to your Pipeline endpoint:
curl -X POST \
   http://{{your-control-plane-ip}}/pipeline/api/v1/orgs/{{orgId}}/secrets\
   -H 'Content-Type: application/json' \
   -H 'Authorization: Bearer {{your-auth-token}} \
   -d {
                {{your chosen provider-specific payload}}
   }
Amazon
{
	"name": "My amazon secret",
	"type": "amazon",
	"values": {
		"AWS_ACCESS_KEY_ID": "{{AWS_ACCESS_KEY_ID}}",
		"AWS_SECRET_ACCESS_KEY": "{{AWS_SECRET_ACCESS_KEY}}"
	}
}
{
	"name": "My google secret",
	"type": "google",
	"values": {
		"type": "{{gke_type}}",
		"project_id": "{{gke-projectId}}",
		"private_key_id": "{{private_key_id}}",
		"private_key": "{{private_key}}",
		"client_email": "{{client_email}}",
		"client_id": "{{client_id}}",
		"auth_uri": "{{auth_uri}}",
		"token_uri": "{{token_uri}}",
		"auth_provider_x509_cert_url": "{{auth_provider_x509_cert_url}}",
		"client_x509_cert_url": "{{client_x509_cert_url}}"
	}
}
Azure
{
	"name": "My azure secret",
	"type": "azure",
	"values": {
		"AZURE_CLIENT_ID": "{{AZURE_CLIENT_ID}}",
		"AZURE_CLIENT_SECRET": "{{AZURE_CLIENT_SECRET}}",
		"AZURE_TENANT_ID": "{{AZURE_TENANT_ID}}",
		"AZURE_SUBSCRIPTION_ID": "{{AZURE_SUBSCRIPTION_ID}}"
	}
}
Values to be substituted in request payloads can be retrieved from your cloud provider account; the Pipeline auth token to be set in the request header can be retrieved by issuing:
curl -X GET http://{{your-control-plane-ip}}/pipeline/api/v1/token
The POST request will return the identifier of the secret:
{
    "name": "My google secret",
    "type": "google",
    "secret_id": "0a4c0d8c-7642-4828-8463-c1492b0e6364"
}
Important: Keep that reference to your
secret_idfor later reuse!
-
The final requirement is a (docker) image registry, where you can store the Node.js application image.
Note: this is different from the previous example where the application artifact was stored in S3 and downloaded at deployment, because, since then, we’ve added support for publishing docker images.
Check out or fork the repository 🔗︎
We have set up a simple Node.js example application that uses a database and exposes REST endpoints for CRUD operations. It can be cloned or forked from here:
git clone git@github.com:banzaicloud/nodejs-example.git
Create the Banzai Cloud CI/CD flow descriptor 🔗︎
Make a copy of the included example CI/CD flow descriptor template:
cp .pipeline.yml.gke.example .pipeline.yml
The content of the CI/CD flow descriptor file should be as follows (replace placeholders with your values):
Warning: you should not add credentials to this file, those must be added as secrets
# generic Banzai Cloud `spotguide` for a Node.js application
pipeline:

# this step creates a Kubernetes cluster on a cloud provider
  create_cluster:
    image: banzaicloud/plugin-pipeline-client:nodejs
    pull: true
    cluster_name: "{{your-cluster-name}}"
    cluster_provider: "google"
    google_project: "{{your-google-project-id}}"
    google_node_count: "2"
    google_gke_version: "1.9.6-gke.1"
    secrets: [plugin_endpoint, plugin_token, plugin_secret_id]

# this step clones the project to the Kubernetes cluster
  remote_checkout:
    image: banzaicloud/plugin-k8s-proxy:nodejs
    original_image: plugins/git

# this step builds and uploads the application image to the image registry (docker)
  build_container:
    image: banzaicloud/plugin-k8s-proxy:nodejs
    original_image: plugins/docker
    dockerfile: Dockerfile
    repo: banzaicloud/nodejs-example
    tags: "{{ printf \"dev-%s\" (.DRONE_COMMIT_SHA | trunc 7) }}"
    log: debug
    secrets: [plugin_endpoint, plugin_token, plugin_username, plugin_password]
    group: test123
    # when:
    #   event: tag

  deploy_monitoring:
    image: banzaicloud/plugin-pipeline-client:nodejs
    deployment_name: "banzaicloud-stable/pipeline-cluster-monitor"
    deployment_release_name: "monitor"

    secrets: [plugin_endpoint, plugin_token]

  deploy_database:
    image: banzaicloud/plugin-pipeline-client:nodejs
    deployment_name: "stable/mongodb"
    deployment_release_name: "nodejs-db"
    deployment_values:
        mongodbUsername: "{{ .PLUGIN_MONGODB_USERNAME }}"
        mongodbPassword: "{{ .PLUGIN_MONGODB_PASSWORD }}"
        mongodbDatabase: your-database
    secrets: [plugin_endpoint, plugin_token, plugin_mongodb_username, plugin_mongodb_password]

# this step deploys the application to the Kubernetes cluster
  deploy_application:
    image: banzaicloud/plugin-pipeline-client:nodejs
    deployment_name: "banzaicloud-stable/nodejs"
    deployment_release_name: "nodejs-example"
    deployment_values:
      image:
        repository: "banzaicloud/nodejs-example"
        tag: "{{ printf \"dev-%s\" (.DRONE_COMMIT_SHA | trunc 7) }}"
      podAnnotations:
        prometheus.io/scrape: "true"
        prometheus.io/path: "/metrics"
        prometheus.io/port: "9999"
      env:
        - name: MONGODB_USERNAME
          value: "{{ .PLUGIN_MONGODB_USERNAME }}"
        - name: MONGODB_URI
          value: "mongodb://nodejs-db-mongodb/your-database"
      secret:
          MONGODB_PASSWORD: "{{ .PLUGIN_MONGODB_PASSWORD | b64enc }}"
      envFrom:
        - secretRef:
            name: nodejs-example
      service:
        type: LoadBalancer
    # when:
    #   event: tag
    secrets: [plugin_endpoint, plugin_token, plugin_mongodb_username, plugin_mongodb_password]
The Banzai Cloud CI/CD flow descriptor explained 🔗︎
The logical succession of the steps that form the CI/CD flow are similar to those presented in our earlier posts:
create_cluster 🔗︎
The first step always specifies a Kubernetes cluster. If the cluster with the given name exists it’s reused, otherwise it’s provisioned.
Note 0.: the example configuration is for GKE, check our previous blog posts for examples pertaining to different cloud providers
Note 1.: if a cluster with the given name is running, the cluster will be reused, otherwise it will be created
Note 2.: cluster names cannot be reused - if a cluster with a given name has been deleted, that name can’t be used to create a new cluster
Important: A similar step is used to delete a cluster, specifically the
cluster_state: deletedproperty, which deletes a running cluster
As mentioned earlier, we’ve recently improved the handling of credentials and other sensitive data; we added components (Vault) to securely manage this kind of information. Furthermore, we’re trying to make using this information more convenient - ideally an authenticated user should use this information with transparency. As per the current status in the CI/CD flow definition we reference cloud credentials through their pipeline identifier, which in turn needs to be registered as a (drone) secret.
In order to get the pipeline identifier of the cloud specific credentials, retrieve it from pipeline (if you haven’t already made a note of it):
curl -X GET \
  'http://{{control-plane-ip}}/pipeline/api/v1/orgs/{{org-id}}/secrets?type={{cloud}}' \
  -H 'Authorization: Bearer {{bearer-token}}' \
cloud should have the value google, azure, or amazon
remote_checkout 🔗︎
This step checks the project out of the GitHub repository to a PVC (persistent volume claim) in the Kubernetes cluster.
build_container 🔗︎
This step is specific to the project being worked on. It’s purpose is to build project artifacts.
run_tests 🔗︎
This step executes the tests for the project.
publish_image 🔗︎
This step builds and publishes the docker image; an existing Docker Hub account is required for this step; Docker Hub credentials need to be added as drone secrets.
deploy_monitoring 🔗︎
An important feature of every application is monitoring. With this (optional) step, monitoring is set up for the application so that you can easily glean insights into the application’s behavior.
deploy_database 🔗︎
This step is specific to this project. The database is deployed separately from the application itself. Database credentials (a username and password already set up for the database being deployed) need to be set up again as secrets.
deploy_application 🔗︎
This step deploys the application’s releases. The step is configured to run whenever a new commit is pushed to the pertinent GitHub repository, but this behavior can be limited to playing itself out when a new tag is added to the application. This is to support the upgrading of the application on Kubernetes without interruptions.
The deployment of the Node.js application is done through the use of a helm chart
The infrastructure after deployment looks like this:
Note: as you can see, monitoring via Prometheus is available for the deployment. However, in order to visualize reported values, application specific dashboards need to be set up.
Benefits 🔗︎
Once set up, the Banzai Cloud CI/CD flow is triggered every time the code in the GitHub repository changes, thus you may see changes go into effect instantaneously. Applications may be redeployed or upgraded to their newest versions after each modification, however, if this an undesired outcome, it’s possible to control this behaviour via git tags.
Conclusions 🔗︎
As you can see, enabling a project for the Banzai Cloud CI/CD flow frees developers from the burden of setting up and managing an environment, and allows them to focus on development. Moreover. letting resources (containers, pods etc…) be managed by Kubernetes has additional benefits (reduced maintenance, operational costs).
While this setup may seem complicated, please note that we’re making progress on further simplifying it: we’re continuously improving the spotguides and supporting components to reduce the complexity of setting up a CI/CD flow.


