One of our goals at Banzai Cloud is to eliminate the concept of nodes, insofar as that is possible, so that users will only be aware of their applications and respective resource needs (cpu, gpu, memory, network, etc). Launching Telescopes was a first step in that direction - helping end users to select the right instance types for the job, through Telescopes infrastructure recommendations, then turning those recommendations into actual infrastructure with Pipeline. When following these recommendations, however, it is still possible that your cluster will run out of resources, or resources will become underutilized over time, so there’s a strong need to automatically scale the cluster at runtime. This is the role of the Cluster Autoscaler and that’s why Pipeline has added support for it.
Learn more about the different types of autoscaling features supported and automated by the Banzai Cloud Pipeline platform platform:
Cluster Autoscaler quick overview 🔗︎
The Cluster Autoscaler is a tool that automatically right sizes your Kubernetes cluster. It runs periodically and reacts to the following events:
- there are pods that failed to run in the cluster due to insufficient resources, usually these pods are in
Pendingstate - some nodes in the cluster are underutilized for a
configurableextended period of time, so they can be deleted and their pods easily placed on other existing nodes.
Cluster Autoscaler is the default autoscaling component for Kubernetes, however it’s not part of the main release, so you have to deploy it just as any other deployment.
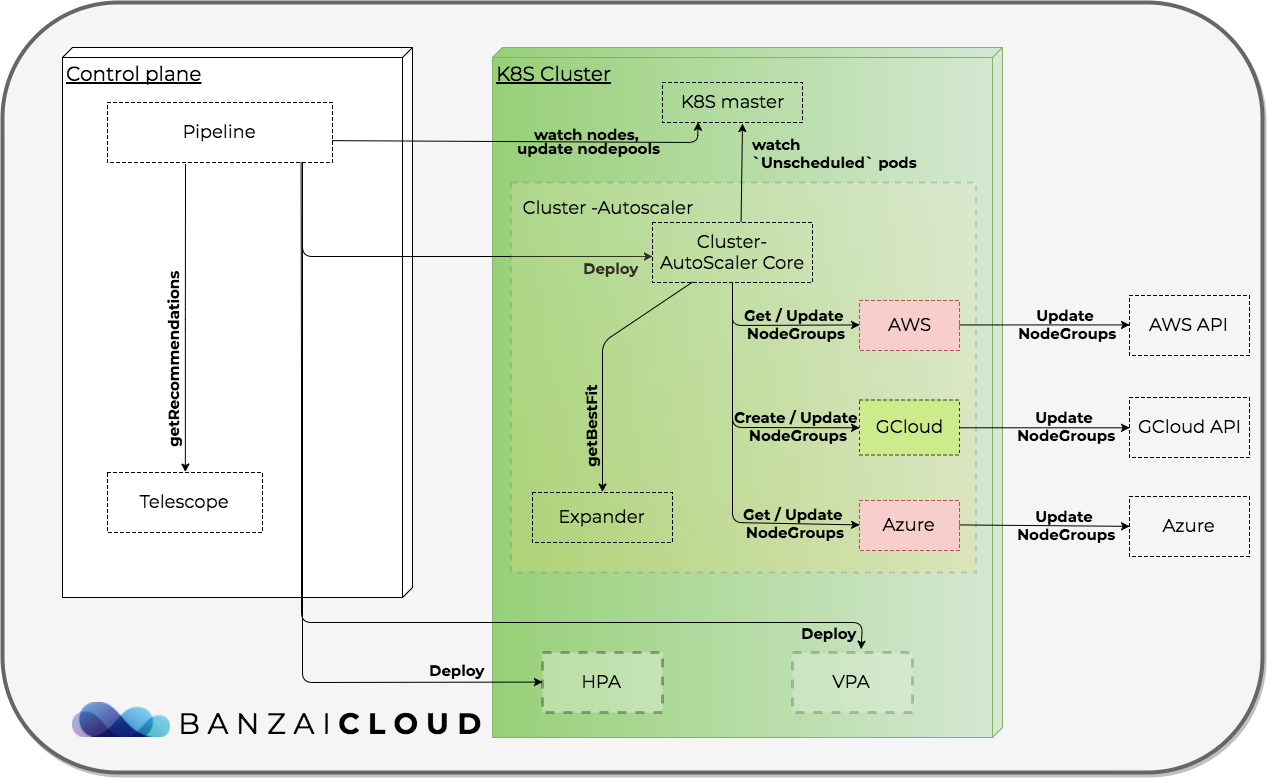
There is a clear separation between expansion strategies, cloud provider specific logic and core logic, using Expander and CloudProvider interfaces thus gives us the flexibility to use different cloud providers and apply different expansion strategies.
When the Cluster Autoscaler identifies that it needs to scale up a cluster due to unschedulable pods, it increases the number of nodes in one of the available node groups. When there is more than one node group, it has to decide which one to expand. Expanders provide different strategies for selecting the node group to which new nodes will be added.
Currently the Cluster Autoscaler provides the following expander strategies:
-
random - randomly selects a node group.
-
most-pods - selects the node group that would be able to schedule the most pods when scaling up. This could be useful when you are using nodeSelector to make sure certain pods land on certain nodes.
-
least-waste - selects the node group with the least idle CPU (or, if groups are tied, unused memory) after scale-up. This is useful when you have different classes of nodes - for example, high CPU or high memory nodes - that you only want to expand when there are pending pods that need a lot of those specific resources.
-
price - selects the node group that costs the least and, at the same time, whose machines match the cluster size.
Node group configurations can be passed in formats similar to, minNumber:maxNumber:nodeGroupname, specifying min and max number of nodes for each node group. As an alternative, you can use tag based autodiscovery, so that Autoscsaler will register only node groups labelled with the given tags. Cluster autoscaler also supports autoprovisioning, which means that, besides selecting from a predefined set of node groups, it’s able to create new, node group-based running simulations and estimates, for all available machine types on a cloud provider, in order for you to choose the best match for your actual cluster workload. During these simulations it uses the same predicate functions run by the Scheduler to estimate real cluster workloads.
There’s support for all major cloud providers - Amazon, Azure, Google - however, only GKE is fully supported as you can see below:
Amazon- autodiscovery works fine, autoprovisioning, price-based expander strategy is ongoing work, not yet merged into masterAKS- no autodiscovery, autoprovisioning, no price based expander strategyGKE- autodiscovery, autoprovisioning, price based expander strategy available
Despite the absence of full feature support for all providers, we have found the autoscaler’s core functionality to be quite useful and flexible, so we decided to use it with Pipeline as a jumping off point autoscaling solution for all free-tier users. We do provide metrics based autoscaling (from Prometheus), which is wired into Hollowtrees for our enterprise users. At the moment, we set the least-waste strategy by default, pass the node group information - Pipeline is aware of this - and deploy the autoscaler automatically, immediately after the cluster has been created.
We’ve extended the existing Cluster Autoscaler Helm chart, with support for passing credentials required by AKS. In the latest image there’s a small issue with the AmazonCloudProvider that causes node groups to fail to register. We have pushed a fix for that upstream to Kubernetes, which is the main reason why, while the fix is merged, we’ve built our own image.
Deploying your own autoscaler to Google can be problematic. The provider is tightly integrated with GKE and you can’t specify node groups directly, since the provider implementation fetches node group infos from node pools (min/max and autoscaling enabled flag), so these have to be filled. However, you can only specify min/max numbers, for example, if you set the autoscaling flag to true in the node pool, so that GKE will automatically deploy its Cluster Autoscaler in the master node. For that reason, we’re deploying the autoscaler to Google via the GKE API.

Example of a cluster scale-up triggered by a SparkPi job via Zeppelin 🔗︎
In the steps below we will show how you can create a single 2xCPU node Amazon cluster with Pipeline using it’s REST API, deploy Zeppelin, and, finally, how you can launch a sample Spark job inside Zeppelin. For this workload a single node cluster will certainly run out of resources, and at that point you’ll see pods pending until new nodes join the cluster.
You can find a more detailed description in one of our previous blog posts about How to create Kubernetes clusters in the cloud with Pipeline.
The below HTTP request examples are from our Postman collection, described here. You can find the request in Postman, after #.
-
Create a cluster on
Amazonwith autoscaling enabled- Submit your AWS credentials as secrets
# Cluster Create AWS POST {{url}}/api/v1/orgs/{{orgId}}/secrets { "name": "My amazon secret", "type": "amazon", "values": { "AWS_ACCESS_KEY_ID": "{{YOUR_AWS_ACCESS_KEY_ID}}", "AWS_SECRET_ACCESS_KEY": "{{YOUR_AWS_SECRET_ACCESS_KEY}}" } }- To enable autoscaling you only have to specify
minCount,maxCountand setautoscaling = truefor each node pool you want to autoscale
      # Add secret AWS
      POST {{url}}/api/v1/orgs/{{orgId}}/clusters
      {
        "name":"awscluster-{{username}}-{{$randomInt}}",
        "location": "eu-west-1",
        "cloud": "amazon",
        "secret_id": "{{secret_id}}",
        "properties": {
              "amazon": {
                  "nodePools": {
                  	"pool1":{
                  		"instanceType": "m2.xlarge",
      	            	"spotPrice": "0.2",
      	            	"autoscaling": true,
      	                "minCount": 1,
      	                "maxCount": 5,
      	                "image": "ami-16bfeb6f"
                  	}
                  },
                  "master": {
                      "instanceType": "m4.xlarge",
                      "image": "ami-16bfeb6f"
                  }
              }
          }
      }
If you’re running on
AKS, use at version 1.9.6 or higher ofKubernetes.- After your cluster is created, download & save the K8s cluster config and set environment variable
KUBECONFIG, so that you will be able to to usekubectlin the following steps to check running pods & nodes.
# Cluster Config GET {{url}}/api/v1/orgs/{{orgId}}/clusters/{{cluster_id}}/config -
Start Spark example in Zeppelin
-
Install Zeppelin-spark deployment
POST {{url}}/api/v1/orgs/{{orgId}}/clusters/{{cluster_id}}/deployments { "name": "banzaicloud-stable/zeppelin-spark" } -
Get the Zeppelin endpoint
    # Cluster Public Endpoint
    GET {{url}}/api/v1/orgs/{{orgId}}/clusters/{{cluster_id}}/endpoints
The Zeppelin url should be listed in the response JSON in the url array.
-
Open the endpoint in a browser and login to Zeppelin as admin with default password: zeppelin.
-
Click on
Create New Noteand paste the following simple example code, which calculates PI:%spark import scala.math.random val slices = 50000 val n = math.min(100000L * slices, Int.MaxValue).toInt // avoid overflow val count =sc.parallelize(1 until n, slices).map { i => val x = random * 2 - 1 val y = random * 2 - 1 if (x*x + y*y < 1) 1 else 0 }.reduce(_ + _) println("Pi is roughly " + 4.0 * count / (n - 1)) -
checkout pods
kubectl get po NAME READY STATUS RESTARTS AGE pipeline-traefik-7c47dc7bd7-j7rcg 1/1 Running 0 21m shuffle-bvck7 1/1 Running 0 17m vigilant-donkey-spark-rss-674d457d77-nslwb 1/1 Running 0 17m vigilant-donkey-zeppelin-84ccc8c9cd-6xlmb 1/1 Running 0 17m zri-spark--2dj2zv9ss-1528129832065-driver-754f9 0/1 Pending 0 10s -
describe
Pendingpod to see if scheduling fails due to Insufficient cpu resourceskubectl describe po zri-spark--2dj2zv9ss-1528129832065-driver-754f9 ... Events: Type Reason Age From Message ---- ------ ---- ---- ------- Warning FailedScheduling 7s (x6 over 22s) default-scheduler 0/2 nodes are available: 1 Insufficient cpu, 1 PodToleratesNodeTaints. -
watch for upcoming nodes
kubectl get nodes -w
After some time, typically 3-4 minutes on AWS, you should see the new node(s) joining the cluster and that all pods are being deployed. If this takes too long, you might see Zeppelin timing out, in which case you can try running it again.
This kind of reactive autoscaling is suitable for long-running jobs like Spark, where the application itself is able to scale it’s workload and scale-up times don’t affect overall running costs.
For the other types of applications we support, like NodeJS, JEE, you need to combine Cluster-Autoscaler with a Horizontal Pod Autoscaler which is able to scale deployments based on different cpu / memory utilization metrics.
For our enterprise users we combine bits of Cluster-Autoscaler with Telescopes and Hollowtrees to allow faster and predictive autoscaling, with cluster utilization calculations based on Prometheus metrics. We will be blogging about these and showing off their open source code, so make sure you follow us.
About Banzai Cloud Pipeline 🔗︎
Banzai Cloud’s Pipeline provides a platform for enterprises to develop, deploy, and scale container-based applications. It leverages best-of-breed cloud components, such as Kubernetes, to create a highly productive, yet flexible environment for developers and operations teams alike. Strong security measures — multiple authentication backends, fine-grained authorization, dynamic secret management, automated secure communications between components using TLS, vulnerability scans, static code analysis, CI/CD, and so on — are default features of the Pipeline platform.


