
The Backyards upgrade process consists of two phases:
Upgrade the Backyards control plane 🔗︎
-
Upgrade Backyards CLI to the version you want to install.
Note: For details on a specific Backyards release, see the release announcements.
-
Deploy a new version of Backyards. The following command in-place upgrades the Backyards control plane. It also installs the new Istio control plane, but the applications keep using the old control plane until you upgrade the Istio control plane.
$ backyards install -aIn case you want to have custom settings for your Istio control plane you can provide that during this install:
$ backyards install -a --istio-cr-file <custom-istio-cr-file.yaml> -
Validate that the Backyards control plane is upgraded and already uses the new Istio control plane:
$ kubectl get po -n=backyards-system -L istio.io/rev
NAME                                            READY   STATUS    RESTARTS   AGE     REV
backyards-74b79fbd48-xfpg5                      3/3     Running   1          6m48s   cp-v17x.istio-system
backyards-als-57568857c9-dm9hf                  2/2     Running   0          6m48s   cp-v17x.istio-system
backyards-grafana-55b54d8895-kvdhm              3/3     Running   0          6m48s   cp-v17x.istio-system
backyards-ingressgateway-64f4df4555-shpcg       1/1     Running   0          6m46s   cp-v17x.istio-system
backyards-kubestatemetrics-8fd988999-vsrh7      2/2     Running   0          6m48s   cp-v17x.istio-system
backyards-leo-6d7f474d9-wdhg2                   2/2     Running   1          6m48s   cp-v17x.istio-system
backyards-prometheus-operator-9d54d6796-929tc   3/3     Running   1          6m48s   cp-v17x.istio-system
backyards-sre-alert-exporter-8577475bd9-vhfn6   2/2     Running   1          6m48s   cp-v17x.istio-system
backyards-sre-controller-f846b9448-cph44        2/2     Running   1          6m48s   cp-v17x.istio-system
backyards-tracing-7c5c88cf-mlnc8                2/2     Running   0          6m47s   cp-v17x.istio-system
prometheus-backyards-prometheus-0               4/4     Running   1          6m3s    cp-v17x.istio-system
prometheus-node-exporter-crpq2                  1/1     Running   0          12m
prometheus-node-exporter-j6bkx                  1/1     Running   0          12m
prometheus-node-exporter-n2sbh                  1/1     Running   0          12m
Upgrade the Istio control plane 🔗︎
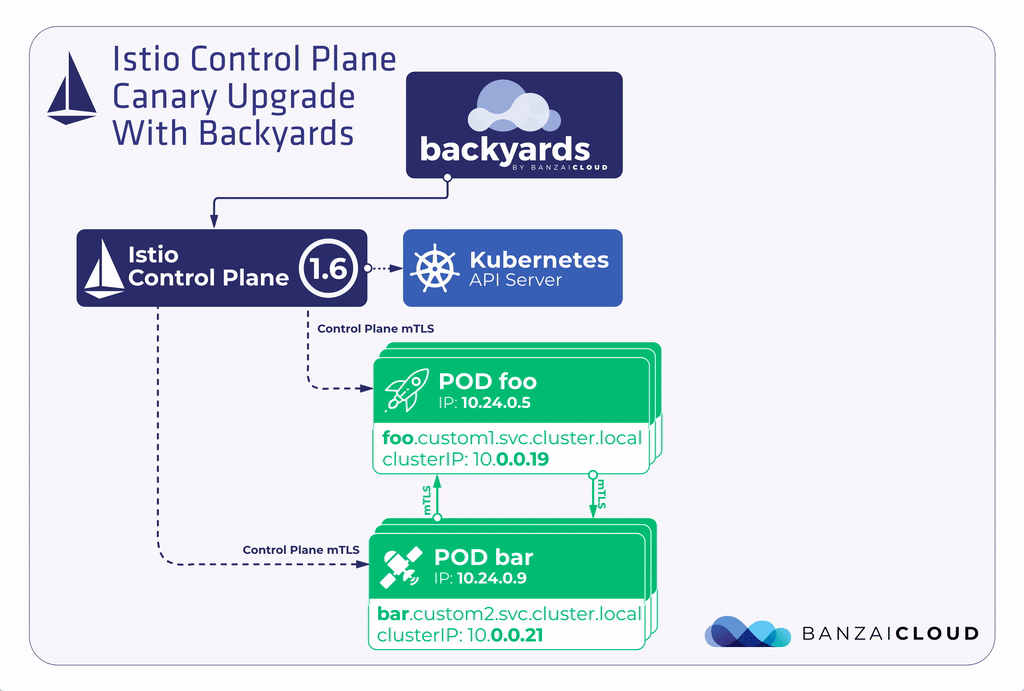
With Backyards, you can upgrade the Istio control plane to a new version using a process similar to canary upgrades.
Note: Upgrading to a new version of Backyards involves upgrading Istio as well.
Let’s suppose that you have Backyards 1.3.2 with an Istio 1.6 control plane running in your cluster and you’d like to upgrade to Backyards 1.4 with an Istio 1.7 control plane. Here are the high level steps necessary to accomplish this using the canary upgrade flow.
- Deploy an Istio 1.7 control plane next to the Istio 1.6 control plane.
- Migrate the data plane gradually to the new control plane.
- When migration is fully finished, uninstall the Istio 1.6 control plane.
This canary upgrade model is much safer than the in-place upgrade workflow, because it can be done gradually. If any issues arise, they probably affect only a small portion of your applications, and if something happens, it is much easier to rollback only a part of your applications to use the original control plane.
This upgrade flow gives us more flexibility and confidence when making Istio upgrades, dramatically reducing the potential for service disruptions.
Limitations 🔗︎
Currently, you can migrate your applications to the new control plane on a per namespace basis.
Steps 🔗︎
To upgrade the Istio control plane to a newer version, complete the following steps. The examples in this procedure assume that you are upgrading from Istio 1.6 to Istio 1.7. Adjust the version numbers as needed for your environment.
| Backyards version | Supported Istio versions |
|---|---|
| 1.3 | 1.6 |
| 1.4 | 1.7 |
| 1.5 | 1.8 |
Complete the pre-upgrade checks for the Istio control plane 🔗︎
-
Verify that the new Istio control plane is deployed as well: there should be two istio-operator-
and two istiod- entries in the output. $ kubectl get po -n=istio-system NAME READY STATUS RESTARTS AGE istio-ingressgateway-5df9c6c68f-vnb4c 1/1 Running 0 3m47s istio-operator-v16x-0 2/2 Running 0 3m59s istio-operator-v17x-0 2/2 Running 0 3m43s istiod-5b6d78cdfc-6kt5d 1/1 Running 0 2m45s istiod-cp-v17x-b58f95c49-r24tr 1/1 Running 0 3m17sThe
backyards install -acommand took care of installing the new Istio control plane, but so far only the old control plane is used from the applications.
Complete the pre-upgrade checks for the Istio configurations 🔗︎
-
If you are using EnvoyFilters to customize your Envoy configuration, update your EnvoyFilter custom resources, because the syntax of these Lua filter configuration was changed in Istio 1.7. For details, see our Istio 1.7 overview.
CAUTION:
If you run Istio 1.7 with an EnvoyFilter containing the old Lua filter config syntax which does not have a specific proxy version specified, your istio proxy containers won’t start! -
If you have a MeshGateway resource, where the
spec.runAsRootfield is either set to false or it is omitted (means that your gateway container runs as non root) and you have a port lower than 1024 defined, you have the following options:- Set the
spec.runAsRootfield totrue, if you’d like to run your gateway container as root. - Specify a targetPort higher than 1024.
CAUTION:
Without this change your gateway pod might fail to start! - Set the
-
In Istio 1.7.0, which is used in Backyards 1.4.1 by default, there is an issue with headless services, their endpoints are not updated automatically in istiod: https://github.com/istio/istio/issues/26617
Solution: The best will be to upgrade to Backyards 1.4.2, which will use Istio 1.7.1, where the issue will be fixed. Until then, when headless services are scaled, the istiod pod needs to be restarted manually to have the updated endpoints.
Migrate the gateways 🔗︎
-
Move the gateways so they use the new Istio control plane.
$ kubectl -n istio-system patch mgw <your-gateway> --type=merge --patch "
spec:
  istioControlPlane:
    name: "<new-istio-cp-name>"
    namespace: "istio-system"
Complete the pre-migration checks 🔗︎
-
Verify that your namespaces are labeled for sidecar injection.
$ kubectl get ns <name-of-your-namespace> -L istio-injection NAME STATUS AGE ISTIO-INJECTION <name-of-your-namespace> Active 2m21s enabled -
Make sure that the pods of your applications use the sidecar proxy of the Istio version you want to upgrade from, for example, 1.6.
$ POD_NAME=$(kubectl get pods -n <name-of-your-namespace> -l app=<name-of-your-application> -o=jsonpath='{.items[0].metadata.name}')
$ kubectl get po -n=<name-of-your-namespace> $POD_NAME -o yaml | grep istio-proxyv2:
    image: banzaicloud/istio-proxyv2:1.6.3-bzc
    image: docker.io/banzaicloud/istio-proxyv2:1.6.3-bzc
Migrate your data plane to the new control plane 🔗︎
Repeat this step for other namespaces that you want to migrate and in the meantime make sure that your applications can still communicate with each other.
Note that the two Istio control planes share trust, because they use the same certificates for encrypted communication. Therefore, when an application pod that still uses the old Istio’s control plane calls another pod that already uses the new Istio’s control plane, the encrypted communication will succeed because of that shared trust. This means that you can migrate the data plane on a namespace by namespace basis, the communication between the pods won’t be affected.
-
Label the namespace of your application you want to migrate for sidecar injection with the new control plane’s label. The label name is: istio-control-plane-cr-name.istio-control-plane-cr-namespace, for example, cp-v17x.istio-system, or cp-v18x.istio-system.
$ kubectl label ns <name-of-your-namespace> istio-injection- istio.io/rev=cp-v17x.istio-system --overwrite -
Make sure that the labeling is correct.
$ kubectl get ns <name-of-your-namespace> -L istio-injection -L istio.io/rev NAME STATUS AGE ISTIO-INJECTION REV <name-of-your-namespace> Active 19m cp-v17x.istio-system -
Restart the pod in the namespace.
$ kubectl rollout restart deployment -n <name-of-your-namespace> -
Wait for the rollout to finish, then make sure that the new sidecar proxy is used for one of the application pods.
$ POD_NAME=$(kubectl get pods -n <name-of-your-namespace> -l app=<name-of-your-application> -o=jsonpath='{.items[0].metadata.name}') $ kubectl get po -n=<name-of-your-namespace> $POD_NAME -o yaml | grep istio-proxyv2: image: banzaicloud/istio-proxyv2:1.7.0-bzc image: docker.io/banzaicloud/istio-proxyv2:1.7.0-bzc -
Test your application to verify that it works with the new control plane as expected. In case of any issues, refer to the rollback section to roll back to the original Istio control plane.
Roll back the data plane to the old control plane in case of issues 🔗︎
CAUTION:
Only do this step, if you have issues with your data plane pods, which were working with the old Istio control plane, and you deliberately want to move your workloads back to that control plane!-
If there is a problem and you want to roll the namespace back to the old control plane, set the istio-injection=enabled label on the namespace, and restart the pod using the
kubectl rollout restart deploymentcommand:$ kubectl label ns <name-of-your-namespace-with-issues> istio-injection=enabled $ kubectl rollout restart deployment -n <name-of-your-namespace-with-issues>
Uninstall the old Istio control plane 🔗︎
-
After you have migrated all your namespaces and verified that your applications work, check that the only pod using the old control plane is the old
istiodpod.It’s recommended that you take some time to make sure that everything is working on the new control plane before turning off the old one.
$ kubectl get po -A -l istio.io/rev -L istio.io/rev NAMESPACE NAME READY STATUS RESTARTS AGE REV backyards-system backyards-74b79fbd48-xfpg5 3/3 Running 1 20m cp-v17x.istio-system backyards-system backyards-als-57568857c9-dm9hf 2/2 Running 0 20m cp-v17x.istio-system backyards-system backyards-grafana-55b54d8895-kvdhm 3/3 Running 0 20m cp-v17x.istio-system backyards-system backyards-ingressgateway-64f4df4555-shpcg 1/1 Running 0 20m cp-v17x.istio-system backyards-system backyards-kubestatemetrics-8fd988999-vsrh7 2/2 Running 0 20m cp-v17x.istio-system backyards-system backyards-leo-6d7f474d9-wdhg2 2/2 Running 1 20m cp-v17x.istio-system backyards-system backyards-prometheus-operator-9d54d6796-929tc 3/3 Running 1 20m cp-v17x.istio-system backyards-system backyards-sre-alert-exporter-8577475bd9-vhfn6 2/2 Running 1 20m cp-v17x.istio-system backyards-system backyards-sre-controller-f846b9448-cph44 2/2 Running 1 20m cp-v17x.istio-system backyards-system backyards-tracing-7c5c88cf-mlnc8 2/2 Running 0 20m cp-v17x.istio-system backyards-system prometheus-backyards-prometheus-0 4/4 Running 1 19m cp-v17x.istio-system demo-a app-a-989f8b7d5-r7gxp 2/2 Running 0 2m46s cp-v17x.istio-system demo-b app-b-6fd9976f8-8fnsw 2/2 Running 0 91s cp-v17x.istio-system istio-system istio-ingressgateway-74cffbd5d5-58kgl 1/1 Running 0 4m43s cp-v17x.istio-system istio-system istiod-65484c4dbc-dxchq 1/1 Running 0 20m mesh.istio-system istio-system istiod-cp-v17x-b58f95c49-xxpwm 1/1 Running 0 20m cp-v17x.istio-system -
Uninstall the old Istio control plane.
$ kubectl delete -n=istio-system istio <istio-old-control-plane-name>


