
The following procedure describes how to upgrade the node pools of a cluster. Upgrading node pools allows you to modify the node pools of an existing cluster without having to manually delete and recreate the node pool. Currently, you can:
- Change the image running on the virtual machines of the node pool.
- Customize the batch size, drain options, and other parameters used during the update.
How it works 🔗︎
The process is basically a rolling upgrade: Pipeline creates a new node pool with the new parameters, transfers the load, then destroys the old node pool.
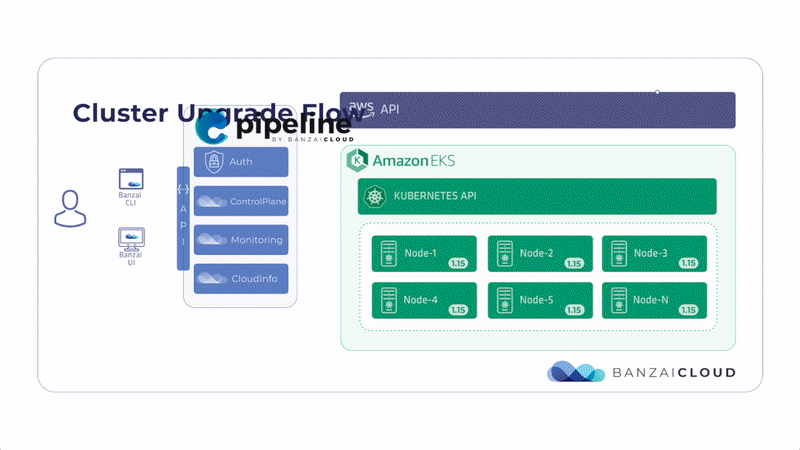
When upgrading a node pool, Pipeline performs the following actions.
- Ensures that the node pool’s desired capacity is stable.
- Updates the configuration of the node pool.
- Lists the nodes that need to be upgraded.
- If the list empty, the upgrade is finished, otherwise, it proceeds to the next step.
- Increases the size of the node pool by
maxSurgenodes. - Disables the cluster autoscaler if it’s enabled.
- Pipeline drains the next batch of nodes (set in
maxBatchSize) to be upgraded so the workloads can be relocated or finished, then waits for the configured timeout (by default, timeout is 1 minute, the batch size is configurable, it is 2 by default). - Pipeline terminates the nodes in the batch.
- Checks if the number of unavailable nodes is lower than the configured
maxUnavailablethreshold. - Repeat from Step 7 until all nodes have been updated.
Note: To rollback to the previous version of the node pool, repeat the upgrade process with the old YAML file of the node pool. Include only the parameters that you want to change during the update, you don’t have to list every parameter of the node pool in the YAML file.
Rollback is possible only if the cluster has been created with Banzai Cloud Pipeline version 0.5.0 or later, or if a node pool upgrade has been successfully completed on the cluster at least once. Otherwise, the rollback will delete and recreate every node.
- Decreases the size of the node pool by
maxSurgenodes to restore the original capacity. - Re-enables the cluster autoscaler if it was originally enabled.
Note that during the upgrade process, the capacity of the node pool is reduced by the number of nodes in the batch, as these nodes are being upgraded. To avoid this decrease in capacity, you can set the maxSurge option to increase the capacity of the node pool for the duration of the upgrade.
Pipeline monitors the number of available nodes in the node pool. If at any time the number of unavailable nodes becomes higher than the value set as maxUnavailable, the update process stops. By default, maxUnavailable is 0, so if any nodes become unavailable (for example, because updating a batch fails for some reason), the update process stops.
Duration of the update 🔗︎
Updating the node pool can take several hours, depending on the configuration, workload, and the available capacity in the node pool. Among others, the following configuration settings influence the length of the process:
- Low Pod Disruption Budget.
- Pods with high terminationGracePeriodSeconds value.
- The node affinity and anti-affinity settings of the pods.
- Using PersistentVolumes.
Prerequisites 🔗︎
-
Only the node pools of clusters that were created from Banzai Cloud Pipeline can be upgraded. Upgrading the node pools of imported clusters is not possible.
-
Currently the following clusters are supported:
- Amazon EKS clusters
- PKE clusters running on AWS
- worker node pools
- master node pool in a multi-master setup (upgrading a single-node master nodepool is not supported)
-
When upgrading a node pool that has Cluster Autoscaler enabled, disable the autoscaler. Scaling down the cluster while upgrading the node pool can cause problems.
-
To perform node pool updates, the cluster management user needs permissions to the following actions:
- ec2:TerminateInstances
- autoscaling:DetachInstances
Upgrade a node pool 🔗︎
CAUTION:
The upgrade will fail in the following cases:
- you do not have enough quota
- additional nodes cannot be provisioned
- your cluster is running on spot instances and an instance disappears
-
Upgrade Banzai CLI to the latest version (at least 0.11.0).
-
Login to Pipeline, then connect to the cluster where you want to upgrade the node pool.
-
Select the cluster to update:
The easiest way to execute subsequent kubectl and banzai commands on a Pipeline-managed cluster is to use the
banzai cluster shellcommand. It will let you interactively select a cluster, and open a subshell with the proper Kubernetes context defined:banzai cluster shell -
List the cluster node pools to determine the node pool to upgrade
banzai cluster nodepool listThe command returns the details of the cluster node pools such as the node pool name used as node pool identifying reference, for example:
Name Size Autoscaling MinimumSize MaximumSize VolumeEncryption VolumeSize VolumeType InstanceType Image SpotPrice SubnetID SecurityGroups Status StatusMessage pool1 2 Enabled 1 2 AWS account default 50 gp2 t2.small ami-03d9393d97f5959fe subnet-0d922e468626e9e3f READY pool2 1 Enabled 1 2 Disabled 25 gp3 t2.small ami-0644e90665b26316b 0.03 subnet-0d922e468626e9e3f READY -
Define the new parameters of the node pool in a local YAML file. Include only the parameters that you want to change during the update, you don’t have to list every parameter of the node pool. Note that currently you can change only the image running on the virtual machines of the node pool.
CAUTION:
Your worker nodes must not run a newer Kubernetes version than your control plane. You can check the Kubernetes version of the nodes in a node pool by running the following command:
kubectl get nodes -l nodepool.banzaicloud.io/name=<pool> -o json | jq '.items[].status.nodeInfo.kubeletVersion'The possible values are as follows. Note that certain options are available only for Pipeline Enterprise subscribers:
Value Requires Pipeline Enterprise Description Example image AMI ID (Note that the ID can vary between regions. You can check the official images with a command like curl -s /products/pipeline/cloudinfo/api/v1/providers/amazon/services/eks/regions/${region:-eu-west-1}/images | jq ".[]|select(.version==\"${version:-1.17}\" and .gpu != true)".)ami-yyyyyyyyy options Optional parameters options.maxBatchSize Number of nodes to update in a batch. Default: 2 options.maxSurge Increase the size of the node pool by maxSurgenodes to maintain the original capacity during an upgrade. Default: 02 options.maxUnavailable yes Maximum number of nodes that can be unavailable during the update. Default: 0 options.drain yes The parameters for draining the nodes being updated See the detailed example options.drain.timeout yes Timeout to wait for the node to drain in seconds. Default: 300 options.drain.failOnError yes If true, the update fails if a node cannot be drained. Default: true options.drain.podSelector yes A Kubernetes label selector. Default: empty string “app=kaleidoscope” useInstanceStore Use instance store volumes (NVMe disks) for the node pool as Kubelet root, and provision emptyDir volumes on local instance storage disks. For details, see [useInstanceStore (true false)](/docs/pipeline/clusters/create/eks/reference/#nodepool-useinstancestore). Default: false true volumeEncryption Node EBS volume encryption {“enabled”: true, encryptionKeyARN: “arn:aws:kms:aws-region:000000000000:key/00000000-0000-0000-0000-000000000000”} volumeSize Node EBS volume size in GiB. Default: original value 20 volumeType Node EBS volume type. Default: Pipeline defined fallback value gp3 Note: By default, the capacity of your cluster decreases by maxBatchSize number of nodes, then returns to normal size after every upgraded batch (breathing).
To maintain the original capacity, set the maxSurge option at least to the value of maxBatchSize.
Example with default values,
update_nodepool.yaml:image: "ami-02dca57ad67c7bf57"Example with customized options,
update_nodepool.yaml:image: ami-04bf3ca704bd6b643 options: # all options are optional maxBatchSize: 4 maxSurge: 2 maxUnavailable: 2 # maximum number of nodes that can be unavailable during the update drain: timeout: 600 # drain timeout in seconds failOnError: true # if a drain error should make the update process fail podSelector: "app=kaleidoscope" # a kubernetes label selector volumeEncryption: enabled: true encryptionKeyARN: arn:aws:kms:aws-region:000000000000:key/00000000-0000-0000-0000-000000000000 volumeSize: 20 volumeType: "gp3" -
Run the following command to start upgrading the cluster.
banzai cluster nodepool update <nodepool-to-update> --file <update_nodepool.yaml>The command returns the process ID of the update process, for example:
✓ [2020-05-05T14:23:46+02:00] tailing process 0379cecf-a379-4a6a-9da5-0544200a7b43The output displays the events of the update. You can exit from the process, it will not cancel the update. To cancel an update, see Cancel a node pool update.
Note: If the node pool update fails with an error message, check the Troubleshooting node pool updates section for tips.
After the update process has started, any new nodes start with the new configuration. For example, if accidentally the node pool is scaled up during the update, the new nodes will start with the updated configuration.
-
(Optional) To follow the events of an already running update process in the terminal, run the following command:
$ banzai cluster nodepool update tail <process-id> -
Pipeline performs the upgrade process described in the How it works section.
Note: To rollback to the previous version of the node pool, repeat the upgrade process with the old YAML file of the node pool. Include only the parameters that you want to change during the update, you don’t have to list every parameter of the node pool in the YAML file.
Rollback is possible only if the cluster has been created with Banzai Cloud Pipeline version 0.5.0 or later, or if a node pool upgrade has been successfully completed on the cluster at least once. Otherwise, the rollback will delete and recreate every node.
Cancel a node pool update 🔗︎
You can cancel an ongoing update process if needed, for example, if you have accidentally started the update with an invalid image (in case of custom images, Banzai Cloud Pipeline cannot verify their validity).
CAUTION:
This command only stops the update process, it does not rollback to the previous version.-
Cancel the update by running the following command. The process ID is the same ID that was reported on the console when the process was started.
$ banzai cluster nodepool update cancel <process-ID-of-the-update> -
After the update process has started, any new nodes start with the new configuration. For example, if accidentally the node pool is scaled up during the update, the new nodes will start with the updated configuration.
Note: To rollback to the previous version of the node pool, repeat the upgrade process with the old YAML file of the node pool. Include only the parameters that you want to change during the update, you don’t have to list every parameter of the node pool in the YAML file.
Rollback is possible only if the cluster has been created with Banzai Cloud Pipeline version 0.5.0 or later, or if a node pool upgrade has been successfully completed on the cluster at least once. Otherwise, the rollback will delete and recreate every node.
Troubleshooting node pool updates 🔗︎
CLOUDFORMATION_STACK_FAILED 🔗︎
If you receive the eks-update-node-pool process failed: CLOUDFORMATION_STACK_FAILED error message, check the detailed error message. If it contains You must use a valid fully-formed launch template. The image id '[ami-<imageid>]' does not exist, probably the image ID you set is not valid.
- Verify that the AMI ID you use is valid. You can find the list of default AMI IDs (based on Kubernetes version and region) in the Amazon EKS documentation.
- Verify that the image is available in the region you want to use it.
Setting options has no effect 🔗︎
If you set an option in the YAML file and it does not seem to have any effect, check the description of the option. Certain options are available only in Pipeline Enterprise.


